Inhaltsverzeichnis
Werbung
Verfügbare Sprachen
Verfügbare Sprachen
Quicklinks
Werbung
Inhaltsverzeichnis

Inhaltszusammenfassung für Aukey CP-T06
- Seite 1 User Manual Four-Section Tripod with Ball Head...
- Seite 2 Contents English 01 ~ 10 11 ~ 20 Deutsch 21 ~ 30 Français Español 31 ~ 40 Italiano 41 ~ 50 日本語 51 ~ 60...
-
Seite 3: Package Contents
Thank you for purchasing the AUKEY CP-T06 Four-Section Tripod with Ball Head. Please read this user manual carefully and keep it for future reference. If you need any assistance, please contact our support team with your product model number and Amazon order number. -
Seite 4: Product Diagram
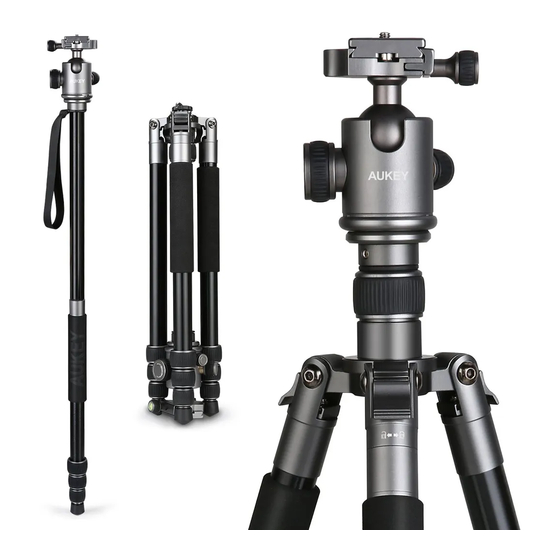
Product Diagram Quick Release Plate Camera Screw Bubble Level Quick Release Knob Mounting Platform Ball Joint Knob Drag Control Knob Pan Knob Screw Plate Center Column Extension Lock Leg Angle Lock Center Column Foam Grip Retractable Weight Hook Leg Section Extension Lock Rubber Foot - 02 -... - Seite 5 Adjusting Leg Angle ● If the legs are folded down, hold the leg angle lock to enable free movement. Release before reaching any of the three leg angle locking positions to lock. If the legs are folded up, they will naturally pass each position (with a slight click sound) but lock when the legs are moved back to those positions ●...
- Seite 6 Extending Leg Sections Turn each leg section extension collar to the left (legs pointing down) to release the leg section below it. Adjust extension as desired (without trying to over-extend) and turn the collar to the right to tighten (without over-tightening) and fix in position. - 04 -...
- Seite 7 Adjusting Center Column Height While holding the center column firmly, turn the center column extension collar to the right to loosen. Raise or lower the column to the desired position, and turn the collar to the left to securely fix the column in place.
- Seite 8 Reversing the Center Column For close-up photos or low-angle shooting, the center column can be installed upside down. Don’t do this while your camera is mounted on the tripod. 1. Unscrew and remove the ball head (if installed) and the bottom end of the center column with the retractable weight hook 2.
- Seite 9 Using the Short Center Column for Low-Angle Shooting For low-angle shooting, use the short center column instead of the long one and adjust the tripod legs to the widest angle (80°) locking position. 1. Unscrew and remove the ball head (if installed) and the bottom end of the center column with the retractable weight hook 2.
- Seite 10 Drag Control Knob: This knob increases and decreases resistance (friction) on the ball joint to more finely adjust the smoothness and speed of its movement. Slightly turn the ball head knob counterclockwise to release the ball joint and turn the drag control knob counterclockwise to further loosen it. Use further small adjustments of the two knobs together in either direction to get the desired resistance and control with the ball joint Quick Release Knob: The knob on the side of the mounting platform releases the quick release plate...
- Seite 11 Using the Monopod One of the tripod legs is detachable so it can be used as a monopod (single-leg camera support) for easy on-the-go camera stabilization. 1. Turn the leg with two lock symbols (marked directly below the leg angle lock) to the left (legs pointing down) and keep unscrewing to remove it 2.
- Seite 12 Amazon CA orders: support.ca@aukey.com Amazon JP orders: support.jp@aukey.com *Please note, AUKEY can only provide after sales service for products purchased directly from AUKEY. If you have purchased from a different seller, please contact them directly for service or warranty issues.
-
Seite 13: Spezifikation
Vielen Dank für den Kauf des AUKEY CP-T06 Vier Abschnitte Stativ mit Kugelkopf. Bitte lesen Sie diese Bedienungsanleitung sorgfältig durch und bewahren Sie sie zum späteren Nachschlagen auf. Wenn Sie Hilfe benötigen, wenden Sie sich bitte an unser Support-Team mit Ihrer Produkt-Modellnummer und Amazon-Bestellnummer. - Seite 14 Produktdiagramm Schnellwechselplatte Kameraschraube Nivelliergerät Schnellwechselknopf Montageplattform Dämpfungs Kugelgelenkknopf Einstellungknopf Horizontale Knopf Schraubenplatte Mittelsäulenverlängerungs Schloss Beinarretierung Mittelsäule Schaumgriff Einziehbarer Gewichts Haken Beinabschnittsverlängerungs Schloss Gummifuß - 12 -...
-
Seite 15: Einstellen Des Beianstellwinkels
Einstellen des Beianstellwinkels ● Wenn die Beine nach unten gefaltet, halten Sie die Beinwinkelverriegelung, um freie Bewegung zu ermöglichen. Freigabe vor Erreichen einer der drei Beinwinkelverriegelungspositionen zum Verriegeln. Wenn die Beine nach oben gefaltet sind, werden sie natürlich jede Position passieren (mit einem leichten Klickgeräusch), aber verriegeln, wenn die Beine zurück zu diesen Positionen bewegt werden ●... -
Seite 16: Einstellen Der Beinabschnitte
Einstellen der Beinabschnitte Drehen Sie jeden Beinabschnitt Verlängerungskragen nach links (Beine nach unten), um den Beinabschnitt unten zu lösen. Stellen Sie die Verlängerung wie gewünscht ein (ohne übertrieb zu verlängern) und drehen Sie den Kragen nach rechts, um sich festzuziehen (ohne Überdrehen) und fixieren. - 14 -... -
Seite 17: Justierung Des Mittelsäulenauszugs
Justierung des Mittelsäulenauszugs Während des Festhalten der mittleren Säule, drehen Sie den Mittelsäulenverlängerungskragen nach rechts, um sich zu lösen. Heben oder senken Sie die Säule in die gewünschte Position und drehen Sie den Kragen nach links, um die Säule sicher zu befestigen. Hinweis: Achten Sie beim Anheben oder Absenken der Mittelsäule darauf;... -
Seite 18: Umdrehen Der Mittelsäule
Umdrehen der Mittelsäule Für Nahaufnahmen oder Low-Shot-Aufnahmen kann die Mittelsäule umgedreht werden. Tun Sie das nicht, während Ihre Kamera auf dem Stativ montiert ist. 1. Schrauben und entfernen Sie den Kugelkopf (falls installiert) und das untere Ende der Mittelsäule mit dem zurückziehbaren Gewichtshaken 2. -
Seite 19: Verwenden Die Kurzen Mittelsäule Für Niederwinkelaufnahmen
Verwenden die Kurzen Mittelsäule für Niederwinkelaufnahmen Für die Nahwinkelstellung Photographien verwenden Sie die kurze Mittelsäule anstelle des langen und stellen Sie die Stativbeine auf den breitesten Winkel (80 °) (Verriegelungsposition )ein. 1. Schrauben und entfernen Sie den Kugelkopf (falls installiert) und das untere Ende der Mittelsäule mit dem zurückziehbaren Gewichtshaken 2. -
Seite 20: Kameras Montage Ohne Kugelkopf
Dämpfersteuerknopf: Dieser Knopf erhöht und verringert den Widerstand (Reibung) am Kugelgelenk, um die Glätte und Geschwindigkeit seiner Bewegung feiner einzustellen. Drehen Sie den Kugelkopfknopf gegen den Uhrzeigersinn, um das Kugelgelenk zu lösen und drehen Sie den Ziehknopf gegen den Uhrzeigersinn, um ihn weiter zu lösen. Verwenden Sie weitere kleine Einstellungen der beiden Knöpfe in beide Richtungen, um den gewünschten Widerstand und die Kontrolle mit dem Kugelgelenk zu erhalten Schnellwechselknopf: Der Knopf auf der Seite der Montageplattform löst die Schnellverschlußplatte (und jede angeschlossene Kamera). -
Seite 21: Verwenden Des Einbeinstativ
Verwenden des Einbeinstativ Eines der Stativbeine ist abnehmbar, so dass es als Einbeinstativ (Unterstützung des Ein-Bein-Kamera) für eine einfache On-the-Go Kamera Stabilisierung verwendet werden kann. 1. Drehen Sie das Bein mit zwei Schloßsymbolen (markiert direkt unterhalb der Beinwinkelverriegelung) nach links (Beine nach unten) und halten Sie das Abschrauben, um es zu entfernen 2. -
Seite 22: Verwenden Mit Dem Gürteltbeutel
Ihrer Region entspricht. Bitte geben Sie Ihre Amazon-Bestellnummer und Produkt-Modellnummer an. Amazon EU orders: support.eu@aukey.com *Bitte beachten Sie, dass AUKEY nur nach Kundendienst für Produkte, die direkt bei AUKEY gekauft wurden. Wenn Sie von einem anderen Verkäufer gekauft haben, wenden Sie sich bitte direkt an Service- oder Garantieprobleme. -
Seite 23: Spécifications
Merci d'acheter le AUKEY CP-T06 Quatre - Sections Trépied avec Rotule Ball. Veuillez lire attentivement ce mode d'emploi et conservez-le pour la référence future. Si vous avez besoin d'assistance, contactez notre équipe de support avec votre numéro de modèle de produit et votre numéro de commande Amazon. - Seite 24 Schéma de Produit Plateau Rapide Vis de Caméra Niveau à Bulle d'air Bouton de Plateau Rapide Plateau d’Installation Molette de Ball Locking Molette de Contrôle de Friction Molette Panoramique Indépendant Plateau de Vis Serrage d’Extension de Colonne Centrale Serrage d’Angulations des Jambes Colonne Centrale Poignée en Mousse...
- Seite 25 Ajustement de l’Angle des Pieds ● Si les pieds sont pliés en contrebas, appuyez le serrage d’angulations des jambes pour le movement libre. Modifiez le sélecteur d’angle à la position désirée. Si les pieds sont pliés en contrehaut, ils passeront naturellement chaque position ( avec un son de click léger ) et verrouilleront quand les pieds se sont déplacés les positions originaux.
- Seite 26 Réglage de la Hauteur de Colonne Tournez chaque collier d'extension de section de pied vers la gauche pour libérer chaque extension. Quand la hauteur désirée est atteinte ( n’essayez pas de surtension) et retournez le collier vers la droite pour les serrer ( interdit d’un serrage excessif). - 24 -...
- Seite 27 Ajustement de la Hauteur de la Colonne Centrale Retirez l’appareil photo, puis tournez le collier d’extension de la colonne centrale vers la droite pour desserrer. Ajustez la colonne à la hauteur désirée; Puis pour la maintenir en position, resserez le collier. Note: Faites attention lorsque vous relevez ou abaissez la colonne centrale;...
- Seite 28 Inversion de la Colonne Centrale Pour les photos en gros plan ou les prises de vue à angle bas, la colonne centrale peut être inversée à l’envers. Ne faites pas cela pendant que la caméra est montée sur le trépied. 1.
- Seite 29 Utilisation de la Colonne Centrale Courte pour Tirer en Bas Angle Pour tirer en bas angle, utilisez la courte colonne centrale à la place de la longue et ajustez le pied du trépied jusqu'à l’angle le plus large (80°) 1. Dévissez et retirez la rotule (si elle est installée) et fond de la colonne centrale avec le crochet rétractile 2.
- Seite 30 Molette de Contrôle de Friction: La molette augmente et diminue la friction de ball locking pour adjuster la lubrification et la rapidité de son mouvement. Tournez légèrement la molette de ball locking dans le sens contraire des aiguilles d'une montre pour desserrer la rotule et tournez la m olette de contrôle de friction dans le sens inverse des aiguilles d'une montre aussi pour la desserrer davantage.
- Seite 31 Utilisation du Monopied L’un des trépied est détachable donc il peut être utilisé comme un monopied 1. Tournez le pied avec deux symboles de verrouillage (signez directement sous le verrouillage de pied) vers le gauche ( les pieds pointant vers le bas) et dévisser jusqu’à l'enlever 2.
- Seite 32 Amazon EU orders: support.eu@aukey.com *Veuillez noter que AUKEY ne peut fournir le service après-vente que pour les produits achetés directement chez AUKEY. Si vous avez acheté les produits depuis d’un vendeur différent, veuillez le contacter pour tous les services ou garantie.
-
Seite 33: Contenido Del Paquete
Gracias por comprar AUKEY CP-T06 trípode de cuatro secciones con cabeza de bola. Lea atentamente este manual usuario y guárdelo para futuras consultas. Si necesita alguna ayuda, póngase en contacto con nuestro equipo de asistencia técnica con el número de modelo de su producto y el número de pedido de Amazon. -
Seite 34: Diagrama Del Producto
Diagrama del Producto Placa de Liberación Rápida Tornillo de Cámara Nivel Topográfico Perilla de Liberación Rápida Plataforma de Montaje Perilla de Articulación de Bola Perilla de Control de Arrastre Perilla de Panorámica Placa de Tornillo Bloqueo de Extensión de Columna Central Bloqueo de las Piernas de Ángulo Columna Central... - Seite 35 Ajuste del Ángulo de las Piernas ● Si las piernas están dobladas hacia abajo, mantenga el bloqueo del ángulo de las piernas para permitir el libre movimiento. Suéltelo antes de alcanzar cualquiera de las tres posiciones de bloqueo del ángulo de las piernas para bloquearlas. Si las piernas están dobladas hacia arriba, pasarán naturalmente cada posición (con un leve sonido de clic) pero se bloquearán cuando las piernas se muevan de nuevo a esas posiciones ●...
- Seite 36 Extensión de las Piernas de Secciones Gire cada collar de extensión de piernas de secciones hacia la izquierda (las piernas apuntando hacia abajo) para liberar las piernas de secciones debajo de él. Ajuste la extensión como desee (sin intentar exagerarla) y gire el collar a la derecha para apretarlo (sin apretarlo excesivamente) y fíjelo en posición.
- Seite 37 Ajuste de la Altura de la Columna Central Mientras sostenga firmemente la columna central, gire el collar de extensión de la columna central hacia la derecha para aflojarlo. Levante o baje la columna hasta la posición deseada y gire el collar a la izquierda para fijar firmemente la columna en su lugar.
- Seite 38 Inversión de la Columna Central Para fotografías en primer plano o fotografías en ángulo bajo, la columna central se puede instalar boca abajo. No lo haga mientras su cámara está montada en el trípode. 1. Desenrosque y quite la cabeza de bola (si está instalada) y el extremo inferior de la columna central con el gancho retráctil 2.
- Seite 39 Uso de la Corta Columna Central para Disparos de Bajo Ángulo Para el disparo en ángulo bajo, utilice la corta columna central en lugar de la larga y ajuste las piernas del trípode a la posición de bloqueo más amplio (80°). 1.
- Seite 40 Perilla de Control de Arrastre: Esta perilla aumenta y disminuye la resistencia (fricción) en la rótula para ajustar más finamente la suavidad y la velocidad de su movimiento. Gire ligeramente la perilla de la cabeza de bolas hacia la izquierda para liberar la rótula y gire la perilla de control de la fricción hacia la izquierda para aflojarla más.
- Seite 41 Uso de Monopode Una de las piernas del trípode es desmontable para que pueda utilizarse como un monopode (soporte de cámara de una sola pierna) para una fácil estabilización de la cámara en marcha. 1. Gire la pierna con dos símbolos de bloqueo (marcados directamente debajo del bloqueo del ángulo de la pierna) a la izquierda (piernas apuntando hacia abajo) y manténgalos desenroscando para sacarlos 2.
- Seite 42 Pedidos de Amazon EU: support.eu@aukey.com *Por favor tenga en cuenta, AUKEY sólo puede proporcionar servicio postventa para productos comprados directamente de AUKEY. Si usted ha comprado de un vendedor diferente, póngase en contacto con ellos directamente por cuestiones de servicio o garantía.
-
Seite 43: Contenuto Della Confezione
Grazie per aquistare il AUKEY CP-T06 Treppiedi a Quattro Sezioni con Testa a Sfera. Si prega di leggere attentamente il manuale d'uso e conservarlo per i riferimenti futuri. Se avete bisogno di assistenza, si prega di contattare il nostro team di supporto con il numero del modello e il numero d'ordine di Amazon. -
Seite 44: Diagramma Del Prodotto
Diagramma del Prodotto Vite della Macchina Piastre di Rilascio Rapido Fotografica Livello di Bolla Pomello di Sgancio Rapido Piattaforma di Montaggio Pomello Congiunta a Sfera Pomello di Controllo a Trascinamento Pomello di Bloccaggio Orizzontale Piastra a Vite Serratura della Estensione di Colonna Centrale Serratura dell'Angolo del Gambe... - Seite 45 Regolazione dell'Angolo delle Gambe ● Se vorrebbe piegare le gambe, può tenere la serratura all'angolo delle gambe per regolare liberamente le gambe. Rilasciare prima di raggiungere una qualsiasi delle tre posizioni di bloccaggio per bloccarlo. Se vorrebbe unire le tre gambe, Passano naturalmente ad ogni posizione (con un leggero suono clic), ma bloccano quando le gambe vengono spostate in quelle posizioni ●...
- Seite 46 Estensione delle Sezioni dei Piedi Girare in senso antiorario i cerchi di estensione della sezione delle gambe (le gambe rivolte verso il basso) per rilasciare le sezione delle gambe sottostanti. Regola l'estensione come desideroso (senza cercare di estendersi) e ruotare in senso orario il cerchio per stringere (non troppo violentemente) e fissare in posizione.
- Seite 47 Regolazione dell'Altezza della Colonna Centrale Tenendo saldamente la colonna centrale, ruotare in senso orario il cerchio di estensione della colonna centrale per allentare. Sollevare o abbassare la colonna nella posizione desiderata e ruotare in senso antiorario il cerchio per fissare saldamente la colonna in posizione Nota: Fare attenzione quando si solleva o si abbassa la colonna centrale;Soprattutto quando c'è...
- Seite 48 Invertire la Colonna Centrale Per foto ravvicinate scattate o riprese a basso angolo, la colonna centrale può essere installata a testa in giù. Non fare così mentre la fotocamera è montata sul treppiede. 1. Svitare e togliere la testa della sfera (se installata) e l'estremità inferiore della colonna centrale con il gancio retrattile 2.
- Seite 49 Utilizzo della Corta Colonna Centro per La Ripresa a Basso Angolo Per le riprese a basso angolo, utilizzare la corta colonna centrale invece di quella lunga e regolare le gambe del treppiede fino alla posizione di chiusura più larga (80 °). 1.
- Seite 50 Pomello di Controllo a Trascinamento: Questo pomello aumenta e diminuisce la resistenza (attrito) sul giunto a sfere per regolare ulteriormente la morbidezza e la velocità del suo movimento. Girare in senso antiorario leggermente il pomello della sfera per rilasciare il giunto a sfera e girare in senso antiorario il pomello di controllo del trascinamento per allentarlo ulteriormente.
- Seite 51 Usare il Monopiede Una delle gambe del treppiede è staccabile e può essere utilizzata come monopiede (supporto fotocamera a gamba singola) per una facile stabilizzazione della fotocamera in movimento. 1. Girare in senso antiorario la gamba con due simboli di blocco (contrassegnati direttamente sotto il blocco dell'angolo della gamba e le gambe rivolte verso il basso) mantenerlo svitato per rimuoverlo 2.
- Seite 52 Amazon EU orders: support.eu@aukey.com *Si prega di notare che AUKEY può offrire solo il servizio di post-ventita per i prodotti acquistiati direttamente da AUKEY. Se ha acquistato da un venditore diversa, si prega di contrattarlo direttamente per problemi di servizio o di garazia.
- Seite 53 はじめに この度は、 本製品CP-T06 4段三脚をご購入頂き、 誠にありがとうございます ! ご使用の前に、 必ず取扱説明書をよ くお読みいただき、 正しくお使いください。 万一問題 ・ 質問がございましたら、 品番とAmazon注文番号を記入した 上、 お気軽に当社のお客様サービスセンターにお問い合わせください。 パッケージ内容 三脚台四段 雲台 短いエレベーター クイックシュー2個 アルミ製石突き3個 (砂および柔らかい地上に使う) アレンレンチ 収納バッグ 雲台収納バッグ ベルトポーチ ユーザーマニュアル 保証カード 製品仕様 製品 CP-T06 最大伸長 (エレベーター含め) 1.69m / 5.56 最大伸長 (エレベーター抜き) 1.36m / 4.45 最小伸長...
- Seite 54 製品図 クイックシュー カメラネジ 水準器 クイック締めノブ カメラ取り付け部 ボールストッパー (主に) ボールストッパー (微調整) パンノブ ネジプレート エレベーターストッパー 開脚ストッパー エレベーター 保護スポンジ エンドフック 脚ロック 石突き - 52 -...
- Seite 55 三脚の角度の調節方法 ● 脚が下向いて折り畳まれている場合は、 開脚ストッパーを押して自由に動かせます。 調整したい角度のロック位 置に到達したら開脚ストッパーを解除して下さい。 脚が上向いて折り畳まれている場合、 脚が自然に各位置を通 過できます (わずかなクリック音で) 。 ● 角度を小さく してロックして位置に移動するには、 脚を押し込んでください。 角度を大きくするには、 ロックしたい ところまで引き出してください。 ● 脚が180° 以上の角度に調整した場合、 そのまま収納できます。 ご注意 : 脚を希望の位置に固定する時、 三脚を損傷しないため、 過大な力を加えないでください。 - 53 -...
- Seite 56 脚の長さの調節方法 各脚ロックを左に回したら (脚を下に向けて) 、 脚部を解除して延長となります。 長さは希望の通りに調整し、 ロック を右に回して (締め過ぎずに) 締め付けて固定します。 - 54 -...
- Seite 57 エレベーターの高さの調整方法 エレベーターをしっかり把持しなから、 エレベーターストッパーを右に緩めて回して、 エレベーターを希望の位置 まで上下調整してから左に回転し固定します。 ご注意 : エレベーターを上げたり下げたり、 特にカメラが装着している時、 エレベーターを必ず把持してエレベータ ー締めのロックを締めてください。 そうしないと、 装置やカメラの損傷および落ちる可能性があります。 - 55 -...
- Seite 58 エレベーターを倒置する方法 大写しと低角度撮影の場合、 エレベーターを上下逆さまに設置できます。 しかし、 カメラが装着している時、 この操 作はしないでください。 1. 雲台 (設置されている場合) とエレベーターの底部のフックを外します。 2. エレベーターストッパーを右に緩め回して、 エレベーターを持ち上げます。 3. エレベーターを上下逆さまに倒置、 下から挿します。 4. 希望の位置まで調整して、 ストッパーを締めます。 5. 必要であれば、 雲台とフックを再度ねじ込んでください。 - 56 -...
- Seite 59 短いエレベーターの使用方法 低角度撮影の場合、 長いものの代わりに短いエレベーターを使用し、 三脚の足を最も広い角度 (80° ) の位置に調 整してロックします。 1. 雲台 (設置されている場合) とエレベーターの底部のフックを外します。 2. エレベーターストッパーを右に回して緩め、 エレベーターを持ち上げます。 3. 短いエレベーターを挿します。 4. 希望の位置まで調整して、 ロックを締めます。 5. 必要であれば、 雲台とフックを再度ねじ込んでください。 雲台の使用方法 ボールストッパー : 一番大きいボールストッパーは雲台の球体を操作できます。 反時計で回転して、 球体が解除で きます (抵抗を感じた時、 それ以上緩めないでください) 。 側面の大きな凹はより大きな下向き角度が可能です。 ボ ールストッパーを時計回りに回して球体をロックします (締め過ぎしないでください) 。 パンノブ : 雲台最小の回転ノブであります。 反時計回り して、 雲台が360° 水平回転できます。 時計回りに回してロ ックします。...
- Seite 60 ボールストッパー (微調整) : このノブは、 球体の抵抗 (摩擦) の増加および減少により、 球体動きの滑らかさとスピ ードをより細かく調整できます。 ボールストッパー (主に) を反時計回転して球体を解除し、 ボールストッパー (微調 整) を反時計回転してさらに緩めます。 球体で希望の抵抗と制御を得るには、 2つのノブを微調整の必要がありま す。 クイッ ク締めノブ : クイックシュー横のクイック締めノブは、 クイックシュー (及び連接したカメラ) を急速外すことが できます。 パッケージには、 2台のカメラを簡単に切り替えるため、 もう一つのクイックシューが付属しています。 ネジ転換 1. 雲台をエレベーターから取り外して、 ネジが見られます。 2. エレベーターのネジプレートを右に回して外し、 中のネジを取って逆さまに穴に挿します。 3. プレートをエレベーターに戻します。 - 58 -...
- Seite 61 一脚の使用方法 三脚の1つは着脱式なので、 一脚として使用することができるし、 簡単にカメラを安定させることもできます。 1. 2つのロック記号のある脚を左 (脚が下を指す) に回して取り外します。 2. 雲台を外した脚にねじ込めます。 3. 利便性と快適性を高めるため、 ベルトポーチ付を使用してください。 - 59 -...
- Seite 62 ● 脚のネジが緩んでいる場合は、 アレンレンチを使用して開脚ストッパーの裏にあるアレンボルトを締めてくださ い。 脚が硬すぎる場合は少し緩めます。 ● 極端な熱を避けてください。 また、 三脚を長時間直射日光に当てないでください。 ● 雲台を水、 埃、 砂などから離してください。 球体を取り外すことはできませんから、 側面の凹に傾けて柔らかい乾 いた布で清潔してくだい。 ちなみに球体を潤滑しないでください。 ● 輸送中と使用しない時は、 雲台と三脚を収納バッグに入れてください。 保証期間とお客様サポート 何かご問題 ・ ご質問などがございましたら、 品番とAmazon注文番号を記入した上で、 下記のメールアドレスまで お問い合わせください。 最も早い営業日にご返信を差し上げさせていただきます。 Amazon JP注文: support.jp@aukey.com *当社は、 AUKEY公式ショップ、 または当社が認める小売業者から購入された製品に対してのみ、 アフターサービスと製品保証 の提供しております。 他の小売業者から購入された製品の交換、 返品、 返金に関して購入先へお問い合わせ下さい。 - 60 -...
- Seite 63 Model: CP-T06 AUKEY International Ltd. www.aukey.com | support@aukey.com No.102, Building P09, Electronics Trade Center Huanan City, Pinghu Town, Longgang District Shenzhen, Guangdong, 518111, CN Made in China...