HAWA Concepta 25 Planungs- Und Montageanleitung
Beschlag für seitlich einschiebbare möbelfronten aus holz bis 25/30 kg.
Vorschau ausblenden
Andere Handbücher für Concepta 25:
- Planungs- und montageanleitung (72 Seiten) ,
- Planung und montage (33 Seiten) ,
- Montageanleitung (3 Seiten)
Inhaltsverzeichnis
Werbung
Quicklinks
Patente
Brevents
Patents
Brevetti
HAWA Concepta 25/30
Planungs- und Montageanleitung
Beschlag für seitlich einschiebbare Möbelfronten aus Holz bis 25/30 kg.
Instructions de conception et de montage
Ferrure pour façades de meubles en bois à escamotage latéral jusqu'à
25/30 kg.
Planning and installation instructions
Hardware system for wooden pivot sliding cabinet doors up to 25/30 kg
(55/66 lbs.).
Istruzioni di progettazione e di montaggio
Ferramenta per frontali di mobili in legno a scomparsa fino a 25/30 kg.
For more information see:
Werbung
Inhaltsverzeichnis

Verwandte Anleitungen für HAWA Concepta 25


Inhaltszusammenfassung für HAWA Concepta 25
- Seite 1 HAWA Concepta 25/30 Planungs- und Montageanleitung Beschlag für seitlich einschiebbare Möbelfronten aus Holz bis 25/30 kg. Instructions de conception et de montage Ferrure pour façades de meubles en bois à escamotage latéral jusqu'à 25/30 kg. Planning and installation instructions Hardware system for wooden pivot sliding cabinet doors up to 25/30 kg (55/66 lbs.).
-
Seite 2: Inhaltsverzeichnis
1 Inhaltsverzeichnis Inhalt Seite Inhaltsverzeichnis Produktinformation Sicherheitsvorschriften Abkürzungen, Symbole Übersichten Übersicht: Anlage links Übersicht: Connector 55 (optional) Übersicht: Connector 110 mit und ohne Sockel (optional) Übersicht: Zwei einliegende Dreh-Einschiebetüren Übersicht: Positionsnummern Planung Planung: Türe einliegend Planung: Führung für zwei einliegende Dreh-Einschiebetüren Planung: Türe auf Boden und Oberboden aufschlagend mit Connector 55 Planung: Türe auf Boden und Oberboden aufschlagend mit Connector 110 Planung: Türe in Mauernische... -
Seite 3: Produktinformation
Es gelten metrische Abmessungen – Zollangaben sind nur zur Information. Anleitungen aufbewahren, Ersatz unter www.hawa.ch. Risiko- und Restrisikogefahr Bei Verwendung von HAWA Concepta 25/30 zum Abdecken von Elektro-Apparaten die Sicherheitshinweise der Gerätehersteller beachten (Wärmestau). Nach Bedarf eine Abschaltautomatik verwenden (z.B. Safty Box, www.halemeier.de). Entsorgung Die Werkstoffe, Zubehör und Verpackung sollen einer umweltgerechten Wiederverwertung zugeführt werden. - Seite 4 1 Sommaire Contenu Page Sommaire Informations sur le produit Consignes de sécurité Abréviations, symboles Aperçus généraux Aperçu général : Installation à gauche Aperçu général : Connector 55 (en option) Aperçu général : Connector 110 avec et sans socle (en option) Aperçu général : Deux portes pivotantes/escamotables intégrées au corps Aperçu général : Des numéros de position Planification...
-
Seite 5: Informations Sur Le Produit
Les dimensions applicables sont métriques - les dimensions en pouces ne sont fournies qu'à titre informatif. Conserver ces instructions ; en cas de perte, il est possible d'en obtenir un nouvel exemplaire sur le site Internet www.hawa.ch. Risques et risques résiduels En cas d'utilisation du système HAWA Concepta 25/30/50 pour dissimuler des appareils électriques, observer les consignes de... - Seite 6 1 Table of contents Contents Page Table of contents Product information Safety instructions Abbreviations, symbols Overviews Overview: Left-hand system Overview: Connector 55 (optional) Overview: Connector 110 with and without base (optional) Overview: Two inset pivot sliding doors Overview: Position numbers Planning Planning: Inset doors Planning: Guide for two pivot sliding doors...
-
Seite 7: Product Information
Retain the instructions. Replacements available from www.hawa.ch. Risk and residual risk When using HAWA Concepta 25/30/50 to conceal electrical appliances please pay attention to the safety notes issued by the manufacturer (heat accumulation). If necessary, use an automatic shutoff device (e.g. Safety Box, www.halemeier.de). - Seite 8 1 Indice Indice Pagina Indice Informazioni sul prodotto IT Norme di sicurezza Abbreviazioni, simboli Panoramiche Panoramica: Installazione a sinistra Panoramica: Connector 55 (opzionale) Panoramica: Connector 110 con e senza zoccolo (opzionale) Panoramica: Due ante a scomparsa per rotazione all'interno Panoramica: Numeri di posizione Progettazione Progettazione: Anta all'interno Progettazione: Guida per due ante a scomparsa per rotazione all'interno...
-
Seite 9: Informazioni Sul Prodotto
Conservare le istruzioni. In caso di perdita, possono essere scaricate in www.hawa.ch. Rischio e rischio residuo Se si utilizza HAWA Concepta 25/30 per coprire apparecchi elettrici, osservare le indicazioni di sicurezza dei produttori degli ap- parecchi (in particolare per quanto riguarda l'accumulazione di calore). All'occorrenza utilizzare uno spegnimento automatico (per es. -
Seite 10: Abkürzungen, Symbole
HAWA Concepta 25/30 Abkürzungen, Symbole / A bréviations, symboles / A bbreviations, symbols / A bbreviazioni, simboli Einschubtiefe / Profondeur d'escamotage / Slide-in depth / Profondità di inserimento Einbauhöhe / Hauteur d’encastrement / Installation height / Altezza d'incasso Korpustiefe /... - Seite 11 HAWA Concepta 25/30 allgemeines Gebotszeichen / Signal d’obligation général / General mandatory sign Segnale d'obbligo generale Die in dieser Montageanleitung verwendeten Symbole für sicherheitsrelevante Hinweise (Gefahrenhinweise) haben folgende Bedeutung: Les symboles utilisés dans ces instructions de montage pour les indications importantes en matière de sécurité (indications de dangers) ont les significations suivantes.
- Seite 12 HAWA Concepta 25/30...
-
Seite 13: Übersichten
HAWA Concepta 25/30 Übersichten / A perçus généraux / O verviews / P anoramiche Übersicht: Anlage links Aperçu général : Installation à gauche Overview: Left-hand system Panoramica: Installazione a sinistra... -
Seite 14: Übersicht: Connector 55 (Optional)
Panoramica: Connector 55 (opzionale) Verbindungsprofil Connector zu HAWA-Concepta 25/30, siehe Montageanleitung 23227. Profil de raccordement Connector pour HAWA-Concepta 25/30, voir instructions de montage 23227. Connecting profile Connector for HAWA-Concepta 25/30, see installation instructions 23227. Profilo di collegamento Connector per HAWA-Concepta 25/30, vedere istruzione di montaggio 23227. -
Seite 15: Übersicht: Connector 110 Mit Und Ohne Sockel (Optional)
Panoramica: Connector 110 con e senza zoccolo (opzionale) Verbindungsprofil Connector zu HAWA-Concepta 25/30, siehe Montageanleitung 23227. Profil de raccordement Connector pour HAWA-Concepta 25/30, voir instructions de montage 23227. Connecting profile Connector for HAWA-Concepta 25/30, see installation instructions 23227. Profilo di collegamento Connector per HAWA-Concepta 25/30, vedere istruzione di montaggio 23227. -
Seite 16: Übersicht: Zwei Einliegende Dreh-Einschiebetüren
HAWA Concepta 25/30 Übersicht: Zwei einliegende Dreh-Einschiebetüren Aperçu général : Deux portes pivotantes/escamotables intégrées au corps Overview: Two inset pivot sliding doors Panoramica: Due ante a scomparsa per rotazione all'interno... -
Seite 17: Übersicht: Positionsnummern
HAWA Concepta 25/30 Übersicht: Positionsnummern Aperçu général : Des numéros de position Overview: Position numbers Panoramica: Numeri di posizione 22055 25592 25596 24699 22592 25855 22861 22593 22306 24533 25795 24535 25796 [10] 25828 [11] 25815 [12] 25656 [13] 24624... -
Seite 18: Planung: Türe Einliegend
HAWA Concepta 25/30 Planung / P lanification / P lanning / P rogettazione Planung: Türe einliegend Planification : Porte intégrée au corps Planning: Inset doors Progettazione: Anta all'interno Seite demontierbar / Côte démontable / Removable side / Lato smontabile... - Seite 19 HAWA Concepta 25/30 Planung: Führung für zwei einliegende Dreh-Einschiebetüren Planification : Guide pour deux portes pivotantes/escamotables intégrées au corps Planning: Guide for two pivot sliding doors Progettazione: Guida per due ante a scomparsa per rotazione all'interno...
-
Seite 20: Planung: Türe Auf Boden Und Oberboden Aufschlagend Mit Connector 55
HAWA Concepta 25/30 Planung: Türe auf Boden und Oberboden aufschlagend mit Connector 55 Planification : Porte allant du sol au plafond avec Connector 55 Planning: Doors closing against base and top section with Connector 55 Progettazione: Ante appoggiate su fondo e cielo con Connector 55... -
Seite 21: Planung: Türe Auf Boden Und Oberboden Aufschlagend Mit Connector
HAWA Concepta 25/30 Planung: Türe auf Boden und Oberboden aufschlagend mit Connector 110 Planification : Porte allant du sol au plafond avec Connector 110 Planning: Doors closing against base and top section with Connector 110 Progettazione: Ante appoggiate su fondo e cielo con Connector 110 Maximale Türdicke 28 mm... -
Seite 22: Planung: Türe In Mauernische
HAWA Concepta 25/30 Planung: Türe in Mauernische Planification : Porte dans une niche murale Planning: Doors in wall recess Progettazione: Anta in nicchia di muro Seite demontierbar / Côte démontable / Removable side / Lato smontabile... -
Seite 23: Berechnung: Gewicht Zu Türgrössenverhältnis
HAWA Concepta 25/30 Berechnung / C alcul / C alculation / C alcolo Berechnung: Gewicht zu Türgrössenverhältnis Calcul de : Rapport poids/taille des portes Calculation: Door weight/height ratio Calcolo: Peso rapportato alla grandezza anta HAWA-Concepta 25 1850 1800 1750 1700... - Seite 24 HAWA Concepta 25/30 HAWA-Concepta 30 2300 2250 2200 2150 2100 2050 2000 1950 1900 1850 Türgewicht in KG / TB = Türbreite in mm / TH = Türhöhe in mm Poids de porte en kg / TB = largeur de porte en mm / TH = hauteur de porte en mm...
-
Seite 25: Berechnung: Masse Grundriss
HAWA Concepta 25/30 Berechnung: Masse Grundriss Calcul de : Dimensions plan d'ensemble Calculation: Plan view dimensions Calcolo: Dimensioni di pianta 19- 30 mm ( "1 ") 55 mm (2 ") 0 mm 0 mm 0 mm ---- - ---- - 33 mm (1 ") - Seite 26 HAWA Concepta 25/30 2 mm ( ") 29,5 mm (1 ") 3 mm ( ") 30 mm (1 ") ---- - ---- - ---- - 3 mm ( ") 28,5 mm (1 ") 4 mm ( ") 29,5 mm (1 ")
-
Seite 27: Berechnung: Beschlagstiefe
HAWA Concepta 25/30 Berechnung: Beschlagstiefe Calcul de : Profondeur de ferrure Calculation: Hardware depth Calcolo: Profondità ferramenta Bei der Planung der Türgriffe auf mögliche Kollisionsgefahr achten. Lors de la planificaton des poignées de portes, prendre garde aux risques de collisions possibles. -
Seite 28: Berechnung: Bohrpositionen
Bohrungen nur in Kombination mit HAWA-Folding Concepta, 3-türig, LMB = 2120 mm Perçages uniquement en combinaison avec le système HAWA-Folding Concepta pour 3 portes, LMB = 2120 mm Drill holes only in combination with HAWA-Folding Concepta, 3-door, clearance = 2120 mm (6’11 ")l... - Seite 29 Bohrungen nur in Kombination mit HAWA-Folding Concepta, 3-türig, LMB = 2120 mm Perçages uniquement en combinaison avec le système HAWA-Folding Concepta pour 3 portes, LMB = 2120 mm Drill holes only in combination with HAWA-Folding Concepta, 3-door, clearance = 2120 mm (6’11 ")l...
-
Seite 30: Vormontage: Bearbeitung Profile Links
HAWA Concepta 25/30 Vormontage / P rémontage / P re-assembly / M ontaggio preliminare Vormontage: Bearbeitung Profile links Prémontage : Usinage des profils de gauche Pre-assembly: Processing the left side profiles Montaggio preliminare: Lavorazione profili a sinistra ■ DE Schienen hinten ablängen Couper les rails à... -
Seite 31: Vormontage: Bearbeitung Profile Rechts
HAWA Concepta 25/30 Vormontage: Bearbeitung Profile rechts Prémontage : Usinage des profils de droite Pre-assembly: Processing the right side profiles Montaggio preliminare: Lavorazione profili a destra ■ DE Schienen hinten ablängen Couper les rails à l’arrière à la bonne longueur... -
Seite 32: Vormontage: Türe
Montaggio preliminare: Anta Nur in Kombination mit HAWA-Folding Concepta, 3-türig, LMB = 2120 mm Uniquement en combinaison avec le système HAWA-Folding Concepta pour 3 portes, LMB = 2120 mm Only in combination with HAWA-Folding Concepta, 3-door, clearance = 2120 mm (6’11 ") -
Seite 33: Vormontage: Korpusseite
HAWA Concepta 25/30 Vormontage: Korpusseite Prémontage : Côté corps de meuble Pre-assembly: Cabinet side Montaggio preliminare: Lato mobile Stopper Anlage links Butée d’arrêt installation à gauche Stop left-hand systems Fermo, installazione a sinistra Stopper Anlage rechts Butée d’arrêt installation à droite... - Seite 34 HAWA Concepta 25/30...
-
Seite 35: Vormontage: Aussenseite
HAWA Concepta 25/30 Vormontage: Aussenseite Prémontage : Côté extérieur Pre-assembly: Outside pocket wall Montaggio preliminare: Lato esterno Türdicke S Bürstenhöhe Epaisseur de porte S Hauteur de joint brosse Door thickness S Brush height Spessore anta S Altezza spazzola S = 19 - 30 mm ( " - 1 ") P = 35 mm (1 ") -
Seite 36: Vormontage: Anschlagdämpfung
HAWA Concepta 25/30 Vormontage: Anschlagdämpfung Prémontage : Amortissement au niveau de la butée Pre-assembly: Dampener Montaggio preliminare: Ammortizzatore battuta links / gauche / left / a sinistra rechts / droite / right / a destra... -
Seite 37: Vormontage: Holm
HAWA Concepta 25/30 Vormontage: Holm Prémontage : Montant Pre-assembly: Upright Montaggio preliminare: Longherone links / gauche / left / a sinistra rechts / droite / right / a destra... -
Seite 38: Vormontage: Ausrichten Des Schrankes
HAWA Concepta 25/30 Vormontage: Ausrichten des Schrankes Prémontage : Ajustement de l’armoire Pre-assembly: Aligning the cabinet Montaggio preliminare: Allineamento dell'armadio Der Schrank muss nivelliert und an den Baukörper (Boden, Wand, Decke) geschraubt werden. L’armoire doit être mise à niveau et vissée sur le corps de bâtiment (sol, mur, plafond). -
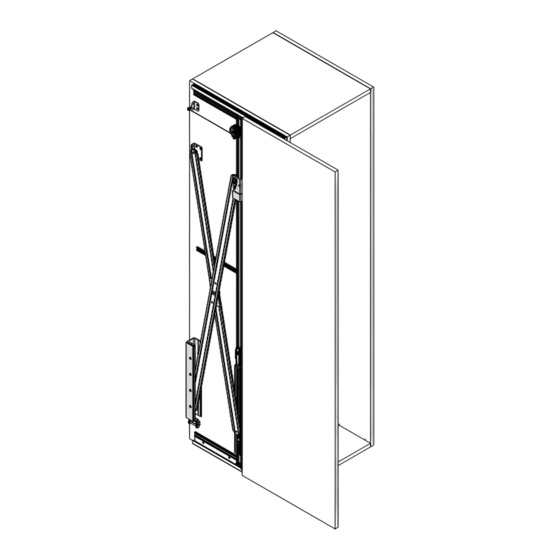
Seite 39: Montage: Montage Schere Und Holm Anlage Links
HAWA Concepta 25/30 Montage / M ontage / A ssembly / M ontaggio Montage: Montage Schere und Holm Anlage links Montage : Montage ciseaux et montant pour installation à gauche Assembly: Scissor and upright installation, left-hand system Montaggio: Montaggio forbice e longherone, installazione a sinistra... - Seite 40 HAWA Concepta 25/30...
- Seite 41 HAWA Concepta 25/30 Holm einmitten und festschrauben Centrer et visser à bloc le montan Center the upright and tighten fastener Centrare il longherone e fissarlo con viti...
-
Seite 42: Montage: Schere Und Holm Anlage Rechts
HAWA Concepta 25/30 Montage: Schere und Holm Anlage rechts Montage : Ciseaux et montant pour installation à droite Assembly: Scissor and upright, right-hand system Montaggio: Forbice e longherone, installazione a destra... - Seite 43 HAWA Concepta 25/30...
- Seite 44 HAWA Concepta 25/30 Holm einmitten und festschrauben Centrer et visser à bloc le montan Center the upright and screw tight Centrare il longherone e fissarlo con viti...
-
Seite 45: Montage: Türe
HAWA Concepta 25/30 Montage: Türe Montage : Porte Assembly: Door Montaggio: Anta Holm mit Positionslehre (25808) arretieren / Bloquer le montant avec le gabarit de position (25808) / Secure the upright with a positioning gauge (25808) / Bloccare il longherone con la dima di posizionamento (25808) -
Seite 46: Montage: Türeinzug
HAWA Concepta 25/30 Montage: Türeinzug Montage : Dispositif d’escamotage de la porte Assembly: Door closing system Montaggio: Meccanismo di chiusura anta VORSICHT / ATTENTION / CAUTION / ATTENZIONE Montagereihenfolge muss eingehalten werden. L'ordre de montage doit être respecté. Adherence to the assembly sequence is mandatory. - Seite 47 HAWA Concepta 25/30 ■ DE 1. Holm einschieben 2. Zugseil einhängen 3. Sicherungsstift abdrehen 4. Sicherungsstift herausziehen 5. Sicherungsstift in die dafür vorgesehene Bohrung stecken / (Wiederverwendung bei Demontage) 1. Faire glisser le montant 2. Accrocher le câble tracteur 3. Tourner la goupille de sécurité...
-
Seite 48: Montage: Feineinstellung Holmneigung Türe 19 - 30 Mm
HAWA Concepta 25/30 Montage: Feineinstellung Holmneigung Türe 19 - 30 mm Montage : Réglage fin de l’inclinaison du montant de la porte entre 19 et 30 mm Assembly: Fine adjustment of door upright angle 19 - 30 mm Montaggio: Regolazione di precisione dell'inclinazione del longherone per ante 19 - 30 mm Holm kann mit Positionslehre (25808) arretiert werden. -
Seite 49: Montage: Feineinstellung Holmneigung Türe 31 - 50 Mm
HAWA Concepta 25/30 Montage: Feineinstellung Holmneigung Türe 31 - 50 mm Montage : Réglage fin de l’inclinaison du montant de la porte entre 31 et 50 mm Assembly: Fine adjustment of door upright angle 31 - 50 mm Montaggio: Regolazione di precisione dell'inclinazione del longherone per ante 31 - 50 mm ■... -
Seite 50: Montage: Positionierung Anschlagdämpfer
HAWA Concepta 25/30 Montage: Positionierung Anschlagdämpfer Montage : Positionnement du dispositif d’amortissement de butée Assembly: Positioning the stop dampener Montaggio: Posizionamento ammortizzatore battuta Anschlagdämpfer oben / Amortissement de butée en haut / Top dampener / Ammortizzatore di battuta in alto ■... - Seite 51 HAWA Concepta 25/30 Anschlagdämpfer unten / Amortissement de butée en bas / Bottom dampener / Ammortizzatore di battuta in basso ■ DE 1. Holm hinten in Anschlag schieben (a) 2. Anschlagdämpfer in Kontakt mit Führungsrolle (b) 3. ~3 mm einstellen (c) 4.
-
Seite 52: Montage: Höheneinstellung Türe
HAWA Concepta 25/30 Montage: Höheneinstellung Türe Montage : Réglage en hauteur de la porte Assembly: Door height adjustment Montaggio: Regolazione in altezza dell'anta ■ DE 1. Höhe einstellen 2. arretieren 1. Régler la hauteur 2. Bloquer 1. Adjust height 2. Tighten fasteners 1. -
Seite 53: Montage: Feineinstellung Türfuge
HAWA Concepta 25/30 Montage: Feineinstellung Türfuge Montage : Réglage fin de la jointure de porte Assembly: Door clearance gap fine adjustment Montaggio: Regolazione di precisione fuga anta Mittleres Scharnier lösen zum Einstellen der Türfuge Desserrer la charnière centrale pour régler la jointure de porte... - Seite 54 HAWA Concepta 25/30 9.10 Montage: Feineinstellung Türfuge Montage : Réglage fin de la jointure de porte Assembly: Door clearance fine adjustment Montaggio: Regolazione di precisione fuga anta ■ DE 1. Tiefe einstellen (a) 2. festziehen (b) 1. Régler la profondeur (a) 2.
-
Seite 55: Montage: Feineinstellung Türe
HAWA Concepta 25/30 9.11 Montage: Feineinstellung Türe Montage : Réglage fin de la porte Assembly: Fine adjustment of doors Montaggio: Regolazione di precisione anta ■ DE 1. Türe schliessen. 2. Falls nötig Holmneigung mittels Scherenlager anpassen bis Türe korrekt schliesst. -
Seite 56: Montage: Feineinstellung Einzugsgeschwindigkeit
HAWA Concepta 25/30 9.12 Montage: Feineinstellung Einzugsgeschwindigkeit Montage : Réglage fin vitesse de retrait Assembly: Fine adjustment pull-in speed Montaggio: Regolazione di precisione velocità meccanismo di chiusura Durch Verstellen der Schraube kann die Einzugsgeschwindigkeit, der Türe in die Nische, reduziert werden. -
Seite 57: Demontage: Türeinzug Bei Fixer Aussenseite
HAWA Concepta 25/30 10 Demontage / D émontage / D isassembling / S montaggio 10.1 Demontage: Türeinzug bei fixer Aussenseite Démontage : Dispositif d’escamotage de la porte avec côté extérieur fixe Disassembly: Door closing system for fixed outside panel Smontaggio: Meccanismo di chiusura anta con lato esterno fisso VORSICHT / ATTENTION / CAUTION / ATTENZIONE Demontagereihenfolge muss eingehalten werden. - Seite 58 HAWA Concepta 25/30 ■ DE 1. Holm ausziehen (a) 2. Sicherungsstift entnehmen (b) 3. Sicherungsstift in die dafür vorgesehene Bohrung stecken (c) 1. Tirer le montant (a) 2. Retirer la goupille de sécurité (b) 3. Enficher la goupille de sécurité dans le perçage prévu à cet effet (c) 1.
- Seite 59 HAWA Concepta 25/30 Dübelstab bauseits / Barre-cheville incombant au client / Dowel rod provided by others / Barra tassello a cura del committente...
- Seite 60 Toute transmission de ce document à un tiers, toute reproduction, quels qu'en soient le type et la forme - même par extraits - et toute exploitation et/ou communication de son contenu, sont formellement interdits sans accord préalable écrit de la part de la société Hawa Sliding Solutions AG, excepté pour un usage interne.