Inhaltsverzeichnis
Werbung
Quicklinks
Werbung
Inhaltsverzeichnis

Verwandte Anleitungen für Jenway 550

Inhaltszusammenfassung für Jenway 550
- Seite 1 Temperature Meter Model 550 Instruction Manual 550 350/Rev B/04-17...
- Seite 3 Safety Please read this information carefully prior to installing or using this equipment. The unit described in this manual is designed be operated only by trained personnel. Any adjustments, maintenance and repair must be carried out as defined in this manual, by a person qualified to be aware of the hazards involved.
- Seite 4 Toujours se référer aux fiches techniques de santé et de sécurité accompagnant tout produit chimique utilisé. Respecter les procédures de laboratoire généralement acceptées pour la manipulation en toute sécurité des produits chimiques. Si l’utilisateur suspecte qu’un problème quelconque puisse mettre en cause la sécurité, l’appareil doit être rendu inopérant en empêchant son utilisation.
- Seite 5 Leggere attentamente queste istruzioni prima di installare o utilizzare il dispositivo. L’unità descritta nel presente manuale è stata realizzata per essere utilizzata solo da personale che ha ricevuto l’apposita formazione. Qualsiasi operazione di regolazione, manutenzione e riparazione deve essere effettuata sulla base di quanto indicato nel presente manuale da personale qualificato consapevole dei rischi connessi.
- Seite 6 Es fundamental que tanto los operarios como el personal de servicio utilicen un sistema de trabajo seguro, así como las instrucciones detalladas que se especifican en este manual. Cualquier elemento que no se encuentre entre los definidos en los procedimientos de mantenimiento aquí descritos no podrá utilizarse en este instrumento.
-
Seite 7: Inhaltsverzeichnis
Contents Page SECTION 1 - Introduction INSTRUMENT DESCRIPTION INSTRUMENT SPECIFICATION SECTION 2 – Installation UNPACKING INSTALLATION DISPLAY AND CONTROLS SECTION 3 – Temperature Adjustment MANUAL TEMPERATURE ADJUSTMENT AUTOMATIC TEMPERATURE CORRECTION (ATC) SECTION 4 – Calibration and Measurement SECTION 5 – Care and Maintenance BATTERY REPLACEMENT SECTION 6 –... -
Seite 8: Section 1 - Introduction
SECTION 1 - Introduction 1.1 INSTRUMENT DESCRIPTION Model 550 is a general purpose handheld pH and temperature meter offering 2 point calibration and automatic buffer recognition. This model simultaneously displays both the temperature compensated pH readings and temperature. 1.2 INSTRUMENT SPECIFICATION... -
Seite 9: Section 2 - Installation
SECTION 2 - Installation 2.1 UNPACKING Remove the 550 meter from the packaging and ensure the following items are included: Model 550 pH and temperature meter (550 271) Epoxy bodied combination pH electrode (924 001) Temperature probe (170 101) pH 4, 7 and 10 buffer sachets... -
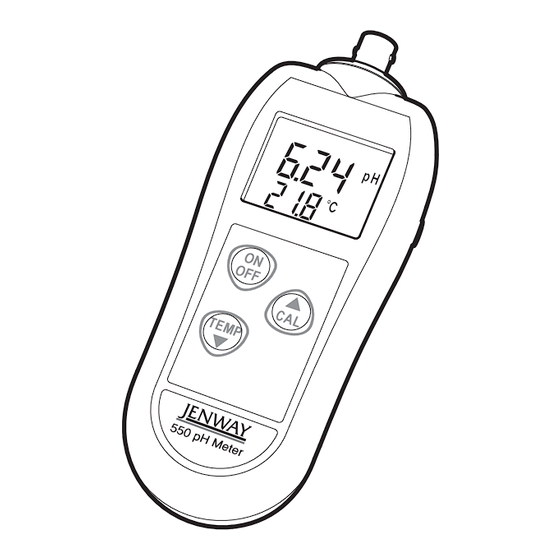
Seite 10: Display And Controls
2.3 DISPLAY AND CONTROLS The pH meter has an LCD display which displays the pH and temperature simultaneously. The keypad used for this meter enables an easy and effective way of calibrating and performing a measurement. Fig. 2.3.1 – Display and Controls 1. - Seite 11 The instrument will switch off automatically after 10 minutes of inactivity (i.e. no key presses). To disable the auto-off function press and hold the CAL key whilst switching the unit on. “Auto-off disabled” will be displayed across the screen. When the unit is turned off the auto-off function will be re-enabled. To change the instrument temperature units between °C and °F, when the unit is switched off, press and hold the ON/OFF key for 8 seconds.
-
Seite 12: Section 3 - Temperature Adjustment
SECTION 3 - Temperature Adjustment Model 550 is supplied with a temperature probe enabling automatic temperature compensation to be used. If the probe is disconnected then manual temperature compensation can be used instead. 3.1 MANUAL TEMPERATURE ADJUSTMENT To manually adjust the temperature hold down the TEMP key for 3 seconds until ‘Set’... -
Seite 13: Section 4 - Calibration And Measurement
Before performing a measurement the instrument must be calibrated. It is recommended that the instrument is calibrated daily to achieve consistent and accurate results. Model 550 has a 2 point calibration process. The first calibration point MUST be buffer pH 7.00. The second calibration point depends on the acidity of the solution which is to be measured. - Seite 14 Once the instrument is calibrated the sample can be measured. Place the pH electrode and temperature probe into the sample and allow to stabilise. If ‘Hi’ is displayed the readings are higher than 14pH. If ‘Lo’ is displayed the readings are below 0pH. If ‘Err’...
-
Seite 15: Section 5 - Care And Maintenance
SECTION 5 - Care and Maintenance Over time the electrode sensor will degrade, but regular calibrating, cleaning and the correct storage will prolong its life. The epoxy bodied combination electrode supplied with this instrument is suitable for the majority of tests carried out in aqueous solutions. -
Seite 16: Battery Replacement
5.1 BATTERY REPLACEMENT Replace the battery when the battery icon is low. This meter will continue to measure accurately but after further usage the meter will display ‘FLAt bAT’ and shutdown. Unscrew the screws on the back of the meter and replace with three AAA batteries ensuring that the polarities are correct. -
Seite 17: Section 6 - Accessories And Spare Parts
SECTION 6 - Accessories and Spare Parts 6.1 OPTIONAL ACCESSORIES Part Code Description 025 037 pH 4 buffer (red, 500ml) 025 038 pH 7 buffer (yellow, 500ml) 025 039 pH 10 buffer (blue, 500ml) 025 179 pH 4 buffer sachets (pack of 10) 025 180 pH 7 buffer sachets (pack of 10) 025 181... -
Seite 18: Section 7 - Service And Support
7.1 SERVICE Our dedicated service staff are on hand to help in the unlikely event that your Jenway equipment develops a fault. Please contact them by one of the following means with a clear description of the problem: E-mail: cpservice@coleparmer.com... -
Seite 19: Section 8 - Declaration Of Conformity
Signed for and on behalf of the above manufacturer Additional Information Year of CE Marking: 2016 Place of Issue Stone, Staffordshire, UK Date of Issue 02 March 2016 Authorised Representative Steve Marriott Title Technical Director Signature Declaration of Conformity is also available to view online at www.jenway.com... - Seite 20 Cole-Parmer Ltd. Beacon Road, Stone, Staffordshire, ST15 0SA, United Kingdom Tel: +44 (0)1785 812121 Email: cpinfo@coleparmer.com Web: www.jenway.com...