Inhaltsverzeichnis
Werbung
Verfügbare Sprachen
Verfügbare Sprachen
Quicklinks
Werbung
Inhaltsverzeichnis

Verwandte Anleitungen für Blumfeldt 10029146


Inhaltszusammenfassung für Blumfeldt 10029146
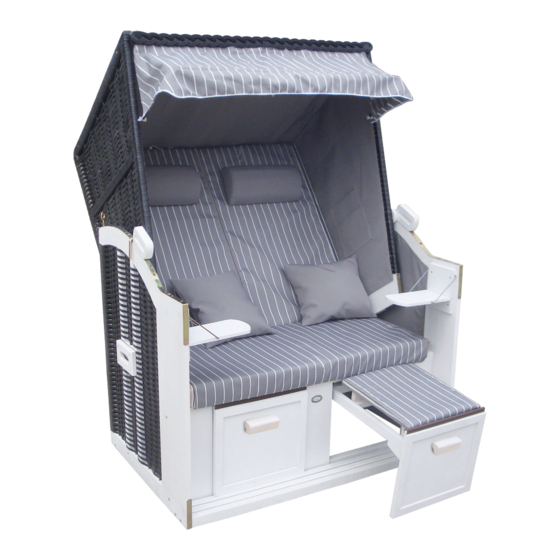
- Seite 1 Strandkorb 10029146 10029147 10029148 10029149...
-
Seite 2: Lieferumfang
Sehr geehrter Kunde, wir gratulieren Ihnen zum Erwerb Ihres Gerätes. Lesen Sie die folgenden Hinweise sorgfältig durch und befolgen Sie diese, um möglichen Schäden vorzubeugen. Für Schäden, die durch Missachtung der Hinweise und unsachgemäßen Gebrauch entstehen, übernehmen wir keine Haftung. Lieferumfang Bild Bezeichnung... -
Seite 3: Aufbauhinweise
Wichtige Hinweise Aufbauhinweise: • Idealerweise erfolgt der Aufbau zu zweit • Sie benötigen einen stabilen Kreuzschlitz-Schraubendreher oder besser einen Akkuschrauber mit guten (neuen) Kreuz-Bits. • Bitte stellen Sie Ihren Akkuschrauber auf einen mittleren Drehmoment, um ein Überdrehen des Schraubenkopfes zu verhindern. •... - Seite 4 Schritt 2: Montage der Fußbänke An der Fußbank sind hinten 2 Ringe für die Führungs- Die Fußbank lässt sich ganz schienen (F) angebracht. einfach mit je 4 Schrauben Die Schiene bitte so einfüh- (B) montieren. ren, dass das geschwunge- ne Ende hinten ist. Das geschwungene Ende Setzen Sie nun die Fußbank der Führungsschiene wird...
- Seite 5 Schritt 4: Zusammensetzen von Ober- und Unterkorb Zunächst halten Sie den Oberkorb bitte so zum Un- terkorb, dass sich die be- Stecken Sie nun den Ver- reits vormontierte Schraub- stellgriff (E) in ein Loch auf platte am Oberkorb in der der Schiene am Unterkorb, Mitte von zwei Löchern auf halten eine Kunststoffschei-...
-
Seite 6: Packing Content
Dear Customer, congratulations on purchasing this equipment. Please read this manual carefully and take care of the following hints to avoid damages. Any failure caused by ignoring the mentioned items and cautions mentioned in the instruction manual are not covered by our warranty and any liability. Packing Content Picture Description... -
Seite 7: Important Hints
Important Hints Assembly instructions:: • Ideally, assembly should be performed with two people • You will need a stable Phillips screwdriver or preferably a cordless screwdriver with good (new) cross bits • Please set your electric screwdriver to a medium torque to prevent over-revving the screw head •... - Seite 8 Step 2: Mounting the footrests On the footrest, 2 rings The footrest can be moun- for guide rails (F) are rear ted easily with 4 screws mounted. Please insert the (B). rail so that the curved end is the rear. The curved end of the guide Now place the footstool rail will now be simply...
- Seite 9 Step 4: Joining together the upper and lower baskets First, hold the upper rack to the lower rack so that Now insert the adjustment the pre-assembled screw handle (E) in a hole on the plate located on the upper rail on the lower rack, hold basket is in the middle of a plastic washer against the two holes on the rail on...
- Seite 10 Chère cliente, cher client, Toutes nos félicitations pour l’acquisition de ce nouvel appareil. Veuillez lire attentivement et respec- ter les instructions de ce mode d’emploi afin d’éviter d’éventuels dommages. Nous ne saurions être tenus pour responsables des dommages dus au non-respect des consignes et à la mauvaise utilisa- tion de l’appareil.
-
Seite 11: Consignes Importantes
Consignes importantes Consignes de montage • Dans l’idéal, effectuer le montage à deux personnes. • Un tournevis cruciforme est nécessaire au montage ou au mieux une visseuse électrique avec de bons embouts cruciformes (neufs). • Régler la visseuse électrique sur une vitesse intermédiaire pour éviter de détériorer le pas de vis. •... - Seite 12 Étape 2 : montage du repose-pieds L’arrière du repose-pieds Le repose-pieds se fixe comporte deux anneaux aisément à l’aide de 4 vis. prévus pour les glissières. L’extrémité tortueuse de Faire passer à présent le chaque glissière peut à repose-pied en diagonale présent être introduite dans par l’ouverture de la face le trou pré-percé...
- Seite 13 Étape 4 : assemblage du socle et de la partie supérieure de la corbeille Maintenir à présent la par- tie supérieure de la cor- beille au-dessus du socle Puis introduire une poignée de telle manière à ce que d’ajustement (E) dans un la plaque à...
- Seite 14 Gentile cliente, La ringraziamo per aver acquistato il nostro dispositivo. La preghiamo di leggere attentamente le segu- enti istruzioni e di seguirle per evitare eventuali danni. Non ci assumiamo alcuna responsabilità per danni derivati da una mancata osservazione delle avvertenze di sicurezza e da un uso improprio del dispositivo. Consegna Quan- Quan-...
-
Seite 15: Avvertenze Importanti
Avvertenze importanti Istruzioni di montaggio: • Si consiglia di montare la sdraia in due. • Per il montaggio occorre un cacciavite con punta a croce oppure un avvitatore a batteria. • Impostare l’avvitatore elettrico ad una velocità media, per evitare un serraggio eccessivo della vite. - Seite 16 Fase 2: Montaggio del poggiapiedi Al poggiapiedi sono installati Il poggiapiedi può essere 2 anelli per le guide di scor- montato facilmente utiliz- rimento (F). Inserire la gui- zando 4 viti (B). da in modo che l’estremità curva sia dietro. Ora è...
- Seite 17 Fase 4: Assemblaggio del cesto superiore e inferiore Inserire il cesto superio- re nel cesto inferiore: la Inserire la manopola di re- piastra di montaggio pre- golazione (E) nel foro posto assemblata posta sul cesto sulla guida di scorrimento superiore deve trovarsi al del cesto inferiore.
-
Seite 18: Contenido Del Envío
Estimado cliente: Le felicitamos por la adquisición de este producto. Lea atentamente el siguiente manual y siga cui- dadosamente las instrucciones de uso con el fin de evitar posibles daños. La empresa no se res- ponsabiliza de los daños ocasionados por un uso indebido del producto o por haber desatendido las indicaciones de seguridad. -
Seite 19: Indicaciones Importantes
Indicaciones importantes Indicaciones de montaje: • Se recomienda realizar el montaje entre dos personas. • Necesita un destornillador de estrella estable. Si fuera posible, un destornillador eléctrico con pun- ta de estrella nueva. • Coloque el destornillador eléctrico en el nivel de potencia medio para evitar atornillar demasiado profundos los tornillos. - Seite 20 Paso 2: montaje del reposapiés En el reposapiés encontrará 2 anillas para las guías (F). El reposapiés se monta fá- Introduzca las guías de tal cilmente con 4 tornillos (B). manera que el extremo cer- rado quede orientado hacia atrás. Coloque el reposapiés con El extremo móvil de la guía cuidado en la abertura de-...
- Seite 21 Paso 4: montaje de las partes superior e inferior A continuación, sujete la parte superior junto con la Introduzca una sujeción inferior para que los dos ajustable (E) en un aguje- orificios ya perforados para ro de las guías en la parte los tornillos queden en el inferior del sillón, mantenga centro de dos agujeros en...