
Verwandte Anleitungen für Nordmende CSG62WH


Inhaltszusammenfassung für Nordmende CSG62WH
- Seite 1 CSG62WH CSG52LPGWH OPERATING AND INSTALLATION INSTRUCTIONS OF FREESTANDING GAS COOKER...
- Seite 2 Dear Customer, Our goal is to offer you products with high quality that exceed your expectations. Your appliance is produced in modern facilities carefully and particularly tested for quality. This manual is prepared in order to help you use your appliance that is manufactured by the most recent technology, with confidence and maximum efficiency.
-
Seite 3: Inhaltsverzeichnis
CONTENTS: 1. BRIEF PRESENTATION OF PRODUCT 2. WARNINGS 3. INSTALLATION AND PREPARATIONS FOR USE 3.1 Environment where the appliance to be installed 3.2 Installation of product 3.3 Adjustment of feet 3.4 Gas connection 3.5 Electric connection and safety 3.6 Gas conversion 4. -
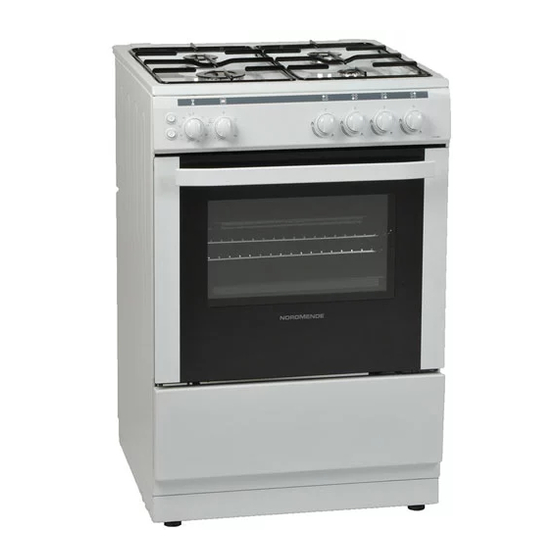
Seite 4: Brief Presentation Of Product
1. BRIEF PRESENTATION OF PRODUCT MODEL DEPTH WIDTH HEIGHT (cm) (cm) (cm) CSG52LPGWH CSG62WH List of Components: 1- Cooktop 9- Grill Burner 2- Control Panel 10- Oven Lamp 3- Oven Door Handle 11- Semi-Rapid Burner 4- Cover 12- Rapid Burner... -
Seite 5: Warnings
2. WARNINGS READ THESE INSTRUCTIONS CAREFULLY AND COMPLETELY BEFORE USING YOUR APPLIANCE, AND KEEP IT IN A CONVENIENT PLACE FOR REFERENCE WHEN NECESSARY. THIS MANUAL IS PREPARED FOR MORE THAN ONE MODEL IN COMMON. YOUR APPLIANCE MAY NOT HAVE SOME OF THE FEATURES THAT ARE EXPLAINED IN THIS MANUAL. PAY ATTENTION TO THE EXPRESSIONS THAT HAVE FIGURES, WHILE YOU ARE READING THE OPERATING MANUAL. - Seite 6 2. WARNINGS - WARNING: If the surface is cracked, switch off the appliance to avoid the possibility of electric shock. - For hobs incorporating a lid, any spillage should be removed from the lid before opening. And also the hob surface should be allowed to cool before closing the lid.
- Seite 7 2. WARNINGS - WARNING: Ensure that the appliance is switched off before replacing the lamp to avoid the possibility of electric shock. - CAUTION: Accessible parts may be hot when the cooking or grilling is in use. Young children should be kept away. •...
- Seite 8 2. WARNINGS During usage • When you first run your oven a certain smell will emanate from the insulation materials and the heater elements. For this reason, before using your oven, run it empty at maximum temperature for 45 minutes. At the same time you need to properly ventilate the environment in which the product is installed.
-
Seite 9: Installation And Preparations For Use
3. INSTALLATION AND PREPARATIONS FOR USE This modern, functional and practical cooker, that was manufactured with the parts and materials of highest quality, will meet your cooking needs in every aspect. You must surely read this manual so that you don't have any problem in future and to be able to have satisfactory results. The following information are the required rules for right installation and service processes. -
Seite 10: Installation Of Product
3. INSTALLATION AND PREPARATIONS FOR USE Cooker hood flue Electrical ventilator Air inlet section Air inlet section min. 100cm min. 100cm Figure 3 Figure 4 Min. 60cm COOKER HOOD Figure 5 3.2 Installation of product There are some factors that must be paid attention to while installing your product. Surely be very careful to while installing your product. -
Seite 11: Adjustment Of Feet
3. INSTALLATION AND PREPARATIONS FOR USE 3.3 Adjustment of feet Your product stands on 4 adjustable feet. When the product is placed where to be used, check if the product is balanced. If it is not balanced, you can make the adjustment by turning the feet clockwise if required. -
Seite 12: Electric Connection And Safety
3. INSTALLATION AND PREPARATIONS FOR USE always use the seals provided in the gas conversion kit. The seals used during connection should also be approved to be used in gas connections. Do not use plumbing seals for gas connections. Remember that this appliance is ready to be connected to gas supply in the country for which it has been produced. -
Seite 13: Gas Conversion
3. INSTALLATION AND PREPARATIONS FOR USE • The appliance is adjusted for 230V 50Hz electricity. If the mains electricity is different contact your authorized service. Figure 8 • The supply cord should be kept away from hot parts of appliance. Otherwise, the cord may be damaged, causing short circuit. - Seite 14 3. INSTALLATION AND PREPARATIONS FOR USE Spanner Injector Figure 10 Figure 9 Oven/Grill Injectors: The oven and grill injectors are assembled by a single screw that is placed on the tip of the burner. For grill burners, this screw is already visible(Figure 11). Remove the screw, pull the grill burner to yourself and you will see the injector revealed on the rear surface of the oven cavity (Figure 12).
- Seite 15 3. INSTALLATION AND PREPARATIONS FOR USE To determine the minimum position, ignite the burners and leave them on in minimum position. Remove the with the help of a small screwdriver fasten or loosen the bypass screw around 90 angular degrees. When the flame has a length of at least 4mm, the gas is well distributed. Make sure that the flame does not die out when passing from the maximum position to the minimum position.
-
Seite 16: Use Of Your Product
4. USE OF YOUR PRODUCT 4.1 Use of gas burners Ignition of the burners To determine which knob controls which burner, check the position symbol above the knob. • Manual Ignition of the Gas Burners If your appliance is not equipped with any ignition aid or in case there is a failure in the electric network, follow the procedures listed below: For Hob Burners: To ignite one of the burners, press and turn its knob counter-clockwise so that the knob is in maximum position, approach a match, taper or another manual aid to its upper... -
Seite 17: Control Of Hob Burners
4. USE OF YOUR PRODUCT Flame safety device: Hob Burners (If your hob is equipped with gas safety device) Hobs equipped with flame failure device provide security in case of accidentally extinguished flame. If such a case occurs, the device will block the burners gas lines and will avoid any accumulation of unburned gas. - Seite 18 4. USE OF YOUR PRODUCT Your hob has burners of different diameters. The most economic way of using gas is to choose the correct size gas burners for your cooking pan size and to bring the flame to minimum position once the boiling point is reached.
-
Seite 19: Control Of Oven Burner
4. USE OF YOUR PRODUCT 4.1.2 Control of the Oven Burner After you ignite the oven burner as explained before, you can adjust the temperature inside the oven as you require, using the numbers on the control panel or knob ring: Bigger numbers mean higher temperatures, while smaller numbers mean lower temperatures. -
Seite 20: Control Of Grill Burner
4. USE OF YOUR PRODUCT • If you are cooking more than one tray of similar items, for example cakes or biscuits, swap the trays during cooking or you can remove the top tray when the food is cooked and move the lower tray to the higher shelf to finish cooking. -
Seite 21: Use Of Mechanical Minute Minder
4. USE OF YOUR PRODUCT • Food should be thoroughly dried before grilling to minimize splashing. Brush lean meats and fish lightly with a little oil or melted butter to keep them moist during cooking. • Foods should be placed on the center of the grid to allow maximum circulation of air. •... -
Seite 22: Accessories Used In Oven
4. USE OF YOUR PRODUCT 4.2 Accessories used in oven • The product already supplied with accessories. You can also use accessories you purchase from the market, but they must be heat and flame resistant. You can also use glass dishes, cake molds, special oven trays that are appropriate for use in oven. - Seite 23 4. USE OF YOUR PRODUCT Oven Cavity Rack positions for molded racks 5. Rack 4. Rack 3. Rack 2. Rack 1. Rack Oven Accessories * The accessories of your oven may be different due to the model of your product. Wire grid Wire grid is used to grill or to place different cookwares on it.
-
Seite 24: Cleaning And Maintenance
5. CLEANING AND MAINTENANCE 5.1 Cleaning Be sure that all control switches are off and your appliance cooled before cleaning your oven. Plug off the appliance. Check whether they are appropriate and recommended by the manufacturer before using the cleaning materials on your oven. As they may damage the surfaces, do not use caustic creams, abrasive cleaning powders, thick wire wool or hard tools. - Seite 25 5. CLEANING AND MAINTENANCE Removal of oven door To remove the oven door; • Open the oven door(1). • Open the saddle bracket up to end position(2). • Close the door till it almost reaches to the full closed position as shown in 3 figure and remove the door by pulling it towards yourself.
-
Seite 26: Maintenance
5. CLEANING AND MAINTENANCE Burner Caps: Periodically, enameled pan support, enameled covers, burner heads must be washed with soapy warm water rinsed and dried. After drying them thoroughly, replace them correctly. Enamelled Parts: In order to keep them a new, it is necessary to clean them frequently with mild warm soapy water and then dry with cloth. -
Seite 27: Service And Transport
6. SERVICE AND TRANSPORT 6.1 Basic troubleshooting before contacting service If the oven does not operate : • The oven may be plugged off, there has been a black out. If the oven does not heat : • The heat may be not adjusted with oven's heater control switch. If the interior lighting lamp does not light : •... -
Seite 28: Injector Table
INJECTOR TABLE CSG62WH CSG52LPGWH G30 28-30mbar 10,3kW 749 g/h G30/G31 G30 28-30mbar 10,3kW I2H IE Class: 1 G20 20 mbar 28-30/37 G30/G31 mbar 28-30/37 LARGE BURNER I3+ IE Class: 1 mbar DIA. of INJECTOR (1/100mm) NOMINAL RATING (KW) 2,75 LARGE BURNER... - Seite 29 Brand CSG62WH Model Type of Oven Mass 43(+/-2) Energy Efficiency Index - conventional 103,6 Energy Efficiency Index - fan forced Energy Class 6,30 MJ/cycle - Energy consumption (gas) - conventional kWh/cycle 1,75 MJ/cycle - Energy consumption (gas) - fan forced...
- Seite 30 Brand CSG52LPGWH Model Type of Oven Mass 35(+/-2) Energy Efficiency Index - conventional 103,7 Energy Efficiency Index - fan forced Energy Class 5,94 MJ/cycle - Energy consumption (gas) - conventional kWh/cycle 1,65 MJ/cycle - Energy consumption (gas) - fan forced kWh/cycle Number of cavities Heat Source...
- Seite 31 Brand CSG62WH CSG52LPGWH Model Type of Hob Number of Cooking Zones Heating Technology-1 Size-1 Auxiliary Energy Efficiency-1 Heating Technology-2 Size-2 Semi-Rapid Energy Efficiency-2 59,0 Heating Technology-3 Size-3 Semi-Rapid Energy Efficiency-3 59,0 Heating Technology-4 Size-4 Rapid Energy Efficiency-4 57,0 Energy Efficiency of Hob...
- Seite 32 The symbol on the product or on its packaging indicates that this product may not be treated as household waste. Instead it shall be handed over to the applicable collection point for the recycling of electrical and electronic equipment. By ensuring this product is disposed of correctly, you will help prevent potential negative consequences for the environment and human health, which could otherwise be caused by inappropriate waste handling of this product.
- Seite 33 CSG62WH CSG52LPGWH BETRIEBS-UND INSTALLATIONSANLEITUNG VON FREISTEHENDEN GASHERD...
- Seite 34 Werte Kunden, Unser Ziel ist es, Ihnen Produkte mit hoher Qualität anzubieten, die Ihre Erwartungen übertreffen. Ihr Gerät ist in modernen Einrichtungen sorgfältig und vor allem auf Qualität geprüft produziert. Dieses Handbuch wurde erstellt, um Ihnen bei der Verwendung Ihres Gerätes, das nach neuesten Technologien hergestellt wurde, zu helfen und Ihnen zu zeigen, wie Sie das Gerät möglichst vorteilhaft einsetzen.
- Seite 35 INHALTSVERZEICHNIS: 1. KURZÜBERSICHT ÜBER DAS GERÄT 2. WARNHINWEISE 3. INSTALLATION UND VORBEREITUNGEN FÜR DIE VERWENDUNG Umfeld wo das Gerät installiert werden muss Installation des Produkts Einstellung der Standfüsse Gasanschluss Elektrischer Anschluss und Sicherheitshinweise Gas Umbau VERWENDUNG IHRES HERDS Verwendung der Gasbrenner 4.1.1 Kontrolle von Herd-Brennern 4.1.2...
-
Seite 36: Kurzübersicht Über Das Gerät
1. KURZÜBERSICHT ÜBER DAS GERÄT MODELL TIEFE BREITE HÖHE (cm) (cm) (cm) CSG52LPGWH CSG62WH LISTE DER BESTANDTEILE : 1- Kochfeld 9- Grill-Brenner 2 - Bedienfeld 10 - Ofenlampe 3 - Klappengriff 11 - Halbschnellkochplatte 4- Auszugsblende 12 - Schnellkochplatte 5- Verstellbare Füße 13 - Zusatzkochplatte 6 - Backraumtür... - Seite 37 2. SICHERHEITSHINWEISE LESEN SIE DIESE ANLEITUNG VOLLSTÄNDIG UND SORGFÄLTIG DURCH, BEVOR SIE IHR GERÄT IN BETRIEB NEHMEN, UND HALTEN SIE ES STETS ZUR VERFÜGUNG WENN NÖTIG. DIESES HANDBUCH WURDE FÜR VERSCHIEDENE MODELLE EINER REIHE VERFASST. ES KANN SEIN, DASS IHR GERÄT ÜBER EINIGE EIGENSCHAFTEN, DIE IN DIESEM HANDBUCH ERLÄUTERT WURDEN NICHT VERFÜGT.
-
Seite 38: Warnhinweise
2. WARNHINWEISE WARNUNG: Brandgefahr: lagern Sie keine Gegenstände auf den Kochflächen. WARNUNG: Wenn die Oberfläche rissig ist, schalten Sie das Gerät aus, um die Gefahr eines elektrischen Schlages zu vermeiden. Für Kochfelder mit Abdeckung: Entfernen Sie vor dem Öffnen der Abdeckung alle Verunreinigungen darauf. Lassen Sie die Kochfelder stets abkühlen, bevor Sie die Abdeckung schließen. - Seite 39 2. WARNHINWEISE um die Gefahr von elektrischen Schlägen zu vermeiden. VORSICHT: Die außen zugänglichen Teile können sehr heiß werden, wenn das Kochen oder Grillen in Verwendung ist. Halten Sie kleine Kinder fern von dem Gerät. hr Gerät wurde in Übereinstimmung mit den einschlägigen lokalen und internationalen Normen und Vorschriften hergestellt.
- Seite 40 2. WARNHINWEISE einer ähnlich qualifizierten Person ersetzt werden, um eine Gefährdung zu vermeiden. Lassen Sie Kinder niemals auf die Backraumtür klettern oder darauf sitzen, wenn diese offen ist. Warnhinweise zur Installation: Nehmen Sie das Gerät nicht in Betrieb, solange es nicht vollständig eingebaut ist. Das Gerät muss von einem autorisierten Techniker aufgestellt und in Betrieb genommen werden.
- Seite 41 2. WARNHINWEISE Achten Sie stets darauf, dass die Regler in der Position "0" (Stop), wenn der Herd nicht in Betrieb ist. Die Backbleche neigen sich, wenn sie herausgezogen wurden. Achten Sie darauf, dass Sie die heiße Flüssigkeit nicht verschütten. VORSICHT: Bei der Verwendung eines Gaskochgeräts kommt es zur Bildung von Hitze, Feuchtigkeit und Verbrennungsgasen in dem Raum, in dem das Gerät aufgestellt ist.
-
Seite 42: Installation Und Vorbereitungen Für Die Verwendung
3. INSTALLATION UND VORBEREITUNGEN FÜR DIE VERWENDUNG Dieser moderne, zweckmäßige und praktische Herd wurde aus hochwertigen Teilen und Materialien gefertigt und wird all Ihren Ansprüchen in jeder Hinsicht gerecht werden. Damit Sie im Betrieb auf keine Probleme stoßen und Sie das Gerät erfolgreich verwenden können, müssen Sie dieses Handbuch unbedingt genau durchlesen. -
Seite 43: Installation Des Produkts
3. INSTALLATION UND VORBEREITUNGEN FÜR DIE VERWENDUNG Dunstabzug- shaube Elektrischer Ventilator Lufteinlass mit Lufteinlass mit mindestens 100cm² mindestens 100cm² Querschnitt Querschnitt Abb. 3 Abb. 4 Mind. 60cm. DUNSTABZUG Abb. 5 3.2 Installation des Produkts Bei der Installation Ihres Herds müssen bestimmte Faktoren beachtet werden. Seien Sie sehr vorsichtig, während der Installation Ihres Produktes. -
Seite 44: Einstellung Der Standfüsse
3. INSTALLATION UND VORBEREITUNGEN FÜR DIE VERWENDUNG 3.3 Einstellung der Standfüsse Der Herd steht auf 4 einstellbaren Standfüßen. Wenn das Gerät dort aufgestellt ist, wo es benutzt werden soll, kontrollieren Sie ob es ausgewogen ist. Wenn es nicht ausgewogen ist, können Sie, wenn erforderlich, eine Einstellung durchführen, indem Sie die Füße im Uhrzeigersinn drehen. -
Seite 45: Elektrischer Anschluss Und Sicherheitshinweise
3. INSTALLATION UND VORBEREITUNGEN FÜR DIE VERWENDUNG Die Dichtungen die während der Verbindung benutzt werden, sollten ebenfalls genehmigt sein, um in Gas-Verbindungen verwendet zu werden. Verwenden Sie keine Sanitär-Dichtungen für Gas- Verbindungen. Beachten Sie, dass dieses Gerät bereit ist, um an die Gasversorgung des Landes, für die sie hergestellt worden ist, verbunden zu werden. -
Seite 46: Gas Umbau
3. INSTALLATION UND VORBEREITUNGEN FÜR DIE VERWENDUNG • Das Gerät ist für 230V 50Hz Strom eingestellt. Wenn das Stromnetz anders ist, melden Sie sich bei Ihrem autorisierten Service Abb. 8 • Das Netzkabel sollte von den heißen Teilen des Gerätes ferngehalten werden. Andernfalls kann das Kabel beschädigt werden, und zum Kurzschluss führen. - Seite 47 3. INSTALLATION UND VORBEREITUNGEN FÜR DIE VERWENDUNG Schlüssel Düse Abb. 10 Abb. 9 Backofen / Grill Injektoren Der Brenner im Backraum ist mit einer einzelnen Schraube versehen, die sich an der Brennerspitze befindet. Für Grillbrenner, ist diese Schraube bereits sichtbar (Abbildung 11). Entfernen Sie die Schraube, ziehen Sie den Grill-Brenner zu sich selbst und sehen Sie den Injektor enthüllt auf der Rückseite des Garraums (Abbildung 12).
- Seite 48 3. INSTALLATION UND VORBEREITUNGEN FÜR DIE VERWENDUNG Zur Bestimmung der minimalen Position, zünden Sie die Brenner und lassen sie auf ihrer minimalen Stellung brennen. Verändern Sie nun mit einem kleinen Schraubendreher die Bypassschraube um etwa 90° (festziehen oder lockern). Wenn die Flamme mindestens 4 mm hoch ist, wird das Gas gut verteilt. Stellen Sie sicher, dass die Flamme nicht ausgeht, wenn sie von der Maximal- in die Minimalstellung geregelt wird.
-
Seite 49: Verwendung Ihres Herds
4. VERWENDUNG IHRES HERDS 4.1 Verwendung der Gasbrenner Zündung der Brenner Um festzustellen, welche Regler welchen Brenner kontrolliert, überprüfen Sie die Das Stellungssymbol oberhalb des Reglers. • Manuelle Zündung der Gasbrenner Ist Ihr Herd nicht mit elektrischer Zündung ausgestattet, oder bei einem Ausfall des Stromnetzes, gehen Sie wie folgt vor: FFür Kochfeld-Brenner: Zum Zünden der Brenner, drücken und drehen Sie den Regler gegen den Uhrzeigersinn, so dass der Regler in maximaler Position ist, an ein Konus oder andere manuelle Hilfe... -
Seite 50: Kontrolle Von Herd-Brennern
4. VERWENDUNG IHRES HERDS Flammensicherheitsvorrichtung Hob-Brenner (Wenn Ihr Kochfeld mit einer Gas-Sicherheitsvorrichtung ausgestattet ist) Kochfelder, die mit Zündsicherung ausgestattet sind, bieten Sicherheit im Falle von versehentlich gelöschten Flammen. Wenn ein solcher Fall eintritt, wird das Gerät die Gasleitung des Brenners blockieren und jede Ansammlung von unverbranntem Gas vermeiden. - Seite 51 4. VERWENDUNG IHRES HERDS Ihr Herd hat Brenner mit unterschiedlichen Durchmessern. Die wirtschaftlichste Art und Weise der Verwendung von Gas ist auf die richtige Gasbrenner Größe für Ihre Pfannengröße zu wählen und die Flamme auf ein Minimum zu bringen, sobald der Siedepunkt erreicht ist. Es wird empfohlen, das Kochgeschirr stets mit dem Deckel zu schließen.
-
Seite 52: Kontrolle Von Ofen-Brennern
4. VERWENDUNG IHRES HERDS 4.1.2 Kontrolle von Ofen-Brennern Nachdem Sie wie zuvor beschrieben den Backofen-Brenner zünden, können Sie mit Hilfe der Zahlen auf dem Bedienfeld oder des Knopf-Rings, die Temperatur im Inneren des Ofens, nach Ihrem Wunsch einstellen. Größere Zahlen bedeuten höhere Temperaturen, während kleinere Zahlen niedrigere Temperaturen bedeuten. -
Seite 53: Kontrolle Von Grill-Brennern
4. VERWENDUNG IHRES HERDS • Wenn Sie mehr als ein Tablett mit ähnlichen Produkten kochen, zum Beispiel Kuchen oder Kekse, tauschen Sie die Tabletten während des Kochens oder Sie können das obere Fach entfernen, wenn das Essen gekocht ist und das untere Tablett auf das höhere Regal verschieben, um das Kochen zu beenden. -
Seite 54: Das Benutzen Vom Digitalen Kurzzeitwecker
4. VERWENDUNG IHRES HERDS • Um das Spritzen zu minimieren, sollten Lebensmittel vor dem Grillen gründlich getrocknet werden. Mageres Fleisch und Fisch leicht mit ein wenig Öl oder zerlassener Butter bepinseln, um die Feuchtigkeit während des Kochens zu bewahren. • Lebensmittel sollten in der Mitte des Gitters platziert werden, um eine maximale Luftzirkulation zu ermöglichen. -
Seite 55: Im Backraum Verwendetes Zubehör
4. VERWENDUNG IHRES HERDS 4.2 Im Backraum verwendetes Zubehör • Es sind verschiedene Zubehörteile für den Backraum vorhanden. Sie können auch handelsübliches Zubehör verwenden (dieses muss jedoch hitze- und feuerfest sein). Sie können auch handelsübliches Glasgeschirr, Kuchenformen, Backbleche etc. verwenden. •... -
Seite 56: Ofen Zubehör
4. VERWENDUNG IHRES HERDS Garraum Regal-Positionen für geformte Regale 5. Einschub 4. Einschub 3. Einschub 2. Einschub 1. Einschub Ofen Zubehör * Wegen des Modells Ihres Produktes kann das Zubehör des Backofens unterschiedlich sein. Bratgitter Drahtgitter wird zum Grillen verwendet oder um unterschiedliches Kochgeschirr darauf zu platzieren. -
Seite 57: Reinigung Und Wartung
5. REINIGUNG UND WARTUNG 5.1 Reinigung Stellen Sie vor der Reinigung sicher, dass alle Regler abgedreht sind und das Gerät ausgekühlt ist. Trennen Sie das Gerät vom Netz. Überprüfen Sie vor der Verwendung spezieller Reiniger, ob diese für das Produkt geeignet sind oder vom Hersteller empfohlen werden. Verwenden Sie keine ätzenden Mittel, Scheuerpulver, Stahlwolle oder harte Werkzeuge, da diese die Oberflächen beschädigen können. - Seite 58 5. REINIGUNG UND WARTUNG Ausbau der Backraumtür Ausbau der Backraumtür • Öffnen Sie die Backraumtür vollständig (1). • Öffnen Sie die Spannklinke bis zur Endstellung (2). • Schließen Sie die Tür, bis es fast die volle rd geschlossene Position wie in Abbildung 3 gezeigt, erreicht und entfernen Sie die Klappe, indem sie es zu sich selbst ziehen.
-
Seite 59: Wartung
5. REINIGUNG UND WARTUNG Brenneraufsätze Emaillierte Pfannenträger, emaillierte Deckel, Brenner Köpfe müssen in regelmäßigen Abständen, mit warmem Seifenwasser abgespült und getrocknet werden. Nach dem Sie sie gründlich getrocknet haben, ersetzen Sie sie richtig. Emaillierte Teile: Um diesen ein neues Aussehen zu erhalten, müssen sie regelmäßig mit mildem warmem Seifenwasser gereinigt und dann mit einem weichen Tuch trockengerieben werden. -
Seite 60: Wartung Und Transport
WARTUNG UND TRANSPORT 6.1 Grundlegenede Fehlerbehebung, bevor Sie den Service kontaktieren Wenn der Herd nicht funktioniert: • Überprüfen Sie, ob der Herd ausgesteckt ist oder ein Stromasufall vorliegt. Wenn der Herd nicht heiß wird: • Überprüfen Sie, ob die Temperatur mit dem Temperaturregler eingestellt wurde. Wenn die Innenraumbeleuchtung nicht funktioniert: •... - Seite 61 INJEKTOR TABELLE CSG62WH CSG52LPGWH G30 28-30mbar 10,3kW 749 g/h G30/G31 G30 28-30mbar 10,3kW I2H IE Class: 1 G20 20 mbar 28-30/37 G30/G31 749 g/h mbar 28-30/37 SCHNELLBRENNER I3+ IE Class: 1 mbar Durchmesser Düse Nennleistung 2,75 SCHNELLBRENNER Verbrauch in 1h...
- Seite 62 Dieses Symbol auf dem Produkt oder der Verpackung weist darauf hin, dass dieses Produkt nicht als Haushaltsmüll entsorgt werden darf. Statt dessen muss es an einem entsprechenden Sammelpunkt für das Recycling von elektrischen und elektronischen Geräten abgegeben werden. Indem Sie sicherstellen, dass dieses Produkt richtig entsorgt wird, helfen Sie, mögliche schädliche Auswirkungen auf die Umwelt und Gesundheit zu vermeiden, die durch unsachgemäße Handhabung dieses Produktes entstehen können.