Herunterladen Inhalt Inhalt Diese Seite drucken
Korg K25 Bedienungsanleitung

Korg K25 Bedienungsanleitung

Midi studio controller
Vorschau ausblenden Andere Handbücher für K25:
Inhaltsverzeichnis

Werbung

Verfügbare Sprachen

Verfügbare Sprachen

Owner's Manual
Manuel d'utilisation
Bedienungsanleitung

Werbung

Inhaltsverzeichnis

Fehlerbehebung

loading

Inhaltszusammenfassung für Korg K25

  • Seite 1 Owner’s Manual Manuel d’utilisation Bedienungsanleitung...
  • Seite 2: Inhaltsverzeichnis

    Table of Contents Precautions ................3 Introduction ................4 Main Features ................... 4 Controllers and their Functions ..............4 Setup ..................7 Installing the MIDI driver and softwares ........... 7 Making connections and turning on the power ......... 8 About the K-Series and the driver ports ..........10 About K-Series’...
  • Seite 3: Precautions

    AC adapter from the wall outlet. Please also retain your receipt as proof of pur- Then contact your nearest Korg dealer or the store chase otherwise your product may be disqualified where the equipment was purchased.
  • Seite 4: Introduction

    Keep this manual in a safe place where you can easily refer to it in the future. This manual applies to the K25, K49, and K61. There is a special section that covers the additional features of the K61P.
  • Seite 5 Owner’s Manual 1. Keyboard The keyboard features full-size, velocity-sensing keys. 2. ClickPoint Two modes allow the ClickPoint controller to behave as an X - Y realtime controller, or as a clickable cursor/mouse when working with Softsynths or DAW software running on a computer. 3.
  • Seite 6: Rear Panel

    (standard plug). 3. PEDAL jack An optional momentary pedal (such as the Korg PS-2 pedal switch) can be con- nected to the pedal jack. The K-Series will automatically detect the polarity of the pedal when the power is turned on.
  • Seite 7: Setup

    K-Series Editor, and the M1 Le software synthesizer. Please read before use ❏ Copyright to all software pertaining to this product is the property of Korg Corpora- tion. ❏ A license agreement for the software pertaining to this product is included separately.
  • Seite 8: Making Connections And Turning On The Power

    Making connections and turning on the power Be sure all your equipment is turned off BEFORE you begin hooking everything up. You must excercise caution, otherwise you may damage your speaker system or cause other malfunctions. Connections using USB Use a USB cable to connect the K-Series to the USB connector of your computer. If you want to use a pedal, connect it to the PEDAL jack.
  • Seite 9 Owner’s Manual Set the power switch to the DC position. The power LED will light. When the power is turned on, the most recently saved settings will be recalled automatically. Turn on any external MIDI sound modules connected to your K-Series controller. Power switch position MIDI OUT Power supply connector...
  • Seite 10: About The K-Series And The Driver Ports

    K-Series is used as a USB-MIDI controller, select this port for computer application’s MIDI output. SOUND / CTRL (CTRL if K25/K49/K61) SOUND/CTRL is used to receive scene data from the computer. Select this port as the K-Series Editor’s MIDI input. In addition, this port is used to play notes on internal sound engine of the K61P.
  • Seite 11: Restoring The Factory Preset Programs

    Owner’s Manual Restoring the factory preset programs To restore the K-Series to the original factory settings, hold down SW1 and SW2 while turning on the power. The controllers setting when factory is shipped Controller Function SW1 / SW2 Program change (-1/+1) KNOB1 CC#074 (Cutoff) KNOB2...
  • Seite 12: Operation

    Operation The K-Series editor software (included on the CD-ROM) is used to assign the control- ler settings and certain parameter values. MIDI messages are sent using MIDI channel. Keyboard Note messages are sent from the keyboard. Three velocity curves (and a constant 127 velocity) allow the keyboard response to be tailored to the performer’s playing style.
  • Seite 13: Sw1 And Sw2

    -4...+4 K61/K61P -3...+3 Key lights(status) Octave setting Dark ±0 octave Green +1 / -1octave Orange +2 / -2octave +3 / -3octave Red Flashing +4 / -4octave(K25/K49 only) PITCH wheel Use the Pitch Bend Wheel to send MIDI pitch bend messages.
  • Seite 14: Mod Wheel

    MOD wheel By assigning a MIDI control change number, the Modulation Wheel can be used to operate external MIDI equipment and control musical software applications. The assignable values are “No Assign/Control Change/After touch”. No Assign No MIDI information is sent from this controller. Control Change [0...127] Use the Mod Wheel to smoothly change the value of the assigned MIDI control change parameter.
  • Seite 15: Using The K61P's Internal Sounds

    Owner’s Manual Using the K61P’s Internal Sounds Selecting a sound The 24 Internal sounds of the K61P are organized into three banks each containing eight sounds. To select a particular sound, you need to select a program button and a bank.
  • Seite 16: Setting Mode

    Chorus Chorus adds a sense of depth and motion to the sound Press the [CHORUS] button to select the depth of the chorus effect. The selected setting will be shown by the color of the [CHORUS] button. [CHORUS] key Chorus depth Dark Green Light...
  • Seite 17 Owner’s Manual Press the [BANK] button to exit the Setting mode. Loud ( Note Touch, control change setting Light Light (less force is required to play loudly) Standard(general piano intensity) Output Normal Heavy (gently struck notes are played softer) Level CONST(all notes play with a velocity of 127) Heavy Soft (...
  • Seite 18 Press the [BANK] button to exit the Setting mode. The pitch setting reverts to standard A4=440Hz if the power is cut off Temperament Temperaments are different tuning systems, mainly used in the baroque and classical periods. In addition to the standard equal tuning, the K61P provides historical Kirnberger and Werckmeister temperaments.
  • Seite 19: Midi Channel Setting

    Owner’s Manual MIDI channel setting You can set the K61P to the same MIDI channel as the connected MIDI equipment. MIDI channel is 1-16. Hold down [BANK] button until the K-Series enters the Setting mode. Press the Program 5 [PIANO 5/E.P. 5/ORGAN 5] button (the button will flash). Press one of the notes between C4~D#5.
  • Seite 20: Program Change Enable/Disable

    The local control setting Local control on Computer K61P KBD/KNOB Keyboard/Each controllers SOUND/CTRL Tone generator Local control off Computer K61P KBD/KNOB Keyboard/Each controllers Tone generator SOUND/CTRL The local on/off setting is set to local on if power cut off. Program change enable/disable Every time you select one of the K61P’s internal sounds, a MIDI program change message is also sent to any connected MIDI equipment.
  • Seite 21 Owner’s Manual Volume message filter You can prevent the internal sound engine from receiving volume change messages. If the Volume message filter is set to “On”, the K61P’s internal sound generator will accept volume(07) message from Knob1, Knob2 and the Slider if they are assigned control change cc#07.
  • Seite 22: Troubleshooting

    Troubleshooting ❏ Power does not turn on • Is the power switch set to the correct position? (p.8 “Making connections and turning on the power”) • Is the K-Series be connected to your computer via a hub? If so, try using the AC adapter.
  • Seite 23: Specifications

    • Headphones jack (K61P only) ❏ Power supply • USB BUS power mode (when using the USB connector) • DC9V, AC adapter (optional) ❏ Current consumption K25/K49/K61: When using USB bus power 110 mA When using DC9V adapter 120 mA...
  • Seite 24: Included Items

    ❏ Included items • USB cable • CD-ROM (containing M1 Le software synthsizer, K-Series Editor software, Driver, Setup Wizard etc.) • Owner’s manual • MIDI Implementation chart • Software license agreement ❏ Computer operating requirements Macintosh Operating system: Mac OS X ver.10.3 or later Computer: Apple Macintosh computer with a USB port, satisfying the operating requirements of Mac OS X...
  • Seite 25 Sommaire Précautions ................26 Introduction ................. 27 Fonctions Principales ................27 Nom des parties ..................27 Installation ................30 Installation des drivers MIDI et des logiciels .......... 30 Connexions et mise sous tension ............31 A propos de la série K et des drivers de ports........33 A propos de la connection MIDI OUT de la série K ........
  • Seite 26: Précautions

    électrocution. Veillez à ne pas laisser tomber d’objets métalliques dans le boîtier. Si cela se produisait, débranchez l’adaptateur secteur de la prise de courant et contactez votre revendeur Korg le plus proche ou le magasin où vous avez acheté l’instrument.
  • Seite 27: Introduction

    ❏ Utilisez le logiciel de synthèse fourni M1 Le avec le clavier de la série K, vous pourrez entendre des sons de très haute qualité immédiatement. ❏ Les 24 sons du K61P’s sont issus des pianos numériques Korg. Vous pouvez jouer des sons de pianos et d’orgue de très haute qualité.
  • Seite 28 1. Clavier Le clavier possède des touchesstandard sensibles à la vélocité. 2. ClickPoint Assigné en MIDI, le ClickPoint peut être utilisé pour contrôler des appareils externes branchés en MIDI, et des logiciels de synthèses comme des séquenceurs tournant sur PC. Le ClickPoint peut être utilisé aussi comme une souris. 3.
  • Seite 29: Panneau Arrière

    Manuel d’utilisation 2. Bouton [BANK] 3 sons sont assignés à chaque bouton programme. Pressez (BANK) poursélectionner l’un d’entre eux. 3. Bouton [PROGRAM] Selectioonne les sons assignés aux boutons. 4. Bouton [REVERB] Ce bouton réglé pour enclencher ou éteidre l’effet echo, et la profondeur de la réverbération.
  • Seite 30: Installation

    M1 Le. Lire avant utilisation s’il vous plait ❏ Le copyright de tout le logiciel concernant ce produit est la propriété de Korg Cor- poration. ❏ L’accord de licence pour le logiciel concernant ce produit est inclus séparément.
  • Seite 31: Connexions Et Mise Sous Tension

    Manuel d’utilisation Connexions et mise sous tension Vérifiez que tous vos équipements soient éteints avant de commentcer quoique ce soit. Vous devez faire attention lors de l’écoute, sinon vous pouvez endommager votre système de haut-parleur ou causer d’autres défauts de fonctionnement. Connexion USB Employez un câble USB pour relier la K-Série au connecteur USB de votre ordinateur.
  • Seite 32 Commutez l’alimentation, la LED s’allumera. À ce moment, les réglages sauvés seront lus automatiquement. Allumez vos appareils externes. La K-Série détecte la polarité de la pédale quand le courant est établi. Si une pédale est reliée, ne la maintenez pas tant que vous n’avez pas allumé la série K. Power switch position Power supply connector PEDAL jack...
  • Seite 33: A Propos De La Série K Et Des Drivers De Ports

    K est utilisée comme un port USB-MIDI, selectionnez ce port pour les pour les port MIDI OUT de vos applications. SOUND / CTRL (CTRL si K25/K49/K61) SOUND/CTRL est utilisé pour recevoir des données de scène venant de l’ordinateur. Sélectionnez ce port pour les entrées MIDI de la série K. De plus, ce port permet au K 61P de jouer des notes du générateur de son interne.
  • Seite 34: Restoration Des Programmes D'usine

    Restoration des programmes d’usine Allumez le clavier en maintenant les touchesSW1 et SW2. Réglages des contrôleurs quand l’appareil est déballé Contrôleurss Fonction SW1 / SW2 Changement de programme (-1/+1) KNOB1 CC#074 (Cutoff) KNOB2 CC#079 (EG Intensity) SLIDER CC#007 (Volume) PITCH wheel Fixed (Pitch Bend) MOD wheel CC#001 (Modulation)
  • Seite 35: Manuel D'opérations

    Manuel d’utilisation Manuel d’opérations Utilisez l’éditeur de la série K pour paramétrer celui ci. Les messages MIDI sont envoyés en utilisant le canal MIDI global. Clavier Envoi des messages de notes. 3 courbes de vélocité et une constante (127) peuvent être paramétrées afin d’avoir la réaction adéquate.
  • Seite 36: Boutons [Sw1]/[Sw2]

    Sombre ±0 octave Vert +1 / -1octave Orange +2 / -2octave Rouge +3 / -3octave Red clignotant +4 / -4octave(K25/K49 seulement) Molette de PITCH Utilisez Le la molette vers le haut/bas pour envoyer des messages MIDI de changement de pitch.
  • Seite 37: Molette De Modulation

    Manuel d’utilisation Molette de MODULATION Avec l’assignation du contrôle MIDI, la molette de modulation peut être utilisée pour piloter l’équipement MIDI externe ou le synthétiseur logiciel fonctionnant sur l’ordinateur. Les valeurs assignables sont “pas d’assignation/Changement de contrôle/aftertouch”. Pas d’assignation Si la molette de modulation n’’est pas assigné au contrôle MIDI, les messages seront non transmis.
  • Seite 38: Jouer Avec Le Générateur De Sons (K61P)

    Jouer avec le générateur de sons (K61P) Selectionner un son (Program change) Sélectionnez le son désiré en utilisant les boutons de sélection. Appuyez sur le bouton de banque jusqu’à ce que vous choisissiez une des trois. Chaque fois que le boutonf de banque enfoncé, la banque choisie commutera de BANK1, de BANK2 ou de BANK3.
  • Seite 39: Mode De Paramétrage

    Manuel d’utilisation Chorus Ajoutez des sons décalés pour avoir un effet riche et profond. Ce s’appelle l’effet de chorus. Appuyez sur la touche [CHORUS], choisissez une des trois profondeurs de cho- rus. L’e paramétrage choisi est montré par la led principale. Bouton [CHORUS] profondeur de Reverb Eteint...
  • Seite 40 Pressez [BANK] pour quitter le mode de paramétrage. Note Touch, control change setting Loud ( Light Son doux avec courbe dure même jouée doucement) Intensité de piano Standard (general) Output Son fort avec courbe douce si joué doucement Normal Level CONST(son avec intensité...
  • Seite 41 Manuel d’utilisation Tempérament Sélectionne le tempérament de la musique. Il y a quelques morceaux de musique classique qui emploient le temperament classique. Afin de jouer les notes avec ce temperament, la K-Série possède ceux classique appelés Kirnberger et Werckmeister, et le temperament égal le plus largement utilisé par les instruments actuels.
  • Seite 42 Réglage du canal MIDI Régler le canal MIDI de votre clavier sur le même canal que votre équipement MIDI externe. Canaux MIDI 1 à 16. Appuyez sur [BANK] jusqu’à ce que le clavier soit en mode réglage. Pressez Program 5 [PIANO 5/E.P. 5/ORGAN 5] pour éclairer la Led. Pressez une des notes entre C4~D#5.
  • Seite 43: Program Change Activé/Désactivé

    Manuel d’utilisation Les réglages du contrôle local Local control on Computer K61P KBD/KNOB Keyboard/Each controllers SOUND/CTRL Tone generator Local control off Computer K61P KBD/KNOB Keyboard/Each controllers Tone generator SOUND/CTRL Le réglage du local on/off est sur local on quand l’appareil est éteint. Program change activé/désactivé...
  • Seite 44 Message de filtre de volume lLe message de chnagementd e contrôle MIDI cc#07(volume) du générateur de son interne peut être éffacé. Si il est réglé sur “On”, le générateur sonore de la sérieK acceptera le message de volume (07) des potentiomètres1/potentiomètres 2 and curseur si ils sont assignés au changement de contrôle cc#07.
  • Seite 45: Messages D'erreur

    Manuel d’utilisation Messages d’erreur ❏ L’appareil ne peut pas s’allumer • Est ce que le bouton d’alimentation est sur la bonne position? (p.31 “Connexions et mise sous tension”) • La série K peut elle être connectée à votre ordinateur via un hub USB? ❏...
  • Seite 46: Caractéristiques

    • Prise casque (K61P seulement) ❏ Alimentation • Port USB en mode alimentation (en utilisant le connecteur USB • Adaptateur secteur DC9V, AC (optionel) ❏ Consommations de courant K25/K49/K61: En utilisant le port USB 110 mA En utilisant l’adaptateur secteur 120 mA...
  • Seite 47 Manuel d’utilisation ❏ Articles inclus • Cable USB • CD-ROM (contenant le logiciel de synthèse M1 Le, Logiciel d’édition de la série K, Driver, Aide à l’installation) • Mode d’emploi • Tableau d’implémentation MIDI • Accord de licence de logiciel ❏...
  • Seite 48 Inhalt Vorsichtsmaßregeln ............49 Einleitung ................50 Die wichtigsten Funktionen ..............50 Bedienelemente und ihre Funktionen ............. 50 Vorbereitung ................ 53 Installieren des MIDI-Treibers und der Software ........53 Anschlüsse und Einschalten ..............54 Die K-Serie und die Treiber-Ports ............56 Die MIDI OUT-Buchse der K-Serie ............
  • Seite 49: Vorsichtsmaßregeln

    Falls ein Gegenstand in das Gerät eindringt, ziehen Sie das Netzteil von der Steckdose ab. Dann wenden Sie sich an Ihren Korg-Fachhändler oder an des Geschäft, in dem das Gerät gekauft wurde. CE-Kennzeichen für europäische harmonisierte Standards...
  • Seite 50: Einleitung

    Weise. Bewahren Sie diese Bedienungsanleitung für die spä- tere Bezugnahme an einem sicheren Ort auf. Diese Bedienungsanleitung bezieht sich auf folgende Geräte: K25, K49, K61 sowie K61P (dem ein separater Abschnitt gewid- met ist). Die wichtigsten Funktionen ❏...
  • Seite 51: Klangerzeugung (K61P)

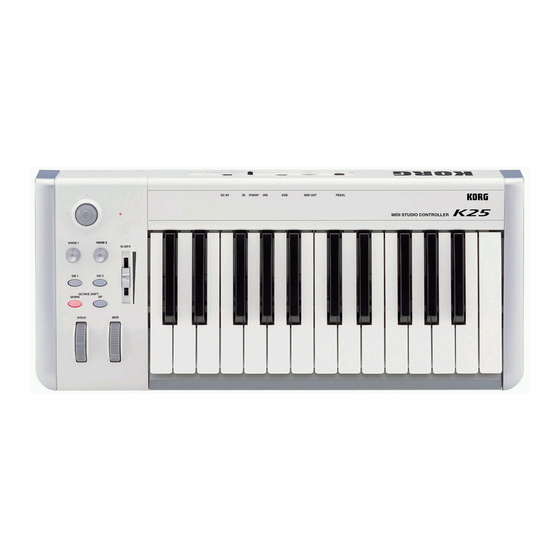
    Bedienungsanleitung 1. Tastatur Hierbei handelt es sich um eine anschlagdynamische „Standard“-Tastatur. 2. ClickPoint Der ClickPoint-Funktion können zwei (einer für die „X“- und einer für die „Y“-Ach- se) MIDI-Steuerbefehle (CC) zugeordnet werden, was sich z.B. für die Fernbedie- nung von Software-Synthesizern oder Recording-Programmen („DAWs“) eignet, die Sie auf Ihrem PC installieren.
  • Seite 52 3. PROGRAM-Taster Hiermit wählen Sie den gewünschten Klang innerhalb der aktuellen Bank. 4. REVERB-Taster Mit diesem Taster kann der Halleffekt ein-/ausgeschaltet werden. Außerdem lässt sich hiermit der Hallanteil einstellen. 5. CHORUS-Taster Mit diesem Taster kann der Chorus-Effekt ein-/ausgeschaltet werden. Außerdem lässt sich hiermit der Effektanteil einstellen.
  • Seite 53: Vorbereitung

    Microsoft Windows XP Home Edition/Professional mit Service Pack 1 oder neuer Installation Hinweise für die Installation des KORG USB-MIDI-Treibers für Windows XP, von „K-Series Editor“ und dem „M1 Le“ Software-Synthesizer finden Sie auf der beiliegenden CD-ROM. Bitte lesen Sie sie sorgfältig durch ❏...
  • Seite 54: Anschlüsse Und Einschalten

    Anschlüsse und Einschalten Schalten Sie alle beteiligten Geräte VOR Herstellen der Verbindungen AUS. Gehen Sie mit Bedacht vor, um weder Ihre Lautsprecher, noch die übrigen Geräte zu beschädigen. Verbindung per USB Verbinden Sie die K-Serie über ein USB-Kabel mit dem USB-Port des Computers. Wenn Sie ein Pedal verwenden möchten, schließen Sie es an die PEDAL-Buchse an.
  • Seite 55: Verwendung Der Internen Klangerzeugung (K61P)

    Bedienungsanleitung Wenn Sie ein Pedal verwenden möchten, schließen Sie es an die PEDAL-Buchse an. Die K-Serie ermittelt beim Einschalten automatisch die Polarität des angeschlosse- nen Pedals. Wenn Sie ein Pedal angeschlossen haben, dürfen Sie es beim Ein- schalten auf keinen Fall drücken. Stellen Sie den Netzschalter auf „DC“.
  • Seite 56: Die K-Serie Und Die Treiber-Ports

    MIDI OUT-Gerät MIDI OUT MIDI-Dumps SOUND/CTRL *1 Klangerzeuger *2 *1 „CTRL“ beim K25/49/61 *2 Nur K61P MIDI IN-Gerät KBD/KNOB „KBD/KNOB“ dient für die Übertragung der von der Tastatur und den Bedienelementen erzeugten MIDI-Befehle. Wenn Sie ein Programm mit dem „K“-Keyboard fernbedienen möchten, müssen Sie diesen Port als MIDI-Eingang jenes Programms definieren.
  • Seite 57: Wiederherstellen Der Werksvorgaben

    Bedienungsanleitung Wiederherstellen der Werksvorgaben Halten Sie bei Bedarf SW1 und SW2 gedrückt, während Sie das Keyboard einschalten, um wieder die Werkseinstellungen zu laden. Die Controller Einstellungen des Werkszustands Controller Funktion SW1 / SW2 Program change (-1/+1) KNOB1 CC#074 (Cutoff) KNOB2 CC#079 (EG Intensity) SLIDER CC#007 (Volume)
  • Seite 58: Bedienung

    Bedienung Die Einrichtung des „K“-Keyboards muss mit dem beiliegenden „K-SeriesEditor“-Pro- gramm erfolgen. Die MIDI-Befehle werden auf dem Global-Kanal gesendet. Tastatur (Keyboard) De Tastatur sendet Notenbefehle. Das Anschlagverhalten kann anhand dreier Kurven bzw. als Fixwert (127) definiert werden.Außerdem lässt sich die Tonhöhe höher und tiefer transponieren. ClickPoint Der „X“- (links/rechts) und „Y“-Achse (auf/ab) können separate MIDI-Steuerbefehle zugeordnet werden.
  • Seite 59: Sw1- & Sw2-Taster

    Ausführungen gleich. „K“-Keyboard Oktavbereich –4…+4 –4…+4 K61/K61P –3…+3 Leuchtstatus Oktavierung ±0 Oktaven Grün +1/–1 Oktave Orange +2/–2 Oktaven +3/–3 Oktaven Rotes Blinken +4/–4 Oktaven (nur beim K25/K49) PITCH-Rad Bewegen Sie dieses Rad auf oder ab, um Pitch Bend-Befehle (Tonhöhenbeugung) zu senden.
  • Seite 60: Mod-Rad

    MOD-Rad Dem Modulationsrad kann man bei Bedarf einen beliebigen Steuerbefehl (CC) zuord- nen, was sich z.B. für die Fernbedienung von Software-Synthesizern und Hardware- Geräten eignet. Die Möglichkeiten lauten „No Assign/Control Change/Aftertouch“. No Assign Es werden keine Daten gesendet. Control Change [0...127] Mit dem MOD-Rad kann die gewählte Funktion stufenlos angesteuert werden.
  • Seite 61: Verwendung Der Klangerzeugung (K61P)

    Bedienungsanleitung Verwendung der Klangerzeugung (K61P) Anwählen von Klängen Mit den 8 Programmtastern können 24 verschiedene (8 x 3) Klänge gewählt werden. Folglich müssen Sie auch die benötigte Bank wählen. Um z.B. den „Clav“-Klang zu wählen, müssen Sie zuerst den sechsten Programmtaster von links drücken (damit er leuchtet).
  • Seite 62: Einstellungen

    Chorus Mit diesem Effekt erwecken Sie den Eindruck, dass ein Part von mehreren Musikern gleichzeitig gespielt wird. Drücken Sie den [CHORUS]-Taster wiederholt, um den gewünschten Chorus-Anteil zu wäh- len. Die Farbe der Tasterbeleuchtung informiert Sie über die gewählte Einstellung. [CHORUS]-Taster Chorus-Anteil Grün En wenig...
  • Seite 63 Bedienungsanleitung Drücken Sie den [BANK]-Taster, um den Einstellungsmodus zu verlassen. Laut ( Note Bedeutung Leicht Leicht (selbst mit relativ leichtem Anschlag werden schon laute Noten erzielt) Ausgangs- Normal (Ansprache wie auf einem Klavier) Normal pegel Har t (für laute Noten muss man här ter hinlangen) Hart Fest (alle Noten haben den Wert „127“)
  • Seite 64: Ein Wort Zum "Stretch Tuning"-Verfahren

    Drücken Sie die Tasten B3 und C4 gleichzeitig, um die Kammertonfrequenz wieder auf A4= 440Hz zu stellen. Drücken Sie den [BANK]-Taster, um den Einstellungsmodus zu verlassen. Beim Ausschalten wird die Stimmung wieder auf A4= 440Hz gestellt. Stimmungssystem Hiermit können Sie ein anderes Stimmungssystem wählen. Die Wahl eines anderen Stimmungssystems eignet sich vor allem für klassische Barockmusik.
  • Seite 65: Einstellen Des Midi-Kanals

    Bedienungsanleitung Programmtaster BANK 1 [PIANO1] Grand Piano 1 [PIANO2] Grand Piano 2 [PIANO3] Standard Piano [PIANO4] Bright Piano [PIANO5] Honky Tonk Piano [PIANO6] Mellow Piano Einstellen des MIDI-Kanals Die MIDI-Kommunikation funktioniert nur, wenn das „K“-Keyboard und das Empfänger- gerät denselben MIDI-Kanal verwenden. Der Einstellbereich für den MIDI-Kanal lautet 1~16.
  • Seite 66: 'Local'-Einstellung

    Drücken Sie den [BANK]-Taster, um den Einstellungsmodus zu verlassen. ‘Local’-Einstellung „Local“-Funktion an Computer K61P KBD/KNOB Tastatur/Bedienelemente SOUND/CTRL Klangerzeugung „Local“-Funktion aus Computer K61P KBD/KNOB Tastatur/Bedienelemente Klangerzeugung SOUND/CTRL Beim Ausschalten wird der „Local“-Parameter wieder aktiviert. Aktivieren/Filtern von Programmwechseln Bei Anwahl eines anderen Klangs auf dem K61P wird die entsprechende MIDI- Programmnummer gesendet.
  • Seite 67: Filtern Von Lautstärkebefehlen

    Bedienungsanleitung Drücken Sie den [BANK]-Taster, um den Einstellungsmodus zu verlassen. Filtern von Lautstärkebefehlen Auch die Steuerbefehle (CC07) für Lautstärkeänderungen der internen Klangerzeugung können gefiltert werden. Wenn dieser Parameter aktiv ist, reagiert die interne Klanger- zeugung auf CC07-Befehle, die (nach der entsprechenden Zuordnung) von KNOB1/ KNOB2 oder dem SLIDER gesendet werden.
  • Seite 68: Fehlersuche

    Fehlersuche ❏ Das Gerät kann nicht eingeschaltet werden • Befindet sich der Netzschalter in der richtigen Position? („Anschlüsse und Einschalten“, S. 54) • Haben Sie das „K“-Keyboard über einen Hub mit Ihrem Computer verbunden? Wenn ja, sollten Sie ein Netzteil verwenden. ❏...
  • Seite 69: Technische Daten

    • Ausgänge (L/MONO, R, nur beim K61P) • Kopfhöreranschluss (nur beim K61P) ❏ Stromversorgung • Stromversorgung über den USB-Bus (bei Verwendung des USB-Ports) • DC9V-Netzteil (Sonderzubehör) ❏ Stromverbrauch K25/K49/K61: Speisung über USB-Bus 110mA Bei Verwendung eines DC9V-Netzteils 120mA K61P: Speisung über USB-Bus...
  • Seite 70: Lieferumfang

    ❏ Lieferumfang • USB-Kabel • CD-ROM (mit M1 Le Software-Synthesizer, K-Series Editor, Treiber, Installations- Wizard usw.) • Bedienungsanleitung • MIDI-Implementierungstabelle • Software-Lizenzvereinbarung ❏ Systemanforderungen Macintosh Betriebssystem: Mac OS X V.10.3 oder neuer Rechner: Apple Macintosh mit USB-Port, der die Anforderungen von Mac OS X erfüllt Windows Betriebssystem:...
  • Seite 71: Midi Implementation Chart

    Active Sense Reset Notes Transmitting by allocating it to the controller becomes possible. *2: It corresponds to Device Inquiry message besides KORG System Exclusive message. Mode 1: OMNI ON, POLY Mode 2: OMNI ON, MONO : Yes Mode 3: OMNI OFF, POLY...
  • Seite 72 *2: It receives it when the setting of Volume message filer is off. *3: It sends and receives it when enable/disable setting of the program change is enable. *4: It corresponds to Device Inquiry message besides KORG System Exclusive message. Mode 1: OMNI ON, POLY...
  • Seite 73 4015-2 Yanokuchi, Inagi-city, Tokyo 206-0812 Japan C 2006 KORG INC.

Diese Anleitung auch für:

K49K61K61p

Inhaltsverzeichnis