Werbung
Verfügbare Sprachen
Verfügbare Sprachen
MANUAL & RECIPE BOOK
For Model Number RC 301M - 3 Cup – 0.7L
MANUAL Y LIBRO DE RECETAS
Para el modelo número: RC 301M - 3 tazas de 0,7 L
BEDIENUNGSANLEITUNG & REZEPTHEFT
Für Modellnr. RC 301M – 3 Tassen - 0,7 l
MANUALE E RICETTARIO
Per Modello numero RC 301M - 3 misurini - 0,7 litri
HANDLEIDING & RECEPTENBOEK
Voor model nummer RC 301M - 3 cup - 0,7 L
MANUEL ET LIVRE DE RECETTES
Pour le modèle numéro RC 301M - 3 tasses - 0,7 l
IMPORTANT: Do Not Use This Cooker Until You Have Read This Entire Manual Thoroughly. FOR HOME
USE ONLY
IMPORTANTE: No utilizar esta cocedora hasta haber leído todo el manual de instrucciones.
ÚNICAMENTE PARA UTILIZAR EN CASA
WICHTIG: Verwenden Sie dieses Gerät erst, wenn Sie die gesamte Bedienungsanleitung sorgfältig
durchgelesen haben. NUR FÜR DEN HEIMGEBRAUCH
IMPORTANTE: leggere attentamente il presente manuale prima di usare il multicooker. SOLO PER
USO DOMESTICO
BELANGRIJK: Gebruik deze pan pas nadat u de gehele handleiding aandachtig hebt doorgelezen.
ALLEEN VOOR HUISHOUDELIJK GEBRUIK
IMPORTANT : Ne pas utiliser cet appareil avant d'avoir lu entièrement le présent manuel. RÉSERVÉ À
L'USAGE DOMESTIQUE
Werbung
Kapitel

Inhaltszusammenfassung für perfect cooker RC 301M
- Seite 1 For Model Number RC 301M - 3 Cup – 0.7L MANUAL Y LIBRO DE RECETAS Para el modelo número: RC 301M - 3 tazas de 0,7 L BEDIENUNGSANLEITUNG & REZEPTHEFT Für Modellnr. RC 301M – 3 Tassen - 0,7 l...
- Seite 3 CONTENTS English........................................P4-12 Español.........................................P13-21 Deutsch........................................P22-30 Italiano.........................................P31-39 Nederlands......................................P40-48 Français.......................................P49-57 Recipes, Recetas, Rezepte, Ricette, Recepten, Recettes........................P59-105...
-
Seite 4: Inhaltsverzeichnis
TABLE OF CONTENTS Important Safeguards/Specifications ..........5-7 Care and Cleaning/Helpful Hints ............11 Parts and Accessories ................8 Limited Warranty ................12 General Operating Instructions ............9-10 Conversion Chart .................58 Asian Noodle Bowl ................60 Meatloaf .....................82 Raspberry Bread Pudding ..............62 Beef Fiesta Bowl ................84 Cheesecake .................. -
Seite 5: Important Safeguards/Specifications
The locked cooking chamber builds up heat while it seals in flavour and nutrition. The You are about to discover why so many busy food lovers are switching to Perfect Cooker™... result... meals cook faster and taste a whole lot better. - Seite 6 • CAUTION: HOT SURFACES. This appliance generates heat and escaping • When in operation, The Perfect Cooker requires sufficient air space on all sides including steam during use. Proper precautions must be taken to prevent the risk of top and bottom.
- Seite 7 SPECIFICATIONS For Perfect Cooker™ 3 Cup – 0.7L Model Model # Power Rating Functions Operating Temp Capacity °C °F Cook 100-103 212-217 RC301M - 3 Cup - 0.7L 220 - 240V, 50Hz, 200W Cook & Warm Warm 60-80 140-176 • When unit is plugged in, the WARM light will turn on.
-
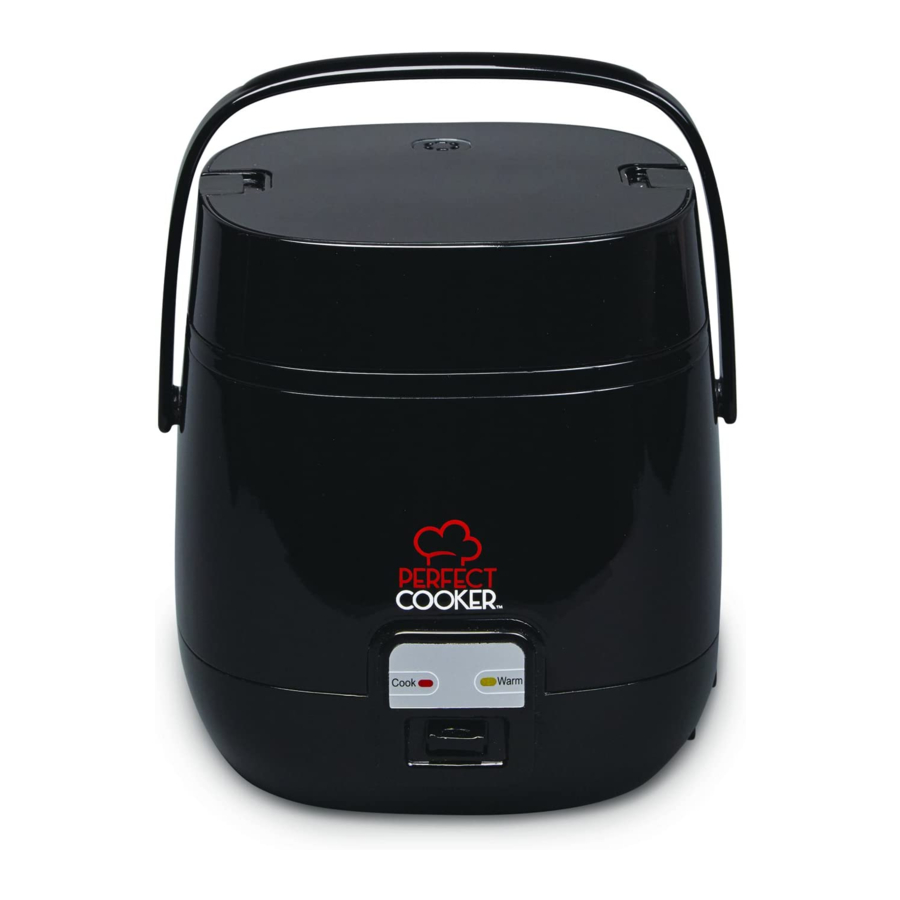
Seite 8: Parts And Accessories
PARTS & ACCESSORIES IMPORTANT: Your Perfect Cooker has been shipped with the components shown below. Check everything carefully before use. If any part is missing or damaged, do not use this product and contact shipper using the customer service number located on the back cover of the owner’s manual. -
Seite 9: Getting Started
GETTING STARTED Before using the Perfect Cooker™ for the first time, wash the Inner Pot (C), the Outer Lid (A) and the Inner Lid (B) with warm soapy water, a dish cloth or non abrasive sponge. To separate the Inner and Outer lids for cleaning, simply grasp the medium rubber gasket of the Inner Lid and pull out gently. Rinse all with clean water and dry thoroughly. -
Seite 10: Control Panel
2. Cover and lock the Outer Lid in place. Food To Go! 3. Attach AC cord to Unit Base. Prepare meals to go with your Perfect Cooker™. Great for the 4. Plug into AC outlet. office or anywhere that has a 220 – 240V electrical outlet. -
Seite 11: Care And Cleaning/Helpful Hints
CARE & CLEANING TO CLEAN: After use, unplug unit and allow to cool completely before cleaning. The Perfect Cooker™ must be cleaned thoroughly after each use in order to prevent damage caused by a build-up of food or cooking residue. -
Seite 12: Limited Warranty
The manufacturer warrants that your Perfect Cooker™ is free of defects in materials and workmanship and will, at its option, repair or replace any defective Perfect Cooker™ that is returned to it. All parts and components of the Perfect Cooker™ are warranted for 60 days from the original date of purchase. This warranty is valid only in accordance with the conditions set forth below: 1. - Seite 13 ÍNDICE Especificaciones/Precauciones importantes .......14-16 Mantenimiento y limpieza/Consejos útiles ........20 Partes y accesorios ................17 Garantía limitada ................21 Instrucciones generales de funcionamiento ......18-19 Tablas de conversión ................58 CUENCO DE FIDEOS ASIÁTICOS ............61 HAMBURGUESA DE CARNE ..............83 BUDÍN DE PAN Y FRAMBUESA ............63 FIESTA DE BOL DE TERNERA ..............85 PASTEL DE QUESO ................65 TORTILLA ....................87...
-
Seite 14: Especificaciones/Precauciones Importantes
ESTA COCEDORA ES PERFECTA... mundial. Perfect Cooker™ es la última adquisición en nuestra distinguida línea. Hemos probado y per- Para todo el mundo al que le guste la facilidad y comodidad de una comida de gourmet feccionado una combinación adecuada y garantizada de materiales, superficies para cocinar cocinada rápidamente utilizando un solo recipiente y perfecta para una o dos personas. -
Seite 15: Corriente Eléctrica
Antes de utilizar: limpie la parte inferior del recipiente interior y la superficie del • El Perfect Cooker™ genera un exceso de calor y vapor durante su funcionamiento. Se plato calentador. Introduzca el recipiente interior girándolo ligeramente hacia la derecha y deberán tomar todas las precauciones necesarias para evitar cualquier riesgo de incendios,... - Seite 16 ESPECIFICACIONES Para Perfect Cooker™ 3 tazas de 0,7 L Nº de modelo Potencia Funciones Temperatura de Capacidad funcionamiento °C °F Cook 100-103 212-217 Cocción (Cook) RC301M - 3 Cup - 0.7L 220 - 240V, 50Hz, 200W Calentar (Warm) Warm 60-80 140-176 •...
-
Seite 17: Partes Y Accesorios
PARTES Y ACCESORIOS IMPORTANTE: Su Perfect Cooker™ ha sido enviado con los componentes que se muestran más abajo. Compruebe todo cuidadosamente antes de utilizar. Si faltara cualquier parte o estuviera dañada, no utilice este producto y póngase en contacto con el expedidor utilizando el número de atención al cliente indicado en la parte trasera del manual de usuario. -
Seite 18: Puesta En Marcha
PUESTA EN MARCHA Antes de utilizar el Perfect Cooker™ por primera vez, lave el recipiente interior (C), la tapadera exterior (A) y la tapadera interior (B) con agua templada y jabón, un paño o una esponja no abrasiva. Para separar la tapadera interior de la exterior para su limpieza, simplemente sujete la junta de goma del medio de la tapadera interior y tire suavemente. -
Seite 19: Panel De Control
2. Cubra y ajuste la tapadera exterior pertinentemente. ¡Comida para llevar! 3. Conecte el cable CA a la unidad base. Prepare comida para llevar con su Perfect Cooker™. Perfecto 4. Enchufe a la toma eléctrica. para la oficina o para cualquier lugar donde haya una toma de 220-240 V. -
Seite 20: Mantenimiento Y Limpieza
MANTENIMIENTO Y LIMPIEZA PARA LIMPIAR: Después de utilizar, desenchufar la unidad y dejar que se enfríe totalmente antes de limpiar. El Perfect Cooker™ debe limpiarse exhaustivamente después de cada uso para evitar daños por una acumulación de alimentos o residuos. -
Seite 21: Garantía Limitada
El fabricante garantiza que Perfect Cooker™ se suministra sin desperfectos en sus materiales y fabricación y, asimismo, garantiza, a su discreción, reparar o reemplazar cualquier parte defectuosa del Perfect Cooker™ que se le envíe. Todas las partes y componentes del Perfect Cooker™ cuentan con una garantía de 60 días desde la fecha original de compra. - Seite 22 INHALTSVERZEICHNIS Wichtige Sicherheitshinweise/Spezifikationen ......23-25 Pflege und Reinigung/Hilfreiche Tipps ..........29 Teile und Zubehör ................26 Beschränkte Garantie ................30 Allgemeine Bedienungshinweise ..........27-28 Umrechnungstabellen ................58 ASIATISCHER NUDELTOPF ..............61 HACKBRATEN ..................83 HIMBEER-BROTPUDDING ..............63 BEEF FIESTA BOWL ................85 KÄSEKUCHEN ..................65 OMELETT .....................87 PEPERONI-CALZONE ................67 LACHS ....................89 FETTUCCINE ALFREDO ................69 ZUPFBRATEN ..................
-
Seite 23: Wichtige Sicherheitshinweise
DIESES GERÄT IST PERFEKT... Der Perfect Cooker™ ist das neueste Produkt in unserem gediegenen Angebot. Wir haben die richtige Kombination von Materialien, Kochflächen und elektronischer Technologie Für alle, die unkomplizierten Komfort zu schätzen wissen: schnell zubereitete Gour- sorgfältig getestet und perfektioniert, um jedes Mal perfekte Ergebnisse zu garantieren. - Seite 24 Inbetriebnahme: Die Unterseite des Innentopfs und die Oberflächen der Heizplatte reinigen. Den • Der Perfect Cooker™ entwickelt bei der Verwendung sehr hohe Temperaturen und Dampf. Alle Innentopf ins Gerät geben, vorsichtig im und gegen den Uhrzeigersinn drehen, bis Sie sicher sind, erforderlichen Sicherheitsvorkehrungen müssen befolgt werden, um Brände, Verbrennungen und...
-
Seite 25: Spezifikationen
SPEZIFIKATIONEN Für den Perfect Cooker™ 3 Tassen – 0,7 l Modell Modellnr. Nennleistung Funktionen Betriebstemperatur Fassungsvermögen °C °F Cook 100-103 212-217 Garen (Cook) RC301M - 3 Cup - 0.7L 220 - 240V, 50Hz, 200W Warmhalten (Warm) Warm 60-80 140-176 • Wenn das Gerät eingesteckt ist, schaltet sich die WARM-Leuchte (Warmhalten) ein •... -
Seite 26: Teile & Zubehör
TEILE & ZUBEHÖR WICHTIG: Ihr Perfect Cooker™ wird mit den unten angeführten Teilen geliefert. Überprüfen Sie vor der Inbetriebnahme alles sorgfältig. Wenn ein Teil fehlt oder beschädigt sein sollte, verwenden Sie das Produkt nicht. Kontaktieren Sie den Lieferanten über die Kundendienstnummer, die Sie auf der Rückseite des Benutzerhandbuchs finden. - Seite 27 INBETRIEBNAHME Vor der ersten Inbetriebnahme des Perfect Cooker™ waschen Sie den Innentopf (C), den Außendeckel (A) und den Innendeckel (B) mit warmem Seifenwasser, einem Reinigungstuch oder einem nicht scheuernden Schwamm. Um den Innen- und Außendeckel zur Reinigung auseinanderzunehmen, einfach die mittelgroße Gummidichtung des Innendeckels nehmen und vorsichtig herausziehen.
-
Seite 28: Bedienfeld
„Cook“-LED-Anzeige, die Kontrolltaste schaltet in die „Aus“-Position und die „Warm“-LED-Anzeige schaltet sich automatisch ein. Der Hinweis: Nach dem Erhitzen Vorsicht beim Anfassen des Perfect Cooker™ hält die Mahlzeit warm, bis Sie bereit sind, sie zu servieren. Deckels und Innentopfs walten lassen. -
Seite 29: Reinigung
• Bei Mahlzeiten, die besonders süß oder fettig sind, kann der Perfect Cooker früher als gewünscht auf WARMHALTEN schalten. In diesem Fall fügen Sie mehr Flüssigkeit hinzu. • Beim Backen im Perfect Cooker ist es üblicherweise notwendig, mehr als einmal auf COOK (Garen) zu drücken. Sie müssen ungefähr 5 Minuten lang warten, nachdem das Gerät auf WARM (Warmhalten) schaltet, bevor Sie erneut auf COOK schalten können. -
Seite 30: Beschränkte Herstellergarantie
Der Hersteller garantiert, dass Ihr Perfect Cooker™ frei von Material- und Herstellungsfehlern ist. Der Hersteller wird nach eigenem Ermessen jeglichen defekten Perfect Cooker™, der an ihn zurückgesendet wird, reparieren oder ersetzen. Alle Teile und Komponenten des Perfect Cooker™ sind 60 Tage lang ab dem ursprünglichen Kaufdatum gewährleistet. - Seite 31 INDICE Norme di sicurezza importanti/Caratteristiche principali ..32-34 Manutenzione e pulizia/Consigli utili ..........38 Componenti e accessori ..............35 Garanzia limitata ................39 Istruzioni d’uso ................36-37 Tabelle di conversione ...............58 NOODLE ASIATICI ................61 POLPETTONE ..................83 BUDINO DI PANE AI LAMPONI ............63 FIESTA DI MANZO SERVITA IN CIOTOLA PER TACO ......85 CHEESECAKE ..................65 FRITTATA ....................87 CALZONE AL SALAME PICCANTE ............67...
-
Seite 32: Norme Di Sicurezza Importanti/Caratteristiche Principali
IL MULTICOOKER È PERFETTO... il Multicooker perfetto™ è l’ultimissima aggiunta alla nostra esclusiva linea. Abbiamo testato e perfezionato la giusta combinazione di materiali, superfici di cottura e tecnologia elettrica per chi ama la semplicità e la convenienza di cucinare velocemente deliziosi piatti realizzati garantendo risultati perfetti, cottura dopo cottura. - Seite 33 seguire attentamente la ricetta per tali ingredienti e, come regola di base, non riempire l’unità oltre contenute nel presente manuale, non potrà utilizzare o pulire l’ e lettrodomestico. la metà. Riempire eccessivamente l’apparecchio potrebbe causare intasamenti, permettendo lo • Qualora l’apparecchio dovesse cadere o essere immerso accidentalmente in acqua, staccare sviluppo di pressione in eccesso.
-
Seite 34: Caratteristiche Tecniche
CARATTERISTICHE TECNICHE Per il Multicooker perfetto™ 3 misurini - 0,7 litri Capacità del Portata di Funzioni Temperatura di modello # alimentazione funzionamento °C °F Cook (Cottura) Cook 100-103 212-217 RC301M - 3 Cup - 0.7L 220 - 240V, 50Hz, 200W Warm Warm 60-80 140-176 (Riscaldamento) -
Seite 35: Componenti E Accessori
COMPONENTI E ACCESSORI IMPORTANTE: il Multicooker perfetto™ ha in dotazione i componenti di seguito mostrati. Prima dell’uso, controllare tutto molto attentamente. Nel caso in cui un componente risulti mancante o sia danneggiato, non utilizzare il prodotto e contattare il corriere utilizzando il numero di assistenza clienti riportato sul retro della copertina del presente manuale. -
Seite 36: Guida Introduttiva
GUIDA INTRODUTTIVA Prima di utilizzare per la prima volta il Multicooker perfetto™, lavare il recipiente interno (C), il coperchio esterno (A) e il coperchio interno (B) con acqua calda e detergente neutro e con un panno o una spugnetta non abrasiva. Per separare e lavare il coperchio esterno e quello interno, afferrare la guarnizione in gomma del coperchio interno e tirare delicatamente. -
Seite 37: Pannello Di Controllo
PANNELLO DI CONTROLLO UN UNICO PULSANTE DI CONTROLLO PER TUTTE LE TUE RICETTE! IMPORTANTE: quando il piatto è pronto, scollegare la spina dalla presa elettrica. Utilizzando guanti da forno e presine, aprire le chiusure ermetiche del coperchio e rimuovere il coperchio esterno. Utilizzando il APRIRE IL mestolo fornito in dotazione, servire la pietanza in un piatto di portata. -
Seite 38: Manutenzione E Pulizia/Consigli Utili
MANUTENZIONE E PULIZIA PULIZIA: dopo l’uso, scollegare e far raffreddare completamente l’unità prima di procedere alla pulizia. Il Multicooker perfetto™ deve essere pulito accuratamente dopo ogni utilizzo al fine di evitare danni causati dall’accumulo di residui di alimenti. Attenzione: non immergere mai l’unità base in acqua o altri liquidi. Prima di pulire l’unità... -
Seite 39: Garanzia Limitata
GARANZIA LIMITATA DEL PRODUTTORE Il produttore garantisce che il Multicooker perfetto™ è privo di difetti di materiale e fabbricazione e, a sua discrezione, riparerà o sostituirà qualunque Multicooker perfetto™ difettoso che sarà restituito. Tutti i componenti del Multicooker perfetto™ sono garantiti per 60 giorni dalla data di acquisto. La presente garanzia è valida solo in conformità... - Seite 40 INHOUDSOPGAVE Belangrijke voorzorgsmaatregelen/specificaties ......41-43 Verzorging en reiniging/nuttige tips ..........47 Onderdelen en accessoires ...............44 Beperkte garantie ................48 Algemene gebruiksaanwijzingen ..........45-46 Conversietabellen ................58 KOM MET AZIATISCHE NOEDELS ............61 GEHAKTBROOD ..................83 FRAMBOZENBROODPUDDING ............63 RUNDVLEESFIESTA ................85 KAASTAART ..................65 OMELET ....................87 PEPPERONI CALZONE .................67 ZALM ....................89 FETTUCCINE ALFREDO ................69 PULLED PORK ..................
-
Seite 41: Belangrijke Voorzorgsmaatregelen/Specificaties
DEZE PAN IS PERFECT… Perfect Cooker™ is het nieuwste product in ons gedistingeerde assortiment. We hebben de juiste combinatie van materialen, kookoppervlakken en elektronische technologie Voor iedereen die de eenvoud en het gemak van snel bereide heerlijke maaltijden in één waarmee elke keer weer de beste resultaten worden bereikt getest en geperfectioneerd. -
Seite 42: Elektrische Voeding
• Er moet bij het gebruik van de Perfect Cooker™ voldoende ruimte rondom het apparaat zijn, • VOORZICHTIG: HETE OPPERVLAKKEN. Dit apparaat ontwikkelt hitte en er ontsnapt stoom tijdens het inclusief de boven- en onderkant. -
Seite 43: Specificaties
SPECIFICATIES Voor Perfect Cooker™ model 3 cup – 0,7 l Modelnummer Voeding Functies Bedrijfstemperatuur Capaciteit °C °F Cook 100-103 212-217 Cook (Koken) RC301M - 3 Cup - 0.7L 220 - 240V, 50Hz, 200W Warm Warm 60-80 140-176 • Als het apparaat op de voeding wordt aangesloten, gaat het lampje WARM branden. -
Seite 44: Onderdelen En Accessoires
ONDERDELEN & ACCESSOIRES BELANGRIJK: Uw Perfect Cooker™ wordt geleverd met de hieronder afgebeelde component- en. Controleer alles zorgvuldig voorafgaande aan het gebruik. Als een onderdeel ontbreekt of beschadigd is, gebruik het product dan niet en neem contact op met de leverancier met behulp van het klantenservicenummer op de achteromslag van de gebruikershandleiding. -
Seite 45: Aan De Slag
AAN DE SLAG Als u de Perfect Cooker™ voor het eerst gaat gebruiken, was dan eerst de inwendige pan (C), het uitwendige deksel (A) en het inwendige deksel (B) met een warm sopje, een vaatdoek of een niet schurend sponsje. U scheidt het inwendige en uitwendige deksel van elkaar voor reiniging door de rubberen pakking van het inwendige deksel voorzichtig naar buiten te trekken. -
Seite 46: Bedieningspaneel
LED Cook uit, de bedieningsknop gaat naar de stand UIT tact om het eten op te warmen als u zover bent. en de LED Warm gaat automatisch branden. De Perfect Cooker™ houdt het eten Opmerking: Wees voorzichtig als u het deksel en de inwen- warm totdat u zover bent om het op te dienen. -
Seite 47: Verzorging & Reiniging
VERZORGING & REINIGING REINIGING: Trek na gebruik de stekker uit het stopcontact en laat de eenheid volledig afkoelen voordat u deze gaat reinigen. De Perfect Cooker™ moet grondig worden gereinigd na elk gebruik om schade te voorkomen die kan ontstaan door opeenhoping van voedselresten. -
Seite 48: Beperkte Garantie
BEPERKTE GARANTIE VAN DE FABRIKANT De fabrikant garandeert dat uw Perfect Cooker™ vrij is van materiaal- of fabricagefouten en zal naar eigen goeddunken een defecte Perfect Cooker™ die wordt geretourneerd repareren of vervangen. Op alle onderdelen en componenten van de Perfect Cooker™ is een garantie van 60 dagen vanaf de oorspronkelijke datum van aankoop van toepassing. - Seite 49 TABLE DES MATIÈRES Consignes de sécurité/spécifications importantes ....50-52 Entretien et nettoyage/astuces utiles ..........56 Pièces et accessoires ................. 53 Garantie limitée .................57 Consignes d’utilisation générales ..........54-55 Tableaux de conversion ..............58 NOUILLES ASIATIQUES ............... 61 PAIN DE VIANDE ................83 PUDDING AU PAIN ET AUX FRAMBOISES ..........63 FIESTA DE BOEUF ................85 CHEESECAKE ..................65...
-
Seite 50: Consignes De Sécurité/Spécifications Importantes
CE CUISEUR EST PARFAIT… Perfect Cooker™ est le tout dernier appareil de notre gamme. Nous avons testé et perfec- tionné la combinaison appropriée de matériaux, les surfaces de cuisson et la technologie Pour les personnes qui aiment pouvoir préparer facilement, rapidement et de manière électronique qui garantissent des résultats parfaits à... -
Seite 51: Alimentation Électrique
Introduire le récipient intérieur en le faisant tourner légèrement dans le sens horaire puis • Le Perfect Cooker™ génère beaucoup de chaleur et de vapeur pendant son fonctionnement. antihoraire jusqu’à ce que vous soyez sûr qu’il est bien en place sur la plaque chauffante. Dans le Toutes les précautions nécessaires doivent être prises pour éviter les incendies, les brûlures et... - Seite 52 SPÉCIFICATIONS Pour le modèle Perfect Cooker™ 3 tasses – 0,7 l Capacité du Puissance nominale Fonctions Température de modèle nº fonctionnement °C °F Cuire (Cook) Cook 100-103 212-217 RC301M - 3 Cup - 0.7L 220 - 240V, 50Hz, 200W maintenir chaud...
-
Seite 53: Pièces Et Accessoires
PIÈCES ET ACCESSOIRES IMPORTANT: Votre Perfect Cooker™ a été expédié avec les pièces indiquées ci-dessous. Vérifier attentivement toutes les pièces avant utilisation. S’il en manque ou si elles sont endommagées, ne pas utiliser ce produit et contacter l’expéditeur en vous adressant au numéro du service clients situé au dos du manuel d’utilisateur. -
Seite 54: Pour Commencer
POUR COMMENCER Avant d’utiliser le Perfect Cooker™ pour la première fois, laver le récipient intérieur (C), le couvercle extérieur (A) et le couvercle intérieur (B) avec de l’eau savonneuse tiède, un torchon ou une éponge non abrasive. Afin de séparer les couvercle intérieur et extérieur pour les nettoyer, attraper simplement le joint en caoutchouc du milieu du couvercle intérieur et tirer doucement. -
Seite 55: Écran De Commande
OFF et le voyant LED Maintenir chaud s’allume automa- Remarque : Prenez des précautions lors de la manipulation tiquement. Le Perfect Cooker™ maintient le plat chaud jusqu’à ce que vous soyez du couvercle et du récipient intérieur après le réchauffage. -
Seite 56: Entretien Et Nettoyage/Astuces Utiles
ENTRETIEN ET NETTOYAGE POUR LE NETTOYAGE : Après utilisation, débrancher l’appareil et le laisser refroidir entièrement avant de le nettoyer. Le Perfect Cooker™ doit être entièrement nettoyé après chaque utilisation afin d’éviter tout dommage dû à l’accumulation de nourriture ou de résidus de cuisson. -
Seite 57: Garantie Limitée
Le fabricant garantit votre Perfect Cooker™ contre tout défaut de matériaux et main-d’œuvre et il réparera ou remplacera, à sa discrétion, tout Perfect Cooker™ dé- fectueux qui lui est retourné. Toutes les pièces ou composants du Perfect Cooker™ sont garanties pendant 60 jours à compter de la date initiale d’achat. Cette garantie est uniquement valable conformément aux conditions fixées ci-dessous :... -
Seite 58: Conversion Chart
CONVERSION TABLES, TABLAS DE CONVERSIÓN, UMRECHNUNGSTABELLEN, TABELLE DI CONVERSIONE, CONVERSIETABELLEN, TABLEAUX DE CONVERSION MEASUREMENT TABLE LIQUID CONVERSIONS CUPS GRAMS IMPERIAL METRIC AMERICAN 1/8 cup (2 Tablespoons) 1/2 fl oz 15 ml 1 tbsp 1/4 cup 1 fl oz 30 ml 1/8 cup 1/3 cup 2 fl oz... - Seite 59 RECIPES In many of the following recipes, we have a technique for using the cook feature. Once you press the Cook button, the unit will heat up. When the unit has reached the allotted temperature, it will switch over to keep warm. At this point, there is still enough heat left to continue cooking the food inside.
-
Seite 60: Asian Noodle Bowl
2 oz. rice noodles (dry - rolled up) 1 cup chicken stock 2 tbsp. red miso paste • Place the Inner Pot into the Perfect Cooker. • Add the chicken stock, and miso mix. • Add in the rest of the ingredients . -
Seite 61: Cuenco De Fideos Asiáticos
• Posizionare il recipiente interno nel • Verser le bouillon de poulet et le • Coloque el recipiente interior en el • Innentopf in den Perfect Cooker geben. Multicooker perfetto. mélange de miso. • Plaats de inwendige pan in de Perfect Perfect Cooker. -
Seite 62: Raspberry Bread Pudding
• Add in the butter and melt, then add in bread mixture. • Place the Lid on the Perfect Cooker, lock in place and press down on the Cook button. • After 12 minutes, carefully remove Inner Pot from PC and flip over Bread Pudding. -
Seite 63: Budín De Pan Y Frambuesa
Perfect Cooker geben und auf die Gar- druk op de knop Cook. • Bien vaporiser l’intérieur du récipient Colóquelo en el Perfect Cooker y pulse el • Ungere il recipiente interno. Posizionare Taste drücken. avec de l’huile. Placer le récipient intérieur botón de Cocinar (Cook). -
Seite 64: Cheesecake
• Mix in the cream cheese and vanilla until smooth. • Place the Inner Pot into the Perfect Cooker, rub butter on the walls of the Inner Pot. • Pour the cream cheese mixture into the Inner Pot. -
Seite 65: Pastel De Queso
• Mélanger le formage en crème et la hasta conseguir una textura uniforme. e l’estratto di vaniglia fino a ottenere un vanille jusqu’à obtention d’un mélange • Innentopf in den Perfect Cooker geben • Plaats de inwendige pan in de Perfect composto omogeneo. homogène. -
Seite 66: Pepperoni Calzone
Roll out the dough thin. Layer all the ingredients on the dough on one side. Fold over and seal everything in. • Place the Inner Pot into the Perfect Cooker. • Place in the Inner Pot. • Secure the Lid and Press the Cook Button. -
Seite 67: Calzone De Pepperoni
Perfect Cooker. strato, su un lato dell’impasto. Alzare maak de deegrand dicht. • Den Innentopf in den Perfect Cooker • Placer dans le récipient intérieur. l’impasto da un lato e coprire il ripieno • Coloque el recipiente interior en el geben. -
Seite 68: Fettuccine Alfredo
1/2 cup water 1/4 cup grated Parmesan cheese Dash salt and pepper • Place the Inner Pot into the Perfect Cooker. • Add in all the ingredients and mix. • Secure the Lid and Press the Cook Button. • At 12-15 minutes, the pasta, the pasta is al dente. -
Seite 69: Fettuccine Alfredo
1/4 de tasse de Parmesan Un pizzico di sale e pepe Pincée de sel et poivre • Coloque el recipiente interior en el • Innentopf in den Perfect Cooker geben. • Plaats de inwendige pan in de Perfect Perfect Cooker. Cooker. -
Seite 70: Chicken Pot Pie
8 oz. peas and carrots (frozen) 2 cups heavy cream 4 small biscuits • Place the Inner Pot into the Perfect Cooker. • Place the biscuits in the Inner Pot, around the sides and bottom. • Mix the soup, chicken, peas and carrots and place into the biscuit. -
Seite 71: Pastel De Pollo
• Plaats de inwendige pan in de Perfect 4 petits biscuits Cooker. • Coloque el recipiente interior en el • Innentopf in den Perfect Cooker geben. • Posizionare il recipiente interno nel Perfect Cooker. • Plaats de biscuitjes in de inwendige pan •... -
Seite 72: Penne Alla Vodka
1 oz. grated cheese Dash salt and pepper • Place the Inner Pot into the Perfect Cooker. • Fill the inner liner with pasta to the 1 cup draw line. • Mix the liquids together: crushed tomato, vodka, cream, and stock. -
Seite 73: Penne Alla Vodka
Snufje peper en zout Pincée de sel et poivre • Coloque el recipiente interior en el • Den Innentopf in den Perfect Cooker • Posizionare il recipiente interno nel • Plaats de inwendige pan in de Perfect • Placer le récipient intérieur dans le Perfect Cooker. -
Seite 74: Jambalaya
1 tbsp. olive oil 1 tsp. Cajun spice Salt and pepper to taste • Place the Inner Pot into the Perfect Cooker. • Add in the oil, chicken, Andouille, and brown the meat. • Add the flour. Stir to incorporate the flour. -
Seite 75: Jambalaya
• Coloque el recipiente interior en el • Posizionare il recipiente interno nel Perfect Cooker. Multicooker perfetto. • Innentopf in den Perfect Cooker geben. • Voeg nu de olie, kip en Andouille toe en • Verser l’huile, ajouter le poulet, bruin het vlees. -
Seite 76: Mac And Cheese
1 cup shredded cheddar and 1/2 cup on top 1/2 tsp. cornstarch Dash salt and pepper • Place the Inner Pot into the Perfect Cooker. • Place all the ingredients into the Inner Pot. • Secure the Lid and press the Cook button. -
Seite 77: Macarrones Con Queso
Perfect Cooker. 1/2 cucchiaino di amido di mais • Coloque el recipiente interior en el • Innentopf in den Perfect Cooker geben. • Plaats de inwendige pan in de Perfect • Placer tous les ingrédients dans le Un pizzico di sale e pepe Perfect Cooker. -
Seite 78: Lasagna
LASAGNA 5 no bake lasagna sheets, 3 meatballs, sliced, 12 oz. pasta sauce, 1 egg, 1 cup ricotta cheese, 2 tbsp. Parmesan cheese, 1/4 cup mozzarella, shredded • Place the sheets of pasta in hot water to soften, 5 minutes. • Mix the cheeses and the egg together. • Mix 3/4 cup of sauce with sliced meatballs. • Pour in 1/2 cup sauce into the Inner Pot on the bottom. • Shake off excess water from the lasagna and lay the sheets on the bottom and up the sides. -
Seite 79: Egg Muffin
English muffin over the cheese. • Place the Lid on the Perfect Cooker. Lock in place and press down on the Cook button. • Cook 12 min then flip over. Cook 10 min. -
Seite 80: Oatmeal
1 cup water 4 oz. steel cut oatmeal pinch of salt • Place the Inner Pot into the Perfect Cooker. • Add in the water. • Secure the lid and Press the Cook Button. • When the water is boiling, add in the oatmeal and stir. -
Seite 81: Avena
4 oz. di fiocchi d’avena Snufje zout Un pizzico di sale • Coloque el recipiente interior en el • Innentopf in den Perfect Cooker geben. • Placer le récipient intérieur dans le Perfect Cooker. Perfect Cooker. • Plaats de inwendige pan in de Perfect •... -
Seite 82: Meatloaf
Flip it over and return to Inner Pot. • Spread ketchup over the top. • Place the Lid on the Perfect Cooker, lock in place and press down on the cook button and cook for 15 minutes. • Remove and serve. -
Seite 83: Hamburguesa De Carne
Cuire den Innentopf zurückgeben. • Coloque la tapadera en el Perfect Cooker, uit de Perfect Cooker. Keer het om en leg premere verso il basso il pulsante COOK (Cook). ajuste bien y pulse el botón de Cocinar het terug in de inwendige pan. -
Seite 84: Beef Fiesta Bowl
1/3 cup rice 8 oz. (fiesta mix) frozen black beans, corn, onions, peppers • Place the Inner Pot into the Perfect Cooker. • Add in all the ingredients. Mix. • Secure the Lid and press the Cook button once. Cook for 15 minutes. -
Seite 85: Fiesta De Bol De Ternera
8 oz. di (fiesta mix) fagioli neri, mais, • Ajouter tous les ingrédients. Mélanger. Cooker. • Coloque el recipiente interior en el • Innentopf in den Perfect Cooker geben. cipolle, peperoni surgelati • Fermer le couvercle et appuyer sur le Perfect Cooker. -
Seite 86: Omelette
In a bowl, crack the eggs and whip until smooth. Add in the rest of the ingredients. • Place the Inner Pot into the Perfect Cooker, and press down on the Cook button. • Add in the olive oil, add in egg mixture. -
Seite 87: Tortilla
Perfect Cooker, and appuyer sur le bouton • Coloque el recipiente interior en el Cuire (Cook). Perfect Cooker y pulse el botón de Cocinar • Olivenöl hinzufügen, die Eimischung • Posizionare il recipiente interno nel • Voeg de olijfolie toe en het eimengsel. -
Seite 88: Salmon
SALMON 2- 4 oz. filets of salmon 2 oz. chili glaze • Place the Inner Pot into the Perfect Cooker. • Place the salmon into the Inner Pot, pour the glaze over the salmon. • Secure the Lid and press the Cook button. -
Seite 89: Salmón
2 oz. chiliglazuur 2 oz. de glaçage au chili • Coloque el recipiente interior en el • Innentopf in den Perfect Cooker geben. • Posizionare il recipiente interno nel • Plaats de inwendige pan in de Perfect • Placer le récipient intérieur dans le Perfect Cooker. -
Seite 90: Pulled Pork
1 onion, chopped 1 tsp. garlic powder 1 tsp. olive oil • Place the Inner Pot into the Perfect Cooker, and press down on the Cook button. • Add the olive oil, and brown the meat. • Add the rest of the ingredients. -
Seite 91: Cerdo Desmenuzado
Cuire (Cook). und auf die Gar-Taste drücken. Cooker en druk op de knop Cook. Perfect Cooker y pulse el botón de Cocinar • Posizionare il recipiente interno nel • Ajouter l’huile d’olive et faire dorer la • Olivenöl hinzufügen und das Fleisch •... -
Seite 92: Shrimp Scampi
1 tbsp. chopped parsley 6 cloves garlic, chopped Dash salt and pepper • Place the Inner Pot into the Perfect Cooker, press the Cook button. • Melt the butter with the garlic for 5 minutes. • Add the rest of the ingredients. Secure the Lid. -
Seite 93: Langostinos Rebozados
• Innentopf in den Perfect Cooker geben, • Plaats de inwendige pan in de Perfect Cuire (Cook). Perfect Cooker y pulse el botón de Cocinar auf die Gar-Taste drücken. Cooker; druk op de knop Cook. • Posizionare il recipiente interno nel •... -
Seite 94: Shepherd's Pie
1 Tbsp. Worcestershire sauce 1 Tbsp. BBQ Sauce 1 cup frozen peas and carrots • Place the Inner Pot into the Perfect Cooker. • Place all the ingredients into the Inner Pot, top with the mashed potatoes. • Secure the Lid and press the Cook button. -
Seite 95: Shepherd's Pie
• Plaats de inwendige pan in de Perfect 1 cucchiaio di salsa Worcestershire 1 tasse de petits pois et carottes Cooker. • Innentopf in den Perfect Cooker geben. 1 cucchiaio di salsa barbeque congelés • Coloque el recipiente interior en el •... -
Seite 96: Turkey Chili
1/2 tsp. cumin 1/2 tsp. sugar Dash salt and pepper • Place the Inner Pot into the Perfect Cooker. • Add the turkey, press the Cook button. Brown meat, drain off fat. • Add in the rest of the ingredients. -
Seite 97: Pavo Con Chile
1/2 theelepel suiker Sal y pimienta Un pizzico di sale e pepe Snufje zout en peper • Innentopf in den Perfect Cooker geben. • Placer le récipient intérieur dans le Perfect Cooker. • Coloque el recipiente interior en el • Pute hinzufügen, auf die Gar-Taste •... -
Seite 98: Meatballs
MEATBALLS Frozen meatballs Pasta sauce Dash salt and pepper • Place the Inner Pot into the Perfect Cooker. • Place all the ingredients into the Inner Pot. • Secure the Lid and press the Cook button. -
Seite 99: Albóndigas
• Coloque el recipiente interior en el • Plaats de inwendige pan in de Perfect Perfect Cooker. Cooker. • Innentopf in den Perfect Cooker geben. • Posizionare il recipiente interno nel • Placer le récipient intérieur dans le • Coloque todos los ingredientes en el •... -
Seite 100: White Rice
WHITE RICE 6 oz. rice 8 oz. water • Place the Inner Pot into the Perfect Cooker. • Add in the rice and the water. • Secure the Lid and press the Cook button once. Basmati rice 1-1/2 cup rice... -
Seite 101: Arroz Blanco
8 oz. water 8 oz. d’eau • Coloque el recipiente interior en el • Innentopf in den Perfect Cooker geben. • Posizionare il recipiente interno nel Plaats de inwendige pan in de Perfect • Placer le récipient intérieur dans le Perfect Cooker. -
Seite 102: Lava Brownie
1 tbsp. thick caramel sauce • In a mixing bowl follow directions from the box. • Place the Inner Pot into the Perfect Cooker. • Pour half of the mix into the Inner Pot. Next, add the caramel in the center, then pour the rest of the batter over the caramel. -
Seite 103: Lava Brownie
• In una ciotola, seguire le istruzioni • Dans un saladier, suivre les consignes instrucciones del paquete. Cooker. • Innentopf in den Perfect Cooker geben. riportate sulla confezione. du paquet. • Coloque el recipiente interior en el • Giet de helft van het mengsel in de •... -
Seite 104: Beef Stew
1/2 onion, chopped 1 tbsp. olive oil for sautéing the meat 1/4 cup peas, frozen • Place the Inner Pot into the Perfect Cooker, and press down on the Cook button. • Add the olive oil, and brown the meat, drain any excess fat. -
Seite 105: Estofado De Ternera
1/4 Tasse Erbsen, tiefgefroren 1/4 de tasse de petits pois, congelés • Coloque el recipiente interior en el Perfect Cooker y pulse el botón de Cocinar • Posizionare il recipiente interno nel • Plaats de inwendige pan in de Perfect (Cook). - Seite 106 Wij zijn erg trots op het ontwerp en de kwaliteit van onze Perfect Cooker™. Dit apparaat is geproduceerd volgens de hoogste normen. Nous sommes très fiers du design et de la qualité de notre Perfect Cooker™. Ce produit a été fabriqué conformément aux plus hauts niveaux de qualité.