Inhaltsverzeichnis
Werbung
Verfügbare Sprachen
Verfügbare Sprachen
Quicklinks
Copyright Notice:
Copyright Notice:
Copyright Notice:
Copyright Notice:
Copyright Notice:
No part of this installation guide may be reproduced, transcribed, transmitted, or trans-
lated in any language, in any form or by any means, except duplication of documen-
tation by the purchaser for backup purpose, without written consent of ASRock Inc.
Products and corporate names appearing in this guide may or may not be registered
trademarks or copyrights of their respective companies, and are used only for identifica-
tion or explanation and to the owners' benefit, without intent to infringe.
Disclaimer:
Disclaimer:
Disclaimer:
Disclaimer:
Disclaimer:
Specifications and information contained in this guide are furnished for informational
use only and subject to change without notice, and should not be constructed as a
commitment by ASRock. ASRock assumes no responsibility for any errors or omissions
that may appear in this guide.
With respect to the contents of this guide, ASRock does not provide warranty of any kind,
either expressed or implied, including but not limited to the implied warranties or
conditions of merchantability or fitness for a particular purpose. In no event shall
ASRock, its directors, officers, employees, or agents be liable for any indirect, special,
incidental, or consequential damages (including damages for loss of profits, loss of
business, loss of data, interruption of business and the like), even if ASRock has been
advised of the possibility of such damages arising from any defect or error in the guide
or product.
This device complies with Part 15 of the FCC Rules. Operation is subject to the
following two conditions:
(1) this device may not cause harmful interference, and
(2) this device must accept any interference received, including interference that
may cause undesired operation.
CALIFORNIA, USA ONLY
The Lithium battery adopted on this motherboard contains Perchlorate, a toxic
substance controlled in Perchlorate Best Management Practices (BMP) regulations
passed by the California Legislature. When you discard the Lithium battery in
California, USA, please follow the related regulations in advance.
"Perchlorate Material-special handling may apply, see
www.dtsc.ca.gov/hazardouswaste/perchlorate"
ASRock Website: http://www.asrock.com
Copyright©2010 ASRock INC. All rights reserved.
ASRock
Published April 2010
870 Extreme3
Motherboard
1 1 1 1 1
Werbung
Inhaltsverzeichnis

Verwandte Anleitungen für ASROCK 870 Extreme3


Inhaltszusammenfassung für ASROCK 870 Extreme3
- Seite 1 ASRock. ASRock assumes no responsibility for any errors or omissions that may appear in this guide. With respect to the contents of this guide, ASRock does not provide warranty of any kind, either expressed or implied, including but not limited to the implied warranties or conditions of merchantability or fitness for a particular purpose.
-
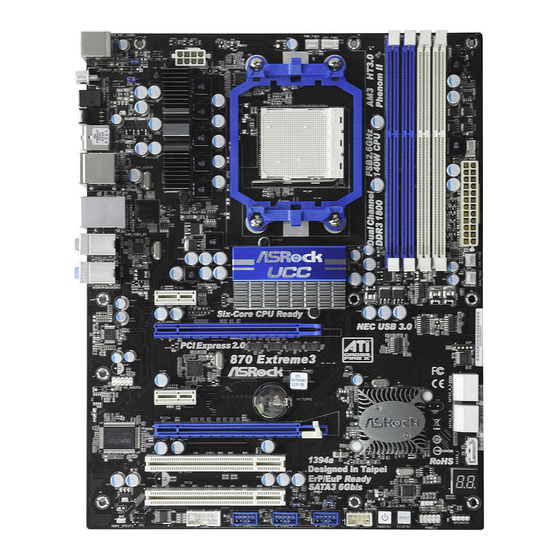
Seite 2: Motherboard-Layout
SATA3 Connector (SATA3_1, White) (HD_AUDIO1, White) Dr. Debug (LED) PCI Express 2.0 x16 Slot (PCIE2; Blue) Power LED Header (PLED1) PCI Express 2.0 x1 Slot (PCIE1; White) Chassis Speaker Header (SPEAKER 1, White) 2 2 2 2 2 ASRock 870 Extreme3 Motherboard... - Seite 3 “ok”. Choose “2CH”, “4CH”, “6CH”, or “8CH” and then you are allowed to select “Realtek HDA Primary output” to use Rear Speaker, Central/Bass, and Front Speaker, or select “Realtek HDA Audio 2nd output” to use front panel audio. 3 3 3 3 3 ASRock 870 Extreme3 Motherboard...
-
Seite 4: Package Contents
In case any modifications of this manual occur, the updated version will be available on ASRock website without further notice. You may find the latest VGA cards and CPU support lists on ASRock website as well. ASRock website http://www.asrock.com If you require technical support related to this motherboard, please visit our website for specific information about the model you are using. - Seite 5 Rear Panel I/O I/O Panel - 1 x PS/2 Keyboard Port - 1 x Coaxial SPDIF Out Port - 1 x Optical SPDIF Out Port - 6 x Ready-to-Use USB 2.0 Ports 5 5 5 5 5 ASRock 870 Extreme3 Motherboard...
- Seite 6 - Drivers, Utilities, AntiVirus Software (Trial Version), AMD OverDrive Utility, AMD Fusion, AMD Fusion Media Explorer, ASRock Software Suite (CyberLink DVD Suite - OEM and Trial; Creative Sound Blaster X-Fi MB - Trial) Unique Feature - ASRock OC Tuner (see CAUTION 7)
- Seite 7 - FCC, CE, WHQL - ErP/EuP Ready (ErP/EuP ready power supply is required) (see CAUTION 13) * For detailed product information, please visit our website: http://www.asrock.com WARNING Please realize that there is a certain risk involved with overclocking, including adjusting the setting in the BIOS, applying Untied Overclocking Technology, or using the third- party overclocking tools.
- Seite 8 CAUTION! ASRock UCC (Unlock CPU Core) feature simplifies AMD CPU activation. As long as a simple switch of the BIOS option “ASRock UCC”, you can unlock the extra CPU core to enjoy an instant performance boost. When UCC feature is...
- Seite 9 ASRock Instant Flash is a BIOS flash utility embedded in Flash ROM. This convenient BIOS update tool allows you to update system BIOS without entering operating systems first like MS-DOS or Windows ® . With this utility, you can press <F6> key during the POST or press <F2> key to BIOS setup menu to access ASRock Instant Flash.
- Seite 10 When placing screws into the screw holes to secure the motherboard to the chassis, please do not over-tighten the screws! Doing so may damage the motherboard. ASRock 870 Extreme3 Motherboard...
-
Seite 11: Cpu Installation
Then connect the CPU fan to the CPU FAN connector (CPU_FAN1, see Page 2, No. 7). For proper installation, please kindly refer to the instruction manuals of the CPU fan and the heatsink. ASRock 870 Extreme3 Motherboard... - Seite 12 It is not allowed to install a DDR or DDR2 memory module into DDR3 slot; otherwise, this motherboard and DIMM may be damaged. If you adopt DDR3 1800/1600 memory modules on this motherboard, it is recommended to install them on DDR3_A2 and DDR3_B2 slots. ASRock 870 Extreme3 Motherboard...
-
Seite 13: Installing A Dimm
DIMM if you force the DIMM into the slot at incorrect orientation. Step 3. Firmly insert the DIMM into the slot until the retaining clips at both ends fully snap back in place and the DIMM is properly seated. ASRock 870 Extreme3 Motherboard... -
Seite 14: Installing An Expansion Card
Step 4. Align the card connector with the slot and press firmly until the card is completely seated on the slot. Step 5. Fasten the card to the chassis with screws. Step 6. Replace the system cover. ASRock 870 Extreme3 Motherboard... - Seite 15 Step 1. Insert one Radeon graphics card into PCIE2 slot and the other Radeon graphics card to PCIE4 slot. Make sure that the cards are properly seated on the slots. ASRock 870 Extreme3 Motherboard...
- Seite 16 Connect the DVI monitor cable to the DVI connector on the Radeon graphics card on PCIE2 slot. (You may use the DVI to D-Sub adapter to convert the DVI connector to D-Sub interface, and then connect the D-Sub monitor cable to the DVI to D-Sub adapter.) ASRock 870 Extreme3 Motherboard...
- Seite 17 Then you will find “ATI Catalyst Control Center” on your Windows taskbar. ATI Catalyst Control Center Step 6. Double-click “ATI Catalyst Control Center”. Click “View”, select “CrossFireX ”, and then check the item “Enable CrossFireX ”. Select “2 GPUs” or “4 GPUs” and click “Apply”. ASRock 870 Extreme3 Motherboard...
- Seite 18 This motherboard supports Surround Display upgrade. With the external add-on PCI Express VGA cards, you can easily enjoy the benefits of Surround Display feature. For the detailed instruction, please refer to the document at the following path in the Support CD: ..\ Surround Display Information ASRock 870 Extreme3 Motherboard...
- Seite 19 BIOS. If you need to clear the CMOS when you just finish updating the BIOS, you must boot up the system first, and then shut it down before you do the clear-CMOS action. ASRock 870 Extreme3 Motherboard...
- Seite 20 I/O panel, there are (9-pin USB6_7) three USB 2.0 headers on this (see p.2 No. 30) motherboard. Each USB 2.0 header can support two USB 2.0 ports. (9-pin USB8_9) (see p.2 No. 29) (9-pin USB10_11) (see p.2 No. 27) ASRock 870 Extreme3 Motherboard...
- Seite 21 (see p.2 No. 20) The LED is on when the system is operating. The LED keeps blinking in S1 state. The LED is off in S3/S4 state or S5 state (power off). ASRock 870 Extreme3 Motherboard...
-
Seite 22: Inhaltsverzeichnis
20-pin ATX power supply. To use the 20-pin ATX power supply, please plug your power supply along with Pin 1 and Pin 13. 20-Pin ATX Power Supply Installation ASRock 870 Extreme3 Motherboard... - Seite 23 HDMI_SPDIF header, providing SPDIF audio output to HDMI VGA (2-pin HDMI_SPDIF1) card, allows the system to (see p.2 No. 33) connect HDMI Digital TV/ projector/LCD devices. Please connect the HDMI_SPDIF connector of HDMI VGA card to this header. ASRock 870 Extreme3 Motherboard...
-
Seite 24: Smart Switches
You are not allowed to use Clear CMOS switch function if you set up the system password. If you want to clear the CMOS values, please clean your system password in advance or refer to page 19 “Clear CMOS jumper” description instead. ASRock 870 Extreme3 Motherboard... - Seite 25 Store the Uncompressed pointer for future use in PMM. Copying Main BIOS into memory. Leaves all RAM below 1MB Read-Write including E000 and F000 shadow areas but closing SMRAM. Restore CPUID value back into register. Give control to BIOS POST (ExecutePOSTKernel). ASRock 870 Extreme3 Motherboard...
- Seite 26 ROMs. Initializes all the output devices. Allocate memory for ADM module and uncompress it. Give control to ADM module for initialization. Initialize language and font modules for ADM. Activate ADM module. ASRock 870 Extreme3 Motherboard...
- Seite 27 Uninstall POST INT1Ch vector and INT09h vector. Deinitializes the ADM module. Prepare BBS for Int 19 boot. End of POST initialization of chipset registers. Save system context for ACPI. Passes control to OS Loader (typically INT19h). ASRock 870 Extreme3 Motherboard...
-
Seite 28: Installing Windows
Using SATA3 HDDs without NCQ and Hot Plug functions (IDE mode) STEP 1: Set up BIOS. Enter BIOS SETUP UTILITY Advanced screen Storage Configuration. Set the “SATA Operation Mode” option to [IDE]. STEP 2: Install Windows ® XP / XP 64-bit OS on your system. ASRock 870 Extreme3 Motherboard... - Seite 29 PCI / PCIE buses are in the fixed mode so that FSB can operate under a more stable overclocking environment. Please refer to the warning on page 7 for the possible overclocking risk before you apply Untied Overclocking Technology. ASRock 870 Extreme3 Motherboard...
- Seite 30 CD-ROM drive. It will display the Main Menu automatically if “AUTORUN” is enabled in your computer. If the Main Menu does not appear automatically, locate and double-click on the file “ASSETUP.EXE” from the “BIN” folder in the Support CD to display the menus. ASRock 870 Extreme3 Motherboard...
-
Seite 31: Einführung
1. Einführung 1. Einführung 1. Einführung Wir danken Ihnen für den Kauf des ASRock 870 Extreme3 Motherboard, ein zuverlässiges Produkt, welches unter den ständigen, strengen Qualitätskontrollen von ASRock gefertigt wurde. Es bietet Ihnen exzellente Leistung und robustes Design, gemäß der Verpflichtung von ASRock zu Qualität und Halbarkeit. -
Seite 32: Spezifikationen
Quad CrossFireX und CrossFireX Audio - 7.1 CH HD Audio mit dem Inhalt Schutz (Realtek ALC892 Audio Codec) - Premium Blu-ray-Audio-Unterstützung - PCIE x1 Gigabit LAN 10/100/1000 Mb/s - Realtek RTL8111E - Unterstützt Wake-On-LAN - Unterstützt LAN-Kabelerkennung ASRock 870 Extreme3 Motherboard... - Seite 33 - 1 x Rücksetzschalter (Reset) mit LED BIOS - 8Mb AMI BIOS - AMI legal BIOS mit Unterstützung für “Plug and Play” - ACPI 1.1-Weckfunktionen - JumperFree-Modus - SMBIOS 2.3.1 - CPU VID, VCCM, NB, SB Stromspannung Multianpassung ASRock 870 Extreme3 Motherboard...
- Seite 34 -Dienstprogramm, AMD Fusion, AMD Fusion Media Explorer, ASRock-Software- Suite (CyberLink DVD Suite und Creative Sound Blaster X-Fi MB) (OEM- und Testversion) Einzigartige - ASRock OC Tuner (siehe VORSICHT 7) Eigenschaft - Intelligent Energy Saver (Intelligente Energiesparfunktion) (siehe VORSICHT 8) - Sofortstart...
- Seite 35 Sie Ihr System durch den Hardware-Monitor Funktion zu überblicken und Ihre Hardware-Geräte übertakten, um die beste ® Systemleistung unter der Windows Umgebung zu erreichen. Besuchen Sie bitte unsere Website für die Operationsverfahren von ASRock OC Tuner. ASRock-Website: http://www.asrock.com ASRock 870 Extreme3 Motherboard...
- Seite 36 Dateisystem FAT32/16/12 benutzen muss. 10. Allein der Name – OC DNA* – beschreibt es wörtlich, was die Software zu leisten vermag. OC DNA ist ein von ASRock exklusiv entwickeltes Dienstprogramm, das Nutzern eine bequeme Möglichkeit bietet, Übertaktungseinstellungen aufzuzeichnen und sie Anderen mitzuteilen.
- Seite 37 Stromversorgung dem Standard entsprechen, was bedeutet, dass bei einem Stromverbrauch von 100 mA die 5-Volt-Standby-Energieeffizienz höher als 50% sein sollte. Für die Wahl einer EuP-fähigen Stromversorgung empfehlen wir Ihnen, weitere Details beim Hersteller der Stromversorgung abzufragen. ASRock 870 Extreme3 Motherboard...
-
Seite 38: Sicherheitshinweise Vor Der Montage
Unterlage, oder zurück in die Tüte, mit der die Komponente geliefert wurde. Wenn Sie das Motherboard mit den Schrauben an dem Computergehäuse befestigen, überziehen Sie bitte die Schrauben nicht! Das Motherboard kann sonst beschädigt werden. ASRock 870 Extreme3 Motherboard... -
Seite 39: Installation Des Cpu-Lüfters Und Des Kühlkörpers
Kontakt zueinander haben. Verbinden Sie dann den CPU- Lüfter mit dem CPU-LÜFTER-Anschluss (CPU_FAN1, siehe Seite 2, Nr. 7). Beziehen Sie sich für eine richtige Installation auf die Handbücher des CPU- Lüfters und des Kühlkörpers. ASRock 870 Extreme3 Motherboard... -
Seite 40: Installation Der Speichermodule (Dimm)
2.3 Installation der Speichermodule (DIMM) 2.3 Installation der Speichermodule (DIMM) 2.3 Installation der Speichermodule (DIMM) Die Motherboards 870 Extreme3 bieten vier 240-pol. DDR3 (Double Data Rate 3) DIMM-Steckplätze und unterstützen die Dual-Kanal-Speichertechnologie. Für die Dual-Kanalkonfiguration dürfen Sie nur identische (gleiche Marke, Geschwindigkeit, Größe und gleicher Chiptyp) DDR3 DIMM-Paare in den... -
Seite 41: Einsetzen Eines Dimm-Moduls
Steckplätze zu zwingen, führt dies zu dauerhaften Schäden am Mainboard und am DIMM-Modul. Schritt 3: Drücken Sie die DIMM-Module fest in die Steckplätze, so dass die Halteklammern an beiden Enden des Moduls einschnappen und das DIMM-Modul fest an Ort und Stelle sitzt. ASRock 870 Extreme3 Motherboard... -
Seite 42: Erweiterungssteckplätze: (Pci- Und Pci Express-Slots)
2.4 Erweiterungssteckplätze: (PCI- und PCI Express-Slots): 2.4 Erweiterungssteckplätze: (PCI- und PCI Express-Slots): 2.4 Erweiterungssteckplätze: (PCI- und PCI Express-Slots): Es stehen 2 PCI- und 4 PCI Express-Slot auf dem 870 Extreme3 Motherboard zur Verfügung. PCI-Slots: PCI-Slots werden zur Installation von Erweiterungskarten mit dem 32bit PCI-Interface genutzt. - Seite 43 / 7 unterstützt. ® Die Quad CrossFireX -Funktion wird nur vom Betriebssystem Windows Vista 7 unterstützt. Schauen Sie auf der AMD-Website nach, ob es ATI CrossFireX Treiber-Updates gibt. Beachten Sie den detailliert erklärten Installationsablauf auf Seite 15. ASRock 870 Extreme3 Motherboard...
-
Seite 44: Einstellung Der Jumper
USB6_7/8_9/10_11- Weckfunktionen zu aktivieren. Hinweis: Um +5VSB nutzen zu können, muss das Netzteil auf dieser Leitung 2A oder mehr leisten können. CMOS löschen (CLRCMOS1, 3-Pin jumper) (siehe S.2, No. 26) Default- CMOS Einstellung löschen ASRock 870 Extreme3 Motherboard... -
Seite 45: Anschlüsse
USB 2.0-Header Zusätzlich zu den sechs üblichen USB 2.0-Ports an den (9-pol. USB6_7) I/O-Anschlüssen befinden sich (siehe S.2 - No. 30) drei USB 2.0- Anschlussleisten am Motherboard. Pro USB 2.0- Anschlussleiste werden zwei USB 2.0-Ports unterstützt. ASRock 870 Extreme3 Motherboard... - Seite 46 Wählen Sie „Mixer“. Wählen Sie „Recorder“ (Rekorder). Klicken Sie dann auf „FrontMic“ (Vorderes Mikrofon). ® Bei den Betriebssystemen Windows 7 / 7 64 Bit / Vista / Vista 64 Bit: Wählen Sie im Realtek-Bedienfeld die „FrontMic“ (Vorderes Mikrofon)- Registerkarte. Passen Sie die „Recording Volume“ (Aufnahmelautstärke) ASRock 870 Extreme3 Motherboard...
-
Seite 47: (4-Pin Cha_Fan1)
(siehe S.2, No. 13) (3-pin PWR_FAN1) (siehe S.2, No. 6) CPU-Lüfteranschluss Verbinden Sie das CPU - Lüfterkabel mit diesem (4-pin CPU_FAN1) Anschluss und passen Sie den (siehe S.2, No. 7) schwarzen Draht dem 1 2 3 4 Erdungsstift an. ASRock 870 Extreme3 Motherboard... - Seite 48 Sie einen traditionellen 4-Pin ATX 12V Energieversorgung adoptieren. Um die 4-Pin ATX Energieversorgung zu verwenden, stecken Sie bitte Ihre Energieversorgung zusammen mit dem Pin 1 und Pin 5 ein. Installation der 4-Pin ATX 12V Energieversorgung ASRock 870 Extreme3 Motherboard...
- Seite 49 (siehe S.2 - No. 31) unterstützen. HDMI_SPDIF-Anschluss Der HDMI_SPDIF-Anschluss stellt einen SPDIF- (2-pin HDMI_SPDIF1) Audioausgang für eine HDMI- (siehe S.2 - No. 33) VGA-Karte zur Verfügung und ermöglicht den Anschluss von HDMI-Digitalgeräten wie Fernsehgeräten, Projektoren, LCD-Geräten an das System. ASRock 870 Extreme3 Motherboard...
- Seite 50 “Clear CMOS jumper” (CMOS löschen-Jumper) auf Seite 44 beziehen. Debug-LED Debug-LED Debug-LED Debug-LED Debug-LED Die integrierte Debug-LED liefert Codeinformationen, die eine Fehlerbehebung erleichtern. Siehe die Abbildungen auf den Seiten 25, 26 und 27 zum Ablesen der Debug-LED-Codes. ASRock 870 Extreme3 Motherboard...
-
Seite 51: Windows Windows Xp 64-Bit Mit Raid-Funktionalität Installieren
SCHRITT 1: Konfigurieren Sie BIOS. Rufen Sie im BIOS-DIENSTPROGRAMM den Bildschirm „Erweitert“ und „Storage-Konfiguration“ auf. Setzen Sie die Option “SATA Operation Mode” (SATA-Betriebsmodus) auf [IDE]. SCHRITT 2: Installieren Sie Windows ® XP / XP 64-Bit in Ihrem System. ASRock 870 Extreme3 Motherboard... -
Seite 52: Installation Von Windows Vista
Rufen Sie im BIOS-DIENSTPROGRAMM den Bildschirm „Erweitert“ und „Storage-Konfiguration“ auf. Setzen Sie die Option “SATA Operation Mode” (SATA-Betriebsmodus) auf [AHCI]. SCHRITT 2: Installieren Sie Windows ® 7 / 7 64-Bit / Vista / Vista 64-Bit in Ihrem System. ASRock 870 Extreme3 Motherboard... - Seite 53 File ASSETUP.EXE im BIN-Verzeichnis der Support-CD, um die Menüs aufzurufen. Das Setup-Programm soll es Ihnen so leicht wie möglich machen. Es ist menügesteuert, d.h. Sie können in den verschiedenen Untermenüs Ihre Auswahl treffen und die Programme werden dann automatisch installiert. ASRock 870 Extreme3 Motherboard...
-
Seite 54: Contenu Du Paquet
1. Introduction 1. Introduction Merci pour votre achat d’une carte mère ASRock 870 Extreme3 une carte mère très fiable produite selon les critères de qualité rigoureux de ASRock. Elle offre des performances excellentes et une conception robuste conformément à l’engagement d’ASRock sur la qualité... - Seite 55 (Realtek ALC892 Audio Codec) - Prise en charge de l’audio Premium Blu-ray - PCIE x1 Gigabit LAN 10/100/1000 Mb/s - Realtek RTL8111E - Support du Wake-On-LAN - Prise en charge de la détection de câble LAN ASRock 870 Extreme3 Motherboard...
- Seite 56 - 1 x interrupteur d’alimentation avec LED - 1 x interrupteur de réinitialisation avec LED BIOS - 8Mb BIOS AMI - BIOS AMI - Support du “Plug and Play” - Compatible pour événements de réveil ACPI 1.1 ASRock 870 Extreme3 Motherboard...
- Seite 57 - Pilotes, utilitaires, logiciel anti-virus (Version d’essai), Utilitaire AMD OverDrive , AMD Fusion, AMD Fusion Media Explorer, Suite logicielle ASRock (CyberLink DVD Suite et Creative Sound Blaster X-Fi MB) (Version OEM et d’essai) Caractéristique - Tuner ASRock OC (voir ATTENTION 7) unique - Économiseur d’énergie intelligent (voir ATTENTION 8)
- Seite 58 2-canaux, 4-canaux, 6-canaux et 8-canaux. Veuillez vous référer au tableau en page 3 pour effectuer la bonne connexion. Il s’agit d’un usage facile ASRock overclocking outil qui vous permet de surveiller votre système en fonction de la monitrice de matériel et overclocker vos périphériques de matériels pour obtenir les meilleures...
- Seite 59 (L’économiseur d’énergie intelligent). Site Web d’ASRock: http://www.asrock.com O ASRock Instant Flash é um utilitário de flash do BIOS incorporado na memória Flash ROM. Esta prática ferramenta de actualização do BIOS permite-lhe actualizar o BIOS do sistema sem necessitar de entrar nos ®...
- Seite 60 5v en mode de veille doit être supérieure à 50% pour 100 mA de consommation de courant. Pour choisir une alimentation électrique conforme à la norme EuP, nous vous recommandons de consulter votre fournisseur de courant pour plus de détails. ASRock 870 Extreme3 Motherboard...
- Seite 61 5. Lorsque vous placez les vis dans les orifices pour vis pour fixer la carte mère sur le châssis, ne serrez pas trop les vis ! Vous risquez sinon d’endommager la carte mère. ASRock 870 Extreme3 Motherboard...
- Seite 62 Ensuite, connectez le ventilateur du CPU à la prise du VENTILATEUR DU CPU (CPU_FAN1, reportez-vous en page 2, No. 7). Pour une bonne installation, veuillez vous référer aux manuels d’instruction sur le ventilateur du CPU et le dissipateur. ASRock 870 Extreme3 Motherboard...
- Seite 63 2.3 Installation des modules m émoire [DIMM] 2.3 Installation des modules m émoire [DIMM] La carte mère 870 Extreme3 dispose de quatre emplacements DIMM DDR3 (Double Data Rate 3) de 240-broches, et supporte la Technologie de Mémoire à Canal Double. Pour effectuer une configuration à canal double, vous devez toujours installer des paires de DIMM DDR3 identiques (de la même marque, de la...
- Seite 64 DIMM. Etape 3. Insérez fermement le module DIMM dans son emplacement jusqu’à ce que les clips de maintien situés aux deux extrémités se ferment complètement et que le module DIMM soit inséré correctement. ASRock 870 Extreme3 Motherboard...
- Seite 65 Slot d’extension (Slots PCI et Slots PCI Express) Slot d’extension (Slots PCI et Slots PCI Express) Il y a 2 ports PCI et 4 ports PCI Express sur la carte mère 870 Extreme3. Slots PCI: Les slots PCI sont utilisés pour installer des cartes d’extension dotées d’une interface PCI 32 bits.
- Seite 66 ® Windows Vista / 7 uniquement. Veuillez consulter le site d’AMD pour les mises à jour de driver ATI CrossFireX . Veuillez suivre les instructions d’installation de la page 15 pour plus de détails. ASRock 870 Extreme3 Motherboard...
- Seite 67 10_11 de réveiller le système. Note: Pour sélectionner +5VSB, il faut obligatoirement 2 Amp et un courant standby supérieur fourni par l’alimentation. Effacer la CMOS (CLRCMOS1) (voir p.2 fig. 26) Paramètres Effacer la par défaut CMOS ASRock 870 Extreme3 Motherboard...
- Seite 68 6,0 Gb/s. Câble de données Toute cote du cable de data SATA Série ATA (SATA) peut etre connecte au disque dur SATA3 ou au connecteur SATA3 (en option) sur la carte mere. ASRock 870 Extreme3 Motherboard...
- Seite 69 AC’97. E. Pour activer le micro avant. Pour les systèmes d’exploitation Windows ® XP / XP 64 bits : Sélectionnez “Mixer”. Sélectionnez “Recorder” (Enregistreur). Puis cliquez sur “FrontMic” (Micro avant). ASRock 870 Extreme3 Motherboard...
- Seite 70 (voir p.2 No. 6) Connecteur pour ventilateur Veuillez connecter un câble de ventilateur d’UC sur ce connecteur et brancher le fil noir (CPU_FAN1 br. 4) sur la broche de terre. (voir p.2 fig. 7) 1 2 3 4 ASRock 870 Extreme3 Motherboard...
- Seite 71 ATX 12V, il peut toujours travailler si vous adoptez une approche traditionnelle à 4 broches ATX 12V alimentation. Pour utiliser l’alimentation des 4 broches ATX, branchez votre alimentation avec la broche 1 et la broche 5. 4-Installation d’alimentation à 4 broches ATX 12V ASRock 870 Extreme3 Motherboard...
- Seite 72 SPDIF vers la carte VGA HDMI, (voir p.2 No. 33) et permettant au système de se connecter au un téléviseur numérique HDMI /un projecteur / un périphérique LCD. Veuillez brancher le connecteur HDMI_SPDIF de la carte VGA HDMI sur ce connecteur. ASRock 870 Extreme3 Motherboard...
- Seite 73 La LED de débogage intégrée sert à fournir des informations de code, ce qui rend le dépannage encore plus facile. Veuillez consulter les diagrammes des pages 25, 26 et 27 pour la lecture des codes LED de débogage. ASRock 870 Extreme3 Motherboard...
- Seite 74 A. Entrez dans UTILITAIRE DE CONFIGURATION BIOS écran Avancé Configuration Storage. B. Réglez l’option “SATA Operation Mode”« Mode de fonctionnement SATA » sur [IDE]. ETAPE 2: Installer le système d’exploitation Windows ® XP / XP 64-bit sur votre système. ASRock 870 Extreme3 Motherboard...
- Seite 75 écran Avancé Configuration Storage. B. Réglez l’option “SATA Operation Mode”« Mode de fonctionnement SATA » sur [AHCI]. ® ETAPE 2: Installer le système d’exploitation Windows 7 / 7 64-bit / Vista / Vista 64-bit sur votre système. ASRock 870 Extreme3 Motherboard...
- Seite 76 CD-ROM. Le Menu principal s’affiche automatiquement si “AUTORUN” est activé dans votre ordinateur. Si le Menu principal n’apparaît pas automatiquement, localisez dans le CD technique le fichier “ASSETUP.EXE” dans le dossier BIN et double-cliquez dessus pour afficher les menus. ASRock 870 Extreme3 Motherboard...
- Seite 77 1. Introduzione Grazie per aver scelto una scheda madre ASRock 870 Extreme3, una scheda madre affidabile prodotta secondo i severi criteri di qualità ASRock. Le prestazioni eccellenti e il design robusto si conformano all’impegno di ASRock nella ricerca della qualità e della resistenza. Questa Guida Rapida all’Installazione contiene l’introduzione alla motherboard e la guida passo-passo all’installazione.
- Seite 78 - 7.1 CH HD Audio con protezioni contenuti (Realtek ALC892 Audio Codec) - Supporto audio Blu-ray Premium - PCIE x1 Gigabit LAN 10/100/1000 Mb/s - Realtek RTL8111E - Supporta Wake-On-LAN - Supporta il rilevamento cavo LAN ASRock 870 Extreme3 Motherboard...
- Seite 79 - 8Mb AMI BIOS - Suppor AMI legal BIOS - Supporta “Plug and Play” - Compatibile con ACPI 1.1 wake up events - Supporta jumperfree - Supporta SMBIOS 2.3.1 - Regolazione multi-voltaggio CPU VID, VCCM, NB, SB ASRock 870 Extreme3 Motherboard...
- Seite 80 - Predisposto ErP/EuP (è necessaria l’alimentazione predisposta per il sistema ErP/EuP) (vedi ATTENZIONE 13) * Per ulteriori informazioni, prego visitare il nostro sito internet: http://www.asrock.com AVVISO Si prega di prendere atto che la procedura di overclocking implica dei rischi, come anche la regolazione delle impostazioni del BIOS, l’applicazione della tecnologia Untied Overclocking...
- Seite 81 6 canali e 8 canali per l’uscita audio. Controllare la tavola a pagina 3 per eseguire il collegamento appropriato. Si tratta di uno strumento di sicronizzazione ASRock di face uso in grado di implementare il controllo del sistema tramite la funzione di hardware monitor e sincronizzare le Vostre unita‘...
- Seite 82 Energy Saver (Risparmio intelligente dell’energia). Sito Internet di ASRock: http://www.asrock.com ASRock Instant Flash è una utilità Flash BIOS integrata nella Flash ROM. Questo comodo strumento d’aggiornamento del BIOS permette di aggiornare il sistema BIOS senza accedere a sistemi operativi come MS- ®...
- Seite 83 5. Nell’usare i giraviti per fissare la scheda madre al telaio non serrare eccessivamente le viti! Altrimenti si rischia di danneggiare la scheda madre. ASRock 870 Extreme3 Motherboard...
- Seite 84 Quindi collegare la ventolina CPU al connettore PU FAN (CPU_FAN1, fare riferimento a pagina 2, Numero 7). Per eseguire un’installazione appropriata, fare riferimento al manuale d’istruzioni della ventolina CPU e del dispersore di calore. ASRock 870 Extreme3 Motherboard...
- Seite 85 2.3 Installazione dei moduli di memoria (DIMM) 2.3 Installazione dei moduli di memoria (DIMM) La scheda madre 870 Extreme3 fornisce quattro alloggiamenti DIMM DDR3 (Double Data Rate 3) a 240 pin, e supporta la tecnologia Dual Channel Memory. Per la configurazione a due canali, è...
- Seite 86 DIMM stessa. Step 3. Inserire saldamente la DIMM nello slot fino a far scattare completamente in posizione i fermagli di ritegno alle due estremità e fino ad installare correttamente la DIMM nella sua sede. ASRock 870 Extreme3 Motherboard...
- Seite 87 Slot di espansione (Slot PCI ed Slot PCI Express) Slot di espansione (Slot PCI ed Slot PCI Express) Sulla scheda madre 870 Extreme3 c’è 2 slot PCI ed 4 slot PCI Express. Slot PCI: Sono utilizzati per installare schede di espansione con Interfaccia PCI a 32-bit.
- Seite 88 Nota: Per selezionare +5V_DUAL, si richiedono almeno 2 Ampere e il consumo di corrente in standby sarà maggiore. Quando si seleziona +5V_DUAL, i dispositivi USB possono riattivare il sistema dallo stato S3 (Suspend to RAM). ASRock 870 Extreme3 Motherboard...
- Seite 89 Non cancellare la CMOS subito dopo aver aggiornato il BIOS. Se è necessario cancellare la CMOS una volta completato l’aggiornamento del BIOS, è necessario riavviare prima il sistema, e poi spegnerlo prima di procedere alla cancellazione della CMOS. ASRock 870 Extreme3 Motherboard...
- Seite 90 (9-pin USB8_9) (vedi p.2 No. 29) (9-pin USB10_11) (vedi p.2 No. 27) Collettore modulo infrarossi Questo collettore supporta moduli ad infrarossi optional (5-pin IR1) per la trasmissione e la (vedi p.2 Nr. 32) ricezione senza fili. ASRock 870 Extreme3 Motherboard...
- Seite 91 è in funzione. Il LED continua a lampeggiare in stato S1. Il LED è spento in stato S3/S4 o S5 (spegnimento). Collettore casse telaio Collegare le casse del telaio a questo collettore. (4-pin SPEAKER1) (vedi p.2 item 21) ASRock 870 Extreme3 Motherboard...
- Seite 92 ATX a 24 pin, ma può funzionare lo stesso se si adotta un alimentatore ATX a 20 pin. Per usare l’alimentatore ATX a 20 pin, collegare l’alimentatore con il Pin 1 e il Pin 13. Installazione dell’alimentatore ATX a 20 pin ASRock 870 Extreme3 Motherboard...
- Seite 93 SPDIF su scheda (2-pin HDMI_SPDIF1) HDMI VGA, consente al (vedi p.2 Nr. 33) sistema di collegare dispositivi per TV digitale HDMI/proiettori/ LCD . Collegare il connettore HDMI_SPDIF della scheda VGA HDMI a questo header. ASRock 870 Extreme3 Motherboard...
- Seite 94 Quindi, i driver compatibili con il sistema vengono rilevati automaticamente ed elencati nella pagina del driver del CD in dotazione. Per l’installazione dei driver necessari, procedere in base ad un ordine dall’alto verso il basso. In tal modo, i driver installati funzioneranno correttamente. ASRock 870 Extreme3 Motherboard...
- Seite 95 1° PASSO: Configurare il BIOS. Entrare in UTILIT BIOS SETUP Avanzate Configurazione Storage. Impostare l’opzione “SATA Operation Mode” (Modalità operativa SATA) su [IDE]. ® Passo 2: Installazione di Windows 7 / 7 64-bit / Vista / Vista 64-bit sul sistema. ASRock 870 Extreme3 Motherboard...
- Seite 96 ROM. Se la funzione “AUTORUN” è attivata nel computer, apparirà automaticamente il Menù principale. Se il Menù principale non appare automaticamente, posizionarsi sul file ASSETUP.EXE nel CESTINO del CD di supporto e cliccare due volte per visualizzare i menù. ASRock 870 Extreme3 Motherboard...
- Seite 97 1. Introducción 1. Introducción Gracias por su compra de ASRock 870 Extreme3 placa madre, una placa de confianza producida bajo el control de calidad estricto y persistente. La placa madre provee realización excelente con un diseño robusto conforme al compromiso de calidad y resistencia de ASRock.
- Seite 98 - 7.1 CH HD Audio con Protección de Contenido (Realtek ALC892 Audio Codec) - Compatible con audio Blu-ray de alta calidad - PCIE x1 Gigabit LAN 10/100/1000 Mb/s - Realtek RTL8111E - Soporta Wake-On-LAN - Admite detección de conexión de cable LAN ASRock 870 Extreme3 Motherboard...
- Seite 99 - 1 x Dr. Debug (indicador LED de avería de 7 segmentos) Conmutador - 1 x conmutador de borrado de memoria CMOS con indicador rápido - 1 x conmutador de encendido con indicador LED - 1 x conmutador de reinicio con indicador LED ASRock 870 Extreme3 Motherboard...
- Seite 100 CD de soport - Controladores, Utilerías, Software de Anti Virus (Versión de prueba), Utilidad AMD OverDrive , AMD Fusion, AMD Fusion Media Explorer, conjunto de aplicaciones ASRock (CyberLink DVD Suite y Creative Sound Blaster X-Fi MB) (OEM y versión de prueba) Característica - Sintonizador de ASRock OC (vea ATENCIÓN 7)
- Seite 101 ATENCIÓN! La función ASRock UCC (Unlock CPU Core, desbloquear núcleo la CPU) simplifica la activación de una CPU AMD. Con sólo activar la opción “Unlock CPU Core” (desbloquear núcleo la CPU) en el BIOS, es posible desbloquear el núcleo de CPU adicional y disfrutar de un aumento de...
- Seite 102 . Gracias a esta utilidad, sólo necesitará pulsar <F6> durante la fase POST o pulsar <F2> para acceder al menú de configuración del BIOS y a la utilidad ASRock Instant Flash. Ejecute esta herramienta y guarde el archivo correspondiente al sistema BIOS nuevo en su unidad flash USB, unidad de disco flexible o disco duro para poder actualizar el BIOS con sólo...
- Seite 103 Para seleccionar una fuente de alimentación que cumpla la directiva EuP, le recomendamos que consulte con el fabricante de la fuente de alimentación para obtener más detalles. 1 0 3 1 0 3 1 0 3 1 0 3 1 0 3 ASRock 870 Extreme3 Motherboard...
- Seite 104 5. Al colocar los tornillos en sus agujeros para fijar la placa madre en el chasis, no los apriete demasiado. Eso podría dañar la placa madre. 1 0 4 1 0 4 1 0 4 1 0 4 1 0 4 ASRock 870 Extreme3 Motherboard...
- Seite 105 Página 2, N. 7). Para realizar la instalación correctamente, consulte el manual de instrucciones del ventilador de la CPU y el radiador. 1 0 5 1 0 5 1 0 5 1 0 5 1 0 5 ASRock 870 Extreme3 Motherboard...
- Seite 106 2.3 Instalación de Memoria 2.3 Instalación de Memoria La placa 870 Extreme3 ofrece cuatro ranuras DIMM DDR3 de 240 pines, y soporta Tecnología de Memoria de Doble Canal. Para la configuración de doble canal, necesitará instalar siempre pares DIMM DDR3 idénticos (de la misma marca, velocidad, tamaño y tipo) en las ranuras del mismo color.
- Seite 107 Paso 3. Inserte la DIMM con firmeza dentro de la ranura hasta que los clips de sujeción de ambos lados queden completamente introducidos en su sitio y la DIMM se haya asentado apropiadamente. 1 0 7 1 0 7 1 0 7 1 0 7 1 0 7 ASRock 870 Extreme3 Motherboard...
- Seite 108 Express) Express) Express) Express) La placa madre 870 Extreme3 cuenta con 2 ranuras PCI y 4 ranuras PCI Express. Ranura PCI: Para instalar tarjetas de expansión que tienen 32-bit Interface PCI. Ranura PCI Express: La ranura PCIE1 / PCIE3 (ranura PCIE x1, Bianco) se utiliza con tarjetas PCI Express con ancho de banda x1, como las tarjetas Giga- bit LAN, SATA2.
- Seite 109 Si selecciona +5V_DUAL, los dispositivos USB podran reactivar el sistema siempre que se encuentre en el estado S3 (Suspension a RAM). 1 0 9 1 0 9 1 0 9 1 0 9 1 0 9 ASRock 870 Extreme3 Motherboard...
- Seite 110 CMOS cuando acabe de finalizar la actualización de la BIOS, debe arrancar primero el sistema y, a continuación, apagarlo antes de realizar la acción de borrado de CMOS. 1 1 0 1 1 0 1 1 0 1 1 0 1 1 0 ASRock 870 Extreme3 Motherboard...
- Seite 111 Cabezal de Módulo Infrarrojos Este cabezal soporta un módulo infrarrojos de (5-pin IR1) transmisión y recepción (vea p.2, N. 32) wireless opcional. 1 1 1 1 1 1 1 1 1 1 1 1 1 1 1 ASRock 870 Extreme3 Motherboard...
- Seite 112 El indicador LED parpadeará en el estado S1. El indicador LED se apagará en los estados S3/S4 o S5 (apagado). 1 1 2 1 1 2 1 1 2 1 1 2 1 1 2 ASRock 870 Extreme3 Motherboard...
- Seite 113 Pins 1 y 13. Instalación de una Fuente de Alimentación ATX de 20 Pins 1 1 3 1 1 3 1 1 3 1 1 3 1 1 3 ASRock 870 Extreme3 Motherboard...
- Seite 114 TV Digital HDMI / proyectores / Dispositivos LCD. Conecte el conector HDMI_SPDIF de la tarjeta VGA HDMI a esta cabecera. 1 1 4 1 1 4 1 1 4 1 1 4 1 1 4 ASRock 870 Extreme3 Motherboard...
- Seite 115 25, 26 y 27 si desea obtener más información acerca de la lectura de los códigos del indicador LED de depuración. 1 1 5 1 1 5 1 1 5 1 1 5 1 1 5 ASRock 870 Extreme3 Motherboard...
- Seite 116 Establezca la opción “SATA Operation Mode”(Modo de funcionamiento SATA) en [IDE]. PASO 2: Instale el sistema operativo Windows ® XP / XP 64 bits en su sistema. 1 1 6 1 1 6 1 1 6 1 1 6 1 1 6 ASRock 870 Extreme3 Motherboard...
- Seite 117 PASO 2: Instale el sistema operativo Windows ® 7 / 7 64 bits / Vista Vista 64 bits en su sistema. 1 1 7 1 1 7 1 1 7 1 1 7 1 1 7 ASRock 870 Extreme3 Motherboard...
- Seite 118 Si el Menú Principal no aparece automáticamente, localice y doble- pulse en el archivo ASSETUP.EXE para iniciar la instalación. 1 1 8 1 1 8 1 1 8 1 1 8 1 1 8 ASRock 870 Extreme3 Motherboard...
- Seite 119 / 3 0 , 5 x 2 4 , 4 ASRock ASRock S e r ia l ATA (SATA ) ( I / O 1 1 9 1 1 9 1 1 9 1 1 9 1 1 9 ASRock 870 Extreme3 Motherboard...
- Seite 120 12,0 x 9,6 / 3 0 , 5 x 2 4 , 4 1 2 0 1 2 0 1 2 0 1 2 0 1 2 0 ASRock 870 Extreme3 Motherboard...
- Seite 121 1 2 1 1 2 1 1 2 1 1 2 1 1 2 1 ASRock 870 Extreme3 Motherboard...
- Seite 122 1 2 2 1 2 2 1 2 2 1 2 2 1 2 2 ASRock 870 Extreme3 Motherboard...
- Seite 123 1 2 3 1 2 3 1 2 3 1 2 3 1 2 3 ASRock 870 Extreme3 Motherboard...
- Seite 124 1 2 4 1 2 4 1 2 4 1 2 4 1 2 4 ASRock 870 Extreme3 Motherboard...
- Seite 125 1 2 5 1 2 5 1 2 5 1 2 5 1 2 5 ASRock 870 Extreme3 Motherboard...
- Seite 126 1 2 6 1 2 6 1 2 6 1 2 6 1 2 6 ASRock 870 Extreme3 Motherboard...
- Seite 127 DDR3_A1 DDR3_B1 DDR3_A2 DDR3_B2 ( 1 ) ( 2 ) ( 3 ) * 1 2 7 1 2 7 1 2 7 1 2 7 1 2 7 ASRock 870 Extreme3 Motherboard...
- Seite 128 DIMM DIMM D I M M 1 2 8 1 2 8 1 2 8 1 2 8 1 2 8 ASRock 870 Extreme3 Motherboard...
- Seite 129 870 Extreme3 1 2 9 1 2 9 1 2 9 1 2 9 1 2 9 ASRock 870 Extreme3 Motherboard...
- Seite 130 Short Open 1 3 0 1 3 0 1 3 0 1 3 0 1 3 0 ASRock 870 Extreme3 Motherboard...
- Seite 131 CMOS CMOS 1 3 1 1 3 1 1 3 1 1 3 1 1 3 1 ASRock 870 Extreme3 Motherboard...
- Seite 132 ( 5 - I R 1 ) 1 3 2 1 3 2 1 3 2 1 3 2 1 3 2 ASRock 870 Extreme3 Motherboard...
- Seite 133 ( 9 - PANEL1) 1 2 3 4 1 3 3 1 3 3 1 3 3 1 3 3 1 3 3 ASRock 870 Extreme3 Motherboard...
- Seite 134 ATX. 12V- ATX ATX 12 1 3 4 1 3 4 1 3 4 1 3 4 1 3 4 ASRock 870 Extreme3 Motherboard...
- Seite 135 COM- 1 3 5 1 3 5 1 3 5 1 3 5 1 3 5 ASRock 870 Extreme3 Motherboard...
- Seite 136 RESET CMOS 1 3 6 1 3 6 1 3 6 1 3 6 1 3 6 ASRock 870 Extreme3 Motherboard...
- Seite 137 1 3 7 1 3 7 1 3 7 1 3 7 1 3 7 ASRock 870 Extreme3 Motherboard...
- Seite 138 1 3 8 1 3 8 1 3 8 1 3 8 1 3 8 ASRock 870 Extreme3 Motherboard...
- Seite 139 BIOS Setup Power-On-Self - Test – POST POST BIOS Setup P O S T Ctrl> + <Alt> + <Delete BIOS Setup 1 3 9 1 3 9 1 3 9 1 3 9 1 3 9 ASRock 870 Extreme3 Motherboard...
- Seite 140 1 4 0 1 4 0 1 4 0 1 4 0 1 4 0 ASRock 870 Extreme3 Motherboard...
- Seite 141 ‘ ’ 1 4 1 1 4 1 1 4 1 1 4 1 1 4 1 ASRock 870 Extreme3 Motherboard...
- Seite 142 “ ” 1 4 2 1 4 2 1 4 2 1 4 2 1 4 2 ASRock 870 Extreme3 Motherboard...
- Seite 143 ® 1 4 3 1 4 3 1 4 3 1 4 3 1 4 3 ASRock 870 Extreme3 Motherboard...
- Seite 144 “ ” “ ” ® ® ® 1 4 4 1 4 4 1 4 4 1 4 4 1 4 4 ASRock 870 Extreme3 Motherboard...
- Seite 145 ® 1 4 5 1 4 5 1 4 5 1 4 5 1 4 5 ASRock 870 Extreme3 Motherboard...
- Seite 146 1 4 6 1 4 6 1 4 6 1 4 6 1 4 6 ASRock 870 Extreme3 Motherboard...
- Seite 147 1 4 7 1 4 7 1 4 7 1 4 7 1 4 7 ASRock 870 Extreme3 Motherboard...
- Seite 148 “ ”( 1 4 8 1 4 8 1 4 8 1 4 8 1 4 8 ASRock 870 Extreme3 Motherboard...
- Seite 149 1 4 9 1 4 9 1 4 9 1 4 9 1 4 9 ASRock 870 Extreme3 Motherboard...
- Seite 150 1 5 0 1 5 0 1 5 0 1 5 0 1 5 0 ASRock 870 Extreme3 Motherboard...
- Seite 151 ® ® 1 5 1 1 5 1 1 5 1 1 5 1 1 5 1 ASRock 870 Extreme3 Motherboard...
- Seite 152 “ ” “ ” “ ” “ ” “ ” 1 5 2 1 5 2 1 5 2 1 5 2 1 5 2 ASRock 870 Extreme3 Motherboard...
- Seite 153 1 5 3 1 5 3 1 5 3 1 5 3 1 5 3 ASRock 870 Extreme3 Motherboard...
- Seite 154 ® “ ” “ ” “ ” ® “ ” “ ” 1 5 4 1 5 4 1 5 4 1 5 4 1 5 4 ASRock 870 Extreme3 Motherboard...
- Seite 155 1 2 3 4 1 5 5 1 5 5 1 5 5 1 5 5 1 5 5 ASRock 870 Extreme3 Motherboard...
- Seite 156 1 5 6 1 5 6 1 5 6 1 5 6 1 5 6 ASRock 870 Extreme3 Motherboard...
- Seite 157 RESET CMOS “ ” 1 5 7 1 5 7 1 5 7 1 5 7 1 5 7 ASRock 870 Extreme3 Motherboard...
- Seite 158 ® ® ® ® ® ® ® 1 5 8 1 5 8 1 5 8 1 5 8 1 5 8 ASRock 870 Extreme3 Motherboard...
- Seite 159 ® ® ® ® 1 5 9 1 5 9 1 5 9 1 5 9 1 5 9 ASRock 870 Extreme3 Motherboard...
- Seite 160 “ ” “ ” 1 6 0 1 6 0 1 6 0 1 6 0 1 6 0 ASRock 870 Extreme3 Motherboard...
- Seite 161 1 6 1 1 6 1 1 6 1 1 6 1 1 6 1 ASRock 870 Extreme3 Motherboard...
- Seite 162 ‘ ’ 1 6 2 1 6 2 1 6 2 1 6 2 1 6 2 ASRock 870 Extreme3 Motherboard...
- Seite 163 1 6 3 1 6 3 1 6 3 1 6 3 1 6 3 ASRock 870 Extreme3 Motherboard...
- Seite 164 ® ® ® 1 6 4 1 6 4 1 6 4 1 6 4 1 6 4 ASRock 870 Extreme3 Motherboard...
- Seite 165 “ ” ® ® ® 1 6 5 1 6 5 1 6 5 1 6 5 1 6 5 ASRock 870 Extreme3 Motherboard...
- Seite 166 ® – 1 6 6 1 6 6 1 6 6 1 6 6 1 6 6 ASRock 870 Extreme3 Motherboard...
- Seite 167 1 6 7 1 6 7 1 6 7 1 6 7 1 6 7 ASRock 870 Extreme3 Motherboard...
- Seite 168 1 6 8 1 6 8 1 6 8 1 6 8 1 6 8 ASRock 870 Extreme3 Motherboard...
- Seite 169 1 6 9 1 6 9 1 6 9 1 6 9 1 6 9 ASRock 870 Extreme3 Motherboard...
- Seite 170 1 7 0 1 7 0 1 7 0 1 7 0 1 7 0 ASRock 870 Extreme3 Motherboard...
- Seite 171 1 7 1 1 7 1 1 7 1 1 7 1 1 7 1 ASRock 870 Extreme3 Motherboard...
- Seite 172 ® ® 1 7 2 1 7 2 1 7 2 1 7 2 1 7 2 ASRock 870 Extreme3 Motherboard...
- Seite 173 1 7 3 1 7 3 1 7 3 1 7 3 1 7 3 ASRock 870 Extreme3 Motherboard...
- Seite 174 1 7 4 1 7 4 1 7 4 1 7 4 1 7 4 ASRock 870 Extreme3 Motherboard...
- Seite 175 ® “ ” “ ” “ ” ® “ ” “ ” 1 7 5 1 7 5 1 7 5 1 7 5 1 7 5 ASRock 870 Extreme3 Motherboard...
- Seite 176 1 2 3 4 1 7 6 1 7 6 1 7 6 1 7 6 1 7 6 ASRock 870 Extreme3 Motherboard...
- Seite 177 1 7 7 1 7 7 1 7 7 1 7 7 1 7 7 ASRock 870 Extreme3 Motherboard...
- Seite 178 RESET CMOS 1 7 8 1 7 8 1 7 8 1 7 8 1 7 8 ASRock 870 Extreme3 Motherboard...
- Seite 179 ® ® ® ® ® ® ® 1 7 9 1 7 9 1 7 9 1 7 9 1 7 9 ASRock 870 Extreme3 Motherboard...
- Seite 180 ® ® ® ® 1 8 0 1 8 0 1 8 0 1 8 0 1 8 0 ASRock 870 Extreme3 Motherboard...
- Seite 181 ® ® 1 8 1 1 8 1 1 8 1 1 8 1 1 8 1 ASRock 870 Extreme3 Motherboard...
- Seite 182 1 8 2 1 8 2 1 8 2 1 8 2 1 8 2 ASRock 870 Extreme3 Motherboard...
- Seite 183 ™ ‘ ’ 1 8 3 1 8 3 1 8 3 1 8 3 1 8 3 ASRock 870 Extreme3 Motherboard...
- Seite 184 1 8 4 1 8 4 1 8 4 1 8 4 1 8 4 ASRock 870 Extreme3 Motherboard...
- Seite 185 ® ® 1 8 5 1 8 5 1 8 5 1 8 5 1 8 5 ASRock 870 Extreme3 Motherboard...
- Seite 186 ® ® ® ® 1 8 6 1 8 6 1 8 6 1 8 6 1 8 6 ASRock 870 Extreme3 Motherboard...
- Seite 187 ® 1 8 7 1 8 7 1 8 7 1 8 7 1 8 7 ASRock 870 Extreme3 Motherboard...
- Seite 188 1 8 8 1 8 8 1 8 8 1 8 8 1 8 8 ASRock 870 Extreme3 Motherboard...
- Seite 189 1 8 9 1 8 9 1 8 9 1 8 9 1 8 9 ASRock 870 Extreme3 Motherboard...
- Seite 190 1 9 0 1 9 0 1 9 0 1 9 0 1 9 0 ASRock 870 Extreme3 Motherboard...
- Seite 191 1 9 1 1 9 1 1 9 1 1 9 1 1 9 1 ASRock 870 Extreme3 Motherboard...
- Seite 192 1 9 2 1 9 2 1 9 2 1 9 2 1 9 2 ASRock 870 Extreme3 Motherboard...
- Seite 193 ® ® 1 9 3 1 9 3 1 9 3 1 9 3 1 9 3 ASRock 870 Extreme3 Motherboard...
- Seite 194 1 9 4 1 9 4 1 9 4 1 9 4 1 9 4 ASRock 870 Extreme3 Motherboard...
- Seite 195 1 9 5 1 9 5 1 9 5 1 9 5 1 9 5 ASRock 870 Extreme3 Motherboard...
- Seite 196 ® ® 1 9 6 1 9 6 1 9 6 1 9 6 1 9 6 ASRock 870 Extreme3 Motherboard...
- Seite 197 1 2 3 4 1 9 7 1 9 7 1 9 7 1 9 7 1 9 7 ASRock 870 Extreme3 Motherboard...
- Seite 198 1 9 8 1 9 8 1 9 8 1 9 8 1 9 8 ASRock 870 Extreme3 Motherboard...
- Seite 199 RESET CMOS ® ® 1 9 9 1 9 9 1 9 9 1 9 9 1 9 9 ASRock 870 Extreme3 Motherboard...
- Seite 200 ® ® ® ® ® ® ® ® 2 0 0 2 0 0 2 0 0 2 0 0 2 0 0 ASRock 870 Extreme3 Motherboard...
- Seite 201 ® ® ® 2 0 1 2 0 1 2 0 1 2 0 1 2 0 1 ASRock 870 Extreme3 Motherboard...
- Seite 202 2 0 2 2 0 2 2 0 2 2 0 2 2 0 2 ASRock 870 Extreme3 Motherboard...
- Seite 203 2 0 3 2 0 3 2 0 3 2 0 3 2 0 3 ASRock 870 Extreme3 Motherboard...
- Seite 204 2 0 4 2 0 4 2 0 4 2 0 4 2 0 4 ASRock 870 Extreme3 Motherboard...
- Seite 205 2 0 5 2 0 5 2 0 5 2 0 5 2 0 5 ASRock 870 Extreme3 Motherboard...
- Seite 206 ® ® 2 0 6 2 0 6 2 0 6 2 0 6 2 0 6 ASRock 870 Extreme3 Motherboard...
- Seite 207 ® ® ® ® 2 0 7 2 0 7 2 0 7 2 0 7 2 0 7 ASRock 870 Extreme3 Motherboard...
- Seite 208 ® 2 0 8 2 0 8 2 0 8 2 0 8 2 0 8 ASRock 870 Extreme3 Motherboard...
- Seite 209 2 0 9 2 0 9 2 0 9 2 0 9 2 0 9 ASRock 870 Extreme3 Motherboard...
- Seite 210 2 1 0 2 1 0 2 1 0 2 1 0 2 1 0 ASRock 870 Extreme3 Motherboard...
- Seite 211 2 1 1 2 1 1 2 1 1 2 1 1 2 1 1 ASRock 870 Extreme3 Motherboard...
- Seite 212 2 1 2 2 1 2 2 1 2 2 1 2 2 1 2 ASRock 870 Extreme3 Motherboard...
- Seite 213 2 1 3 2 1 3 2 1 3 2 1 3 2 1 3 ASRock 870 Extreme3 Motherboard...
- Seite 214 ® ® 2 1 4 2 1 4 2 1 4 2 1 4 2 1 4 ASRock 870 Extreme3 Motherboard...
- Seite 215 2 1 5 2 1 5 2 1 5 2 1 5 2 1 5 ASRock 870 Extreme3 Motherboard...
- Seite 216 2 1 6 2 1 6 2 1 6 2 1 6 2 1 6 ASRock 870 Extreme3 Motherboard...
- Seite 217 ® ® 2 1 7 2 1 7 2 1 7 2 1 7 2 1 7 ASRock 870 Extreme3 Motherboard...
- Seite 218 1 2 3 4 2 1 8 2 1 8 2 1 8 2 1 8 2 1 8 ASRock 870 Extreme3 Motherboard...
- Seite 219 2 1 9 2 1 9 2 1 9 2 1 9 2 1 9 ASRock 870 Extreme3 Motherboard...
- Seite 220 RESET CMOS ® ® 2 2 0 2 2 0 2 2 0 2 2 0 2 2 0 ASRock 870 Extreme3 Motherboard...
- Seite 221 ® ® ® ® ® ® ® ® 2 2 1 2 2 1 2 2 1 2 2 1 2 2 1 ASRock 870 Extreme3 Motherboard...
- Seite 222 ® 2 2 2 2 2 2 2 2 2 2 2 2 2 2 2 ASRock 870 Extreme3 Motherboard...
- Seite 223 ® ® ® 2 2 3 2 2 3 2 2 3 2 2 3 2 2 3 ASRock 870 Extreme3 Motherboard...