Herunterladen Inhalt Inhalt Diese Seite drucken
ASROCK 880GMH/USB3 Bedienungsanleitung
Vorschau ausblenden Andere Handbücher für 880GMH/USB3:

Werbung

Verfügbare Sprachen
  • DE

Verfügbare Sprachen

  • DEUTSCH, seite 28
Copyright Notice:
No part of this installation guide may be reproduced, transcribed, transmitted, or trans-
lated in any language, in any form or by any means, except duplication of documentation
by the purchaser for backup purpose, without written consent of ASRock Inc.
Products and corporate names appearing in this guide may or may not be registered
trademarks or copyrights of their respective companies, and are used only for identifi ca-
tion or explanation and to the owners' benefi t, without intent to infringe.
Disclaimer:
Specifi cations and information contained in this guide are furnished for informational use
only and subject to change without notice, and should not be constructed as a commit-
ment by ASRock. ASRock assumes no responsibility for any errors or omissions that may
appear in this guide.
With respect to the contents of this guide, ASRock does not provide warranty of any kind,
either expressed or implied, including but not limited to the implied warranties or condi-
tions of merchantability or fi tness for a particular purpose. In no event shall ASRock, its
directors, offi cers, employees, or agents be liable for any indirect, special, incidental, or
consequential damages (including damages for loss of profi ts, loss of business, loss of
data, interruption of business and the like), even if ASRock has been advised of the pos-
sibility of such damages arising from any defect or error in the guide or product.
This device complies with Part 15 of the FCC Rules. Operation is subject to the following
two conditions:
(1) this device may not cause harmful interference, and
(2) this device must accept any interference received, including interference that
may cause undesired operation.
CALIFORNIA, USA ONLY
The Lithium battery adopted on this motherboard contains Perchlorate, a toxic substance
controlled in Perchlorate Best Management Practices (BMP) regulations passed by the
California Legislature. When you discard the Lithium battery in California, USA, please
follow the related regulations in advance.
"Perchlorate Material-special handling may apply, see
www.dtsc.ca.gov/hazardouswaste/perchlorate"
The terms HDMI™ and HDMI High-Defi nition Multimedia Interface, and the HDMI logo
are trademarks or registered trademarks of HDMI Licensing LLC in the United States and
other countries.
1

Werbung

Inhaltsverzeichnis
loading

Inhaltszusammenfassung für ASROCK 880GMH/USB3

  • Seite 1 ASRock. ASRock assumes no responsibility for any errors or omissions that may appear in this guide. With respect to the contents of this guide, ASRock does not provide warranty of any kind, either expressed or implied, including but not limited to the implied warranties or condi- tions of merchantability or fi...
  • Seite 2: Motherboard-Layout

    PCI Express 2.0 x1 Slot (PCIE1; White) SPI Flash Memory (8Mb) Power Fan Connector (PWR_FAN1) SATAII Connector (SATAII_5 (PORT 4), Blue) Northbridge Controller SATAII Connector (SATAII_4 (PORT 3), Blue) USB_PW2 Jumper SATAII Connector (SATAII_3 (PORT 2), Blue) 2 2 2 2 2 ASRock 880GMH/USB3 Motherboard...
  • Seite 3 “ok”. Choose “2CH”, “4CH”, “6CH”, or “8CH” and then you are allowed to select “Realtek HDA Primary output” to use Rear Speaker, Central/Bass, and Front Speaker, or select “Realtek HDA Audio 2nd output” to use front panel audio. 3 3 3 3 3 ASRock 880GMH/USB3 Motherboard...
  • Seite 4: Package Contents

    In case any modifications of this manual occur, the updated version will be available on ASRock website without further notice. You may find the latest VGA cards and CPU support lists on ASRock website as well. ASRock website http://www.asrock.com If you require technical support related to this motherboard, please visit our website for specific information about the model you are using.
  • Seite 5: Specifications

    - Supports D-Sub with max. resolution up to 2048x1536 @ 85Hz - Supports HDCP function with DVI and HDMI ports - Supports Full HD 1080p Blu-ray (BD) / HD-DVD playback with DVI and HDMI ports 5 5 5 5 5 ASRock 880GMH/USB3 Motherboard...
  • Seite 6 - 8Mb AMI BIOS - AMI Legal BIOS - Supports “Plug and Play” - ACPI 1.1 Compliance Wake Up Events - Supports jumperfree - SMBIOS 2.3.1 Support - VCCM, NB, SB Voltage Multi-adjustment 6 6 6 6 6 ASRock 880GMH/USB3 Motherboard...
  • Seite 7 - FCC, CE, WHQL - ErP/EuP Ready (ErP/EuP ready power supply is required) (see CAUTION 14) * For detailed product information, please visit our website: http://www.asrock.com WARNING Please realize that there is a certain risk involved with overclocking, including adjusting the setting in the BIOS, applying Untied Overclocking Technology, or using the third- party overclocking tools.
  • Seite 8 SATAII hard disk drive to SATAII mode. You can also connect SATA hard disk to SATAII connector directly. It is a user-friendly ASRock overclocking tool which allows you to surveil your system by hardware monitor function and overclock your hardware devices to get the best system performance under Windows ®...
  • Seite 9 10. ASRock Instant Flash is a BIOS flash utility embedded in Flash ROM. This convenient BIOS update tool allows you to update system BIOS without entering operating systems first like MS-DOS or Windows ® . With this utility, you can press <F6> key during the POST or press <F2> key to BIOS setup menu to access ASRock Instant Flash.
  • Seite 10 When placing screws into the screw holes to secure the motherboard to the chassis, please do not over-tighten the screws! Doing so may damage the motherboard. ASRock 880GMH/USB3 Motherboard...
  • Seite 11: Cpu Installation

    Then connect the CPU fan to the CPU FAN connector (CPU_FAN1, see Page 2, No. 2). For proper installation, please kindly refer to the instruction manuals of the CPU fan and the heatsink. ASRock 880GMH/USB3 Motherboard...
  • Seite 12 It is not allowed to install a DDR or DDR2 memory module into DDR3 slot; otherwise, this motherboard and DIMM may be damaged. If you adopt DDR3 1800/1600 memory modules on this motherboard, it is recommended to install them on DDR3_A2 and DDR3_B2 slots. ASRock 880GMH/USB3 Motherboard...
  • Seite 13: Installing A Dimm

    DIMM if you force the DIMM into the slot at incorrect orientation. Step 3. Firmly insert the DIMM into the slot until the retaining clips at both ends fully snap back in place and the DIMM is properly seated. ASRock 880GMH/USB3 Motherboard...
  • Seite 14: Installing An Expansion Card

    Step 4. Align the card connector with the slot and press firmly until the card is completely seated on the slot. Step 5. Fasten the card to the chassis with screws. Step 6. Replace the system cover. ASRock 880GMH/USB3 Motherboard...
  • Seite 15 2. When you playback HDCP-protected video from Blu-ray (BD) or HD-DVD disc, the content will be displayed only in one of the two monitors instead of both monitors. ASRock 880GMH/USB3 Motherboard...
  • Seite 16 F. Set the “Screen Resolution” and “Color Quality” as appropriate for the second monitor. Click “Apply” or “OK” to apply these new values. G. Repeat steps C through E for the diaplay icon identified by the number one, two, three and four. ASRock 880GMH/USB3 Motherboard...
  • Seite 17 HDTV set-top-boxes, as well as few entertain- ment PCs requires a secure connection to a compliant display. Due to the increase in manufacturers employing HDCP in their equipment, it is highly recommended that the HDTV or LCD monitor you purchase is compatible. ASRock 880GMH/USB3 Motherboard...
  • Seite 18 Install the onboard VGA driver from our support CD to your system for both the onboard VGA and the discrete graphics card. Step 6. Restart your computer. Then you will find “ATI Catalyst Control Center” on ® your Windows taskbar. ATI Catalyst Control Center ASRock 880GMH/USB3 Motherboard...
  • Seite 19 Technologies Inc., and is used only for identification or explanation and to the owners’ benefit, without intent to infringe. * For further information of ATI Hybrid CrossFireX technology, please check AMD website for up dates and details. ASRock 880GMH/USB3 Motherboard...
  • Seite 20 BIOS. If you need to clear the CMOS when you just finish updating the BIOS, you must boot up the system first, and then shut it down before you do the clear-CMOS action. ASRock 880GMH/USB3 Motherboard...
  • Seite 21 (SATAII_5 (PORT 4): see p.2, No. 16) Serial ATA (SATA) Either end of the SATA data cable Data Cable can be connected to the SATA / SATAII hard disk or the SATAII (Optional) connector on the motherboard. ASRock 880GMH/USB3 Motherboard...
  • Seite 22 2. If you use AC’97 audio panel, please install it to the front panel audio header as below: A. Connect Mic_IN (MIC) to MIC2_L. B. Connect Audio_R (RIN) to OUT2_R and Audio_L (LIN) to OUT2_L. C. Connect Ground (GND) to Ground (GND). ASRock 880GMH/USB3 Motherboard...
  • Seite 23 If you plan to connect the 3-Pin CPU fan to the CPU fan connector on this motherboard, please connect it to Pin 1-3. Pin 1-3 Connected 3-Pin Fan Installation ATX Power Connector Please connect an ATX power supply to this connector. (24-pin ATXPWR1) (see p.2 No. 8) ASRock 880GMH/USB3 Motherboard...
  • Seite 24 20-Pin ATX Power Supply Installation ATX 12V Power Connector Please connect an ATX 12V power supply to this connector. (4-pin ATX12V1) (see p.2 No. 3) Serial port Header This COM1 header supports a serial port module. (9-pin COM1) (see p.2 No.27) ASRock 880GMH/USB3 Motherboard...
  • Seite 25 Using SATA / SATAII HDDs without NCQ and Hot Plug functions (IDE mode) STEP 1: Set up BIOS. Enter BIOS SETUP UTILITY Advanced screen Storage Configuration. Set the “SATA Operation Mode” option to [IDE]. STEP 2: Install Windows ® XP / XP 64-bit OS on your system. ASRock 880GMH/USB3 Motherboard...
  • Seite 26 PCI / PCIE buses are in the fixed mode so that FSB can operate under a more stable overclocking environment. Please refer to the warning on page 7 for the possible overclocking risk before you apply Untied Overclocking Technology. ASRock 880GMH/USB3 Motherboard...
  • Seite 27 CD-ROM drive. It will display the Main Menu automatically if “AUTORUN” is enabled in your computer. If the Main Menu does not appear automatically, locate and double-click on the file “ASSETUP.EXE” from the “BIN” folder in the Support CD to display the menus. ASRock 880GMH/USB3 Motherboard...
  • Seite 28 1. Einführung 1. Einführung 1. Einführung Wir danken Ihnen für den Kauf des ASRock 880GMH/USB3 Motherboard, ein zuverlässiges Produkt, welches unter den ständigen, strengen Qualitätskontrollen von ASRock gefertigt wurde. Es bietet Ihnen exzellente Leistung und robustes Design, gemäß der Verpflichtung von ASRock zu Qualität und Halbarkeit.
  • Seite 29: Spezifikationen

    - Unterstützt HDMI mit einer maximalen Auflösung von 1920 x 1200 (1080p) - Unterstützt Dual-Link-DVI mit einer maximalen Auflösung von 2560 x 1600 bei 75 Hz - Unterstützt D-Sub mit einer maximalen Auflösung von 2048 x 1536 bei 85 Hz ASRock 880GMH/USB3 Motherboard...
  • Seite 30 - Interne Audio-Anschlüsse - Anschluss für Audio auf der Gehäusevorderseite - 3 x USB 2.0-Anschlüsse (Unterstützung 6 zusätzlicher USB 2.0-Anschlüsse) BIOS - 8Mb AMI BIOS - AMI legal BIOS mit Unterstützung für “Plug and Play” - ACPI 1.1-Weckfunktionen ASRock 880GMH/USB3 Motherboard...
  • Seite 31 -Dienstprogramm, AMD Live! Explorer, AMD Fusion, ASRock-Software-Suite (CyberLink DVD Suite und Creative Sound Blaster X-Fi MB) (OEM- und Testversion) Einzigartige - ASRock OC Tuner (siehe VORSICHT 8) Eigenschaft - Intelligent Energy Saver (Intelligente Energiesparfunktion) (siehe VORSICHT 9) - Sofortstart - ASRock Instant Flash (siehe VORSICHT 10)
  • Seite 32 überblicken und Ihre Hardware-Geräte übertakten, um die beste ® Systemleistung unter der Windows Umgebung zu erreichen. Besuchen Sie bitte unsere Website für die Operationsverfahren von ASRock OC Tuner. ASRock-Website: http://www.asrock.com Mit einer eigenen, modernen Hardware und speziellem Softwaredesign, bietet der Intelligent Energy Saver eine revolutionäre Technologie zur bisher unerreichten Energieeinsparung.
  • Seite 33 Dateisystem FAT32/16/12 benutzen muss. 11. Allein der Name – OC DNA* – beschreibt es wörtlich, was die Software zu leisten vermag. OC DNA ist ein von ASRock exklusiv entwickeltes Dienstprogramm, das Nutzern eine bequeme Möglichkeit bietet, Übertaktungseinstellungen aufzuzeichnen und sie Anderen mitzuteilen.
  • Seite 34 Gemäß einer Empfehlung von Intel muss eine EuP-fähige Stromversorgung dem Standard entsprechen, was bedeutet, dass bei einem Stromverbrauch von 100 mA die 5-Volt-Standby-Energieeffizienz höher als 50% sein sollte. Für die Wahl einer EuP-fähigen Stromversorgung empfehlen wir Ihnen, weitere Details beim Hersteller der Stromversorgung abzufragen. ASRock 880GMH/USB3 Motherboard...
  • Seite 35: Installation

    Wenn Sie Komponenten ausbauen, legen Sie sie immer auf eine antistatische Unterlage, oder zurück in die Tüte, mit der die Komponente geliefert wurde. Wenn Sie das Motherboard mit den Schrauben an dem Computergehäuse befestigen, überziehen Sie bitte die Schrauben nicht! Das Motherboard kann sonst beschädigt werden. ASRock 880GMH/USB3 Motherboard...
  • Seite 36 Kontakt zueinander haben. Verbinden Sie dann den CPU- Lüfter mit dem CPU-LÜFTER-Anschluss (CPU_FAN1, siehe Seite 2, Nr. 2). Beziehen Sie sich für eine richtige Installation auf die Handbücher des CPU- Lüfters und des Kühlkörpers. ASRock 880GMH/USB3 Motherboard...
  • Seite 37: Installation Der Speichermodule (Dimm)

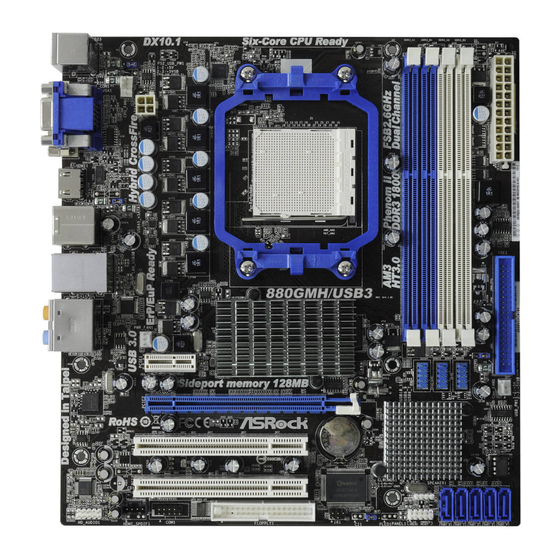
    2.3 Installation der Speichermodule (DIMM) 2.3 Installation der Speichermodule (DIMM) 2.3 Installation der Speichermodule (DIMM) Die Motherboards 880GMH/USB3 bieten vier 240-pol. DDR3 (Double Data Rate 3) DIMM-Steckplätze und unterstützen die Dual-Kanal-Speichertechnologie. Für die Dual-Kanalkonfiguration dürfen Sie nur identische (gleiche Marke, Geschwindigkeit, Größe und gleicher Chiptyp) DDR3 DIMM-Paare in den...
  • Seite 38: Einsetzen Eines Dimm-Moduls

    Steckplätze zu zwingen, führt dies zu dauerhaften Schäden am Mainboard und am DIMM-Modul. Schritt 3: Drücken Sie die DIMM-Module fest in die Steckplätze, so dass die Halteklammern an beiden Enden des Moduls einschnappen und das DIMM-Modul fest an Ort und Stelle sitzt. ASRock 880GMH/USB3 Motherboard...
  • Seite 39: Einbau Einer Erweiterungskarte

    2.4 Erweiterungssteckplätze: (PCI- und PCI Express-Slots): 2.4 Erweiterungssteckplätze: (PCI- und PCI Express-Slots): 2.4 Erweiterungssteckplätze: (PCI- und PCI Express-Slots): Es stehen 2 PCI- und 2 PCI Express-Slot auf dem 880GMH/USB3 Motherboard zur Verfügung. PCI-Slots: PCI-Slots werden zur Installation von Erweiterungskarten mit dem 32bit PCI-Interface genutzt.
  • Seite 40 ® XP nicht verfügbar. Künftig soll ATI Hybrid CrossFireX jedoch auch vom Betriebssystem Windows ® unterstützt werden. Bei einem Besuch unserer Website können Sie sich darüber informieren. Detaillierte Bedienschritte und kompatible PCI Express-Grafikkarten sind auf Seite 18. ASRock 880GMH/USB3 Motherboard...
  • Seite 41: Einstellung Der Jumper

    CMOS Einstellung löschen Hinweis: CLRCMOS1 erlaubt Ihnen das Löschen der CMOS-Daten. Diese beinhalten das System-Passwort, Datum, Zeit und die verschiedenen BIOS-Parameter. Um die Systemparameter zu löschen und auf die Werkseinstellung zurückzusetzen, schalten Sie bitte den Computer ab ASRock 880GMH/USB3 Motherboard...
  • Seite 42 SATAII_1 SATAII_2 SATAII_3 SATAII_4 SATAII_5 ermöglicht eine siehe S.2, No. 18) (PORT 0) (PORT 1) (PORT 2) (PORT 3) (PORT 4) Datenübertragungsrate bis (SATAII_4 (PORT 3): 3,0 Gb/s. siehe S.2, No. 17) (SATAII_5 (PORT 4): siehe S.2, No. 16) ASRock 880GMH/USB3 Motherboard...
  • Seite 43 (CD1: siehe S.2, No. 28) MPEG-Karten mit Ihrem System zu verbinden. Anschluss für Audio auf Dieses Interface zu einem der Gehäusevorderseite Audio-Panel auf der Vorderseite Ihres Gehäuses, ermöglicht (9-Pin HD_AUDIO1) Ihnen eine bequeme (siehe S.2, No. 29) Kontrolle über Audio-Geräte. ASRock 880GMH/USB3 Motherboard...
  • Seite 44 / Vista 64 Bit: Wählen Sie im Realtek-Bedienfeld die „FrontMic“ (Vorderes Mikrofon)- Registerkarte. Passen Sie die „Recording Volume“ (Aufnahmelautstärke) System Panel Anschluss Dieser Anschluss ist für die verschiedenen Funktionen der (9-Pin PANEL1) Gehäusefront. (siehe S.2, No. 21) ASRock 880GMH/USB3 Motherboard...
  • Seite 45 Obwohl dieses Motherboard einen 24-pol. ATX-Stromanschluss bietet, kann es auch mit einem modifizierten traditionellen 20-pol. ATX-Netzteil verwendet werden. Um ein 20-pol. ATX-Netzteil zu verwenden, stecken Sie den Stecker mit Pin 1 und Pin 13 ein. Installation eines 20-pol. ATX-Netzteils ASRock 880GMH/USB3 Motherboard...
  • Seite 46 (siehe S.2, No. 3) damit ausreichend Strom geliefert werden kann. Andernfalls reicht der Strom nicht aus, das System zu starten. COM-Anschluss-Header Dieser COM-Anschluss- Header wird verwendet, um (9-pin COM1) ein COM-Anschlussmodul zu (siehe S.2 - No. 27) unterstützen. ASRock 880GMH/USB3 Motherboard...
  • Seite 47: Installation Von Windows Funktionen

    SCHRITT 1: Konfigurieren Sie BIOS. Rufen Sie im BIOS-DIENSTPROGRAMM den Bildschirm „Erweitert“ und „Storage-Konfiguration“ auf. Setzen Sie die Option “SATA Operation Mode” (SATA-Betriebsmodus) auf [IDE]. SCHRITT 2: Installieren Sie Windows ® XP / XP 64-Bit in Ihrem System. ASRock 880GMH/USB3 Motherboard...
  • Seite 48 Rufen Sie im BIOS-DIENSTPROGRAMM den Bildschirm „Erweitert“ und „Storage-Konfiguration“ auf. Setzen Sie die Option “SATA Operation Mode” (SATA-Betriebsmodus) auf [AHCI]. SCHRITT 2: Installieren Sie Windows ® 7 / 7 64-Bit / Vista / Vista 64-Bit in Ihrem System. ASRock 880GMH/USB3 Motherboard...
  • Seite 49 File ASSETUP.EXE im BIN-Verzeichnis der Support-CD, um die Menüs aufzurufen. Das Setup-Programm soll es Ihnen so leicht wie möglich machen. Es ist menügesteuert, d.h. Sie können in den verschiedenen Untermenüs Ihre Auswahl treffen und die Programme werden dann automatisch installiert. ASRock 880GMH/USB3 Motherboard...
  • Seite 50: Contenu Du Paquet

    1. Introduction Merci pour votre achat d’une carte mère ASRock 880GMH/USB3 une carte mère très fiable produite selon les critères de qualité rigoureux de ASRock. Elle offre des performances excellentes et une conception robuste conformément à l’engagement d’ASRock sur la qualité et la fiabilité au long terme.
  • Seite 51: Spécifications

    - Trois options de sortie VGA : D-Sub, DVI-D et HDMI - Prend en charge le HDMI avec une résolution maximale jusqu’à 1920x1200 (1080p) - Prend en charge le DVI Dual-link avec une résolution maximale jusqu’à 2560x1600 @ 75Hz ASRock 880GMH/USB3 Motherboard...
  • Seite 52 - 1 x En-tête du module infrarouge - 1 x En-tête de port COM - Connecteur pour ventilateur de CPU/Châssis/Ventilateur - br. 24 connecteur d’alimentation ATX - br. 4 connecteur d’alimentation 12V ATX - Connecteurs audio internes - Connecteur audio panneau avant ASRock 880GMH/USB3 Motherboard...
  • Seite 53 - Pilotes, utilitaires, logiciel anti-virus (Version d’essai), Utilitaire AMD OverDrive , AMD Live! Explorer, AMD Fusion, Suite logicielle ASRock (CyberLink DVD Suite et Creative Sound Blaster X-Fi MB) (Version OEM et d’essai) Caractéristique - Tuner ASRock OC (voir ATTENTION 8) unique - Économiseur d’énergie intelligent (voir ATTENTION 9)
  • Seite 54 SATAII au mode SATAII. Vous pouvez aussi directement connecter le disque dur SATA au connecteur SATAII. Il s’agit d’un usage facile ASRock overclocking outil qui vous permet de surveiller votre système en fonction de la monitrice de matériel et overclocker vos périphériques de matériels pour obtenir les meilleures...
  • Seite 55 (L’économiseur d’énergie intelligent). Site Web d’ASRock: http://www.asrock.com 10. O ASRock Instant Flash é um utilitário de flash do BIOS incorporado na memória Flash ROM. Esta prática ferramenta de actualização do BIOS permite-lhe actualizar o BIOS do sistema sem necessitar de entrar nos ®...
  • Seite 56 5v en mode de veille doit être supérieure à 50% pour 100 mA de consommation de courant. Pour choisir une alimentation électrique conforme à la norme EuP, nous vous recommandons de consulter votre fournisseur de courant pour plus de détails. ASRock 880GMH/USB3 Motherboard...
  • Seite 57 5. Lorsque vous placez les vis dans les orifices pour vis pour fixer la carte mère sur le châssis, ne serrez pas trop les vis ! Vous risquez sinon d’endommager la carte mère. ASRock 880GMH/USB3 Motherboard...
  • Seite 58 Ensuite, connectez le ventilateur du CPU à la prise du VENTILATEUR DU CPU (CPU_FAN1, reportez-vous en page 2, No. 2). Pour une bonne installation, veuillez vous référer aux manuels d’instruction sur le ventilateur du CPU et le dissipateur. ASRock 880GMH/USB3 Motherboard...
  • Seite 59 2.3 Installation des modules m émoire [DIMM] 2.3 Installation des modules m émoire [DIMM] La carte mère 880GMH/USB3 dispose de quatre emplacements DIMM DDR3 (Double Data Rate 3) de 240-broches, et supporte la Technologie de Mémoire à Canal Double. Pour effectuer une configuration à canal double, vous devez toujours installer des paires de DIMM DDR3 identiques (de la même marque, de la...
  • Seite 60 DIMM. Etape 3. Insérez fermement le module DIMM dans son emplacement jusqu’à ce que les clips de maintien situés aux deux extrémités se ferment complètement et que le module DIMM soit inséré correctement. ASRock 880GMH/USB3 Motherboard...
  • Seite 61 Slot d’extension (Slots PCI et Slots PCI Express) Slot d’extension (Slots PCI et Slots PCI Express) Il y a 2 ports PCI et 2 ports PCI Express sur la carte mère 880GMH/USB3. Slots PCI: Les slots PCI sont utilisés pour installer des cartes d’extension dotées d’une interface PCI 32 bits.
  • Seite 62 USB6_7/8_9/ 10_11 de réveiller le système. Note: Pour sélectionner +5VSB, il faut obligatoirement 2 Amp et un courant standby supérieur fourni par l’alimentation. Effacer la CMOS (CLRCMOS1) (voir p.2 fig. 24) Paramètres Effacer la par défaut CMOS ASRock 880GMH/USB3 Motherboard...
  • Seite 63 (IDE1 br. 39, voir p.2 No. 10) connecteur bleu connecteur noir vers la carte mère vers le disque dur Câble ATA 66/100/133 80 conducteurs Note: Veuillez vous reporter aux instructions du fabricant de votre IDE périphérique pour les détails. ASRock 880GMH/USB3 Motherboard...
  • Seite 64 (voir p.2 No. 25) fil. Connecteurs audio internes Ils vous permettent de gérer des entrées audio à partir de sources (CD1 br. 4) stéréo comme un CD-ROM, (CD1: voir p.2 fig. 28) DVD-ROM, un tuner TV ou une carte MPEG. ASRock 880GMH/USB3 Motherboard...
  • Seite 65 “FrontMic” (Micro avant). ® Pour les systèmes d’exploitation Windows 7 / 7 64 bits / Vista / Vista 64 bits : Allez sur l’onglet “FrontMic” (Micro avant) sur le Panneau de contrôle Realtek. Ajustez “Recording Volume” (Volume d’enregistrement). ASRock 880GMH/USB3 Motherboard...
  • Seite 66 ATX 24 broches, elle peut encore fonctionner si vous adopter une alimentation traditionnelle ATX 20 broches. Pour utiliser une alimentation ATX 20 broches, branchez à l’alimentation électrique ainsi qu’aux broches 1 et 13. 20-Installation de l’alimentation électrique ATX ASRock 880GMH/USB3 Motherboard...
  • Seite 67 Faute de quoi, il ne sera pas possible de mettre sous tension. En-tête de port COM Cette en-tête de port COM est utilisée pour prendre en charge (COM1 br.9) un module de port COM. (voir p.2 No. 27) ASRock 880GMH/USB3 Motherboard...
  • Seite 68 A. Entrez dans UTILITAIRE DE CONFIGURATION BIOS écran Avancé Configuration Storage. B. Réglez l’option “SATA Operation Mode”« Mode de fonctionnement SATA » sur [IDE]. ETAPE 2: Installer le système d’exploitation Windows ® XP / XP 64-bit sur votre système. ASRock 880GMH/USB3 Motherboard...
  • Seite 69 écran Avancé Configuration Storage. B. Réglez l’option “SATA Operation Mode”« Mode de fonctionnement SATA » sur [AHCI]. ® ETAPE 2: Installer le système d’exploitation Windows 7 / 7 64-bit / Vista / Vista 64-bit sur votre système. ASRock 880GMH/USB3 Motherboard...
  • Seite 70 CD-ROM. Le Menu principal s’affiche automatiquement si “AUTORUN” est activé dans votre ordinateur. Si le Menu principal n’apparaît pas automatiquement, localisez dans le CD technique le fichier “ASSETUP.EXE” dans le dossier BIN et double-cliquez dessus pour afficher les menus. ASRock 880GMH/USB3 Motherboard...
  • Seite 71 Grazie per aver scelto una scheda madre ASRock 880GMH/USB3, una scheda madre affidabile prodotta secondo i severi criteri di qualità ASRock. Le prestazioni eccellenti e il design robusto si conformano all’impegno di ASRock nella ricerca della qualità e della resistenza. Questa Guida Rapida all’Installazione contiene l’introduzione alla motherboard e la guida passo-passo all’installazione.
  • Seite 72 - Supporta HDMI con risoluzione massima fino a 1920x1200 (1080p) - Supporta DVI Dual-link con risoluzione massima fino a 2560x1600 @ 75Hz - Supporta D-Sub con risoluzione massima fino a 2048x1536 @ 85Hz - Supporto della funzione HDCP con le porte DVI e HDMI ASRock 880GMH/USB3 Motherboard...
  • Seite 73 - 3 x Collettore USB 2.0 (supporta 6 porte USB 2.0) BIOS - 8Mb AMI BIOS - Suppor AMI legal BIOS - Supporta “Plug and Play” - Compatibile con ACPI 1.1 wake up events - Supporta jumperfree - Supporta SMBIOS 2.3.1 ASRock 880GMH/USB3 Motherboard...
  • Seite 74 - Predisposto ErP/EuP (è necessaria l’alimentazione predisposta per il sistema ErP/EuP) (vedi ATTENZIONE 14) * Per ulteriori informazioni, prego visitare il nostro sito internet: http://www.asrock.com AVVISO Si prega di prendere atto che la procedura di overclocking implica dei rischi, come anche la regolazione delle impostazioni del BIOS, l’applicazione della tecnologia Untied Overclocking...
  • Seite 75 SATAII per la modalità SATAII. È anche possibile connettere il disco rigido SATA direttamente al connettore SATAII. Si tratta di uno strumento di sicronizzazione ASRock di face uso in grado di implementare il controllo del sistema tramite la funzione di hardware monitor e sincronizzare le Vostre unita‘...
  • Seite 76 Energy Saver (Risparmio intelligente dell’energia). Sito Internet di ASRock: http://www.asrock.com 10. ASRock Instant Flash è una utilità Flash BIOS integrata nella Flash ROM. Questo comodo strumento d’aggiornamento del BIOS permette di aggiornare il sistema BIOS senza accedere a sistemi operativi come MS- DOS or Windows ®...
  • Seite 77 5 v è più alta del 50% con un consumo di corrente di 100 mA. Per la scelta di un’alimentatore predisposto EuP consigliamo di verificare ulteriori dettagli con il produttore. ASRock 880GMH/USB3 Motherboard...
  • Seite 78 5. Nell’usare i giraviti per fissare la scheda madre al telaio non serrare eccessivamente le viti! Altrimenti si rischia di danneggiare la scheda madre. ASRock 880GMH/USB3 Motherboard...
  • Seite 79 Quindi collegare la ventolina CPU al connettore PU FAN (CPU_FAN1, fare riferimento a pagina 2, Numero 2). Per eseguire un’installazione appropriata, fare riferimento al manuale d’istruzioni della ventolina CPU e del dispersore di calore. ASRock 880GMH/USB3 Motherboard...
  • Seite 80 2.3 Installazione dei moduli di memoria (DIMM) 2.3 Installazione dei moduli di memoria (DIMM) La scheda madre 880GMH/USB3 fornisce quattro alloggiamenti DIMM DDR3 (Double Data Rate 3) a 240 pin, e supporta la tecnologia Dual Channel Memory. Per la configurazione a due canali, è necessario installare sempre coppie identiche (stessa marca, velocità, dimensioni e tipo di chip) di DIMM DDR3 negli alloggiamenti...
  • Seite 81 DIMM stessa. Step 3. Inserire saldamente la DIMM nello slot fino a far scattare completamente in posizione i fermagli di ritegno alle due estremità e fino ad installare correttamente la DIMM nella sua sede. ASRock 880GMH/USB3 Motherboard...
  • Seite 82 Slot di espansione (Slot PCI ed Slot PCI Express) Slot di espansione (Slot PCI ed Slot PCI Express) Sulla scheda madre 880GMH/USB3 c’è 2 slot PCI ed 2 slot PCI Express. Slot PCI: Sono utilizzati per installare schede di espansione con Interfaccia PCI a 32-bit.
  • Seite 83 Dopo aver lasciato trascorrere 15 secondi, utilizzare un cappuccio jumper per cortocircuitare i pin 2 e 3 su CLRCMOS1 per 5 secondi. Dopo aver cortocircuitato il jumper Clear CMOS ASRock 880GMH/USB3 Motherboard...
  • Seite 84 (PORT 0) (PORT 1) (PORT 2) (PORT 3) (PORT 4) di memoria interni. L’interfaccia (SATAII_4 (PORT 3): SATAII attuale permette velocità vedi p.2 Nr. 17) di trasferimento dati fino a (SATAII_5 (PORT 4): 3.0 Gb/s. vedi p.2 Nr. 16) ASRock 880GMH/USB3 Motherboard...
  • Seite 85 (CD1: vedi p.2 item 28) ROM,TV tuner, o schede MPEG. Connettore audio sul È un’interfaccia per il cavo del pannello frontale pannello audio. Che consente connessione facile e controllo (9-pin HD_AUDIO1) dei dispositivi audio. (vedi p.2 item 29) ASRock 880GMH/USB3 Motherboard...
  • Seite 86 64-bit: Andare alla scheda “FrontMic” (Microfono frontale) del pannello di controllo Realtek. Regolare la voce “Recording Volume” (Volume registrazione). Connettore del panello Questo connettore accoglie frontale diverse funzioni del pannello frontale. (9-pin PANEL1) (vedi p.2 item 21) ASRock 880GMH/USB3 Motherboard...
  • Seite 87 Installazione dell’alimentatore ATX a 20 pin Connettore ATX 12V È necessario collegare una alimentazione con spinotto da (4-pin ATX12V1) 12V ATX a questo connettore (vedi p.2 item 3) in modo che possa fornire energia sufficiente. In caso contrario l’unità non si avvia. ASRock 880GMH/USB3 Motherboard...
  • Seite 88 Se si desidera installare Windows 7 / 7 64-bit / Vista / Vista 64-bit / XP / XP 64-bit sulle unità disco rigido SATA / SATAII senza funzioni RAID, attenersi alle procedure che seguono relative al sistema operativo che si installa. ASRock 880GMH/USB3 Motherboard...
  • Seite 89 1° PASSO: Configurare il BIOS. Entrare in UTILIT BIOS SETUP Avanzate Configurazione Storage. Impostare l’opzione “SATA Operation Mode” (Modalità operativa SATA) su [AHCI]. Passo 2: Installazione di Windows ® 7 / 7 64-bit / Vista / Vista 64-bit sul sistema. ASRock 880GMH/USB3 Motherboard...
  • Seite 90 ROM. Se la funzione “AUTORUN” è attivata nel computer, apparirà automaticamente il Menù principale. Se il Menù principale non appare automaticamente, posizionarsi sul file ASSETUP.EXE nel CESTINO del CD di supporto e cliccare due volte per visualizzare i menù. ASRock 880GMH/USB3 Motherboard...
  • Seite 91 1. Introducción 1. Introducción Gracias por su compra de ASRock 880GMH/USB3 placa madre, una placa de confianza producida bajo el control de calidad estricto y persistente. La placa madre provee realización excelente con un diseño robusto conforme al compromiso de calidad y resistencia de ASRock.
  • Seite 92 - Admite conexiones DVI Dual-link con una resolución máxima de 2560 x 1600 @ 75 Hz - Admite D-Sub con una resolución máxima de 2048x1536 a 85 Hz - Admite la función HDCP con puertos DVI y HDMI ASRock 880GMH/USB3 Motherboard...
  • Seite 93 - Conector de Audio Interno - Conector de audio de panel frontal - 3 x Cabezal USB 2.0 (admite 6 puertos USB 2.0 adicionales) BIOS - 8Mb AMI BIOS - AMI legal BIOS - Soporta “Plug and Play” ASRock 880GMH/USB3 Motherboard...
  • Seite 94 AMD Fusion, conjunto de aplicaciones ASRock (CyberLink DVD Suite y Creative Sound Blaster X-Fi MB) (OEM y versión de prueba) Característica - Sintonizador de ASRock OC (vea ATENCIÓN 8) Única - Administrador de energía inteligente (vea ATENCIÓN 9) - Instant Boot - ASRock Instant Flash (vea ATENCIÓN 10)
  • Seite 95 Web para obtener los módulos de memoria compatibles. Sitio Web de ASRock: http://www.asrock.com Debido a las limitaciones del sistema, el tamaño real de la memoria debe ser inferior a 4GB para que el sistema pueda funcionar bajo Windows ®...
  • Seite 96 (Economizador de energía inteligente). Sitio web de ASRock: http://www.asrock.com 10. ASRock Instant Flash es una utilidad de programación del BIOS que se encuentra almacenada en la memoria Flash ROM. Esta sencilla herramienta de actualización de BIOS le permitirá actualizar el BIOS del sistema sin necesidad de acceder a ningún sistema operativo, como MS-DOS o...
  • Seite 97 50% con un consumo de corriente de 100mA. Para seleccionar una fuente de alimentación que cumpla la directiva EuP, le recomendamos que consulte con el fabricante de la fuente de alimentación para obtener más detalles. ASRock 880GMH/USB3 Motherboard...
  • Seite 98: Instalación

    4. Ponga cualquier componente deslocalizado sobre la bolsa anti-estástica que viene con la placa madre. 5. Al colocar los tornillos en sus agujeros para fijar la placa madre en el chasis, no los apriete demasiado. Eso podría dañar la placa madre. ASRock 880GMH/USB3 Motherboard...
  • Seite 99 Conecte entonces el ventilador de la CPU al conector CPU FAN (CPU_FAN1, consulte Página 2, N. 2). Para realizar la instalación correctamente, consulte el manual de instrucciones del ventilador de la CPU y el radiador. ASRock 880GMH/USB3 Motherboard...
  • Seite 100 2.3 Instalación de Memoria 2.3 Instalación de Memoria La placa 880GMH/USB3 ofrece cuatro ranuras DIMM DDR3 de 240 pines, y soporta Tecnología de Memoria de Doble Canal. Para la configuración de doble canal, necesitará instalar siempre pares DIMM DDR3 idénticos (de la misma marca, velocidad, tamaño y tipo) en las ranuras del mismo color.
  • Seite 101 Paso 3. Inserte la DIMM con firmeza dentro de la ranura hasta que los clips de sujeción de ambos lados queden completamente introducidos en su sitio y la DIMM se haya asentado apropiadamente. 1 0 1 1 0 1 1 0 1 1 0 1 1 0 1 ASRock 880GMH/USB3 Motherboard...
  • Seite 102 Express) Express) Express) Express) Express) La placa madre 880GMH/USB3 cuenta con 2 ranuras PCI y 2 ranuras PCI Express. Ranura PCI: Para instalar tarjetas de expansión que tienen 32-bit Interface PCI. Ranura PCI Express: La ranura PCIE1 (ranura PCIE x1, Bianco) se utiliza con tarjetas PCI Express con ancho de banda x1, como las tarjetas Gigabit LAN, SATA2.
  • Seite 103 1 0 3 1 0 3 1 0 3 1 0 3 1 0 3 ASRock 880GMH/USB3 Motherboard...
  • Seite 104 SATAII_1 SATAII_2 SATAII_3 SATAII_4 SATAII_5 (SATAII_5 (PORT 4): (PORT 0) (PORT 1) (PORT 2) (PORT 3) (PORT 4) vea p.2, No. 16) 1 0 4 1 0 4 1 0 4 1 0 4 1 0 4 ASRock 880GMH/USB3 Motherboard...
  • Seite 105 (9-pin HD_AUDIO1) conveniente de apparatos de (vea p.2, No. 29) Audio. 1 0 5 1 0 5 1 0 5 1 0 5 1 0 5 ASRock 880GMH/USB3 Motherboard...
  • Seite 106 (Volumen de grabación). Conector del Panel del Este conector acomoda varias systema funciones de panel frontal del systema. (9-pin PANEL1) (vea p.2, No. 21) 1 0 6 1 0 6 1 0 6 1 0 6 1 0 6 ASRock 880GMH/USB3 Motherboard...
  • Seite 107 Para usar una fuente de alimentación ATX de 20 pins, por favor, conecte su fuente de alimentación usando los Pins 1 y 13. Instalación de una Fuente de Alimentación ATX de 20 Pins 1 0 7 1 0 7 1 0 7 1 0 7 1 0 7 ASRock 880GMH/USB3 Motherboard...
  • Seite 108 Cabezal del puerto COM Este cabezal del puerto COM se utiliza para admitir un (9-pin COM1) módulo de puerto COM. (vea p.2, No. 27) 1 0 8 1 0 8 1 0 8 1 0 8 1 0 8 ASRock 880GMH/USB3 Motherboard...
  • Seite 109 Establezca la opción “SATA Operation Mode”(Modo de funcionamiento SATA) en [IDE]. PASO 2: Instale el sistema operativo Windows ® XP / XP 64 bits en su sistema. 1 0 9 1 0 9 1 0 9 1 0 9 1 0 9 ASRock 880GMH/USB3 Motherboard...
  • Seite 110 SATA) en [AHCI]. ® PASO 2: Instale el sistema operativo Windows 7 / 7 64 bits / Vista Vista 64 bits en su sistema. 1 1 0 1 1 0 1 1 0 1 1 0 1 1 0 ASRock 880GMH/USB3 Motherboard...
  • Seite 111 Menú Principal automáticamente si «AUTORUN» está habilitado en su computadora. Si el Menú Principal no aparece automáticamente, localice y doble- pulse en el archivo ASSETUP.EXE para iniciar la instalación. 1 1 1 1 1 1 1 1 1 1 1 1 1 1 1 ASRock 880GMH/USB3 Motherboard...
  • Seite 112 ASRock. ASRock Micro ATX: 9,6 x 9,0 / 24,4 x 22,9 ASRock ASRock Ultra ATA 66/100/133 Serial ATA (SATA) ( 1 1 2 1 1 2 1 1 2 1 1 2 1 1 2 ASRock 880GMH/USB3 Motherboard...
  • Seite 113 9,6 x 9,0 / 2 4 , 4 x 2 2 , 9 1 1 3 1 1 3 1 1 3 1 1 3 1 1 3 ASRock 880GMH/USB3 Motherboard...
  • Seite 114 Hot-Plug 1 1 4 1 1 4 1 1 4 1 1 4 1 1 4 ASRock 880GMH/USB3 Motherboard...
  • Seite 115 1 1 5 1 1 5 1 1 5 1 1 5 1 1 5 ASRock 880GMH/USB3 Motherboard...
  • Seite 116 1 1 6 1 1 6 1 1 6 1 1 6 1 1 6 ASRock 880GMH/USB3 Motherboard...
  • Seite 117 1 1 7 1 1 7 1 1 7 1 1 7 1 1 7 ASRock 880GMH/USB3 Motherboard...
  • Seite 118 1 1 8 1 1 8 1 1 8 1 1 8 1 1 8 ASRock 880GMH/USB3 Motherboard...
  • Seite 119 1 1 9 1 1 9 1 1 9 1 1 9 1 1 9 ASRock 880GMH/USB3 Motherboard...
  • Seite 120 DDR3_A1 DDR3_B1 DDR3_A2 DDR3_B2 (3)* 1 2 0 1 2 0 1 2 0 1 2 0 1 2 0 ASRock 880GMH/USB3 Motherboard...
  • Seite 121 DIMM DIMM DIMM 1 2 1 1 2 1 1 2 1 1 2 1 1 2 1 ASRock 880GMH/USB3 Motherboard...
  • Seite 122 1 2 2 1 2 2 1 2 2 1 2 2 1 2 2 ASRock 880GMH/USB3 Motherboard...
  • Seite 123 Short Open CMOS CMOS 1 2 3 1 2 3 1 2 3 1 2 3 1 2 3 ASRock 880GMH/USB3 Motherboard...
  • Seite 124 1 SATAII_1 SATAII_2 SATAII_3 SATAII_4 SATAII_5 (PORT 0) (PORT 1) (PORT 2) (PORT 3) (PORT 4) 1 2 4 1 2 4 1 2 4 1 2 4 1 2 4 ASRock 880GMH/USB3 Motherboard...
  • Seite 125 IR1) 1 2 5 1 2 5 1 2 5 1 2 5 1 2 5 ASRock 880GMH/USB3 Motherboard...
  • Seite 126 1 2 6 1 2 6 1 2 6 1 2 6 1 2 6 ASRock 880GMH/USB3 Motherboard...
  • Seite 127 PANEL1) ATX. 1 2 7 1 2 7 1 2 7 1 2 7 1 2 7 ASRock 880GMH/USB3 Motherboard...
  • Seite 128 12V-ATX ATX 12 , COM- 1 2 8 1 2 8 1 2 8 1 2 8 1 2 8 ASRock 880GMH/USB3 Motherboard...
  • Seite 129 1 2 9 1 2 9 1 2 9 1 2 9 1 2 9 ASRock 880GMH/USB3 Motherboard...
  • Seite 130 1 3 0 1 3 0 1 3 0 1 3 0 1 3 0 ASRock 880GMH/USB3 Motherboard...
  • Seite 131 BIOS Setup Power-On-Self-Test – POST POST BIOS Setup POST Ctrl> + <Alt> + <Delete BIOS Setup 1 3 1 1 3 1 1 3 1 1 3 1 1 3 1 ASRock 880GMH/USB3 Motherboard...
  • Seite 132 1 3 2 1 3 2 1 3 2 1 3 2 1 3 2 ASRock 880GMH/USB3 Motherboard...
  • Seite 133 ‘ ’ 1 3 3 1 3 3 1 3 3 1 3 3 1 3 3 ASRock 880GMH/USB3 Motherboard...
  • Seite 134 1 3 4 1 3 4 1 3 4 1 3 4 1 3 4 ASRock 880GMH/USB3 Motherboard...
  • Seite 135 ® 1 3 5 1 3 5 1 3 5 1 3 5 1 3 5 ASRock 880GMH/USB3 Motherboard...
  • Seite 136 “ ” ® ® “ ” “ ” ® 1 3 6 1 3 6 1 3 6 1 3 6 1 3 6 ASRock 880GMH/USB3 Motherboard...
  • Seite 137 ® 1 3 7 1 3 7 1 3 7 1 3 7 1 3 7 ASRock 880GMH/USB3 Motherboard...
  • Seite 138 1 3 8 1 3 8 1 3 8 1 3 8 1 3 8 ASRock 880GMH/USB3 Motherboard...
  • Seite 139 1 3 9 1 3 9 1 3 9 1 3 9 1 3 9 ASRock 880GMH/USB3 Motherboard...
  • Seite 140 “ ”( 1 4 0 1 4 0 1 4 0 1 4 0 1 4 0 ASRock 880GMH/USB3 Motherboard...
  • Seite 141 1 4 1 1 4 1 1 4 1 1 4 1 1 4 1 ASRock 880GMH/USB3 Motherboard...
  • Seite 142 ® ® ® 1 4 2 1 4 2 1 4 2 1 4 2 1 4 2 ASRock 880GMH/USB3 Motherboard...
  • Seite 143 “ ” “ ” “ ” “ ” “ ” 1 4 3 1 4 3 1 4 3 1 4 3 1 4 3 ASRock 880GMH/USB3 Motherboard...
  • Seite 144 SATAII_1 SATAII_2 SATAII_3 SATAII_4 SATAII_5 (PORT 0) (PORT 1) (PORT 2) (PORT 3) (PORT 4) 1 4 4 1 4 4 1 4 4 1 4 4 1 4 4 ASRock 880GMH/USB3 Motherboard...
  • Seite 145 1 4 5 1 4 5 1 4 5 1 4 5 1 4 5 ASRock 880GMH/USB3 Motherboard...
  • Seite 146 ® “ ” “ ” “ ” ® “ ” “ ” 1 4 6 1 4 6 1 4 6 1 4 6 1 4 6 ASRock 880GMH/USB3 Motherboard...
  • Seite 147 1 4 7 1 4 7 1 4 7 1 4 7 1 4 7 ASRock 880GMH/USB3 Motherboard...
  • Seite 148 ® ® ® ® 1 4 8 1 4 8 1 4 8 1 4 8 1 4 8 ASRock 880GMH/USB3 Motherboard...
  • Seite 149 ® ® ® ® ® ® ® 1 4 9 1 4 9 1 4 9 1 4 9 1 4 9 ASRock 880GMH/USB3 Motherboard...
  • Seite 150 “ ” “ ” 1 5 0 1 5 0 1 5 0 1 5 0 1 5 0 ASRock 880GMH/USB3 Motherboard...
  • Seite 151 1 5 1 1 5 1 1 5 1 1 5 1 1 5 1 ASRock 880GMH/USB3 Motherboard...
  • Seite 152 ‘ ’ 1 5 2 1 5 2 1 5 2 1 5 2 1 5 2 ASRock 880GMH/USB3 Motherboard...
  • Seite 153 1 5 3 1 5 3 1 5 3 1 5 3 1 5 3 ASRock 880GMH/USB3 Motherboard...
  • Seite 154 ® ® ® 1 5 4 1 5 4 1 5 4 1 5 4 1 5 4 ASRock 880GMH/USB3 Motherboard...
  • Seite 155 “ ” ® ® ® 1 5 5 1 5 5 1 5 5 1 5 5 1 5 5 ASRock 880GMH/USB3 Motherboard...
  • Seite 156 ® – 1 5 6 1 5 6 1 5 6 1 5 6 1 5 6 ASRock 880GMH/USB3 Motherboard...
  • Seite 157 1 5 7 1 5 7 1 5 7 1 5 7 1 5 7 ASRock 880GMH/USB3 Motherboard...
  • Seite 158 1 5 8 1 5 8 1 5 8 1 5 8 1 5 8 ASRock 880GMH/USB3 Motherboard...
  • Seite 159 1 5 9 1 5 9 1 5 9 1 5 9 1 5 9 ASRock 880GMH/USB3 Motherboard...
  • Seite 160 1 6 0 1 6 0 1 6 0 1 6 0 1 6 0 ASRock 880GMH/USB3 Motherboard...
  • Seite 161 ® ® ® 1 6 1 1 6 1 1 6 1 1 6 1 1 6 1 ASRock 880GMH/USB3 Motherboard...
  • Seite 162 1 6 2 1 6 2 1 6 2 1 6 2 1 6 2 ASRock 880GMH/USB3 Motherboard...
  • Seite 163 SATAII_1 SATAII_2 SATAII_3 SATAII_4 SATAII_5 (PORT 0) (PORT 1) (PORT 2) (PORT 3) (PORT 4) 1 6 3 1 6 3 1 6 3 1 6 3 1 6 3 ASRock 880GMH/USB3 Motherboard...
  • Seite 164 1 6 4 1 6 4 1 6 4 1 6 4 1 6 4 ASRock 880GMH/USB3 Motherboard...
  • Seite 165 ® “ ” “ ” “ ” ® “ ” “ ” 1 6 5 1 6 5 1 6 5 1 6 5 1 6 5 ASRock 880GMH/USB3 Motherboard...
  • Seite 166 1 6 6 1 6 6 1 6 6 1 6 6 1 6 6 ASRock 880GMH/USB3 Motherboard...
  • Seite 167 ® ® ® ® 1 6 7 1 6 7 1 6 7 1 6 7 1 6 7 ASRock 880GMH/USB3 Motherboard...
  • Seite 168 ® ® ® ® ® ® ® 1 6 8 1 6 8 1 6 8 1 6 8 1 6 8 ASRock 880GMH/USB3 Motherboard...
  • Seite 169 ® ® 1 6 9 1 6 9 1 6 9 1 6 9 1 6 9 ASRock 880GMH/USB3 Motherboard...
  • Seite 170 1 7 0 1 7 0 1 7 0 1 7 0 1 7 0 ASRock 880GMH/USB3 Motherboard...
  • Seite 171 ™ ‘ ’ 1 7 1 1 7 1 1 7 1 1 7 1 1 7 1 ASRock 880GMH/USB3 Motherboard...
  • Seite 172 1 7 2 1 7 2 1 7 2 1 7 2 1 7 2 ASRock 880GMH/USB3 Motherboard...
  • Seite 173 ® ® 1 7 3 1 7 3 1 7 3 1 7 3 1 7 3 ASRock 880GMH/USB3 Motherboard...
  • Seite 174 ® ® ® ® 1 7 4 1 7 4 1 7 4 1 7 4 1 7 4 ASRock 880GMH/USB3 Motherboard...
  • Seite 175 ® 1 7 5 1 7 5 1 7 5 1 7 5 1 7 5 ASRock 880GMH/USB3 Motherboard...
  • Seite 176 1 7 6 1 7 6 1 7 6 1 7 6 1 7 6 ASRock 880GMH/USB3 Motherboard...
  • Seite 177 1 7 7 1 7 7 1 7 7 1 7 7 1 7 7 ASRock 880GMH/USB3 Motherboard...
  • Seite 178 1 7 8 1 7 8 1 7 8 1 7 8 1 7 8 ASRock 880GMH/USB3 Motherboard...
  • Seite 179 1 7 9 1 7 9 1 7 9 1 7 9 1 7 9 ASRock 880GMH/USB3 Motherboard...
  • Seite 180 ® ® ® 1 8 0 1 8 0 1 8 0 1 8 0 1 8 0 ASRock 880GMH/USB3 Motherboard...
  • Seite 181 1 8 1 1 8 1 1 8 1 1 8 1 1 8 1 ASRock 880GMH/USB3 Motherboard...
  • Seite 182 SATAII_1 SATAII_2 SATAII_3 SATAII_4 SATAII_5 (PORT 0) (PORT 1) (PORT 2) (PORT 3) (PORT 4) 1 8 2 1 8 2 1 8 2 1 8 2 1 8 2 ASRock 880GMH/USB3 Motherboard...
  • Seite 183 1 8 3 1 8 3 1 8 3 1 8 3 1 8 3 ASRock 880GMH/USB3 Motherboard...
  • Seite 184 ® ® 1 8 4 1 8 4 1 8 4 1 8 4 1 8 4 ASRock 880GMH/USB3 Motherboard...
  • Seite 185 1 8 5 1 8 5 1 8 5 1 8 5 1 8 5 ASRock 880GMH/USB3 Motherboard...
  • Seite 186 ® ® ® ® ® ® ® 1 8 6 1 8 6 1 8 6 1 8 6 1 8 6 ASRock 880GMH/USB3 Motherboard...
  • Seite 187 ® ® ® ® 1 8 7 1 8 7 1 8 7 1 8 7 1 8 7 ASRock 880GMH/USB3 Motherboard...
  • Seite 188 ® ® 1 8 8 1 8 8 1 8 8 1 8 8 1 8 8 ASRock 880GMH/USB3 Motherboard...
  • Seite 189 1 8 9 1 8 9 1 8 9 1 8 9 1 8 9 ASRock 880GMH/USB3 Motherboard...
  • Seite 190 1 9 0 1 9 0 1 9 0 1 9 0 1 9 0 ASRock 880GMH/USB3 Motherboard...
  • Seite 191 1 9 1 1 9 1 1 9 1 1 9 1 1 9 1 ASRock 880GMH/USB3 Motherboard...
  • Seite 192 1 9 2 1 9 2 1 9 2 1 9 2 1 9 2 ASRock 880GMH/USB3 Motherboard...
  • Seite 193 ® ® 1 9 3 1 9 3 1 9 3 1 9 3 1 9 3 ASRock 880GMH/USB3 Motherboard...
  • Seite 194 ® ® ® ® 1 9 4 1 9 4 1 9 4 1 9 4 1 9 4 ASRock 880GMH/USB3 Motherboard...
  • Seite 195 ® 1 9 5 1 9 5 1 9 5 1 9 5 1 9 5 ASRock 880GMH/USB3 Motherboard...
  • Seite 196 1 9 6 1 9 6 1 9 6 1 9 6 1 9 6 ASRock 880GMH/USB3 Motherboard...
  • Seite 197 1 9 7 1 9 7 1 9 7 1 9 7 1 9 7 ASRock 880GMH/USB3 Motherboard...
  • Seite 198 1 9 8 1 9 8 1 9 8 1 9 8 1 9 8 ASRock 880GMH/USB3 Motherboard...
  • Seite 199 1 9 9 1 9 9 1 9 9 1 9 9 1 9 9 ASRock 880GMH/USB3 Motherboard...
  • Seite 200 ® ® ® 2 0 0 2 0 0 2 0 0 2 0 0 2 0 0 ASRock 880GMH/USB3 Motherboard...
  • Seite 201 2 0 1 2 0 1 2 0 1 2 0 1 2 0 1 ASRock 880GMH/USB3 Motherboard...
  • Seite 202 SATAII_1 SATAII_2 SATAII_3 SATAII_4 SATAII_5 (PORT 0) (PORT 1) (PORT 2) (PORT 3) (PORT 4) 2 0 2 2 0 2 2 0 2 2 0 2 2 0 2 ASRock 880GMH/USB3 Motherboard...
  • Seite 203 2 0 3 2 0 3 2 0 3 2 0 3 2 0 3 ASRock 880GMH/USB3 Motherboard...
  • Seite 204 ® ® 2 0 4 2 0 4 2 0 4 2 0 4 2 0 4 ASRock 880GMH/USB3 Motherboard...
  • Seite 205 2 0 5 2 0 5 2 0 5 2 0 5 2 0 5 ASRock 880GMH/USB3 Motherboard...
  • Seite 206 ® ® ® ® ® ® ® 2 0 6 2 0 6 2 0 6 2 0 6 2 0 6 ASRock 880GMH/USB3 Motherboard...
  • Seite 207 ® ® ® ® 2 0 7 2 0 7 2 0 7 2 0 7 2 0 7 ASRock 880GMH/USB3 Motherboard...
  • Seite 208 P/N: 15G06X023000AK V1.0 ® ® ® 2 0 8 2 0 8 2 0 8 2 0 8 2 0 8 ASRock 880GMH/USB3 Motherboard...

Inhaltsverzeichnis