Orbit 94066 Montage- Und Benutzerhandbuch
Timer für schlauch-wasserhahn
Installation and User's Guide
Hose Faucet Timer 2 Dial Model 94066
Guía para la instalación y el usuario
Regulador (Timer) de llave de manguera de 2
diales o selectores giratorios, Model 94066
Mode d'emploi et d'installation
Minuterie à 2 cadrans de modèle 94066
pour robinet extérieur
Installazione e guida dell'utente
Timer rubinetto tubo a 2 selettori modello 94066
Montage- und Benutzerhandbuch
Timer für Schlauch-Wasserhahn, Modell 94066 mit 2 Wählscheiben
ENGLISH
Environmental Conditions
Working Temperature: 0 to 50°C (30 to 122°F)
Storage Temperature: -20 to 55°C (-4 to 131°F)
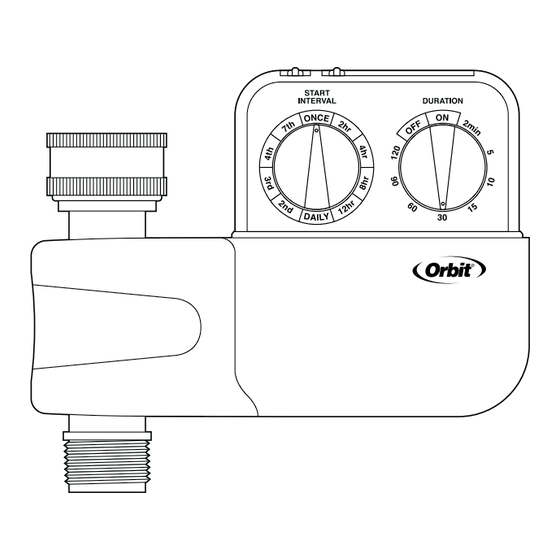
HOSE FAUCET
HOSE WASHER
START
INTERVAL
DURATION
BRASS OR
PLASTIC SWIVEL
CONNECTOR
AUTOMATIC HOSE
FAUCET VALVE
Features
• Two rotary dials for setting the watering interval and
watering duration.
• Battery operated (three AA), not included.
• Ten watering interval options (once, 2 hr, 4 hr, 8 hr, 12 hr,
daily, 2nd day, 3rd day, 4th day, 7th day).
• Ten watering duration options (on, OFF, 2 min, 5 min,
10 min, 15 min, 30 min, 60 min, 90 min, 120 min).
• Manual watering without interrupting the watering interval.
• Weather resistant design.
• Dependable valve design.
• Low power consumtion soleniod.
• Watering interval reminder.
Battery installation
(see figure 1).
1. Remove the timer cover.
2. Pull the battery compartment out of the timer.
3. Install three AA alkaline batteries. Refer to the battery
compartment for the correct orientation of the batteries,
(see figure 1).
4. Place the battery compartment back in the timer.
• Three fresh AA alkaline batteries should last for an entire
watering season. When the battery voltage is below a safe
operating voltage the valve will not open. The batteries
should be replaced when this occurs.
Figure 1
Low Battery Reset Feature
When low batteries are detected the timer will cease to oper-
ate. If this happens, replace the 3 AA batteries with fresh ones,
then press the RESET button on the back of the housing. The
timer will continue to function as before. Note: If the timer
ceases to function with fresh batteries, press the RESET button
to operate the timer.
Set the watering interval (Dial A)
Turn the Interval Dial (A) to the desired watering interval.
(see figure 2).
The Interval dial (A) has ten possible settings:
• Once – the valve will open once for the amount of time on the
Duration dial and then remain inactive until the Interval dial is
rotated to another setting.
• 2 hr – the water will come on every two hours.
START
INTERVAL
DURATION
• 4 hr – the water will come on every four hours.
• 8 hr – the water will come on every eight hours.
• 12 hr – the water will come on every twelve hours.
• Daily – the water will come on once every day.
• 2nd day – the water will come on every other day.
• 3rd day – the water will come on every third day.
• 4th day – the water will come on every fourth day.
• 7th day – the water will come on once a week.
Note:
The time of day when the interval is programmed becomes the
reference time and should be recorded using the interval
reminder slider.
The watering interval will begin after the dial has been station-
ary for 1 second. Whenever the Interval dial is rotated, the
interval resets to the new setting.
COVER
The water will not come on until after the first complete inter-
val. For example if the timer is programmed at noon, and the
TIMER
Interval dial is set to come on every four hours. At four
o'clock the valve will open. If immediate watering is desired
then a manual watering interval may be started.
Figure 2
Figure 3
Set the watering duration (Dial B)
Rotate the Duration Dial (B) to the desired watering duration.
(see figure 3).
The Duration dial (B) has ten possible settings:
• OFF – the valve will close and remain closed when the dial is
in this setting.
• ON – the valve will open and remain open when the dial is in
this setting.
• 2 min, 5 min, 10 min, 15 min, 30 min, 60 min, 90 min, 120 min -
the water will come on automatically at the intervals shown
by the Interval dial and remain on for the chosen duration
before automatically switching off.
To change the watering duration while the valve is open simply
rotate the dial to the new duration. The valve will remain open
for the duration shown on the Duration dial regardless of how
long the valve had been open prior to the change.
Watering once
Turn the Interval dial (A) to the once setting and turn the
Duration dial (B) to the desired setting. The valve will open for
the duration shown on the Duration dial (B) and then close.
The timer will remain inactive until the Interval dial (A) is rotat-
ed to a new setting, or until the valve is activated manually.
Manual watering
Turn the Duration dial (B) to the on setting. The valve will open
and remain open until the dial is rotated to another setting. The
dial can be rotated to a duration setting, and the valve will
remain open for that amount of time. The watering interval is
not interrupted when the valve is operated manually.
To turn the valve off
Rotate the duration Dial (B) to the off setting. The valve will not
open while the dial is in this setting. The watering interval will
continue uninterrupted while the Duration dial is in the off set-
ting.
Interval reminder
The timer has a interval reminder built in to help remind you
when the water should come on next. It has no programining
function and is only an aid for remembering when the watering
interval was programmed. To use the reminder simply slide it to
the hour setting that represents the time of day the watering
interval was set.
Low battery indication
When the battery voltage level drops below the ideal operating
voltage the valve will close. The batteries should be replaced
with three fresh alkaline batteries as soon as possible.
Maintenance and off-season storage
• Remove the timer from the faucet during the winter or during
extended periods of inactivity.
• Open and close the valve several times to allow the water to
drain out.
• Remove the batteries and clean the battery contacts. Discard
the batteries if signs of corrosion are present.
• Store the timer in a warm dry location.
Trouble shooting checklist
Batteries are installed properly.
New alkaline batteries are installed.
The hose faucet is turned on.
Try operating the timer manually by rotating the Duration dial
(B) to the on setting.
ESPAÑOL
Características
• Dos diales o selectores giratorios para fijar el intervalo y la
duración del riego.
• Funcionamiento por batería (tres AA alcalinas), no se
incluyen.
• Diez opciones para riego a intervalos (una vez, 2 hrs, 4 hrs, 8
hrs, 12 hrs, a diario, 2ndo día, 3er día, 4to día, 7mo día).
• Diez opciones para duración de riego (ENCENDIDO, APAGA-
DO, 2 min., 5 min., 10 min., 15 min., 30 min., 60 min., 90 min.,
120 min.).
• Riego manual sin interrumpir el intervalo de riego.
• Diseño resistente a la interperie.
• Diseño de válvulas de funcionamiento seguro.
• Solenoide de bajo consumo de energía.
• Recordatorio de intervalo de riego.
Instalación de batería
(Vea la ilustración 1)
1.Quite la tapa del regulador.
2.Saque del regulador el compartimiento de la batería.
3.Instale tres baterias alcalinas de AA. Refiérase al compar-
timiento de la batería para saber cuál es la posición correcta
de las baterías (vea la ilustración 1).
4.Vuelva a colocar el compartimiento de la batería en el
regulador.
• Tres baterias alcalinas de AA nuevas deben durar toda la
temporada de riego. Cuando el voltaje de la batería no esté a
un nivel de funcionamiento apropiado, la válvula no se abrirá
y el regulador emitirá una señal acústica. Se deben cambiar
las baterías cuando una o las dos condiciones existan.
Illustración 1
Función de Restauración con la Batería Baja
Cuando se detecte que las baterías están bajas el tempo-
rizador dejará de funcionar. Si esto ocurriera, sustituya las 3
baterías AA con baterías nuevas y luego pulse el botón RESET
que se encuentra en la parte posterior del alojamiento de
éstas. El temporizador continuará funcionando igual que antes.
Nota: Si el temporizador deja de funcionar con las baterías
nuevas, pulse el botón RESET para hacerlo funcionar.
Para fijar el intervalo de riego (Selector giratorio A)
Pase el selector giratorio de intervalo (A) al intervalo de riego
deseado. (Vea la ilustración 2)
El dial o selector giratorio de intervalo (A) tiene diez posiciones
posibles:
• Una vez – la válvula se abrirá una vez por el período de tiem-
po estipulado en el dial de duración y permanecerá inactivo
hasta que el dial o selector giratorio se cambie a otra posi-
ción.
• 2 hrs. – el riego se iniciará cada dos horas.
• 4 hrs. – el riego se iniciará cada cuatro horas.
• 8 hrs. – el riego se iniciará cada ocho horas.
• 12 hrs. – el riego se iniciará cada doce horas.
• Diariamente – el riego se iniciará una vez al día.
• 2 do día – el riego se iniciará día por medio.
• 3er día – el riego se iniciará cada tercer día.
• 4to día – el riego se iniciará cada cuarto día.
• 7mo día – el riego se iniciará cada séptimo día.

Verwandte Anleitungen für Orbit 94066


Inhaltszusammenfassung für Orbit 94066
- Seite 1 • 2nd day – the water will come on every other day. Try operating the timer manually by rotating the Duration dial • 3rd day – the water will come on every third day. Timer rubinetto tubo a 2 selettori modello 94066 (B) to the on setting. Montage- und Benutzerhandbuch •...
-
Seite 2: Caractéristiques
Nota: Figure 2 FRANÇAIS La hora del día en que está programado el intervalo se con- vierte en la hora de referencia y se debe registrar usando el Caractéristiques dislizador recordatorio de intervalo. • Deux commutateurs rotatifs à écrans pour le réglage de l’in- El intervalo de riego se inciará... -
Seite 3: Lista Di Controllo Per La Risoluzione Dei Problemi
Caratteristiche Figura 2 Eigenschaften • Due selettori rotanti per impostare l’intervallo e la durata di • Zwei drehbare Wählscheiben für die Einstellung von irrigazione. Bewässerungsintervall und -dauer. • A batteria (tre AA), non comprese. • Batteriebetrieben (drei AA-Batterien, nicht im Lieferumfang enthalten). -
Seite 4: Fehlersuche
Versuchen Sie, den Timer manuell zu bedienen, indem Sie die Dauer-Wählscheibe (B) aufcadran (B) de durée sur la posi- tion de mise en marche. Orbit ® Irrigation Products, Inc. 845 North Overland Rd. North Salt Lake, Utah 84054 94066-24 rev A...