Werbung
Verfügbare Sprachen
Verfügbare Sprachen
Caméra thermographie I.R
Infrared Camera
I.R-Wärmebildkamera
Videocamera termografica I.R
Cámara de termografía IR
FRANÇAIS
Notice d'utilisation simplifiée
ENGLISH
User's Manual : Quick start
DEUTSCH
Bedienungsanleitung
ITALIANO
Libretto d'istruzzioni : Inizio rapido
ESPAÑOL
Manual de Instrucciones
C.A 1886
C.A 1888
Werbung
Inhaltsverzeichnis

Verwandte Anleitungen für Chauvin Arnoux RayCAm C.A 1886

Inhaltszusammenfassung für Chauvin Arnoux RayCAm C.A 1886
- Seite 1 Caméra thermographie I.R Infrared Camera I.R-Wärmebildkamera Videocamera termografica I.R Cámara de termografía IR C.A 1886 C.A 1888 FRANÇAIS Notice d’utilisation simplifiée ENGLISH User’s Manual : Quick start DEUTSCH Bedienungsanleitung ITALIANO Libretto d’istruzzioni : Inizio rapido ESPAÑOL Manual de Instrucciones...
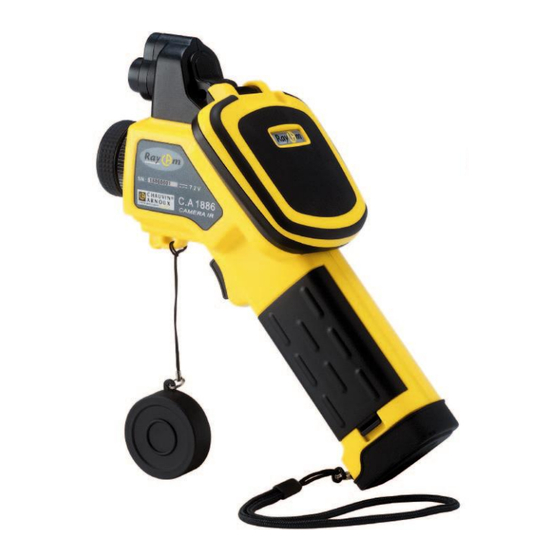
- Seite 2 à la suite d’un non respect des consignes énumérées ci-dessus, le constructeur ainsi que le distributeur ne seront en aucun cas responsables et tous les frais mis en jeu seront entièrement à la charge de l’utilisateur. STRUCTURE DE LA RayCAm C.A 1886 et C.A 1888 Torche Ecran LCD Objectif Image réelle...
- Seite 3 Interface vidéo Carte SD pour RCA standard mémorisation images UTILISATION DES RayCAm C.A 1886 et C.A 1888 Description des touches 1. Bouton ON/OFF de la caméra Appuyez sur cette touche durant quelques secondes pour allumer-éteindre la caméra 2. LED d’allumage (caméra allumée) 3.
- Seite 4 Français 4. Tournez l’objectif manuellement pour régler le focus ; 5. Appuyez sur la touche “A” afin d’ajuster la luminosité, le contraste et l’échelle automatiquement Note : Le bruit provenant de la caméra que vous entendez est normal. Affichage I.R., Réel et MixVision. Cette caméra I.R.
- Seite 5 Français 2. A l’aide des touches sélectionnez le sous-menu « FICHIER » puis appuyez sur « ENTRER » 3. Sélectionnez « SAUVEGARDER » et validez à l’aide de la touche « ENTRER » Ouvrir une image IR 1. Appuyez sur « ENTRER » pour afficher le menu ; 2.
- Seite 6 Français I.R. : Seule l’image I.R. s’affiche à l’écran. Sous menu « IR / Visible » Tous les outils d’analyse sont accessibles. Vision : seule l’image visuelle s’affiche à l’écran. Les ► outils d’analyse ne sont pas tous accessibles. IR / Vision Analyse MixVision : L’image visuelle apparaît en arrière-plan et ►...
- Seite 7 Français 2. Réglage Local Langue French Sortie Vidéo Unité Temp. °C Unité Dist. Meter 3. Réglage Date & Heure Année 2006 Mois Jour Heure Minute 4. Réglage Caméra Rendu couleur : la RayCAm met à votre disposition 6 palettes de couleur Palette Métal Sert à...
-
Seite 8: Specifications Techniques
Français SPECIFICATIONS TECHNIQUES Conditions environnementales de fonctionnement Température de fonctionnement -15° C~50° C Humidité relative 10 – 95 %HR Température de stockage -40° C~70° C Indicateurs techniques Type de détecteur Matrice à Plan Focal Non-refroidi Réponse spectrale 8~14um Résolution C.A 1886 : 160 x 120 C.A 1888 : 384 x 288 NETD C.A 1886 : 0,08°C... - Seite 9 English WARNING The Infrared Camera is one high precious optics and measurement equipment, please be careful when using it: 1. Do not point the camera straightly to the sun, laser welding torch or other over high temperature target for inspection 2.
-
Seite 10: Brief Introduction
English RayCAm C.A 1886 and C.A 1888 INTERFACE DEFINITION Power supply interface Video output interface. SD Card Standard RCA interface RayCAm C.A 1886 - C.A 1888 OPERATION INSTRUCTION Instructions on Key Operations 4. Power switch Press this button for few seconds to turn on or turn off the camera. - Seite 11 English Note: the noise from the camera when operating is normal. I.R., Real, and Real + Mix Display. This I.R. camera records visual images with its built-in digital device. This lets you record a real image and compare it to the thermal image. 1.
- Seite 12 English Recall the infrared image 5. After startup the camera, press the « menu (enter) » key to pop up the menu; 6. Press the direction key to enter « FILE », then press the “menu” key to enter 7. Press the direction key to “Open”...
- Seite 13 English Sub menu «Manual Adj. » Level Span Temp. Range Filter 30°C 10°C -20 -250 It represents the amplitude of the It represents the It represents the median scale, i.e. the difference between the temperature range of the value of the temperature max.
- Seite 14 English 7. Local setup Language French Video output Temp unit °C Dist unit Meter 8. Date & Time Year 2006 Month Hour Minute 9. Camera setup Palette: It provides a number of artificial color options Palette Metal Define the adjustment way of the key “A”. Auto.
-
Seite 15: Technical Specifications
English TECHNICAL SPECIFICATIONS Environmental Requirements Operating temperature -15 ° C~50 ° C Operating humidity 10 – 95 %HR Storage temperature -40 ° C~70 ° C Technical Indexes Type of Detector Uncooled focal plane Spectral range 8~14um Resolution C.A 1886: 160 x 120 C.A 1888: 384 x 288 NETD C.A 1886: 0,08°C... - Seite 16 Wenn Teile der Kamera verbrannt oder beschädigt sind oder Probleme infolge der Nichtbeachtung oben genannter Hinweise auftreten, können Hersteller und Händler hierfür nicht haftbar gemacht werden. Alle anfallenden Kosten gehen in diesem Fall zu Lasten des Benutzers. AUFBAU DER RayCAm C.A 1886 – C.A 1888 LCD-Anzeige Fotoleuchte Sicht-Objektiv...
-
Seite 17: Beschreibung Der Tasten
SCHNITTSTELLE RayCAm C.A 1886 – C.A 1888 Externer Netzadapter Video-Ausgang SD-Karte BEDIENUNG DER RayCAm C.A 1886 – C.A 1888 Beschreibung der Tasten 1. ON/OFF-Schalter der Kamera Taste einige Sekunden gedrückt halten, um die Kamera ein- oder auszuschalten 2. Einschalt-LED (Die LED leuchtet bei eingeschalteter Kamera) Bedienfeld ... - Seite 18 Deutsch 5. Drücken Sie die Taste “A”, um Helligkeit, Kontrast und Skala automatisch einzustellen Anmerkung: Das Geräusch der Kamera, das Sie vernehmen, ist normal. IR-Anzeige, Sichtbild und MixVision. Diese IR-Kamera speichert die Bildaufnahmen mit ihrem eingebauten Digitalgerät. Damit haben Möglichkeit, Bilder aufzunehmen diese...
- Seite 19 Deutsch 8. Wählen Sie mit Hilfe der Tasten das Untermenü "DATEI“ und drücken dann "EINGABE“ 9. Wählen Sie "SPEICHERN" und bestätigen Sie mit Hilfe der Eingabetaste. Öffnen eines IR-Bilds 9. Drücken Sie "EINGABE“, um das Menü anzuzeigen; 10. Wählen Sie mit Hilfe der Tasten das Untermenü...
- Seite 20 Deutsch IR: Mit diesem Modus erscheint nur die Infrarotaufnahme auf der Anzeige. Alle Untermenü „IR/Sichtbild“ Analysetools sind mit diesem Modus zugänglich. Sichtbild: Mit diesem Modus erscheint nur die ► Bildaufnahme auf der Anzeige. Nicht alle Analyse IR/Sichtbild Analysetools sind mit diesem Modus zugänglich. ►...
-
Seite 21: Beschreibung Der Anzeigeleiste
Deutsch 12. Lokale Konfig. Sprache French Videoausgang : Einheit Temp. : °C Einheit Abst Meter 13. Datum & Zeit Jahr 2006 Monat Stunde Minute 14. Kamera-Konfig Farbwiedergabe: Die RayCAm stellt Ihnen 6 Farbmodi zur Wahl Farbauswahl Metall Wird der Einstellmodus der Taste "A" festgelegt Auto. -
Seite 22: Technische Spezifikationen
Deutsch TECHNISCHE SPEZIFIKATIONEN Umgebungsbedingungen Betriebstemperatur -15~50 ° C Relative Luftfeuchtigkeit 10% - 95% r.F. Lagertemperatur -40 ° C~70 ° C Technische Merkmale der RayCAm Sensortyp FPA Matrix, ungekühlt Spektrale 8~14µm Empfindlichkeit Auflösung C.A 1886: 160 x 120 C.A 1888: 384 x 288 NETD C.A 1886: 0,08°C C.A 1888: 0,05°C... - Seite 23 STRUTTURA DELLA RayCAm C.A 1886 – C.A 1888 Schermo LCD Torcia Obiettivo Tastiera Obiettivo IR...
-
Seite 24: Descrizione Dei Tasti
Alimentazione esterna Uscita video Scheda SD UTILIZZO DELLA RayCAm C.A 1886 – C.A 1888 Descrizione dei tasti 7. Tasto ON/OFF della termocamera Premere questo tasto per alcuni secondi per accendere o spegnere la termocamera 8. LED d’accensione (Quando la termocamera è accesa, anche il LED è acceso) 9. - Seite 25 Italiano Rimuovere lo schermo della lente e puntare la termocamera sul bersaglio; Ruotare l’obiettivo manualmente per regolare il focus; 10. Premere il tasto “A” per regolare la luminosità, il contrasto e la scala automatica Visualizzazione I.R., Reale e MixVision. Questa termocamera I.R. registra le immagini reali mediante l’apparecchio digitale integrato.
- Seite 26 Italiano 11. Mediante i tasti , selezionare il sottomenu “FILE” quindi premere “ENTER” 12. Selezionare “SAVE” e convalidare mediante il tasto “ENTER” Aprire un’immagine IR 13. Premere “ENTER” per visualizzare il menu; 14. Mediante i tasti , selezionare il sottomenu “FILE” quindi premere “ENTER”...
- Seite 27 Italiano I.R.: In questo modo, solo l’immagine I.R. si visualizza sullo schermo. Sottomenu “IR/Reale” Reale: In questo modo, solo l’immagine visiva si visualizza sullo schermo. ► Gli strumenti d’analisi non sono tutti accessibili in Analisi IR/Reale questo modo. ► File IR % MixVision: In questo modo, l’immagine reale appare IR/Reale...
- Seite 28 Italiano Lingua French Uscita Video : Unità temp. °C Unità Dist. Meter 18. Data & Ora Anno 2006 Mese Giorno Minuto 19. Setup Resa cromatica: RayCAm mette vostra disposizione 6 modalità colore Palette colori Metallo Serve a definire la modalità di regolazione del tasto “A” Regol.
- Seite 29 Italiano Condizioni ambientali di funzionamento Temperatura di funzionamento -15 ° C~50 ° C Umidità relativa 10 % - 95 % Temperatura di stoccaggio -40 ° C~70 ° C Indicatori tecnici della RayCAm Tipo di rivelatore Matrice a piano focale non raffreddato Risposta spettrale 8~14um Risoluzione...
- Seite 30 ESTRUCTURA DE LA RayCam C.A 1886 – C.A 1888 Pantalla LCD Linterna Objetivo VIS...
-
Seite 31: Descripción De Las Teclas
Alimentación externa Salida vídeo Tarjeta SD USO DE LA RayCAm C.A 1886 – C.A 1888 Descripción de las teclas Botón ON/OFF de la cámara Pulsar esta tecla durante algunos segundos para encender o apagar la cámara LED de encendido (Una vez encendida la cámara, el LED se enciende) - Seite 32 Español 3. Retirar la tapa de la lente y apuntar la cámara hacia el objeto de interés; 4. Girar el objetivo manualmente para ajustar el enfoque; 5. Pulsar la tecla “AUTO” para ajustar la luminosidad, el contraste y la escala automáticamente Nota: el ruido procedente de la cámara es normal.
- Seite 33 Español 14. Utilizando las teclas seleccionar el submenú “ARCHIVO” y luego pulsar “ENTRAR” 15. Seleccionar “GUARDAR” y validar con la tecla “ENTRAR” Abrir una imagen Ir 17. Pulsar “ENTRAR” para ver el menú; 18. Utilizar las teclas para seleccionar el submenú “ARCHIVO” y luego pulsar “ENTRAR”...
- Seite 34 Español I.R.: En este modo, sólo se visualiza la imagen I.R. en pantalla. Todas las herramientas de análisis son accesibles en este modo. Submenú “IR / Visible” VIS: En este modo, sólo aparece la imagen real en pantalla. No todas las herramientas de análisis son ►...
- Seite 35 Español Ajustes Cam. ► Parám. Locales Idioma French Salida Vídeo : Unidad Temp. : °C Unidad Dist Meter Ajustes Cam. ► Fecha y Hora Año 2006 Día Hora Minuto Ajustes Cam. ► Parám. Cámara Prestaciones de color: la RayCAm pone a su disposición 6 modos de color.
- Seite 36 Español ESPECIFICACIONES TÉCNICAS DE LA RayCAm Condiciones ambientales de funcionamiento Temperatura de -15 ° C~50 ° C funcionamiento Humedad relativa 10 – 95 % Temperatura de -40 ° C~70 ° C almacenamiento Indicadores técnicos de la RayCAm Tipo de detector Matriz en Plano Focal No refrigerado Respuesta espectral 8~14um...