Inhaltsverzeichnis
Werbung
Verfügbare Sprachen
Verfügbare Sprachen
Werbung
Kapitel
Inhaltsverzeichnis

Verwandte Anleitungen für Herth+Buss Claw 400

Inhaltszusammenfassung für Herth+Buss Claw 400
- Seite 1 E LPA RTS Claw 400 Multimeter, Strommesszange...
-
Seite 2: Inhaltsverzeichnis
Bedienhinweis 95980785 Inhalt Kapitel Seite 1.0 Einführung 2.0 Einsetzen der Batterie 3.0 Sicherheitsinformationen 4.0 Elektrische Symbole 5.0 Anweisung 6.0 Technische Daten 7.0 Bedienung 8.0 Wartung 9.0 Entsorgung WICHTIG Vor Gebrauch sorgfältig lesen Aufbewahren für späteres Nachschlagen www.herthundbuss.com... -
Seite 3: Bedienhinweis
Bedienhinweis 95980785 1.0 Einführung 3.0 Sicherheitsinformationen Die Strommesszange eignet sich für die Mes- Befolgen Sie diese Anweisungen, um die sung von hohen Strömen bis 400 Ampere. Einsatzsicherheit und die sichere Wartung Messung von Wechsel- und Gleichstrom der Strommesszange zu gewährleisten: mit Nullpunkttaste Lieferung inklusive Tasche 1. -
Seite 4: Elektrische Symbole
Bedienhinweis 95980785 4.0 Elektrische Symbole 7. Überprüfen Sie vor der Verwendung den Betrieb der Strommesszange durch das Messen einer bekannten Stromstärke. 8. Verwenden Sie die Strommesszange nie in Wechselstrom einem Stromkreis mit Spannungen ober- halb von 600 V CAT II. Gleichstrom Ausrüstung der CAT II wurde für den Schutz gegen Transienten in Stromkreisen... -
Seite 5: Anweisung
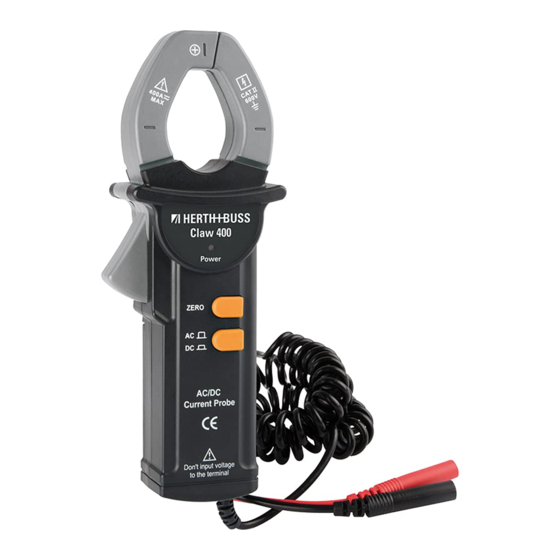
Bedienhinweis 95980785 5.0 Anweisung 1. Klemmbacke Verwendet zum Festklemmen des Leiters, der gemessen werden soll. 2. LED Leuchtet auf, nachdem die Strommess- zange eingeschaltet wurde. Wenn die Batteriespannung hoch genug ist, leuchtet die LED grün. Wenn die Batteriespannung nicht hoch genug ist, leuchtet die LED rot. -
Seite 6: Technische Daten
Bedienhinweis 95980785 6.0 Technische Daten Elektrische Kenndaten: Allgemeine Spezifikationen: Max. messbarer Strom: 400 A Max. Öffnung der Klemmbacken: 33 mm Max. Überlastbarkeit: 600 A DC/AC rms Max. Leitergröße: ø28 mm Max. Arbeitsspannung: 600 V AC rms, Batterie: 9 V, 6F22 oder gleichwertig CAT II Betriebstemperatur: 0 °C –... -
Seite 7: Bedienung
Bedienhinweis 95980785 7.0 Bedienung 3. Stellen Sie die Strommesszange mit dem Bereichsschalter auf den gewünschten Bereich ein. Die LED leuchtet. 4. Wählen Sie die Wechselstrom- oder Gleich- strom-Messung mit der Wechselstrom-/ Gleichstrom-Taste laut Angabe auf den Mar- kierungen neben der Wechselstrom-/Gleich- strom-Taste der Strommesszange aus. -
Seite 8: Wartung
Bedienhinweis 95980785 Hinweis: Wenn Sie die Strommesszange längere Zeit 1. Legen Sie keine Spannung an den Aus- nicht benutzen, sollten Sie die Batterie her- gangssteckern der Strommesszange an. ausnehmen. 2. Bei Gleichstrommessungen zeigt das Dis- 9.0 Entsorgung play des Multimeters auch die Richtung des gemessenen Stroms an. - Seite 9 Operating Instruction 95980785 Content Kapitel Seite 1.0 Introduction 2.0 Installing the battery 3.0 Safety information 4.0 Electrical symbols 5.0 Instruction 6.0 Technical data 7.0 Operation Instruction 8.0 Maintenance 9.0 Disposal IMPORTANT Read carefully before use Keep for later reference...
-
Seite 10: Introduction
Operating Instruction 95980785 1.0 Introduction 3.0 Safety information The clamp meter is suitable for measuring To ensure safe operation and service of the high flows up to 400 amperes. Current Probe, follow these instructions: Measurement of AC/DC current with zero point key 1. -
Seite 11: Electrical Symbols
Operating Instruction 95980785 4.0 Electrical symbols 10. Unclamp the Current Probe from any conductor, and disconnect the multim- eter from the current probe before open- Alternating Current ing battery cover or portion of case. 11. If the LED lights red after the Current Direct Current Probe is tumed on, the battery is low and should be replaced immediately. -
Seite 12: Instruction
Operating Instruction 95980785 5.0 Instruction 1. Jaw Used to clamp the conductor to be measured. 2. LED lt lights after the Current Probe is turned on. lf the battery’s voltage is high enough, the LED lights green. lf the battery’s voltage is not high enough, the LED lights red Indicating that the battery is low and should be replaced immediately. -
Seite 13: Technical Data
Operating Instruction 95980785 6.0 Technical data Electrical specifications: General specifications: Max. Measurable Current: 400A Max. Jaw Opening: 33mm Max. Overload Capability: 600A DC/AC rms Max. Conductor Size: ø28mm Max. Working Voltage: 600V AC rms, CATII Battery: 9V, 6F22 or equivalent Output Sensitivity: 40A range: 10mVIA, Operating Temperature: 0ºC ~ 4ºC, <... -
Seite 14: Operation Instruction
Operating Instruction 95980785 7.0 Operation Instruction 3. Set the Current Probe to the desired range with the range switch, the LED lights. 4. Select ac or dc current measurement with the AC/DC button according to the indica- tion of the marks beside the AC/DC button of the Current Probe. -
Seite 15: Maintenance
Operating Instruction 95980785 9.0 Disposal Note: 1. Do not input voltage to the output plugs of the Current Probe. lf you at some point intend to dis- 2. For DC current measurements, the display pose of this article, then please of the multimeter will also indicate the keep in mind that many of its com- measured current’s direction. - Seite 16 Notice d’emploi 95980785 Contenu Kapitel Seite 1.0 Introduction 2.0 Installation de la pile 3.0 Consignes de sécurité 4.0 Symboles électriques 5.0 Instructions 6.0 Caractéristiques techniques 7.0 Utilisation 8.0 Entretien www.herthundbuss.com...
-
Seite 17: Introduction
Notice d’emploi 95980785 1.0 Introduction 3.0 Consignes de sécurité La pince ampérométrique est l’outil parfait Observez ces consignes afin de garantir la pour mesurer les courants élevés jusqu’à sécurité d’utilisation et l’entretien sûr de la FR FR 400 ampères. pince ampérométrique : Mesure du courant alternatif et du courant continu 1. -
Seite 18: Symboles Électriques
Notice d’emploi 95980785 4.0 Symboles électriques 8. N’utilisez jamais la pince ampérométrique sur un circuit d’une tension supérieure à 600 V CAT II. L’équipement de CAT II est conçu pour Courant alternatif éviter les courants transitoires dans les circuits directement raccordés à l’installa- Courant continu tion basse tension. -
Seite 19: Instructions
Notice d’emploi 95980785 5.0 Instructions 6. Touche CA/CC Utilisée pour sélectionner la fonction cou- 1. Mâchoires de serrage rant continu ou courant alternatif, grâce Utilisées pour serrer le conducteur à me- aux repères situés près de la touche. FR FR surer. -
Seite 20: Caractéristiques Techniques
Notice d’emploi 95980785 6.0 Caractéristiques techniques Caractéristiques électriques : Caractéristiques générales Courant max. mesurable : 400 A Ouverture max. Capacité de surcharge max. : 600 A CC/ des mâchoires de serrage : 33 mm CA moy. quadratique Dimension max. du conducteur : ø28 mm Tension service max. Pile : 9 V, 6F22 ou similaire 600 V CA moy. -
Seite 21: Utilisation
Notice d’emploi 95980785 7.0 Utilisation 3. Réglez la pince ampérométrique sur la plage souhaitée à l’aide du sélecteur de FR FR plage. La LED s’allume. 4. Sélectionnez la mesure du courant alterna- tif ou continu à l’aide de la touche CA/CC, grâce aux repères situés près de la touche CA/CC de la pince ampérométrique. -
Seite 22: Entretien
Notice d’emploi 95980785 Remarque : Si vous n’utilisez pas la pince ampéromé- 1. Ne mesurez pas la tension au niveau des trique pendant une période prolongée, reti- prises de sortie de la pince ampéromé- rez la pile. trique. 9.0 Élimination 2. Lors de la mesure de courant continu, l’écran du multimètre affiche également le sens du courant mesuré. - Seite 23 Notizen / Notice / Remarques...
- Seite 24 Herth+Buss Fahrzeugteile GmbH & Co. KG Dieselstraße 2-4 ı DE-63150 Heusenstamm Herth+Buss France SAS ZA Portes du Vercors, 270 Rue Col de La Chau FR-26300 Châteauneuf-sur-Isère Herth+Buss Belgium Rue de Fisine 9 ı BE-5590 Achêne Herth+Buss UK Ltd Ground Floor, Unit 16, Londonderry Farm...