Oregon Scientific TR119 Bedienungsanleitung
Rf clock with temperature
RF CLOCK WITH TEMPERATURE
MODEL : TR119
USER'S MANUAL
BATTERY
COVER
MAGNET
PLASTIC
CLIP
ENGLISH
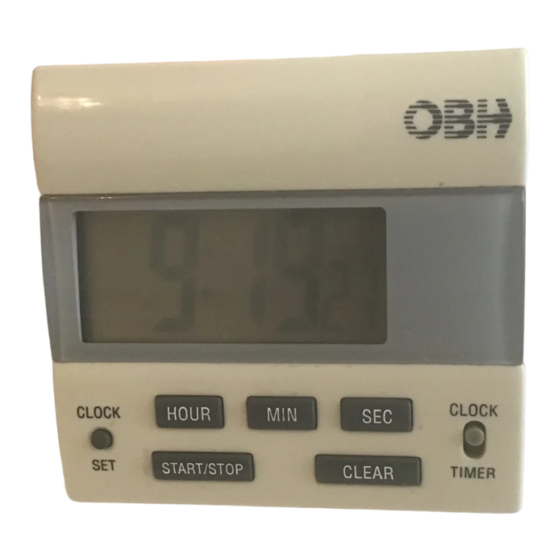
TIMER FEATURES
1.
LCD Count-down/count-up Timer together with Clock.
2.
6 digits display showing HOUR, MINUTE and SECOND for both Timer and Clock.
3.
Automatic count up after Timer counts down to zero.
4.
Count-down Timer : Maximum setting is 23 HR. 59 MIN. 59 SEC.and counts down
at 1 second resolution.
Count-up Timer : Maximum count-up range is 23 HR. 59 MIN. 59 SEC. at 1 second
resolution.
5.
Memory recall function for count-down Timer.
6.
Timer alarm sounds for 1 munute when Timer counts down to zero.
7.
Individual setting buttons for HOUR. MINUTE and SECOND setting.
8.
Last 1 min sound level warning
COUNT-DOWN TIMER SETTING
1.
Switch the TIMER/CLOCK slide switch to TIMER position, 0:00 00 and TIMER
mark will show on display.
2.
Press HOUR button to advance hour digits. Button Confirmative sound can be
heard for each press of button. Press and hold HOUR button for 2 seconds will fast
set the hour digits.
3.
Press MIN button to advance minute digits. Button confirmative sound can be heard
for each press of button. Press and hold MIN button for 2 seconds will fast set the
minute digits.
4.
Press SEC button to advance second digits. Button confirmative sound can be heard
second digits.
5.
If setting is not the desired one, press CLEAR button once to reset Timer to zero
and set time again.
COUNT-DOWN TIMER START/STOP
1.
After time setting is ready, press STAR/STOP button once and Timer will start to
cound down at 1 second resolution.
2.
When Timer is counting, press START/STOP button once and Timer will stop
3.
Press START/STOP button once and Timer will start counting again.
COUNT-DOWN TIMER ALARM
1.
When Timer counts down to 0 HR 00 MIN 00SEC (0:00 00 will show on display).
TIMES-UP mark will flash on display, Timer alarm starts to sound for 1 minute
and Timer will automatically continue to count up at 1 second resolution.
2.
Timer alarm and count-up time can be stopped by pressing HOUR, MIN, SEC,
START/STOP or CLEAR button.
COUNT-DOWN TIMER MEMORY RECALL
1.
After Timer alarm stops, press START/STOP button once can recall pre-setting
desired count-down time. MEMORY mark will appear on display.
2.
Press START/STOP button 2nd time can start Timer and Timer will count down
for another lap. MEMORY mark will dsappear.
COUNT-UP TIMER SETTING
1.
When timer is in rest stage ( 0 HR. 00 MIN. 00 SEC.), press START/STOP button
once will activate count-up feature and Timer starts to count up at 1 second resolu-
tion. Button confirmative sound can be heard.
2.
Press START/STOP button 2nd time can stop the count-up Timer.
3.
Press START/STOP button 3rd time, count-up timer will continue to count up at 1
second resolution.
4.
Press START/STOP button 4th time can stop the count-up Timer.
5.
Press CLEAR button once will reset count-up Timer to zero.
P/N: 086L001630-268 REV1
1/2
COUNT-DOWN AND COUNT-UP
TIME MEASUREMENT:
1.
Switch the TIMER/CLOCK slide switch to TIMER position.
2.
Set desired time to count-down Timer by using the same procedure as count-down
Timer setting.
3.
Press START/STOP button once to start the count-down Timer.
4.
When Timer counts down to 0 HR 00 MIN 00 SEC ( 0:00 00 will show on display),
TIMES-UP mark will flash on display, Timer alarm starts to sound for 1 minute
and Timer will automatically count up at 1 second resolulion.
5.
When you think the count-up peried is good enough for you, press START/STOP
button once to stop the count-up Timer.
6.
Elapsed period after Timer counts down to zero can be known from the count-up
time on display.
NORMAL TIME SETTING
Switch the TIMER/CLOCK slide switch to CLOCK position, normal time of clock
will show on display.
HOUR
Press SET button (button confirmative sound can be heard) and at the same time press
HOUR button (button confirmative sound can be heard) to advance hour digits. Press
SET button and simultaneously press and hold HOUR button for 2 seconds will fast set
the hour digits. AM or PM mark will appear on display for 12 hour version clock.
MINUTE
Press SET button (button beep sound) and at the same time press MIN button (button
beep sound) to advance minute digits. Press, SET button and simultaneously press and
hold MIN button for 2 seconds will fast set the minute digits.
SECOND
Press SET button (button beep sound) and at the same time press SEC button (button
beep sound) will reset second digits to zero when second digits are within 0-30 sec.
range. When second digits are within 31-59 sec. range, press SET and SEC button will
reset second digits to zero and minute digit advance by 1.
REPLACEMENT OF BATTERY
Follow the arrow direction, slide push to open the battery cover at back side of Timer.
Remove exhausted battery, insert a new 1.5V 'AAA' Battery as indicated by the polarity
symbols (+ & -) mark and close battery cover.
CLIP ATTACHMENT
The Timer can clip on thin board or shirt pocket by using the plastic clip at back side of
Timer.
MAGNETIC ATTACHMENT
The Timer can stand iron or steel surface by using the magnet at back side of Timer.
TABLE STANDING
The Timer can stand on table surface by filipping out the metal stand bar at back side of
Timer.
CAUTION
- The content of this manual is subject to change without further notice.
- Due to printing limitation, the displays shown in this manual may differ from
the actual display.
- The manufacturer and its suppliers held no responsibility to you or any other
person for any damage expenses, lost profits, or any other claim arise by using
this product.
- The contents of this manual may not be reproduced without the permission of
the manufacturer.
FRENCH
CARACTERISTIQUES DU MINUTEUR
1.
Affichage (LCD) à cristaux liquides du compte à rebours/compte dans le sens crois-
sant du minuteur couplé à une horloge.
2.
Affichage de 6 chiffres indiquant les heures, les minutes et les secondes pour le
minuteur et l'horloge.
3.
Compte dans le sens positif automatique après que le compte à rebours soit arrivé à
zéro.
4.
Minuteur à rebours : capacité maximale 23H 59M 59S. et compté à rebours à la
cadence d'une seconde.
Minuteur sens croissant : capacité maximale 23H 59M 59S à la cadence d'une seconde
5.
Fonction de rappel mémoire du dernier temps réglé pour le minuteur.
6.
La sonnerie du minuteur dure une minute quand celui-ci arrive à zéro.
7.
Bouton de réglage différent pour les heures, les minutes et les secondes.
8.
Signal sonore de dernière minute.
REGLAGE DU MINUTEUR (COMPTE A REBOURS)
1.
Placez le commutateur TIMER/CLOCK (minuteur/réveil) sur la position TIMER
L'affichage devient 00:00 00 avec le signal TIMER.
2.
Pressez le bouton HOUR pour augmenter le nombre des heures. Un signal sonore
de confirmation est émis chaque fois quevous pressez le bouton Si vous maintenez
le bouton pressé plus de deux secondes, vous activez l'avance rapide des heures.
3.
Pressez le bouton MIN pour augmenter le nombre des minutes. Un signal sonore de
confirmation est émis chaque fois que vous pressez le bouton si vous maintenez
pressé le bouton MIN plus de 2 secondes et l'avance rapide est activée.
4.
Pressez le bouton SEC pour augmenter le nombre des secondes. Un signal sonore
de confirmaton est émis chaque fois vous pressez le bouton. Si vous maintenez
pressé le bouton SEC plus de 2 secondes l'avance rapide des secondes est activée.
5.
Si le réglage n'est pas celui que vous désirez, pressez le bouton CLEAR (annulation)
une fois pour remettre le compteur à zéro et procédez à un nouveau réglage.
MINUTEUR (COMPTE A REBOURS)
ARRêT MARCHE
1.
Quand le réglage du temps est effectué, pressez le bouton STAR/STOP une fois et
le minuteur commence le compte à rebours à la cadence d'une secondes.
2.
Si vous désirez arrêter le minuteur pendant le compte à rebours, pressez le bouton
START/STOP une fois.
3.
Pressez le bouton START/STOP à nouveau et le minuteur se remet en marche.
SONNERIE DU MINUTEUR
1.
Quand le minuteur arrive à 0 heure 00 minute 00 secondes (0:00 00 à l'affichage), le
signal TIMES-UP (temps écoulé) clignote à l'écran et la sonnerie se déclenche
pendant une minute. Le minuteur se met à compter dans le sens croissant à la ca-
dence d'une seconde.
2.
La sonnerie et le minuteur peuvent être arrêtés en pressant l'un des bouton HOUR,
MIN, SEC, START/STOP ou CLEAR.
RAPPEL MEMOIRE DU MINUTEUR (FONCTION
COMPTE A REBOURS)
1.
Après l'arrêt de la sonnerie du minuteur, pressez le bouton START/STOP une fois
pour rappeler le dernier temps réglé pour le minuteur. Le signal MEMORY est
affiché sur l'écran.
2.
Pressez le bouton START/STOP une deuxième fois et le minuteur se déclenche
pour ce nouveau cycle. Le signal MEMORY disparait de l'écran.
ULTILISATION DU MINUTEUR
(FONCTION CROISSANTE)
1.
Quand le minuteur est à zéro (0 heure 00 minute 00 seconde) pressez le bouton
START/STOP une fois pour déclencher le minuteur dans sa fonction croissante, et
le minuteur commencera à mesurer le temps écoulé. Un signal sonore sera émis.
2.
Pressez le bouton START/STOP une deuxième fois, pour arrêter le minuteur.
3.
Pressez le bouton START/STOP une troisième fois pour remettre le minuteur en
marche à la cadence d'une seconde.
4.
Pressez le bouton START/STOP une 4ème fois pour arrêter le minuteur.
5.
Pressez le bouton CLEAR pour remettre l'affichage à zéro.
MESURES DU MINUTEUR (FONCTION COMPTE A
REBOURS ET CROISSANTE)
1.
Placez le commutateur TIMER/CLOCK sur la position TIMER.
2.
Réglez l'heure désirée sur votre minuteur comme décrit précédemment.
3.
Pressez la bouton START/STOP une fois pour activer le compte à rebours.
4.
Quand le minuteur arrive à 0 heure 00 minute 00 seconde (l'affichage indique 0:00
00) le signal TIMES-UP se met à clignoter. La sonnerie sonne alors pendant une
minute et le minuteur compte dans le sens croissant à la cadence d'une seconde.
5.
Quand vous pensez que le temps du minuteur est suffisant pour vous, pressez le
bouton START/STOP une fois pour arrêter le minuteur (fonction croissante).
6.
La période écoulée depuis que le compte à rebours est arrivé à zéro peut être connue
grâce à l'affichage du minuteur (fonction croissante).
REGLAGE DE L'AFFICHAGE DE L'HORLOGE
Placez le commutateur TIMER/CLOCK sur la position CLOCK.
L'heure de l'horloge est affichée.
HEURES
Pressez le bouton SET réglage (un signal sonore de confirmation est
émis) et pressez en même temps le bouton HOUR (un signal sonore
de confirmation est émis) pour faire avancer le chiffre des heures.
Pressez le bouton SET et maintenez pressé le bouton HOUR en même
temps pendant environ 2 secondes pour mettre en route l'avance rapide
de l'heure.
MINUTES
Pressez le bouton SET (un bip est émis) et pressez le bouton MIN en
même temps (un bip est émis) pour faire avancer le chiffre des minutes.
Pressez le bouton SET et maintenez pressé le bouton MIN en même
temps pendant 2 secondes pour mettre en route l'avance rapide des
minutes.
SECONDES
Pressez le bouton SET (un bip est émis) et en même temps pressez le
bouton des secondes (un bip est émis). Ceci remet les secondes à zéro
quand le total des secondes est compris entre 0 et 30 secondes. Si le
total des secondes est compris entre 31 et 59 secondes, cette opération
remet aussi les secondes à zéro mais augmente les minutes d'une unité.
CHANGEMENT DE PILE
Suivez la direction de la flèche, utilisez une pièce pour dévisser le
couvercle du compartiment à pile ou dos du minuteur. Retirez la pile
usagée, inserrez une pile bouton neuve 1,5V G13 (en vous assurant
que le pôle positif "+" soit tourné vers vous) et refermez le couvercle.
POUR ATTACHER LE MINUTEUR AVEC LA PINCE
Le minuteur peut être pincé sur une plaque pas trop épaisse ou une
poche (de chemise) en utilisant la pince en plastique au dos du minuteur.
pour fixer le minuteur avec l'aimant
Vous pouvez fixer le minuteur sur une surface métalique en utilisant
l'aimant au dos du minuteur.
SUPPORTPOURTABLE
Le minuteur peut être posé sur une table ou une surface plate en ouvrant
le support en métal au dos du minuteur.
ATTENTION
- Le contenu de ce livret est susceptible de modifications sans avis préalable.
- En raison des restrictions imposées par l'impression, les affichages figurant dans
ce livret peuvent différer de ceux du produit.
- Le fabricant et ses fournisseurs déclinent toute responsabilité envers vous ou
toute tierce personne pour tout dommage, pertes de bénéfices ou toute autre
revendication résultant de l'utilisation de ce produit.
- Le contenu de ce livret ne peut àtre reporduit sans l'autorisation du fabricant.
DEUTSCH
EIGENSCHAFTEN
1.
LCD Count-down / Count-up Kurzzeitmesser mit Uhr.
2.
6-stellige Anzeige für Stunde, Minute und Sekunde sowie für den Kurzzeitmesser
als auch für die Uhr.
3.
Automatisches Aufwärtszählen, nachdem der Zeitmesser bis auf Null abgezählt hat.
4.
Count-down Kurzzeitmesser : Maximale Einstellung ist 23 Std 59 Min 59 Sek. die
Zähleinheit ist 1 Sekunde.
Count-up Kurzzeitmesser : Maximale count-up Zeitmessung ist 23 Std 59 Min 59
Sek.
5.
Speicherrückruf-Funktion für Count-down Kurzzeitmesser.
6.
Wenn der Kurzzeitmesser auf Null abgezählt hat, ertönt eine Minute lang ein
Signalton.
7.
Separate Einstelltasten zum Einstellen der Stunde, Minute und Sckunde.
8.
Warnton ertönt 1 Minute lang.
EINSTELLEN DES COUNT-DOWN TIMERS
1.
Den Schiebeschalter TIMER/CLOCK auf die Position TIMER schieben, die
Anzeige gibt 0:00 00 und die Markierung TIMER an.
2.
Betätigen Sie die Taste HOUR zum Einstellen der Stundenziffern. Um die
Tastenbetätigung zu bestätigen, kann ein Signalton eingestellt werden. Betätigen
und halten Sie die Taste HOUR 2 Sekunden lang gedrückt, um die Stunden schnell
durchlaufen zu lassen.
3.
Betätigen Sie die Taste MIN zum Einstellen der Minuten. Bei jedem Tastendruck
kann eine Tonbestätigung gehört werden. Betätigen und halten Sie die Taste MIN 2
Sekunden lang gedrückt, um die Minuten schnell durchlaufen zu lassen.
4.
Betätigen Sie die Taste SEC zum Einstellen der Sekundenziffern. Um die
Tastenbetätigung zu bestätigen, kann ein Signalton eingestellt werden. Betätigen
und halten Sie die Taste SEC 2 Sekunden lang gedrückt, um die Sekunden schnell
durchlaufen zu lassen.
5.
Falls die Einstellung nicht wie gewünscht ist, einmal auf die Taste CLEAR drücken,
um den Kurzzeitmesser auf Null einzustellen und dann von neuem die Zeit einstellen.
START/STOP FüR DEN COUNT-DOWN TIMER
1.
Nachdem die Zeit eingestellt ist, einmal auf die Taste START/STOP drücken und
der Kurzzeitmesser beginnt mit einer Einheit von 1 Sek. abzuzählen.
2.
Während der Kurzzeitmesser in Betrieb ist, einmal auf die Taste START/STOP
drücken, um die Zeitmessung zu stoppen.
3.
Nochmals auf die Taste START/STOP drücken und der Kurzzeitmesser beginnt
von neuem zu zählen.
ALARM DES COUNT DOWN TIMER
1.
Wenn der Kurzzeitmesser auf 0 Std 00 Min 00 Sek. abgezählt hat (auf der Anzeige
0:00 00), wird auf der Anzeige die Markierung TIMES-UP aufblinken, der Alarm
wird für 1 Minute lang ertönen und der Kurzzeitmesser zählt automatisch aufwärts
mit einer Zähleinheit von 1 Sekunde.
2.
Der Alarm und die Aufwärtszählzeit können durch Betätigung einer der folgenden
Tasten gestoppt werdern: HOUR, MIN, SEC, START/STOP, CLEAR.
SPEICHERRüCKRUF-FUNKTION BEIM
COUNT-DOWN KURZZEITMESSER
1.
Nach Stoppen des Alarms kann durch Betätigung der Taste START/STOP die
eingestellte Abzählzeit auf die Anzeige zurückgerufen werden. Die Markierung MEM
wird auf der Anzeige erscheinen.
2.
Durch ein zweimaliges Betätigen der Taste START/STOP wird der Kurzzeitmesser
weiter abzählen. Die Markierung MEM verschwindet.
EINSTELLEN DES COUNT-UP TIMERS
1.
Wenn der Zeitmesser gestoppt ist (0 Std 00 Min 00 Sek), kann durch einmaliges
Betätigen der START/STOP-Taste das Aufwärtszählen des Kurzzeitmessers in
Betrieb gesetzt werden. Die Zähleinheit ist 1 Sekunde. Jede Tastenbetätigung kann
durch ein Singnalton bestätigt werden.
2.
Betätigen Sie ein zweites Mal die Taste START/STOP, um die count-down
Zeitmessung zu stoppen.

Verwandte Anleitungen für Oregon Scientific TR119


Inhaltszusammenfassung für Oregon Scientific TR119
- Seite 1 Press START/STOP button once to start the count-down Timer. pressé le bouton SEC plus de 2 secondes l'avance rapide des secondes est activée. MODEL : TR119 When Timer counts down to 0 HR 00 MIN 00 SEC ( 0:00 00 will show on display), Si le réglage n'est pas celui que vous désirez, pressez le bouton CLEAR (annulation)
- Seite 2 Zum Weiterzählen der count-up Zeitmessung ein drittes Mal auf die Taste IMPOSTAZIONE CONTEGGIO ALLA ROVESCIA CALAMITA PER L’ATTACCO Pulsar el botón de ARRANQUE/PARADA por cuarta vez para parar la cuenta START/STOP drücken. creciente del cronómetro. Portate la levetta TIMER/CLOCK sulla posizione TIMER 0:00 00; la scritta TIMER Il timer puo‘...