PELI StealthLite 2450 Gebrauchsanweisung
Wiederaufladbar
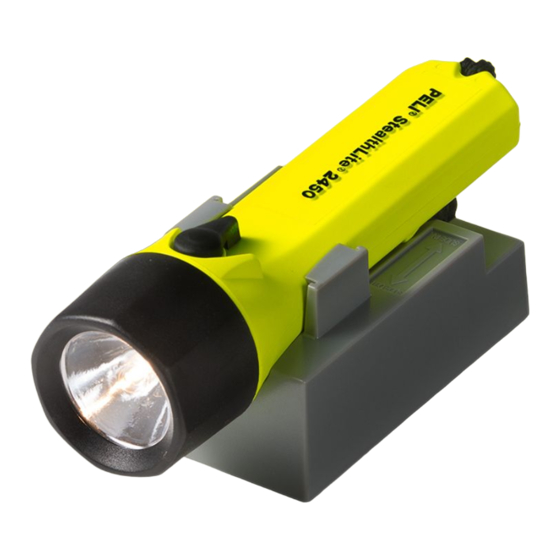
CHARGER BASE MOUNTING INST.
The charger base can be permanently mounted using
double sided tape (included) or with two #8 screws (not
included).
VEHICLE INSTALLATION
The charger base can be permanently mounted in
most vehicles and this operation should be performed
by a professional auto technician. When installing the
charger, ensure that the DIRECT WIRING RIG is con-
nected to an ignition key-switch line.The high amperage
draw of the charger may drain the vehicle's battery if
connected directly to the battery.
PRODUCT SPECIFICATIONS
Lamp Type:
Xenon
Lamp Life:
30 hours
Battery Type:
4.8V NiMH (4-cell)
Battery Brand:
Peli Cat. # 2469
REPLACEMENT PARTS
CAT #
DESCRIPTION
2401
O-ring
2404
Xenon Lamp
8056
12v Plug In Charger Cord
2458
220v Transformer
2470F
Handy Desk / Dash Smart Charger Base
2469
Replacement NIMH Battery
6061
Direct Wiring Rig
Please contact your local retailer on how to obtain
accessories for all Peli products.
StealthLite
TM
Rechargeable 2450
OPERATING INSTRUCTIONS
CHARGING INSTRUCTIONS
To ensure long-term performance charge
battery for 24 hours or more before first use.
Burn time per charge is approximately
3 hours and 30 minutes.
"Quick Charge"
CHARGE TIME 3 TO 4 HRS
1. Push the AC/DC Power Transformer plug into the
Charger Socket (the transformer socket is located
in a pocket in the base). Plug transformer into
electrical receptacle.
The LED should be SOLID GREEN.
2. Insert the torch into charger base until locked in
position. The LED will pulse RED.
3. When the LED changes to SOLID GREEN
the light is fully charged and ready to use.
ON/OFF
Swing the switch lever to the right (light facing away
from you) until light activates. To turn light off, swing
the switch lever to the left (light facing away from you)
until the light goes off.
PILAS ALCALINAS (OPCION)
1. Inserte 4 pilas alcalinas tipo AA (2 en línea con
el extremo + hacia arriba y dos en línea con el
extremo + hacia abajo) conforme a la polaridad
indicada en la calcomanía que se encuentra den-
tro del cuerpo de la linterna.
ADVERTENCIA:
Este producto no está aprobado para uso en lugares
peligrosos con pilas alcalinas. NO CARGUE LAS
PILAS ALCALINAS.
REEMPLAZO DE LA BOMBILLA
Para cambiar el módulo de la bombilla, siga los
pasos especificados para la instalación de las pilas
que aparecen a continuación:
Para retirar el módulo de la bombilla, siga los pasos
No. 1 y 2.
Para cambiar el módulo de la bombilla, siga los
pasos No. 4 y 5.
PRECAUCION:
Si no se va a usar la linterna por algún tiempo, retire
las pilas para evitar la posibilidad que ocurra una
fuga y corrosión.
CAUTION:
Read This Notice Before Use.
Hydrogen Gas Absorber Pellets
Located inside the torch are catalyst pellets which are
present to absorb hydrogen gas that could possibly
be emitted by defective, leaking, reversed polarity or
heavily discharged batteries. If the pellets become
wet, let them air dry. Peli Products assumes no liability
for any brand batteries which are defective or cause
injury to anyone when used in any Peli torch.
DO NOT MODIFY THIS PRODUCT!
Battery Safety Information
WARNING: HANDLE AND STORE BATTERIES
PROPERLY TO AVOID INJURY OR DAMAGE
BATTERIES CAN BE DANGEROUS!
Most battery issues arise from improper handling of
batteries, and particularly from the use of damaged or
counterfeit batteries. Please review the information
below to avoid serious injury and/or damage to your
property.
Rechargeable Batteries
1.
Hazardous location safety approvals for explosive
environments are only valid for the Pelican bat-
tery pack that is supplied with the light.
2.
For replacement battery packs only use the
approved Pelican battery pack for the model of
the light that you are using. The use of other bat-
tery packs will invalidate the safety approval.
BATTERY PACK INSTALLATION
1.
Remove lens housing by turning
counter-clockwise.
2.
Remove the lamp and contact module.
3.
Remove used battery pack and replace with a
fresh battery pack. The battery pack has a plastic
rib to ensure that it can only be installed one way.
4.
Replace the contact module and lamp.
5.
Replace lens housing squarely on threads and
turnclockwise while pressing on the lens hous-
ing slightly.
ALKALINE BATTERY (OPTION)
1. Insert 4 AA cell batteries (2 in-line with + end up
and 2 in-line + end down) as indicated on polarity
sticker located on the inside of the light.
WARNING: Product is not approved for
hazardous location use if using alkaline cells.
Do not charge alkaline batteries.
LAMP REPLACEMENT
To replace the lamp module follow steps in the bat-
teryinstallation section as listed below:
To remove lamp module follow steps #1 and #2.
To replace lamp module follow steps #4 and #5.
CAUTION:
If light is not to be used for some time, remove
batteries to prevent possible leakage and corrosion.
INSTRUCCIONES PARA INSTALAR
LA BASE DEL CARGADOR
La base del cargador se puede instalar perman-
entemente usando cinta adhesiva con adhesivo en
ambas superficies (se incluye) o con dos tornillos #8
(no se incluyen).
INSTALACION EN UN VEHICULO
La base del cargador se puede instalar perman
entemente en un vehículo pero esto lo debe realizar
un técnico especializado en automóviles. Cuando
se instale el cargador se debe asegurar que el
SISTEMA DE CABLES ELÉCTRICOS DIRECTOS
esté conectado a un cable de ignición con llave-
interruptor. Dado que este cargador extrae un ampe-
raje alto, podría agotar la batería del vehículo si se
conecta directamente a ésta.
ESPECIFICACIONES DEL PRODUCTO
Tipo de bombilla:
Xenón
Duración de la bombilla:
30 horas
Tipo de pila:
4.8V NiMH (4 pilas)
Marca de las pilas:
Peli Cat. #2469
PIEZAS DE REPUESTO
DESCRIPCION
NO. DE CAT.
2401
Junta tórica
2404
Bombilla de xenón
8056
Cable para el cargador de 12V
2458
Transformador de 220V
2470F
Base para el cargador Handy
3.
Lights should only be charged in a non-hazardous
location.
4.
Lights should only be charged using the Pelican
charger base that is supplied with the light.
5.
Do not charge with alkaline batteries installed in
the light. Attempting this can cause internal gas or
heat generation resulting in venting, explosion or
possibly fire.
6.
Deep discharge of the rechargeable battery may
cause batteries to vent potentially dangerous gas-
ses and electrolytes.
Always dispose of all batteries properly at
an approved battery recycling center.
StealthLite
TM
Rechargeable 2450
INSTRUCCIONES DE FUNCIONAMIENTO
CAT. NO. 2450
INSTRUCCIONES PARA CARGAR LAS PILAS
Para asegurar el rendimiento a largo plazo de las pilas,
cárguelas durante 24 horas o más antes de usarlas
por primera vez. El tiempo de duración de la pila por
carga es de aproximadamente 3 hora y 30 minutos.
"Carga rápida"
Tiempo de carga - 3 a 4 horas
1. Inserte el enchufe del transformador de CA/CC
en el encastre del cargador (el encastre del trans-
PELI
StealthLite
TM
Rechargeable 2450
SUBMERSIBLE TO 100 METERS
CAT. #2450
Patent #
5,404,281
PELI
PRODUCTS, S.L.U.
TM
c/ Provença, 388, Planta 7 • 08025 • Barcelona, Spain
Tel: +34 934 674 999 • Fax: +34 934 877 393
PELI
PRODUCTS USA
TM
23215 Early Ave. • Torrance, CA 90505
(310) 326-4700 • FAX (310) 326-3311
Desk/Dash Smart
2469
Pila de NiMH de repuesto
6061
Sistema de cables eléctricos directos
Sírvase comunicarse con el vendedor local para
obtener información sobre cómo obtener accesorios
para todos los productos de Peli Products.
PRECAUCIÓN: Lea esta notificación
antes de usar el producto.
Pastillas absorbentes de gas de hidrógeno
Dentro de la linterna se encuentran pastillas catalíti-
cas para absorber el gas de hidrógeno que se
pudiera liberar a causa de defectos, fugas, polaridad
inversa o agotamiento total de las pilas. Si se mojan
las pastillas, deje que se sequen al aire o cámbielas.
Peli Products no asume responsabilidad alguna por
pilas de ninguna marca que tengan defectos o que
causen lesiones a cualquier persona cuando se usen
en cualquier linterna de Peli.
¡NO MODIFIQUE ESTE PRODUCTO!
Información sobre seguridad de las pilas
AVISO: MANIPULAR Y GUARDAR
LAS PILAS CON PRECAUCIÓN PARA
EVITAR DAÑOS LAS PILAS PUEDEN SER
PELIGROSAS.
formador se encuentra en un compartimiento de la
base). Enchufe el transformador en el receptáculo
eléctrico. El indicador LED debe mostrar una luz
VERDE CONSTANTE.
2. Coloque la linterna en la base del cargador hasta
que quede fija. El indicador LED debe mostrar una
luz ROJA INTERMITENTE.
3. Cuando el indicador cambia a una luz VERDE
CONSTANTE quiere decir que la linterna está
completamente cargada y lista para usarse.
ENCENDIDO / APAGADO
Para encender la linterna (con el extremo de la bombilla
apuntando en la dirección opuesta a usted), gire la palan-
ca del interruptor hacia la derecha hasta que se encienda.
Para apagarla, gire la palanca del interruptor hacia la
izquierda (con el extremo de la bombilla apuntando en la
dirección opuesta a usted), hasta que se apague.
INSTALACION DEL CONJUNTO DE PILAS
1. Retire el bastidor de la lente girándolo en
sentido contrario de las agujas del reloj.
2. Retire el módulo de la bombilla y el contacto.
3. Retire el conjunto las pilas usado y coloque el nuevo.
El conjunto de pilas tiene un borde de plástico que
asegura que sólo se instalen en la dirección correcta.
4. Vuelva a colocar el módulo de la bombilla y el contacto.
5. Vuelva a colocar el bastidor de la lente sobre la rosca
y gire en el sentido de las agujas del reloj al mismo
tiempo que ejerce un poco de presión sobre el mismo.
TM
PELI
PRODUCTS, S.L.U.
TM
c/ Provença, 388, Planta 7 • 08025 • Barcelona, Spain
Tel: +34 934 674 999 • Fax: +34 934 877 393
PELI
PRODUCTS USA
TM
23215 Early Ave. • Torrance, CA 90505
(310) 326-4700 • FAX (310) 326-3311
All trademarks and logos displayed herein are registered and
unregistered trademarks of Pelican Products, Inc. and others.
2453-312-500
5-1910 REV A © 2012 Pelican Products OC/12
La mayoría de los problemas relacionados con
las pilas surgen al utilizarlas incorrectamente y,
sobre todo, al emplear pilas falsas o en mal estado.
Consultar la información siguiente para evitar daños
personales o en el producto.
Pilas recargables
1. Los certificados de seguridad para zonas pelig-
rosas en entornos explosivos solo se aplican al
paquete de pilas Pelican que se suministra con
la linterna.
2. Para cambiar los paquetes de pilas utilizar única-
mente las pilas Pelican homologadas
para el modelo de linterna correspondiente. El uso
de otros paquetes de pilas anulará el certificado
de seguridad.
3. No cargar la linterna en zonas peligrosas.
4. Cargar la linterna únicamente en la base de car-
gador Pelican que se suministra con la linterna.
5. No cargar la linterna con las pilas alcalinas den-
tro; podría generarse gas o calor en el interior,
que podría emanar y provocar una explosión o
un incendio.
6. Si las pilas recargables se descargan demasiado
rápido pueden originarse fugas de gases peligro-
sos y electrolitos.
Desechar las pilas en un centro de reciclado
homologado.

Verwandte Anleitungen für PELI StealthLite 2450


Inhaltszusammenfassung für PELI StealthLite 2450
- Seite 1 3. Cuando el indicador cambia a una luz VERDE wet, let them air dry. Peli Products assumes no liability possibly fire. by a professional auto technician. When installing the CONSTANTE quiere decir que la linterna está...
- Seite 2 Veuillez contacter votre détaillant pour obtenir des 2. Birne und Kontaktmodul entfernen. gültig, der mit der Lampe geliefert wurde. accessoires pour tous les produits de Peli Products. MODE D’EMPLOI CAT. N° 2450 2. Verwenden Sie als Ersatz-Akku nur den zugelass- 3.