Herunterladen Inhalt Inhalt Diese Seite drucken
Inhaltsverzeichnis

Werbung

Verfügbare Sprachen

Verfügbare Sprachen

Werbung

Inhaltsverzeichnis
loading

Inhaltszusammenfassung für Korg TN-50

  • Seite 2 Precautions Care If the exterior becomes dirty, wipe it with a clean, Location dry cloth. Do not use liquid cleaners such as Using the unit in the following locations can benzene or thinner, or cleaning compounds or result in a malfunction. flammable polishes.
  • Seite 3 THE FCC REGULATION WARNING (for USA) This equipment has been tested and found to comply with the limits for a Class B digital device, pursu- ant to Part 15 of the FCC Rules. These limits are designed to provide reasonable protection against harmful interference in a residential installation.
  • Seite 4 Notice regarding disposal (EU only) IMPORTANT NOTICE TO CONSUMERS When this “crossed-out wheeled bin” This product has been manufactured accord- symbol is displayed on the product, ing to strict specifications and voltage require- owner’s manual, battery, or battery ments that are applicable in the country in package, it signifies that when you which it is intended that this product should wish to dispose of this product, manu-...
  • Seite 5: Inhaltsverzeichnis

    Table of Contents Main Features ......... 6 Tuning to a reference tone (Sound Installing batteries ......6 Out mode) ..........11 Using the stand ....... 7 Tuning using the reference tone and Parts of the TM-50 and what they do ... 7 meter (Sound Back mode)....
  • Seite 6: Main Features

    Thank you for purchasing the Korg Combo Tuner Metronome TM-50. Main Features With the TM-50 you can tune instruments using the internal mic or by connecting them to the INPUT jack. You can use the tuner and metronome indi- vidually or simultaneously.
  • Seite 7: Using The Stand

    Parts of the TM-50 and what they do Using the stand You can use the stand provided on the back of the TM-50 to tilt it back at an angle for easy viewing. 1. TUNER ON button 2. CALIB/NOTE p, q button 3. SOUND button 4. SOUND BACK button...
  • Seite 8: Turning The Power On/Off

    7. Speaker Turning the power on/off 8. START/STOP button 9. Tuning guide To turn the power on 10. V olume Press either the TUNER ON button or the 11. METRONOME ON button METRONOME ON button and the power 12. B EAT buttons p, q will turn on.
  • Seite 9: Turning The Tuner Off

    ON button to turn off the power. The tuner If you want to tune your instrument using a will also turn off automatically if it’s not in Korg contact mic (separately sold), plug the use for twenty minutes. contact mic into the TM-50’s INPUT jack.
  • Seite 10: Using The Tuner

    decrease the value continuously. This set- Using the tuner ting is stored even when the power is off. Tuning while watching the meter Play a single note on your instrument. The closest note to the input sound will (Meter mode) appear in the center of the display.
  • Seite 11: Tuning To A Reference Tone (Sound Out Mode)

    pitch is sharp. Press the SOUND button to select Sound If you want to tune a just major third above Out mode. or a minor third above a certain note, use The reference tone is output from the PHONES jack or speakers. Use the vol- the “...
  • Seite 12: Tuning Using The Reference Tone And Meter (Sound Back Mode)

    start simultaneously and you can tune mic or INPUT jack will be received and your instrument while viewing the meter. the reference tone will be output from the headphones. Tuning using the reference tone If nothing is connected to the PHONES and meter (Sound Back mode) jack, the input sound from the INPUT jack is received and the reference tone is...
  • Seite 13: Using The Metronome

    remembered even when the power is off. Using the metronome If you’ve selected “PENDULUM STEP” Pressing the TEMPO p or q button will Setting the tempo and time increase or decrease the tempo value by 1 signature step. The value will change continuously if Press the METRONOME ON button.
  • Seite 14: Using Tap Tempo

    If you want to change the time signature, Press the TAP TEMPO button several press the BEAT p or q buttons to make times at regular intervals at the tempo your selection. that you want. The time signature will change as follows. The TM-50 detects the interval used when Press the BEAT p or q buttons: n 0 n1 ...
  • Seite 15: Using The Tuner And Metronome Simultaneously

    and the TAP TEMPO button will blink Using the tuner and metronome accordingly. simultaneously The tap tempo can also be input For example, if you’re playing along with the while the metronome is in use. metronome and you notice that your instru- ment is not tuned correctly, you can leave the Play according to the tempo.
  • Seite 16 “triplets”, “triplets without the center Tuning in Meter mode beat”, “quadruplets” or “quadruplets When you play a single note on your in- without the center beats” as the time strument, the display will show the name signature. of the note that is closest to the pitch that you played.
  • Seite 17: Backlight

    Backlight Specifications When necessary, press the Backlight button Tuner section “ ” to set the backlight. Scale: 12 note equal temperament Each time the Backlight button is pressed, you Detection range*: C1 (32.70 Hz)–C8 (4186.01 can switch to Soft  Auto  Off  Soft… Hz) for a sinewave Reference tone: C3 (130.81 Hz)–C6 (1046.50...
  • Seite 18 Time signatures: 0–9 beats, duplets, triplets, beats, maximum volume, triplets without the center when using zinccarbon beat, quadruplets, quadru- batteries) plets without the center beats Dimensions: 111 (W) x 74 (D) x 18 (H) mm Tempo accuracy: ±0.3% /4.37" (W) x 2.91" (D) x 0.71" (H) Weight: 106 g (3.77 oz.) including Main Specifications...
  • Seite 19 Default values: Calibration = 440 Hz, Detection range = A4, Tempo = 120, Time signature = four beats, Tempo setting type = PENDULUM STEP, Backlight setting = off * Even if the pitch is within the range of de- tection, the TM-50 may be unable to detect the pitch if the sound contains numerous overtones (such as the low and high notes on an acoustic piano) or if the instrument...
  • Seite 20 Précautions raisonnable de postes de radio et de télévision. Maniement Emplacement Pour éviter de les endommager, manipulez les L’utilisation de cet instrument dans les endroits commandes et les boutons de cet instrument suivants peut en entraîner le mauvais fonctionne- avec soin. ment.
  • Seite 21 Note concernant les dispositions REMARQUE IMPORTANTE POUR LES CLIENTS (Seulement EU) Ce produit a été fabriqué suivant des spéci- Quand un symbole avec une poubelle fications sévères et des besoins en tension barrée d’une croix apparait sur le applicables dans le pays où ce produit doit produit, le mode d’emploi, les piles ou être utilisé.
  • Seite 22 Sommaire Caractéristiques principales ....23 Accord sur une note de référence (mode Installation des piles ......23 Son) ..............28 Utiliser le pied ........24 Accorder votre instrument avec la note Parties du TM-50 et leurs fonctions ..24 de référence et le compteur (mode Mise sous/hors tension ......
  • Seite 23: Caractéristiques Principales

    Merci d’avoir fait l’acquisition de Korg Combo Accordeur Métronome TM-50. Caractéristiques principales Grâce au modèle TM-50, vous pourrez accor- der vos instruments à l’aide du micro interne ou en les connectant à la prise INPUT. Vous pouvez utiliser l’accordeur et le métro- nome individuellement ou simultanément.
  • Seite 24: Utiliser Le Pied

    Parties du TM-50 et leurs fonctions Quand les piles sont usées, un symbole de pile apparaît à gauche à l’écran. Rempla- cez alors les piles aussi vite que possible. Utiliser le pied Vous pouvez placer le TM-50 en position verticale en déployant le pied situé à l’arrière 1. Bouton TUNER ON de l’appareil.
  • Seite 25: Mise Sous/Hors Tension

    8. Bouton START/STOP Mise sous/hors tension 9. Guide d’accordage 10. V olume Mise sous tension 11. Bouton METRONOME ON Appuyez sur la bouton TUNER ON ou 12. B outons BEAT p, q METRONOME ON et l’appareil se mettra 13. B outons TEMPO p, q automatiquement sous tension.
  • Seite 26: Pour Mettre L'accordeur Hors Tension

    Le métronome se Si vous souhaitez accorder votre instrument mettra aussi automatiquement hors tension si à l’aide du Contact Microphone Korg vendu vous ne l’utilisez pas pendant vingt minutes.. séparément, branchez le microphone de contact sur la prise INPUT du TM-50.
  • Seite 27: Connexion Du Casque

    prise INPUT, l’accordage s’effectuera par Appuyez sur le bouton TUNER ON. le biais du micro interne. “ ” s’affichera en haut de l’écran et le calibrage (note de référence) Connexion du casque s’affichera en dessous. Vous pouvez raccorder un casque avec Pour changer le calibrage, appuyez sur minijack 1/8"...
  • Seite 28: Accord Sur Une Note De Référence (Mode Son)

    Accord sur une tierce majeure pure ou Si vous utilisez le microphone interne, disposez votre instrument aussi près une tierce mineure pure au-dessus Si vous souhaitez effectuer l’accord sur que possible du microphone afin que une tierce majeure pure au-dessus de A (0 les sons extérieurs ne puissent pas cent), accordez votre instrument de telle être captés pendant l’accord.
  • Seite 29: Accorder Votre Instrument Avec La Note De Référence Et Le Compteur (Mode Retour Son)

    haut-parleurs ou via la prise PHONES. ment et vous pourrez accorder votre ins- Utilisez la commande Volume pour régler trument tout en visualisant le compteur. le volume de sortie. Accorder votre instrument avec la Appuyez sur le bouton CALIB/NOTE p note de référence et le compteur ou q pour sélectionner la note.
  • Seite 30: Utilisation Du Métronome

    PHONES, le son d’entrée du micro interne Utilisation du métronome ou de la prise INPUT sera reçu et la note de référence diffusée à partir du casque. Réglage du tempo et de la signature Si aucun périphérique n’est connecté à la rythmique prise PHONES, le son d’entrée de la prise Appuyez sur le bouton METRONOME ON.
  • Seite 31: Entrée Du Tempo Tap

    le tempo. Ce réglage reste mémorisé même Le pendule du métronome se balancera après la mise hors tension de l’appareil. de gauche à droite selon le tempo et le bouton TAP TEMPO (Réglage du tempo) Si vous avez sélectionné “PAS clignotera selon le rythme.
  • Seite 32 d’un nombre de BPM (battements par minute). nute, “Hi” s’affichera à l’écran et le tempo sera défini sur “252.” Appuyez sur la bouton METRONOME Appuyez sur le bouton START/STOP Le pendule du métronome s’affichera à pour démarrer le métronome. l’écran et la mention “ ”...
  • Seite 33: Utilisation Simultanée De L'accordeur Et Du Métronome

    Procédez de la manière suivante. Utilisation simultanée de l’accordeur et du métronome Appuyez sur le bouton METRONOME Le TM-50 vous permet d’utiliser simultané- Appuyez sur le bouton START/STOP ment l’accordeur et le métronome. pour lancer le métronome. Pour les détails sur le fonctionnement de Si nécessaire, spécifiez le tempo et la l’accordeur et celui du métronome, reportez- signature rythmique, etc.
  • Seite 34 Appuyez sur la bouton TUNER ON pour Accord en mode Son passer en mode Compteur. Accordez votre instrument sur la hauteur L’afficheur indiquera le compteur d’ac- de la note entendue. cord. Le tempo du métronome est indiqué Accord en mode retour son par la diode clignotante du bouton TAP Avec cette note, le compteur et la diode, TEMPO.
  • Seite 35: Rétro-Éclairage

    Rétro-éclairage Spécifications Si nécessaire, appuyez sur le bouton “ ” du Section accordeur rétro-éclairage pour régler le rétro-éclairage. Gamme: 12 notes tempérament égal A chaque fois que vous appuyez sur ce bou- Plage de détection*: C1 (32,70 Hz) à C8 (4186,01 ton, le rétro-éclairage sera défini de la manière Hz) onde sinusoïde suivante ...
  • Seite 36 Réglage du tempo: PAS PENDULAIRE, PAS Durée de vie des piles: Accordeur... COMPLET, TEMPO TAP Environ 70/44/26 heures Signatures rythmiques: (Régler le rétro-éclairage: 0 à 9 battements, Duolets, Off/Léger/Auto, Note A4 Triolets, Triolets avec en fonctionnement continu, omission du battement avec des piles zinccarbone) du milieu, Quartolets, Métronome...
  • Seite 37 de rétro-éclairage du métronome seront enre- Les caractéristiques et l’aspect du produit gistrés même si l’appareil est mis hors tension sont susceptibles d’être modifiés sans avis Néanmoins, les réglages seront réinitialisés préalable en vue d’une amélioration. aux valeurs suivantes si vous remplacez les piles.
  • Seite 38: Vorsichtsmaßnahmen

    Vorsichtsmaßnahmen diesem Erzeugnis. Bedienung Aufstellungsort Vermeiden Sie bei der Bedienung von Schaltern Vermeiden Sie das Aufstellen des Geräts an Orten, und Reglern unangemessenen Kraftaufwand. an denen. • es direkter Sonneneinstrahlung ausgesetzt ist; Reinigung • hohe Feuchtigkeit oder Extremtemperaturen Bei auftretender Verschmutzung können Sie auftreten können;...
  • Seite 39 Hinweis zur Entsorgung (Nur EU) WICHTIGER HINWEIS FÜR KUNDEN Wenn Sie das Symbol mit der Dieses Produkt wurde unter strenger Beach- „durchgekreuzten Mülltonneg auf tung von Spezifikationen und Spannungsan- Ihrem Produkt, der dazugehörigen forderungen hergestellt, die im Bestim- Bedienungsanleitung, der Batterie mungsland gelten.
  • Seite 40 Inhaltsübersicht Die wichtigsten Funktionen..41 Messanzeige (Messmodus) ..... 45 Einsetzen der Batterien ....41 Stimmen auf einen Referenzton Verwendung des Ständers ... 42 (Ton-Ausgabe-Modus) ...... 46 Teile des TM-50 und ihre Funktionen ...42 Stimmen mithilfe des Referenztons und Ein- und Ausschalten ....43 der Messanzeige (Sound Back-Modus) ...47 Einschalten des Geräts......
  • Seite 41: Die Wichtigsten Funktionen

    Herzlichen Dank für den Kauf des Korg Kombi- nation aus Stimmgerät und Metronom TM-50. Die wichtigsten Funktionen Mit dem TM-50 können Sie Ihre Instrumente mithilfe des integrierten Mikrofons oder durch Anschluss an die INPUT-Buchse stimmen. Sie können das Stimmgerät und das Metronom sowohl separat als auch gleichzei- tig verwenden.
  • Seite 42: Verwendung Des Ständers

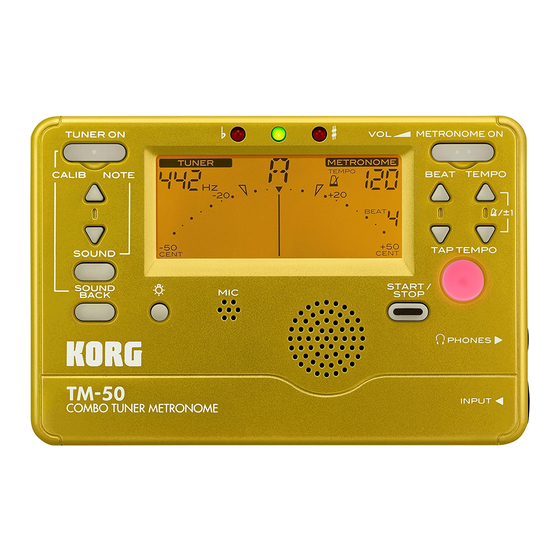
    Teile des TM-50 und ihre Funktionen Verwendung des Ständers Sie können den an der Rückseite des TM-50 vorhandenen Ständer verwenden, um das Gerät zur leichten Betrachtung zurückzuklap- pen. 1. TUNER ON-Taster 2. CALIB/NOTE p, q -Tastern 3. SOUND-Taster 4. SOUND BACK-Taster 5. Beleuchtungstaste 6. Internes Mikrofon...
  • Seite 43: Ein- Und Ausschalten

    7. Lautsprecher Ein- und Ausschalten 8. START/STOP-Taster 9. Stimm-Anleitung Einschalten des Geräts 10. L autstärke Drücken Sie entweder den TUNER ON-Taste 11. METRONOME ON-Taster oder den METRONOME ON-Taste, und das 12. B EAT p, q -Tastern Gerät wird eingeschaltet. 13. T EMPO p, q -Tastern Durch Drücken der TUNER ON-Taste akti-...
  • Seite 44: Ausschalten Des Stimmgeräts

    Wenn Sie ein Instrument mit getrennt Minuten lang nicht verwendet wird. erhältlichen Korg Kontaktmikrofon stimmen wollen, stecken Sie das Kontaktmikrofon in die INPUT-Buchse des TM-50. Wenn das Instrument nicht an die...
  • Seite 45: Anschluss Von Kopfhörern

    es mithilfe des integrierten Mikrofons kann es mithilfe des integrierten gestimmt werden. Mikrofons gestimmt werden. Drücken Sie die TUNER ON-Taste. Anschluss von Kopfhörern Im oberen Teil des Displays erscheint Sie können 1/8-Zoll-Ministecker-Ohrhörer an „ “, und darunter wird die PHONES-Buchse anschließen. Wenn ein- die Kalibrierung (Referenzton) angezeigt.
  • Seite 46: Stimmen Auf Einen Referenzton (Ton-Ausgabe-Modus)

    Instrument auf die korrekte Tonhöhe, Note stimmen wollen, verwenden Sie die so dass der gewünschte Notenname Markierungen „ “ (-13,7 Cent) oder „ “ erscheint. (+15,6 Cent) in der Messanzeige. Stimmen zu einer genauen großen Wenn Sie das interne Mikrofon ver- wenden, bringen Sie das Instrument Terz oder einer kleinen Terz nach oben so nahe wie möglich zum Mikrofon,...
  • Seite 47: Stimmen Mithilfe Des Referenztons Und Der Messanzeige (Sound Back-Modus)

    Drücken Sie die SOUND-Taste, um den Drücken Sie die SOUND-Taste erneut, um Ton-Ausgabe-Modus zu wählen. zum Messmodus zurückzukehren. Der Referenzton wird entweder über Wenn Sie das Instrument an die INPUT- die Kopfhörer (wenn an die PHONES- Buchse oder die Kopfhörer an die PHONES- Buchse angeschlossen) oder über die Buchse anschließen, wird der Messmodus Lautsprecher wiedergegeben.
  • Seite 48 Drücken Sie die SOUND BACK-Taste, Wenn weder die Kopfhörer an die um den Sound Back-Modus zu aktivie- PHONES-Buchse noch das Instru- ren. ment an die INPUT-Buchse ange- Beim Sound Back-Modus wird der schlossen sind, kann der Sound Back- Referenzton wiedergegeben, der dem Modus nicht durchgeführt werden.
  • Seite 49: Verwenden Des Metronoms

    Nachdem Sie „PENDEL-METRONOM Verwenden des Metronoms SCHRITT“ oder „GANZER SCHRITT“ gewählt haben, drücken Sie die Taste TEMPO Einstellen von Tempo und Taktbe- p oder q zum Einstellen des Tempos. Diese zeichnung Einstellung wird auch bewahrt, wenn das Drücken Sie die METRONOME ON- Gerät ausgeschaltet ist.
  • Seite 50: Eingabe Des Tap-Tempos

    erhöht bzw. verringert. Sie können den (Triole) n (Triole ohne Mittentakt- Wert fortlaufend erhöhen oder verrin- schlag) n (Quartole) n (Quar- gern, indem Sie die entsprechende Taste tole ohne Mittentaktschlag) n 0 ... gedrückt halten. Spielen Sie zusammen mit dem Metro- 30 n 31 n 32 ...
  • Seite 51: Gleichzeitige Verwendung Des Stimmgeräts Und Metronoms

    Drücken Sie die TAP TEMPO-Taste die TAP TEMPO-Taste blinkt gemäß dem mehrmals in regelmäßigen Abständen. Takt. Das TM-50 erkennt das beim Drücken der Das Tap-Tempo kann eingegeben Taste verwendete Intervall und stellt es werden, wenn das Metronom ver- als Tempo ein. Das Intervall wird als BPM wendet wird.
  • Seite 52: Stimmgeräts Und Metronoms

    Gleichzeitige Verwendung des Bei gleichzeitiger Verwendung von Stimmgerät und Metronom können Stimmgeräts und Metronoms Sie nicht „Triole“, „Triole ohne Mitten- Wenn Sie zum Beispiel zum Metronom taktschlagg“, „Quartole“, „Quartole spielen und feststellen, dass Ihr Instrument ohne Mittentaktschlag“ als Taktbe- nicht richtig gestimmt ist, können Sie das zeichnung wählen.
  • Seite 53: Hintergrundbeleuchtung

    Tonlage am nächsten liegt. Stimmen Sie Hintergrundbeleuchtung Ihr Instrument unter Beobachtung des Drücken Sie bei Bedarf die Beleuchtungs- Messgeräts und der Stimmanleitung taste „ “, um die Hintergrundbeleuchtung Stimmen im Ton-Ausgabe-Modus einzustellen. Stimmen Sie Ihr Instrument auf die gehörte Mit jedem Tastendruck verändert sich die Tonhöhe.
  • Seite 54: Technische Daten

    Tempo-Einstellung: PENDEL-METRONOM Technische Daten SCHRITT, GANZER SCHRITT, TAP-TEMPOS Stimmgerät-Sektion Skala: 12 Noten gleichschwebende Taktbezeichnungen: 0 ~ 9 Takte, Duole, Triole, Stimmung Triole ohne Mittentaktschlag, Erkennungsbereich*: C1 (32,0 Hz) ~ C8 (4186,01 Hz) Quartole, Quartole ohne für eine Sinuswelle Mittentaktschlag Referenzton: C3 (130,81 Hz) ~ C6 (1046,50 Tempogenauigkeit: ±0,3% Hz) 3 Oktave...
  • Seite 55 Eingang, bei Verwendung geschaltet wird. Wenn Sie aber die Batterien von Zink-Kohle-Batterien) ersetzen, werden diese Einstellungen auf die Metronom ... folgenden Vorgabewerte zurückgesetzt. Ca. 55/35/22 Stunden Vorgabewerte: (Hintergrundbeleuchtung: Kalibrierung = 440 Hz, Referenzton = A4, Die Aus/Soft/Auto, Tempo 120, Einstellungen für Tempo, Taktbezeichnung vier Taktschläge, maximale und Tempoeinstellungstyp, Hintergrundbe- Lautstärke, bei Verwendung...
  • Seite 56 Precauciones Manejo Para evitar una rotura, no aplique excesiva fuerza Ubicación a los conmutadores o controles. El uso de la unidad en las siguientes ubicaciones Cuidado puede dar como resultado un mal funcionamien- Si exterior se ensucia, límpiese con un trapo seco. No use líquidos limpiadores como disolvente, ni •...
  • Seite 57 Nota respecto a residuos y deshechos NOTA IMPORTANTE PARA EL CONSUMIDOR (solo UE) Este producto ha sido fabricado de acuerdo a estrictas especificaciones y requerimientos Cuando aparezca el símbolo del cubo de voltaje aplicables en el país para el cual de basura tachado sobre un producto, está...
  • Seite 58 Índice Características generales ..... 59 medidor ..........63 Instalar las baterías ...... 59 Afinación a un tono de referencia Uso del soporte ......60 (modo Salida de sonido) ....64 Partes del TM-50 y sus funciones 60 Afinación utilizando el medidor y el tono Activación/desactivación de la de referencia (modo Regreso de sonido) 65 alimentación .........
  • Seite 59: Características Generales

    Gracias por adquirir el Combo Afinador Metrónomo TM-50 de Korg. Características generales Con el TM-50 puede afinar instrumentos uti- lizando el micrófono interno o conectándolos al jack INPUT. Puede utilizar el afinador y el metrónomo individualmente o simultáneamente. Instalar las baterías...
  • Seite 60: Uso Del Soporte

    este supuesto, por favor instale nuevas Partes del TM-50 y sus funciones baterías tan pronto como sea posible. Uso del soporte Puede usar el TM-50 en posición vertical abriendo el soporte situado en la parte poste- rior de la unidad. 1. Botón TUNER ON 2. Botones CALIB/NOTE p, q...
  • Seite 61: Activación/Desactivación De La Alimentación

    7. Altavoz (Speaker) Activación/desactivación de la 8. Botón START/STOP alimentación 9. Guía de afinación 10. V olumen Para activar la alimentación 11. Botón METRONOME Pulse el botón TUNER ON o el botón ME- 12. B otones BEAT p, q TRONOME ON y se activará la alimentación. 13. B otones TEMPO p, q Al pulsar el botón TUNER ON, el afi-...
  • Seite 62: Desactivación Del Afinador

    El metrónomo también se Si desea afinar el instrumento utilizando un desactivará automáticamente si no se utiliza micrófono de contacto de Korg (se vende por durante veinte minutos. separado), enchufe el micrófono de contacto en el jack INPUT del TM-50.
  • Seite 63: Conexión De Auriculares

    Pulse el botón TUNER ON. Conexión de auriculares “ ” aparecerá en la parte Puede conectar un juego de auriculares de superior de la pantalla y la calibración miniconector de 1/8" al jack PHONE. (tono de referencia) se mostrará debajo. Una vez enchufado, no se emitirá...
  • Seite 64: Afinación A Un Tono De Referencia (Modo Salida De Sonido)

    Afinación a una tercera mayor justa Si está usando el micro interno, coloque su instrumento tan cerca ascendente o a una tercera menor como sea posible de dicho micro, para ascendente Si desea afinar a una tercera mayor justa evitar que ruidos extraños o de fondo ascendente A (0 cent), afine el instrumento sean captados durante la afinación.
  • Seite 65: Afinación Utilizando El Medidor Y El Tono De Referencia (Modo Regreso De Sonido)

    control de volumen para ajustar el volu- Afinación utilizando el medidor y men de salida. el tono de referencia (modo Regre- Pulse el botón CALIB/NOTE p o q para so de sonido) seleccionar la nota. Esta función se puede utilizar cuando está El tono de referencia de salida cambia de conectado al jack INPUT o al jack PHONES (o la siguiente forma.
  • Seite 66: Uso Del Metrónomo

    desde los auriculares. El péndulo del metrónomo aparecerá en Si no hay nada conectado al jack PHO- la pantalla y “ ” aparece- NES, el sonido de entrada procedente rá encima. del jack INPUT se recibe y el tono de Pulse el botón TEMPO p o q para referencia se emite desde los altavoces.
  • Seite 67: Iintroducción De La Marcación Del Tempo

    valor cambiará continuamente si mantiene La marca de tiempo cambiará de la pulsado el botón. siguiente forma. Pulse los botones BEAT p o q: 0 n1 ... 9 (9 30 n 32 n 34 ... 88 n 92 n 96 ... 232 n 240 n tiempos) n (Dosillo) n (Tresillo)
  • Seite 68: Uso Del Afinador Y Del Metrónomo Simultáneamente

    Pulse el botón TAP TEMPO varias veces La marcación del tempo también se puede a intervalos regulares. introducir con el metrónomo en uso. El TM-50 detecta el intervalo utilizado al Toque siguiendo el tempo. pulsar el botón, lo muestra como un valor Para detener el metrónomo, pulse el BPM (Tiempos por minuto) y lo definirá...
  • Seite 69 metrónomo y nota que el instrumento no está Pulse el botón TUNER ON para acceder afinado correctamente, puede dejar el metróno- al modo Medidor. mo funcionando mientras realiza la afinación. En la pantalla se mostrará el medidor de afinación. El tempo del metrónomo se Realice los pasos siguientes.
  • Seite 70: Luz De Fondo

    Afinación en el modo Regreso de Luz de fondo sonido Utilizando el tono, el medidor de En caso necesario, pulse el botón de luz de afinación y la guía de afinación, ajuste el fondo “ ” para definir la luz de fondo. instrumento.
  • Seite 71: Especificaciones

    CACIÓN DEL TEMPO Especificaciones Marcas de tiempo: 0–9 tiempos, dosillos, tresi- llos, tresillos sin el tiempo Sección del afinador central, cuatrillos, cuatrillos Temperamento: 12-notas, temperamento igual sin los tiempos centrales Rango de detección*: C1 (32,70 Hz)–C8 (4186,01 Hz) Precisión de tempo: ±0,3% para una onda sunisoidal Tonos de Referencia: C3 (130,81 Hz)–C6 (1046,50 Especificaciones principales...
  • Seite 72 Aproximadamente 55/35/22 Valores por defecto: horas (luz de fondo: Calibración = 440 Hz, intervalo de detección Desactivada/Auto/Suave, = A4, tempo = 120, marca de tiempo = cuatro tempo: 120, cuatro tiempos, tiempos, tipo de ajuste de tempo = PENDULUM volumen máximo, si se utili- STEP, ajuste de luz de fondo = desactivada zan baterías de carbón-zinc) * Aunque el tono se encuentre dentro del...

Inhaltsverzeichnis