Seite 1
WatchGuard® XCS Platform WatchGuard® XCS Platform Appliance Models: 170, 370, 570, and 770 Quick Start Guide Guide de démarrage rapide Kurzanleitung Guida introduttiva Guía Rápida WatchGuard® Technologies, Inc.
Seite 2
Registration and Configuration Register with LiveSecurity® Service • Find the serial number on your device and record it. • G o to http://www.watchguard.com/activate • L og in. NOTE: If you are new to WatchGuard®, follow the instructions provided at the URL above to create a profile. • F ollow the instructions on the screen to enter your serial number and receive a feature key. NOTE: If you will not have an Internet connection during the setup procedure, it is highly recommended to copy your feature key to a text file during the activation process. Configuration Checklist • T o configure your WatchGuard device, you must collect the following information about your network: Example User Setting Hostname hostname Domain Name example.com...
Connection and Installation Connect your WatchGuard® XCS NIC 1 Ethernet cable Ethernet cable Switch • Rack mount the device in a secure location. • C onnect a monitor and a keyboard to the connectors located on the back panel of the device. • C onnect the appliance directly to the LAN (Local Area Network) using the first onboard Ethernet connector on the left side of the back panel. • Connect the power cord to the power socket on the back panel of the device. Console Installation • P ower on your device. After the system has booted, startup options are displayed on the monitor. • S elect F2, and then select OK. NOTE: The F2 option is chosen by default after a few seconds.
Seite 4
Web Wizard Web UI Setup Wizard • O pen a Web browser and enter the IP address of the device using the address entered in the network configuration in Step 4, such as: https://10.0.1.10. NOTE: Because WatchGuard XCS uses a self-signed certificate, you will see a certificate warning in your browser. It is safe to ignore the warning (Internet Explorer) or to add a certificate exception (Mozilla Firefox). • On the Login screen enter the default user ID, admin, and the default password, admin. • E nter the Organization Name and Server Admin Email address using the information from your Configuration Checklist in Step 2. • Change the default password. • Select your Intercept Settings for Connection Control and Anti-Spam. • Select Continue to complete the initialization. • T he Web UI Setup Wizard is now complete, and the feature key page is displayed. NOTE: The mail system is initially in a stopped state. The Mail Delivery Settings must be configured before starting the mail system.
Seite 5
Next Steps Congratulations! You have finished the basic setup of your WatchGuard® XCS. You can use the Web UI to continue all configuration and management tasks. Before you begin, we strongly recommend that you use the instructions on this page to: • Add a Feature Key to the WatchGuard XCS • Download Latest Software Updates • Install Software Updates Add a Feature Key to the WatchGuard XCS • Log in to the Web UI. • Select Administration > System > Feature Key, and then click Update. • Copy the text of the feature key file you received in Step 1, and paste it in the text box. • Click Update Key. Download Latest Software Updates The Security Connection feature contacts WatchGuard’s support servers to check for new ...
Seite 10
Enregistrement et configuration Inscrivez-vous au Service LiveSecurity® • Enregistrez le numéro de série de votre appareil. • A llez sur http://www.watchguard.com/activate. • C onnectez-vous REMARQUE : si vous n’êtes pas encore inscrit auprès de WatchGuard®, suivez les instructions fournies à l’adresse électronique ci-dessus pour créer votre profil. • S uivez les instructions à l’écran pour entrer votre numéro de série et recevoir une clé. REMARQUE : si vous ne disposez pas d’une connexion Internet pendant la procédure de configuration, nous vous recommandons fortement de copier votre clé dans un fichier texte pendant l’activation. Check-list de configuration • P our configurer votre appareil WatchGuard, vous devez réunir les informations suivantes sur votre réseau. Exemple Paramètres de l’utilisateur Nom d’hôte (hostname)
Connexion et installation Connectez votre WatchGuard® XCS NIC 1 Câble Ethernet Câble Ethernet Contrôleur d’interface de réseau 1 • Montez l’appareil en rack dans un lieu sûr. • B ranchez un écran et un clavier aux connecteurs situés à l’arrière de l’appareil. • C onnectez l’appareil directement au LAN (réseau local) en utilisant le premier connecteur Ethernet situé à gauche à l’arrière de l’appareil. • Branchez le cordon d’alimentation à la prise qui se trouve à l’arrière de l’appareil. Installation de la console • A llumez votre appareil. Le système s’initialise et plusieurs options de démarrage s’affichent à l’écran.
Seite 12
Assistant Web Assistant de configuration de l’interface utilisateur Web • O uvrez un navigateur Internet et entrez l’adresse IP de l’appareil telle qu’elle figure à l’étape 4 de la configuration réseau ; par ex. : https://10.0.1.10. REMARQUE : comme le WatchGuard XCS utilise un certificat auto-signé, un avertissement sur ce certificat s’affichera dans votre navigateur. Vous pouvez ignorer cet avertissement (Internet Explorer) ou ajouter une exception (Mozilla Firefox). • Sur l’écran de connexion, entrez votre identifiant utilisateur, c’est-à-dire « admin », et votre mot de passe par défaut, également « admin ». • E ntrez le nom de l’entreprise et l’adresse e-mail de l’administrateur du serveur à partir des informations de la check-list de configuration dressée à l’étape 2. • Modifiez le mot de passe par défaut. • Sélectionnez vos paramètres d’interception (Intercept Settings) pour le contrôle de la connexion (Connection Control) et l’Anti-Spam. • Sélectionnez « Continue » pour terminer l’initialisation. • L ’assistant de configuration de l’interface utilisateur Web est maintenant terminé et la ...
Bravo ! L’installation de base de votre appareil WatchGuard® XCS est terminée. Vous pouvez utiliser l’interface utilisateur Web pour poursuivre les tâches de configuration et de gestion. Avant de commencer, nous vous recommandons fortement de suivre les instructions indiquées sur cette page pour : • ajouter une clé au WatchGuard XCS • télécharger les dernières mises à jour logicielles • installer des mises à jour logicielles Ajouter une clé au WatchGuard XCS • Connectez-vous à l’interface utilisateur Web. • Sélectionnez Administration > System > Feature Key et cliquez sur Update. • Copiez le texte du fichier clé reçu à l’étape 1 et collez-le dans la boîte de texte. • Cliquez sur Update Key. Téléchargez les dernières mises à jour logicielles La fonction Security Connection contacte les serveurs du support WatchGuard afin de rechercher ...
Registrierung und Konfiguration Registrieren beim LiveSecurity®-Service • Notieren Sie sich die Seriennummer Ihres Geräts. • G ehen Sie zu http://www.watchguard.com/activate • M elden Sie sich an. HINWEIS: Wenn Sie Neukunde sind, erstellen Sie zunächst ein Profil gemäß den Anweisungen. • F olgen Sie den Anweisungen auf dem Bildschirm zur Eingabe Ihrer Seriennummer. Sie erhalten dann einen Feature-Key. HINWEIS: Für den Fall, dass Ihnen für das Setup keine Internetverbindung zur Verfügung stehen sollte, kopieren Sie während der Aktivierung vorsichtshalber Ihren Feature-Key in eine Textdatei. Konfigurations-Prüfliste • Z ur Konfiguration Ihrer WatchGuard-Appliance müssen Sie folgende Informationen zu Ihrem Netzwerk bereit halten: Beispiel Benutzereinstellung Hostname hostname Domain Name beispiel.com IP Address 10.0.1.10...
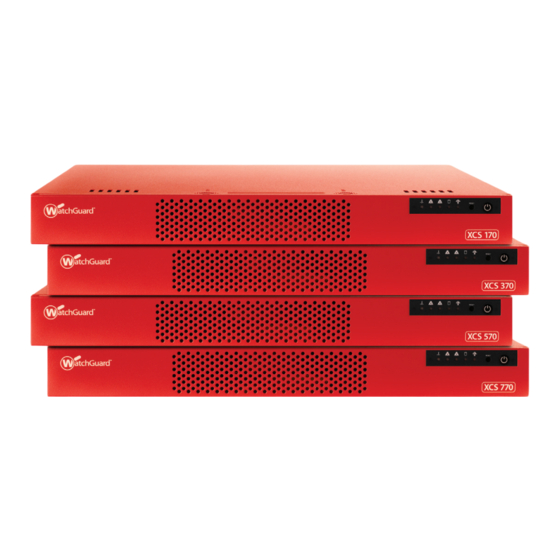
Anschluss und Installation Anschließen/Starten Ihrer WatchGuard®-XCS NIC 1 Ethernet-Kabel Ethernet-Kabel Switch • Montieren Sie das Gerät in ein Rack. • S chliessen Sie Bildschirm und Tastatur über Anschlüsse auf der Rückseite an. • V erbinden Sie die Appliance über die Ethernet-Schnittstelle auf der Rückseite links direkt mit dem LAN (Local Area Network). • Verbinden Sie die Appliance mit dem Stromnetz. Installation über Konsole • S chalten Sie die Appliance ein. Nach dem Start werden verschiedene Optionen angezeigt. • W ählen Sie nacheinander „F2“ und „OK“. HINWEIS: Die F2-Option wird auch ohne Eingabe nach einigen Sekunden als Standard gewählt. • Wählen Sie zur Installation des Dateisystems die Option “Auto”.
Seite 16
Installationsassistent Web-Installationsassistent • Ö ffnen Sie Ihren Webbrowser. Geben Sie als URL die in Schritt 4 der Netzwerkkonfiguration angegebene Adresse (z. B. https://10.0.1.10.) ein. HINWEIS: Da die XCS-Appliance ein selbstsigniertes Zertifikat benutzt, zeigt der Browser eine Warnmeldung an. Beim Internet Explorer können Sie diese ignorieren, bei Mozilla Firefox müssen Sie eine Ausnahme hinzufügen. • Melden Sie sich mit Benutzernamen und Passwort (jeweils „ admin“) an. • G eben Sie die Infos der Prüfliste aus Schritt 2 für „ Organization Name“ und „ Server Admin Email Address“ an. • Ändern Sie das „ Default Password”. • Wählen Sie unter “Intercept Settings” die Einstellungen für “Connection Control” und „ Anti-Spam”. • Klicken Sie auf “Continue”, um den Installationsassistenten abzuschließen. • ...
Weitere Schritte Herzlichen Glückwunsch! Das Setup für Ihr WatchGuard®-XCS-Gerät ist hiermit abgeschlossen. Weitere Konfigurations- und Verwaltungsaufgaben können Sie über die Webschnittstelle erledigen. Führen Sie zuvor aber mit Hilfe der Anweisungen auf dieser Seite folgende Schritte aus: • Hinzufügen eines Feature-Key zur WatchGuard-XCS • Download von Software-Updates • Installieren von Software-Updates Hinzufügen eines Feature-Key zur WatchGuard-XCS • Melden Sie sich bei der Webschnittstelle an. • Wählen Sie “Administration > System > Feature-Key” und dann “Update”. • Fügen Sie den Feature-Key aus der in Schritt 2 angelegten Datei ins Textfeld ein. • Wählen Sie ”Update Key”. Download von Software-Updates Über die Funktion “Security Connection” werden die Support-Server von WatchGuard auf aktuelle Software-Updates geprüft. • Melden Sie sich bei der Webschnittstelle an. • Wählen Sie “Administration > Software Updates > Security Connection”.
Seite 18
Registrazione e configurazione Registrazione con LiveSecurity® Service • Individuare il numero di serie sul dispositivo e registrarlo. • V isitare http://www.watchguard.com/activate • E seguire l’accesso. NOTA: se è la prima volta che si utilizza il sito WatchGuard®, seguire le istruzioni fornite nell’URL sopra indicato per creare un profilo. • S eguire le istruzioni visualizzate sullo schermo per immettere il numero seriale e ricevere una chiave di funzionalità. NOTA: Se non si dispone di una connessione Internet quando viene eseguita la procedura di configurazione, è opportuno copiare la chiave di funzionalità in un file di testo durante la procedura di attivazione Lista di controllo di configurazione • P er configurare il dispositivo WatchGuard, è necessario raccogliere le seguenti informazioni sulla propria rete: Esempio...
Seite 19
Connessione e installazione Collegare WatchGuard® XCS NIC 1 Cavo Ethernet Cavo Ethernet Switch • Montare in armadio il dispositivo in un luogo sicuro. • C ollegare un monitor e una tastiera ai connettori posizionati sul pannello posteriore del dispositivo. • C ollegare l’appliance direttamente alla rete LAN (Local Area Network) utilizzando il primo connettore integrato Ethernet sul lato sinistro del pannello posteriore. • Collegare il cavo di alimentazione alla presa di corrente sul pannello posteriore del dispositivo. Installazione della console • A ccendere il dispositivo. Una volta avviato il sistema, le opzioni di avvio vengono visualizzate sul monitor. • S elezionare F2, quindi selezionare OK.
Seite 20
Procedura guidata Web Impostazione guidata dell’interfaccia utente Web • A prire un browser Web e immettere l’indirizzo IP del dispositivo che utilizza l’indirizzo immesso nella configurazione di rete al Passaggio 4, ad esempio: https://10.0.1.10. NOTA: dal momento che WatchGuard XCS utilizza un certificato self-signed, il browser può pertanto visualizzare un avviso di certificato. Ignorare l’avviso (Internet Explorer) oppure aggiungere un’eccezione di certificato (Mozilla Firefox). • Nella schermata di login, immettere l’ID utente predefinito, admin, e la password predefinita, admin. • I mmettere il nome organizzazione e l’indirizzo email amministratore server utilizzando le informazioni della lista di controllo di configurazione al Passaggio 2 • Modificare la password predefinita. • Selezionare le opzioni di intercettazione per il controllo connessioni e l’antispamming. • Selezionare Continue (Continua) per completare l’inizializzazione. • L ’impostazione guidata dell’interfaccia utente Web è ora completata e viene visualizzata la pagina della chiave di funzionalità. NOTA: il sistema della posta elettronica è inizialmente bloccato in quanto è necessario configurare le impostazioni di recapito posta prima di avviare il sistema di posta elettronica.
Seite 21
Congratulazioni! La configurazione di base del dispositivo WatchGuard® XCS è completata. È ora possibile utilizzare l’interfaccia Web per tutte le altre attività di configurazione e gestione. Prima di iniziare, raccomandiamo di seguire le istruzioni in questa pagina per • Aggiungere una chiave di funzionalità a WatchGuard XCS • Scaricare i più recenti aggiornamenti software • Installare gli aggiornamenti software Aggiungere la chiave di funzionalità a WatchGuard XCS • Eseguire il login all’interfaccia utente Web. • Selezionare Administration > System > Feature Key (Amministrazione > Sistema > Chiave di funzionalità), quindi cliccare su Update (Aggiorna). • Copiare il testo del file della chiave di funzionalità ricevuto nel Passaggio 1 e incollarlo nella casella di testo. • Cliccare su Update Key (Aggiorna chiave).
Seite 27
NIC 1 Ethernet cable Ethernet cable Switch...
Seite 30
Registro y Configuración Regístrese en LiveSecurity® Service • Encuentre el número serial de su dispositivo y guárdelo. • V aya a http://www.watchguard.com/activate • L oguéese. NOTA: si usted es nuevo en WatchGuard®, siga las instrucciones provistas en el URL de arriba para crear un perfil. • Siga las instrucciones en pantalla para ingresar su número serial y recibir una clave. NOTA: si usted no tiene una conexión a Internet durante el procedimiento de setup, es altamente recomendable copiar su clave en un archivo de texto durante el proceso de activación. Lista de Verificación para Configurar • P ara configurar su dispositivo WatchGuard, usted debe recolectar la siguiente información acerca de su red: Example User Setting Nombre del equipo hostname Nombre de dominio ejemplo.com...
Seite 31
Connection and Installation Conecte su WatchGuard® XCS NIC 1 Cable Ethernet Cable Ethernet Switch • Monte en rack el dispositivo en una ubicación segura • Conecte un monitor y un teclado a los conectores ubicados en el panel trasero del dispositivo • Conecte el dispositivo directamente a la LAN (Red de Área Local) usando el primer conector Ethernet incorporado al lado izquierdo del panel trasero • Conecte el cable eléctrico al tomacorriente en el panel trasero del dispositivo Instalación de la Consola • E ncienda el dispositivo. Luego de que el sistema se haya iniciado, se desplegarán las opciones de inicio en el monitor. • Seleccione F2 y luego seleccione OK. NOTA: la opción F2 se elige por defecto luego de unos pocos segundos • Seleccione el tipo de instalación Auto. Se instalará el sistema de archivos. • Seleccione OK para comenzar a configurar la red.
Seite 32
Asistente de Configuración de la Interfaz Web de Usuario Asistente de configuración de la interfaz web de usuario • A bra un navegador web e ingrese la dirección IP del dispositivo usando la dirección ingresada en la configuración de red en el Paso 4, por ejemplo https://10.0.1.10. NOTA: dado que el WatchGuard XCS utiliza un certificado auto firmado, usted verá una advertencia sobre el certificado en su navegador. Es seguro ignorarla (en Internet Explorer) o añadir una excepción de certificado (en Mozilla Firefox). • En la pantalla de Login ingrese el ID por defecto de usuario, admin, y la contraseña por defecto, admin. • I ngrese el Nombre de la Organización y la dirección de email de admin del servidor, usando la información de la lista de verificación que armó en el Paso 2. • Cambie la contraseña por defecto • ...
Pasos Siguientes ¡Felicitaciones! Usted ha finalizado la configuración básica de su dispositivo WatchGuard® XCS. Ahora puede usar la interfaz web para continuar toda la configuración y las tareas de administración. Antes de empezar, le recomendamos enfáticamente que utilice las instrucciones de esta página para: • Añadir una clave al WatchGuard XCS • Descargar las últimas actualizaciones de software • Instalar actualizaciones de software Añadir una clave al WatchGuard XCS • Loguéese en la interfaz web de usuario • Seleccione Administración > Sistema > Feature Key, y luego haga clic en Actualizar. • Copie el texto del archivo de la clave que usted recibió en el Paso 1 y péguelo en la caja de texto. • Haga clic en Actualizar clave. Descargar las últimas actualizaciones de software La característica Security Connection contacta los servidores de soporte de WatchGuard para verificar si hay nuevas actualizaciones de software.