Werbung
Werbung
Inhaltsverzeichnis

Verwandte Anleitungen für ENERMAX ELC-LT120X-HP


Inhaltszusammenfassung für ENERMAX ELC-LT120X-HP
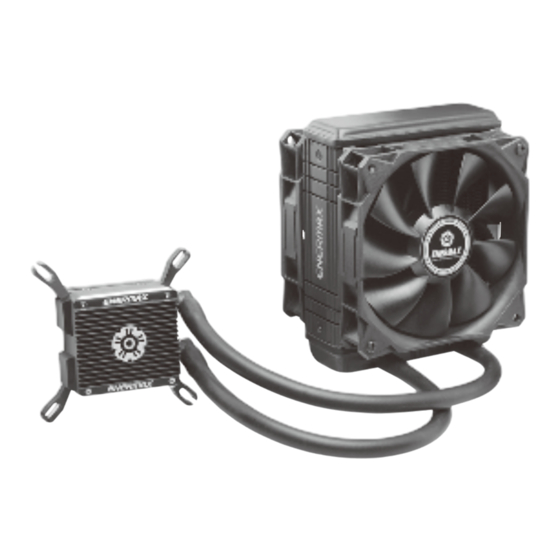
- Seite 1 A l l - I N - O N E L I Q U I D C P U C O O L E R ELC-LT120X 2 Years Warranty...
-
Seite 2: Inhaltsverzeichnis
Index Limited Warranty Specification Part list Intel Installation AMD Installation A l l - I N - O N E L I Q U I D C P U C O O L E R... -
Seite 3: Limited Warranty
This ENERMAX Technology Corporation product is warranted to be free from defects in material and workmanship for a period of two (2) years from the date of purchase. ENERMAX Technology Corporation agrees to repair or replace the product, at its own option and at no... -
Seite 4: Specification
Specification Model ELC-LT120X-HP Copper Cold Plate Material Bearing Ceramic Bearing MTBF 50,000 hrs Motor Speed 2500 rpm Pump Rated Voltage Rated Current 0.3A Dimension 153 x 120 x 43 mm Radiator Material Aluminium Polyamide (PA) rubber Material Tube Length 310 mm... -
Seite 5: Part List
Part list Cooler x 1 Fan x 2 Back Plate x 1 Square Spacer x 1 Stand-off x 4 Fan Screw x 8 Case Screw x 8 Spring Screw x 4 Intel Clip x 2 AMD Clip x 2 Intel LGA 2011 Position Screw x 4 Screw x 4 Insulating sheet x 4... -
Seite 6: Intel Installation
Intel Installation - 4 -... - Seite 7 Step – Silent mode: 600~1300 rpm – Performance mode: 600~2000 rpm – OverClock mode: 600~2500 rpm Choose your desired max. fan speed by adjusting the speed control at the fan hub. Wählen Sie die gewünschte Maximaldrehzahl des Lüfters über den kleinen Regler an der Lüfternabe.
- Seite 8 Step Attach the fan and the radiator to the chassis Schrauben Sie den Lüfter und den Radiator am Gehäuse fest. Fixez le ventilateur et le radiateur sur le châssis Fissare la ventola e il radiatore al case Fijar el ventilador y el radiador a la caja Zamontuj wentylator i radiator na obudowie komputerowej.
- Seite 9 Step *LGA775/1150/1155/1156/1366 LGA1366 LGA1150/1155/1156 LGA775 *Aligning Insert the position screw into the appropriate hole on the back plate for your CPU socket. Drehen Sie die Montageschrauben in die zu Ihrem Sockel passende Bohrung in der Backplate. Insérez la vis de fixation à l'emplacement prévu sur la plaque arrière de votre CPU Inserire le viti di montaggio nel foro appropriato nella piastra posteriore per il socket della vostra CPU.
- Seite 10 Step *LGA775 Notice: For LGA775, please place the square spacer on the central hole of the back plate. Bitte beachten Sie: Für LGA775-Plattformen muss ein zusätzlicher Unterlegrahmen über die Backplate-Öffnung gelegt werden. Remarque: pour LGA775, veuillez placer l’entretoise carré sur le trou central situé sur la plaque arrière Attenzione: per LGA775, sistemare il distanziatore sul foro centrale della piastra posteriore.
- Seite 11 Step *LGA775/1150/1155/1156/1366 Install the Intel back plate on to the back of motherboard; fix the back plate with the stand-off Befestigen Sie die Intel-Backplate auf der Mainboard-Rückseite. Schrauben Sie die Backplate mit den zugehörigen Abstandshaltern fest. Installez la plaque arrière Intel sous la carte-mère à l’aide des vis du support Installare la piastra posteriore Intel nella parte posteriore della scheda madre;...
- Seite 12 Step *LGA2011 Tighten the Intel LGA 2011 screw to the motherboard Schrauben Sie die Backplate mit den passenden LGA2011-Abstandshaltern am Mainboard fest. Serrez la vis du support Intel LGA2011 à la carte-mère Fissare i montanti per Intel LGA 2011 alla scheda madre Fije los tornillos de pilar para Intel LGA 2011 a la placa madre Przykręć...
- Seite 13 Step Apply the thermal grease evenly on the CPU surface Verteilen Sie gleichmäßig eine dünne Schicht Wärmeleitpaste auf der CPU-Oberfläche. Appliquez une couche uniforme de pâte thermique sur la surface du CPU Applicare in modo uniforme la pasta termica sulla superficie della CPU Aplicar de forma uniforme la pasta térmica en la superficie de la CPU Nałóź...
- Seite 14 Step Remove the protect film from the cold-plate Entfernen Sie die Schutzfolie von der Kühlplatte der Pumpe. Retirez le film protecteur de la plaque-froide Rimuovere la pellicola di protezione dalla piastra di raffreddamento Quite la película de protección del bloque de refrigeración Zdjąć...
- Seite 15 Step Place the pump on the CPU and tighten the spring screws until all four corners are secured Platzieren Sie die Pumpe auf der CPU und drehen Sie die Federschrauben fest bis alle vier Seiten fixiert sind. Placez la pompe sur le CPU et serrez les vis à ressort jusqu'à ce que les quatre coins soient bien fixés Posizionare la pompa sulla CPU e fissare le viti fino a che tutti e quattro gli angoli siano fissati.
- Seite 16 Step Pump Pump 3 pin 4 pin Connect the pump power connector to the motherboard Schließen Sie den Stromstecker der Pumpe am Mainboard an. Branchez le connecteur d'alimentation de la pompe à la carte-mère Collegare il connettore di alimentazione della pompa alla scheda madre Conecte el cable de la bomba a la placa madre Podłącz wtyczkę...
- Seite 17 Step PWM Y cable 4 pin Connect the fan connector to the motherboard Schließen Sie den 4-Pin-PWM-Stecker des Lüfters am Mainboard an. Branchez le connecteur du ventilateur à la carte-mère Collegare il connettore della ventola alla scheda madre Conecte el conector del ventilador a la placa madre Podłącz wtyczkę...
-
Seite 18: Amd Installation
AMD Installation - 16 -... - Seite 19 Step – Silent mode: 600~1300 rpm – Performance mode: 600~2000 rpm – OverClock mode: 600~2500 rpm Choose your desired max. fan speed by adjusting the speed control at the fan hub. Wählen Sie die gewünschte Maximaldrehzahl des Lüfters über den kleinen Regler an der Lüfternabe.
- Seite 20 Step Attach the fan and the radiator to the chassis Schrauben Sie den Lüfter und den Radiator am Gehäuse fest. Fixez le ventilateur et le radiateur sur le châssis Fissare la ventola e il radiatore al case Fijar el ventilador y el radiador a la caja Zamontuj wentylator i radiator na obudowie komputerowej.
- Seite 21 Step Remove the preinstalled Intel clip and install the AMD clip to the pump Entfernen Sie die vorinstallierten Halterungen für Intel-Plattformen und montieren Sie die AMD-Halterungen an der Pumpe Enlevez les clips Intel pré-installés et fixez les clips AMD à la pompe. Rimuovere il clip Intel preinstallato e installare il clip AMD alla pompa Quitar el clip Intel preinstalado e instalar el clip AMD a la bomba.
- Seite 22 Step Stick the insulating sheet on the appropriate position. Legen Sie die Entkopplungsplatten an die vorgesehenen Stellen auf der Backplate. Collez la feuille d'isolation sur la position appropriée Attaccare il foglio isolante nella posizione appropriata Pegue la hoja aislante en la posición adecuada Umieść...
- Seite 23 Step *Aligning Place the square spacer on the central hole of the back plate. Insert the position screw into the appropriate hole on the back plate for your CPU socket. Legen Sie den Unterlegrahmen über die Backplate-Öffnung. Drehen Sie die Montageschrauben in die zu Ihrem Sockel passende Bohrung in der Backplate.
- Seite 24 Step Install the AMD back plate on to the back of motherboard; fix the back plate with the stand-off Befestigen Sie die AMD-Backplate auf der Mainboard-Rückseite. Schrauben Sie die Backplate mit den zugehörigen Abstandshaltern fest. Installez la plaque arrière AMD sous la carte-mère à l’aide des vis du support Installare la piastra posteriore AMD nella parte posteriore della scheda madre;...
- Seite 25 Step Apply the thermal grease evenly on the CPU surface Verteilen Sie gleichmäßig eine dünne Schicht Wärmeleitpaste auf der CPU-Oberfläche. Appliquez une couche uniforme de pâte thermique sur la surface du CPU Applicare in modo uniforme la pasta termica sulla superficie della CPU Aplicar de forma uniforme la pasta térmica en la superficie de la CPU Nałóź...
- Seite 26 Step Remove the protect film from the cold-plate Entfernen Sie die Schutzfolie von der Kühlplatte der Pumpe. Retirez le film protecteur de la plaque-froide Rimuovere la pellicola di protezione dalla piastra di raffreddamento Quite la película de protección del bloque de refrigeración Zdjąć...
- Seite 27 Step Place the pump on the CPU and tighten the spring screws until all four corners are secured Platzieren Sie die Pumpe auf der CPU und drehen Sie die Federschrauben fest bis alle vier Seiten fixiert sind. Placez la pompe sur le CPU et serrez les vis à ressort jusqu'à ce que les quatre coins soient bien fixés Posizionare la pompa sulla CPU e fissare le viti fino a che tutti e quattro gli angoli siano fissati.
- Seite 28 Step Pump Pump 3 pin 4 pin Connect the pump power connector to the motherboard Schließen Sie den Stromstecker der Pumpe am Mainboard an. Branchez le connecteur d'alimentation de la pompe à la carte-mère Collegare il connettore di alimentazione della pompa alla scheda madre Conecte el cable de la bomba a la placa madre Podłącz wtyczkę...
- Seite 29 Step PWM Y cable 4 pin Connect the fan connector to the motherboard Schließen Sie den 4-Pin-PWM-Stecker des Lüfters am Mainboard an. Branchez le connecteur du ventilateur à la carte-mère Collegare il connettore della ventola alla scheda madre Conecte el conector del ventilador a la placa madre Podłącz wtyczkę...
- Seite 30 A l l - I N - O N E L I Q U I D C P U C O O L E R © 2013 Enermax Technology Corporation. All rights reserved. Technical changes, printing errors and mistakes excepted.