DELTA DORE TYXIA 1605 Installationsanleitung
Fernbedienung für ausrichtbaren sonnenschutz
Quicklinks
TYXIA 1605
Télécommande Brise-Soleil Orientable
Remote Control for Motorised Blackout Blind
Fernbedienung für ausrichtbaren Sonnenschutz
Telecomando Frangisole orientabile
Telemando parasol orientable
Pilot zdalnego sterowania do żaluzji zewnętrznych
regulowanych
Afstandsbediening verstelbare brise-soleil
FR
Notice d'installation
EN
Installation guide
DE
Installationsanleitung
IT
Guida di installazione
ES
Manual de instalación
PL
Instrukcja instalacji
NL
Installatiehandleiding
www.deltadore.com
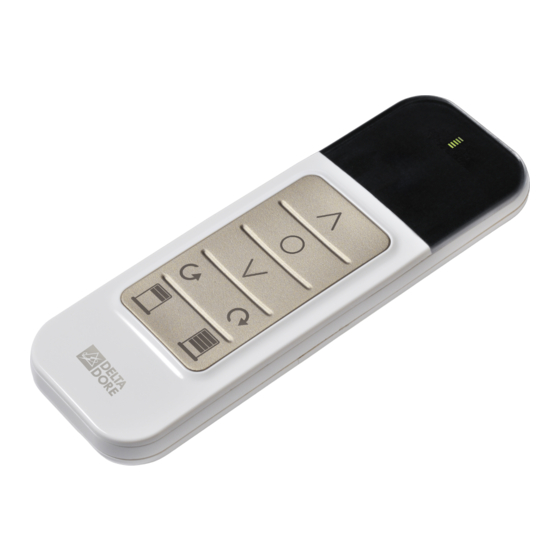
1.
Description / Description / Beschreibung /
Descrizione / Descripción/ Opis /
Omschrijving /
Montée / Raise /
Auf / Salita / Subida /
Podnoszenie / Omhoog /
Stop / Stop / Stopp /
Stop / Stop / Stop /
Stop /
Descente / Lower / Ab
/ Discesa / Bajada /
Opuszczanie / Omlaag /
Inclinaison / Inclination
/Winkeleinstellung /
Inclinazione /Inclinación /
Nachylenie /Gekanteld /
Favoris / Favourites /
Favoriten / Preferiti /
Favoritos / Ulubione /
Favorieten /
Lithium 3 V, CR2032,
(3 years autonomy)
IP
40
868 MHz (EN 300 220)
100 m
-10°C / +70°C
-10°C / +40°C
129 x 45 x 17 mm
R&TTE 1999/5/CE
Important product information
Ë
2.
Montage / Assembly / Montage /
Montaggio/ Montaje/ Montaż /
Montage/
1
2
3
1
2
CR 2032
3
3.
Association / Association / Einlernen / Associazione / Asociación / Przypisanie /
Verbinding
1
2
> 3s
ON
230V~
50 Hz
TYXIA 4731
Ê Mettez l'installation sous tension.
Ë Sur l'émetteur, envoyez
FR
Appuyez 3 secondes sur la touche
l'ordre d'association
du récepteur jusqu'à ce que son
voyant clignote. Relâchez.
Ê Switch on the installation.
Ë Send the association
EN
Press the receiver button for
command to the transmitter
3 seconds until its LED fl ashes.
Release.
Ê Setzen Sie die Anlage unter
Ë Geben Sie über
DE
Spannung. Drücken Sie 3 Sekunden
den Sender die
lang auf die Taste des Empfängers,
Zuordnungsanweisung
bis dessen Kontrolllampe blinkt.
Lassen Sie die Taste los.
Ê Mettete l'installazione sotto
Ë Sull'emettitore, inviate
IT
tensione. Premete per 3 secondi il
l'ordine di associazione
tasto del ricevitore fi no a quando la
sua spia lampeggia. Rilasciate.
Ê Ponga el receptor en tensión.
Ë En el emisor, envíe la
ES
Pulse 3 segundos la tecla del
orden de asociación
receptor hasta que el testigo
parpadee. Deje de pulsar.
Ê Pod³¹cz instalacjê do pr¹du.
Ë Wyślij polecenie
PL
Przez 3 sekundy przytrzymaj
przypisania z nadajnika
naciśniêty przycisk na odbiorniku, a¿
do migniêcia lampki na nim. Puśæ.
Ê Zet de installatie onder spanning.
Ë Verstuur het
NL
Druk gedurende 3 seconden op de
verbindingscommando
toets van de ontvanger tot het lampje
op de zender
knippert. Laat de toets los.
3
OK
OFF
> 3s
Ì Vérifi ez que le voyant du
récepteur ne clignote plus.
Les produits sont associés.
Ì Make sure that the receiver
LED has stopped fl ashing.
The products are associated.
Ì Achten Sie darauf, dass die
Kontrollleuchte am Empfänger
jetzt nicht mehr blinkt. Die Geräte
sind nun miteinander verbunden.
Ì Verifi cate che la spia del
ricevitore non lampeggi più.I
prodotti sono associati.
Ì Compruebe que el testigo del
receptor ha dejado de parpadear.
Los productos se asocian.
Ì Sprawdź, czy lampka na
odbiorniku przesta³a migaæ.
Produkty zosta³y przypisane.
Ì Controleer of het controlelampje
van de ontvanger niet meer
knippert. De producten zijn met
elkaar verbonden.

Verwandte Anleitungen für DELTA DORE TYXIA 1605


Inhaltszusammenfassung für DELTA DORE TYXIA 1605
- Seite 1 Association / Association / Einlernen / Associazione / Asociación / Przypisanie / Verbinding TYXIA 1605 Télécommande Brise-Soleil Orientable Lithium 3 V, CR2032, (3 years autonomy) Remote Control for Motorised Blackout Blind Fernbedienung für ausrichtbaren Sonnenschutz > 3s Telecomando Frangisole orientabile...
- Seite 2 Effacer une association / Remove an association / Zuordnung löschen / Cancellare un’associazione Réglage des favoris / Set favourites / Favoriteneinstellung / Regolazione dei preferiti / Ajuste de los favoritos / Ustawianie ulubionych / Instellen van favorieten / / Suprimir una asociación / Usuwanie przypisania / Een verbinding verwijderen TYXIA 4731 >...