Reloop RP4000M Bedienungsanleitung
Quelle: reloop.com
Inhaltsverzeichnis
Verfügbare Sprachen
Verfügbare Sprachen
Quicklinks
Bedienungsanleitung
ACHTUNG!
Lesen Sie sich vor der ersten Inbetriebnahme zur eigenen Sicher-
heit diese Bedienungsanleitung sorgfältig durch! Alle Personen,
die mit der Aufstellung, Inbetriebnahme, Bedienung, Wartung und
Instandhaltung dieses Gerätes zu tun haben, müssen entspre-
chend qualifiziert sein und diese Betriebsanleitung genau be-
achten. Dieses Produkt erfüllt die Anforderungen der geltenden
europäischen und nationalen Richtlinien, die Konformität wurde
nachgewiesen, die entsprechenden Erklärungen und Unterlagen
sind beim Hersteller hinterlegt.
Instruction Manual
CAUTION!
For your own safety, please read this operation manual carefully
before initial operation! All persons involved in the installation, set-
ting-up, operation, maintenance and service of this device must be
appropriately qualified and observe this operation manual in de-
tail. This product complies with the requirements of the applicable
European and national regulations. Conformity has been proven.
The respective statements and documents are deposited at the
manufacturer.
Mode d'emploi
ATTENTION!
Pour votre propre sécurité, veuillez lire attentivement ce mode
d'emploi avant la première utilisation ! Toutes les personnes
chargées de l'installation, de la mise en service, de l'utilisation,
de l'entretien et la maintenance de cet appareil doivent possé-
der les qualifications nécessaires et respecter les instructions
de ce mode d'emploi. Ce produit est conforme aux directives
européennes et nationales, la conformité a été certifiée et les
déclarations et documents sont en possession du fabricant.
WARNUNG!
Um Feuer oder einen elektrischen Schock zu vermeiden, setzen
Sie dieses Gerät nicht Wasser oder Flüssigkeiten aus! Öffnen Sie
niemals das Gehäuse!
WARNING!
To prevent fire or avoid an electric shock do not expose the
device to water or fluids! Never open the housing!
ATTENTION !
Afin d'éviter un incendie ou une décharge électrique, veillez à te-
nir cet appareil à l'écart des liquides et de l'humidité ! N´ouvrez
jamais le boîtier !
Für weiteren Gebrauch aufbewahren!
Keep information for further reference!
Gardez ces instructions pour des utilisations ultérieurs!
www.reloop.com
Reloop Trademark
Global Distribution GmbH
Schuckertstr. 28
48153 Muenster / Germany
© 2013
1
Inhaltsverzeichnis

Verwandte Anleitungen für Reloop RP4000M


Inhaltszusammenfassung für Reloop RP4000M
- Seite 1 à l‘écart des liquides et de l‘humidité ! N´ouvrez jamais le boîtier ! Für weiteren Gebrauch aufbewahren! Keep information for further reference! Gardez ces instructions pour des utilisations ultérieurs! www.reloop.com Reloop Trademark Global Distribution GmbH Schuckertstr. 28 48153 Muenster / Germany © 2013...
- Seite 3 Bedienungsanleitung Instruction Manual Mode d‘emploi Deutsch ..............04-07 English ................08-11 Français ..............12-15...
-
Seite 4: Sicherheitshinweise
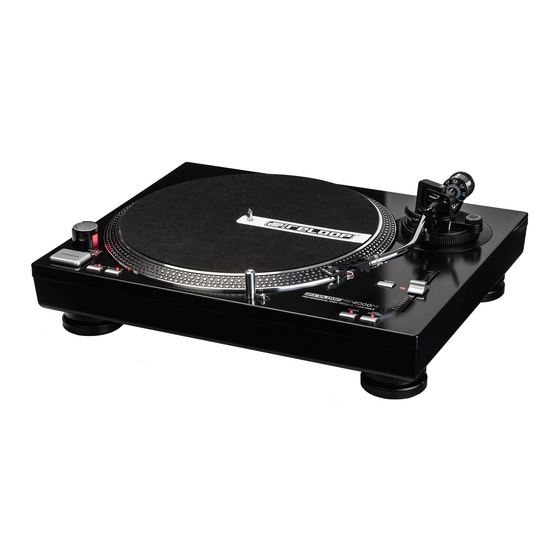
Vor Inbetriebnahme bitten wir Sie, alle Anweisungen sorgfältig zu studieren und zu befolgen. Nehmen Sie den Reloop RP-4000 M aus der Verpackung. Bitte überprüfen Sie vor der ersten Inbetriebnahme, ob kein offensichtlicher Transport- schaden vorliegt. Sollten Sie Schäden am Stromkabel oder am Gehäuse entdecken, nehmen Sie das Gerät nicht in Betrieb und setzen Sie sich bitte mit Ihrem Fachhändler in Verbindung. - Seite 5 BEDIENOBERFLÄCHE RÜCKSEITE BEZEICHNUNGEN 1. Plattenteller 2. Nabe 3. Spannungswahlschalter 4. EIN/AUS Schalter Plattentellerbeleuchtung 5. START /STOP Taster 6. 33/45/78 Umschalter 7. Schalter für Nadelbeleuchtung 8. Rückwärtslauf-Schalter 9. Pitchbereich-Wahlschalter 10. Quartz-Lock Schalter 11. Pitchfader 12. Headshell mit Tonabnehmersystem 13. Tonarm 14. Tonarmstütze 15.
-
Seite 6: Aufbau & Anschlüsse
AUFBAU & ANSCHLÜSSE Befestigen Sie den Plattenteller -1- auf dem Motor. Legen Sie dazu den Plattenteller über die Nabe -2-. Legen Sie das mitgelieferte Slipmat über die Nabe -2- auf den Plattenteller. Stecken Sie das Gegengewicht -18- auf den Tonarm. HINWEIS! Die Gegengewichtsskala -17- muss dabei auf der dem DJ zugewandten Seite sein. - Seite 7 Reloop Global Distribution GmbH, Schuckertstr. 28, 48153 Münster / Germany Fax: +49-251.6099368 Technische Änderungen vorbehalten. Alle Abbildungen ähnlich. Keine Haftung für Druckfehler.