Herunterladen Diese Seite drucken

Werbung

Verfügbare Sprachen

Verfügbare Sprachen

9600 Plus Calibration Tester

Werbung

loading

Inhaltszusammenfassung für WelchAllyn 9600 Plus

  • Seite 1 9600 Plus Calibration Tester...
  • Seite 2 © 2017 Welch Allyn. All rights are reserved. To support the intended use of the product described in this publication, the purchaser of the product is permitted to copy this publication, for internal distribution only, from the media provided by Welch Allyn. No other use, reproduction, or distribution of the publication, or any part of it, is permitted without written permission from Welch Allyn.
  • Seite 3: Inhaltsverzeichnis

    Operation........11 9600 Plus Calibration Tester Setup ....11 Changing the Calibration Set Point Temperature .
  • Seite 4 Séquence de mise en marche ..... . . 7 Avant du testeur d’étalonnage 9600 Plus ....7 Fonctionnement .
  • Seite 5 Vorsicht ......... 3 Auspacken des Kalibriertesters 9600 Plus ....4 Bedienelemente und Anzeigen .
  • Seite 7: Introduction

    The user takes the “temperature” of the 9600 Plus Calibration Tester with the knowledge and assurance that precise readings are obtained because the unit is factory calibrated to National Institute of Standards and Technology (NIST) or equivalent devices.
  • Seite 8: Symbols And Descriptions

    Chapter 1 Introduction Welch Allyn 9600 Plus Calibration Tester Symbols and Descriptions Double Insulation. Direct Current. Handle with Care. Attention! Caution; Consult Directions for Use for more information. Transport/Storage Temperature Relative Humidity Separate collection for electronic equipment Recyclable...
  • Seite 9: Cautions

    Caution Do not immerse or soak the 9600 Plus Calibration Tester in any type of fluid. Caution Only trained Biomedical personnel should operate the 9600 Plus Calibration Tester and conduct calibration verification of thermometers.
  • Seite 10: Unpacking The 9600 Plus Calibration Tester

    Chapter 1 Introduction Welch Allyn 9600 Plus Calibration Tester Unpacking the 9600 Plus Calibration Tester Unpack the 9600 Plus Calibration Tester and inspect for missing items. Retain the shipping materials to return the device to Welch Allyn for recalibration. The following items are enclosed: •...
  • Seite 11: Controls And Indicators

    Controls and Indicators LCD Display Figure 1. LCD Display and Front Buttons Set Point Mode Temperature Calibration Set Units Point Temperature Current Cavity Temperature Temperature Celsius/Fahrenheit Selection Selection Button Button Calibration Set Point Temperature There are three Calibration Set Point temperatures used to test the calibration of the thermometer.
  • Seite 12: Temperature Units

    C / 96.8 F) upon startup. The Last Used mode causes the 9600 Plus Calibration Tester to heat up to the last temperature setting that was used. To change the Set Point Mode, press and hold the C/F and Arrow buttons below the LCD display simultaneously until a single audio beep is heard.
  • Seite 13: Power On Sequence

    Chapter 2 Controls and Indicators Power On Sequence The 9600 Plus Calibration Tester receives power from a wall- mount power pack that plugs into the back of the unit. There is no ON/OFF switch. On power up, the 9600 Plus Calibration Tester performs internal self-checks, displays an all-segments test pattern, beeps and displays the device’s current...
  • Seite 14 Chapter 2 Controls and Indicators Welch Allyn 9600 Plus Calibration Tester Caution Verify the thermometer being tested and the 9600 Plus are set to use the same temperature scale before running a test. Reference the thermometers directions for use to change its temperature scale Figure 2.
  • Seite 15: Dust Cover

    Directions for Use Chapter 2 Controls and Indicators Dust Cover This black, plastic cover keeps dust from entering the Thermistor and Ear Device Ports. To expose the Thermistor and Ear Device Ports, rotate the Dust Cover counter clockwise. To cover the ports, rotate the Dust Cover clockwise.
  • Seite 16 Chapter 2 Controls and Indicators Welch Allyn 9600 Plus Calibration Tester...
  • Seite 17: Operation

    Operation 9600 Plus Calibration Tester Setup Place the 9600 Plus Calibration Tester on a level surface away from sunlight, drafts, and other sources of heat or cold. The 9600 Plus Calibration Tester takes approximately 20 minutes to heat to the lowest setting. When testing several...
  • Seite 18 1. Choose the proper mains plug insert and slide it over the two prongs in the power converter (Figure 2. Plug the power adapter into the 9600 Plus Calibration Tester (Figure 2) and the opposite end into a wall outlet.
  • Seite 19: Welch Allyn Suretemp And Suretemp Plus Thermometers

    Note Prior to testing visually inspect the probe for any physical damage. Damaged probes must be replaced. Figure 4. 9600 Plus Calibration Tester with the Welch Allyn SureTemp Plus Thermometer To begin calibration verification of the thermometers: 1. Remove the probe from the probe well and clean it with either...
  • Seite 20 4. Wait for approximately one minute or until temperature on the thermometer is stable for ten seconds. Compare the thermometer's temperature reading to the 9600 Plus' Calibration Set Point Temperature. If the temperatures are within ±0.1° C (±0.2° F), the thermometer is within calibration.
  • Seite 21: Braun Thermoscan Pro 4000 Model

    Caution Prolonged body contact with the thermometer may impact measurements. When instructed to wait before performing the next step place the thermometer on the work surface. Figure 5. 9600 Plus Calibration Tester with the Braun ThermoScan Pro 4000 To begin calibration verification of the thermometers:...
  • Seite 22 Chapter 3 Operation Welch Allyn 9600 Plus Calibration Tester 1. Check the probe tip lens window for displacement. There shouldn't be any gap in the seam formed between bezel and the lens window. If a gap exists the unit is damaged and must be replaced.
  • Seite 23 9600 Plus Calibration Tester 12. The device will exit CAL mode after four minutes. 13. When using only one 9600 Plus Calibration Tester, test all available thermometers for calibration verification at the current Calibration Set Point Temperature. Proceed to the next Calibration Set Point Temperature, see "Changing the...
  • Seite 24: Braun Thermoscan Pro 6000 Model

    Caution On older versions of the 9600 Plus, the dust cover screw can interfere with the proper positioning of the Braun 6000 in the ear device port. Use the Braun 6000 test fixture (Welch Allyn part number 411690) to ensure proper positioning.
  • Seite 25 Directions for Use Chapter 3 Operation Figure 6. 9600 Plus Calibration Tester with the Braun ThermoScan Pro 6000 A Braun Pro 6000 Calibration Fixture (material number 411690) is available for use with older 9600 Plus calibration testers where the dust cover screw might interfere with the proper alignment of the Braun 6000 in the ear device port.
  • Seite 26 Chapter 3 Operation Welch Allyn 9600 Plus Calibration Tester 2. Gently wipe the probe tip with a cotton swab slightly moistened with isopropyl or ethyl alcohol. Use care not to displace the lens window. Remove excess alcohol with a clean cotton swab, and let air dry for 5 minutes. Do not use any chemical other than alcohol to clean the probe window.
  • Seite 27 8. Wait 5 seconds, press the thermometer Measure button, and watch for the green ExacTemp light to flash. 9. Leave the thermometer in the 9600 Plus Calibration Tester until the ExacTemp light stops flashing and you hear a beep. 10. Remove the Pro 6000 Thermometer from the 9600 Plus Calibration Tester and read the temperature in the thermometer’s display.
  • Seite 28 Do not hold the thermometer while waiting. This allows the thermometer to remain at ambient room temperature. 13. When using only one 9600 Plus Calibration Tester, test all available thermometers for calibration verification at the current calibration set point temperature before proceeding to the next calibration set point temperature.
  • Seite 29: Braun Thermoscan Pro 3000 Model

    Figure 7. 9600 Plus Calibration Tester with Braun ThermoScan Pro 3000 1. Clean the probe tip with a cotton swab slightly moistened with isopropyl alcohol, remove excess alcohol with a clean cotton swab, and let air dry for 5 minutes.
  • Seite 30 4. Wait approximately three seconds, press the thermometer Activation button, and listen for the beep. 5. Remove the Pro 3000 Thermometer from the 9600 Plus Calibration Tester and read the temperature in the thermometer’s display. If the temperatures are within ±0.2° C (±0.4°...
  • Seite 31: Troubleshooting Inaccurate Readings

    Directions for Use Chapter 3 Operation Troubleshooting inaccurate readings 1. Make sure that the sensor window is clean and free of debris 2. Always use new probe covers when calibration testing Braun thermometers. 3. Make sure that the ear and non-contact thermometers are in calibration mode.
  • Seite 32 Chapter 3 Operation Welch Allyn 9600 Plus Calibration Tester...
  • Seite 33: Maintenance

    3. Rinse the cloth with water and thoroughly wring it out. 4. Wipe off the soap and water from the 9600 Plus. 5. Let the 9600 Plus Calibration Tester dry for 15 minutes. 6. Plug the electrical cord into the back of the unit.
  • Seite 34: Problem Solving

    Chapter 4 Maintenance Welch Allyn 9600 Plus Calibration Tester Problem Solving Error Problem Solution Calibration Tester cannot reach Ambient temperature and/or device ° Set Point Temperature because temperature should be within 18.3 ° ° ° room or device is too warm.
  • Seite 35 9600 Plus Calibration Tester Checks If several thermometers do not pass the calibration verification tests, check the 9600 Plus Calibration Tester to determine if it is out of calibration. Before sending the unit to an authorized Welch Allyn service center, complete the checks listed below.
  • Seite 36 30 minutes before conducting a calibration test. 2. Avoid exposure to extreme temperatures. Thermal gradients in the thermometer or the 9600 Plus Calibration Tester can cause unpredictable effects. Verify the 9600 Plus Calibration Tester is within the specified ambient temperature range of 18.3°...
  • Seite 37: Specifications

    Storage Temperature: 0°C – 50°C (32°F – 122°F) Ambient Operating Temperature: 18.3° C to 26.7°C (65° F to 80° F) Operating Humidity: 20% to 95% RH. Non-Condensing Operating Controlled Temperature of 9600 Plus Specifications Low Setting: 36 C (96.8 Intermediate Setting: 38.5 C (101.3...
  • Seite 38: Electromagnetic Compatibility

    Chapter 4 Maintenance Welch Allyn 9600 Plus Calibration Tester Electromagnetic Compatibility This product has been tested and found to comply with all applicable requirements of council directive 89/336/EEC and its amendments. This product has been tested and found to comply with FCC Part 15.107 , Class B.
  • Seite 39: Warranty And Service

    Warranty and Service Limited Warranty Instrumentation purchased new from Welch Allyn is warranted to be free from defects in material and workmanship under normal use and service for a period of one year from the date of first shipment from Welch Allyn. This warranty shall be fulfilled by Welch Allyn or its authorized representative repairing or replacing, at Welch Allyn’s discretion, any such defect free of charge for parts and labor.
  • Seite 40: Service

    Please contact your customer service representative at the appropriate Welch Allyn service center listed below for further information. All equipment used in calibrating the 9600 Plus Calibration Tester is traceable to NIST. Welch Allyn assumes no responsibility if the 9600 Plus Calibration Tester is calibrated at an unauthorized service center.
  • Seite 41 Testeur d’étalonnage 9600 Plus...
  • Seite 42 © 2017 Welch Allyn. Tous droits réservés. Pour utiliser le produit conformément à l'usage prévu décrit dans la présente publication, l'acheteur du produit est autorisé à copier la présente publication, en vue d'une distribution interne uniquement, en utilisant le support fourni par Welch Allyn.
  • Seite 43 Séquence de mise en marche ..... . . 7 Avant du testeur d’étalonnage 9600 Plus ....7 Fonctionnement .
  • Seite 45: Introduction

    (NIST) ou de dispositifs équivalents. Il n’est pas nécessaire ni recommandé d’effectuer des réglages. Le « corps noir » du système 9600 Plus Calibration System agit comme un réservoir thermique pour la sonde de thermistance et comme un radiateur thermique pour les thermomètres auriculaires à...
  • Seite 46: Symboles Et Descriptions

    Chapitre 1 Introduction Welch Allyn Testeur d’étalonnage 9600 Plus NIST ou l’équivalent, rapporter le testeur d’étalonnage 9600 Plus à l’usine pour un étalonnage annuel. Symboles et descriptions Double isolation Courant continu Manipuler avec soin Attention ! Avertissement ; consulter les instructions pour de plus amples informations.
  • Seite 47: Mises En Garde

    Mise en garde Stockez les thermomètres à tester dans la même salle que le testeur d'étalonnage 9600 Plus environ 30 minutes à l'avance afin qu'ils atteignent la température ambiante de la pièce.
  • Seite 48: Déballage Du Testeur D'étalonnage 9600 Plus

    Welch Allyn Testeur d’étalonnage 9600 Plus Déballage du testeur d’étalonnage 9600 Plus Ouvrir la boîte du testeur d’étalonnage 9600 Plus et vérifier s’il manque des pièces. Conserver les matériaux d’emballage afin de retourner l’appareil à Welch Allyn pour un réétalonnage.
  • Seite 49: Commandes Et Indicateurs

    Commandes et indicateurs Affichage ACL Figure 1. Affichage ACL et boutons avant Mode valeur consigne Unités Température température consigne étalonnage Température actuelle cavité Bouton Bouton sélection sélection Celsius/Fahrenheit température Température de consigne d’étalonnage Il existe trois températures de consigne d’étalonnage utilisées pour vérifier l’étalonnage du thermomètre.
  • Seite 50: Unités De Température

    Welch Allyn Testeur d’étalonnage 9600 Plus Température actuelle de la cavité La température actuelle de la cavité du testeur d’étalonnage 9600 Plus est indiquée par de grands chiffres au centre de l’écran (Figure Tandis que l’appareil passe graduellement à la température de consigne d’étalonnage choisie, la température réelle clignote à...
  • Seite 51: Séquence De Mise En Marche

    Chapitre 2 Commandes et indicateurs Séquence de mise en marche Le testeur d’étalonnage 9600 Plus est alimenté par un bloc d’alimentation mural qui se branche à l’arrière de l’appareil. Il n’y a pas d’interrupteur MARCHE/ARRÊT. Lors de la mise sous tension, le testeur d’étalonnage 9600 Plus effectue une auto-...
  • Seite 52 Chapitre 2 Commandes et indicateurs Welch Allyn Testeur d’étalonnage 9600 Plus Figure 2. Avant du testeur d’étalonnage 9600 Plus Fiche d’alimentation Port de sonde à thermistance Capuchon anti- poussière Port de dispositif auriculaire Capuchon anti-poussière Ce couvercle de plastique noir empêche les poussières de pénétrer dans les ports de sonde à...
  • Seite 53 Mode d’emploi Chapitre 2 Commandes et indicateurs Ports de sonde à thermistance et de dispositif auriculaire Le port de dispositif auriculaire est le plus grand des deux ports situés sous le capuchon anti-poussière. Il est destiné aux thermomètres auriculaires Braun ThermoScan Pro 3000 et Pro 4000 (Figure Le port de sonde à...
  • Seite 54 Chapitre 2 Commandes et indicateurs Welch Allyn Testeur d’étalonnage 9600 Plus...
  • Seite 55: Fonctionnement

    Fonctionnement Installation du testeur d’étalonnage 9600 Plus Placer le testeur d’étalonnage 9600 Plus sur une surface plane à l’abri des rayons du soleil, des courants d’air et de toute source de chaleur ou de refroidissement. Le testeur d’étalonnage 9600 Plus met environ 20 minutes à chauffer pour atteindre la première température de consigne.
  • Seite 56 L ’affichage de la température clignotera un certain temps avant de devenir continu pour indiquer que le testeur d’étalonnage 9600 Plus s’est stabilisé et est prêt à être utilisé.
  • Seite 57: Thermomètres Welch Allyn Suretemp Et Suretemp Plus

    Mise en garde Stockez les thermomètres à tester dans la même salle que le testeur d'étalonnage 9600 Plus environ 30 minutes à l'avance afin qu'ils atteignent la température ambiante de la pièce. Remarque Avant de procéder au test, inspectez la sonde visuellement afin de déceler d'éventuels...
  • Seite 58 Comparer la lecture du thermomètre à la température de consigne du testeur d’étalonnage 9600 Plus. Si les températures sont à moins de ±0,1 °C (±0,2 °F) d’écart, le thermomètre respecte la norme d’étalonnage.
  • Seite 59: Modèle Braun Thermoscan Pro 4000

    Lorsqu'il est indiqué de patienter avant de passer à l'étape suivante, placez le thermomètre sur le plan de travail. Figure 5. Testeur d’étalonnage 9600 Plus avec le thermomètre Braun ThermoScan Pro 4000...
  • Seite 60 Chapitre 3 Fonctionnement Welch Allyn Testeur d’étalonnage 9600 Plus Pour commencer la vérification de l’étalonnage des thermomètres : 1. Recherchez un éventuel déplacement sur la lentille de la pointe de la sonde. Il ne doit y avoir aucun vide dans le joint formé...
  • Seite 61 Plus jusqu’au signal sonore. 9. Retirer le thermomètre Pro 4000 du testeur d’étalonnage 9600 Plus et lire la température affichée sur le thermomètre. Si les températures sont à moins de ±0,2 °C (±0,4 °F) d’écart, le thermomètre respecte la norme d’étalonnage.
  • Seite 62 Chapitre 3 Fonctionnement Welch Allyn Testeur d’étalonnage 9600 Plus 12. Le dispositif quittera le mode d’étalonnage CAL après quatre minutes. 13. Lorsque vous n'utilisez qu'un seul testeur d'étalonnage 9600 Plus, procédez à un test de vérification de l'étalonnage de tous les thermomètres disponibles à la température actuelle du point d'étalonnage.
  • Seite 63: Modèle Braun Thermoscan Pro 6000

    Chapitre 3 Fonctionnement Modèle Braun ThermoScan Pro 6000 Attention Stockez les thermomètres à tester dans la même salle que le testeur d'étalonnage 9600 Plus environ 30 minutes à l'avance afin qu'ils atteignent la température ambiante de la pièce. Attention La température ambiante doit être stable et comprise entre 18,3 °C et 26,7 °C (65,0 °F et 80,0 °F).
  • Seite 64 Chapitre 3 Fonctionnement Welch Allyn Testeur d’étalonnage 9600 Plus Figure 6. Utilisation du testeur d'étalonnage 9600 Plus avec le thermomètre Braun ThermoScan Pro 6000 L'outil d'étalonnage Braun Pro 6000 (référence 411690) peut être utilisé avec les anciens modèles de testeurs d'étalonnage 9600 Plus sur lesquels la vis de la housse de protection risque de gêner le bon alignement du port du dispositif auriculaire...
  • Seite 65 Mode d’emploi Chapitre 3 Fonctionnement 2. Nettoyez délicatement la pointe de la sonde à l'aide d'un coton-tige légèrement imbibé d'alcool isopropyle ou d'alcool éthylique. Veillez à ne pas déplacer la fenêtre de la lentille. Enlevez l'excédent d'alcool à l'aide d'un coton-tige propre et laissez sécher à...
  • Seite 66 10. Retirez le thermomètre Pro 6000 du testeur d'étalonnage 9600 Plus et lisez la température sur l'écran du thermomètre. Si les températures sont d'environ ±0,2 °C (±0,4 °F), le thermomètre est dans la plage d'étalonnage.
  • Seite 67 Remarque Le couvre-sonde doit être remplacé par un nouveau couvre-sonde avant chaque relevé afin de supprimer toute chaleur résiduelle absorbée par le testeur d'étalonnage 9600 Plus. 12. Attendez une minute complète avant de prendre une autre mesure avec le même thermomètre. Des mesures répétées sur une courte séquence peuvent entraîner des résultats plus...
  • Seite 68: Modèle Braun Thermoscan Pro 3000

    Lorsqu'il est indiqué de patienter avant de passer à l'étape suivante, placez le thermomètre sur le plan de travail. Figure 7. Testeur d’étalonnage 9600 Plus avec le thermomètre Braun ThermoScan Pro 3000...
  • Seite 69 Activation du thermomètre et attendre le signal sonore. 5. Retirer le thermomètre Pro 3000 du testeur d’étalonnage 9600 Plus et lire la température affichée sur le thermomètre. Si les températures sont à moins de ±0,2 °C (±0,4 °F) d’écart, le thermomètre respecte la norme d’étalonnage.
  • Seite 70: Résolution Des Problèmes De Relevés Incorrects

    Chapitre 3 Fonctionnement Welch Allyn Testeur d’étalonnage 9600 Plus 7 . Le dispositif quittera le mode d’étalonnage CAL après environ quatre minutes. 8. Vérifier l’étalonnage de tous les thermomètres à la température de consigne actuelle. Passer à la température de consigne suivante, voir «...
  • Seite 71: Entretien

    Faire très attention que l’eau et le détergent n’entrent pas dans les deux ports de dispositif. 3. Rincer le chiffon à l’eau et l’essorer à fond. 4. Éponger le détergent et l’eau de l’appareil 9600 Plus. 5. Laisser le testeur d’étalonnage 9600 sécher pendant 15 minutes.
  • Seite 72: Dépannage

    Chapitre 4 Entretien Welch Allyn Testeur d’étalonnage 9600 Plus Dépannage Erreur Problème Solution Le testeur d’étalonnage ne peut La température ambiante et/ou la atteindre la température de température du dispositif doivent être ° ° consigne, car la pièce ou le...
  • Seite 73 Vérifications du testeur d’étalonnage 9600 Plus Si plusieurs thermomètres ne réussisent pas le test d’étalonnage, vérifier le testeur d’étalonnage 9600 Plus pour établir s’il donne des résultats hors plage. Avant d’envoyer l’appareil à un centre d’entretien Welch Allyn agréé, effectuer les vérifications ci- dessous.
  • Seite 74 Chapitre 4 Entretien Welch Allyn Testeur d’étalonnage 9600 Plus 3. S’assurer que le testeur d’étalonnage 9600 Plus n’est pas exposé à des températures extrêmes pouvant endommager la précision de la thermistance. L ’exposition du testeur d’étalonnage 9600 Plus à des températures élevées peut altérer ses caractéristiques de résistance et de température,...
  • Seite 75: Spécifications

    Température ambiante de fonctionnement : 18,3 °C à 26,7 °C (65 °F à 80 °F) Humidité de fonctionnement : HR de 20 % à 95 %. Sans condensation Spécifications de Température contrôlée de l’appareil 9600 Plus fonctionnement Réglage inférieur : 36 °F (96,8 °F) Réglage intermédiaire : 38,5 °F (101,3 °F)
  • Seite 76: Compatibilité Électromagnétique

    Chapitre 4 Entretien Welch Allyn Testeur d’étalonnage 9600 Plus Compatibilité électromagnétique Ce produit a été testé et constaté conforme à toutes les exigences en vigueur de la directive du conseil 89/336/EEC et à ses modifications. Ce produit a été testé et constaté conforme aux exigences du FCC Partie 15.107 , Classe B.
  • Seite 77: Garantie Et Entretien

    Garantie et entretien Garantie limitée Les instruments neufs achetés auprès de Welch Allyn sont garantis contre tout vice de matériau et de main-d’oeuvre, dans des conditions normales d’utilisation et d’entretien, pendant une période d’un an à compter de la date de la première expédition effectuée par Welch Allyn.
  • Seite 78: Entretien

    9600 Plus est traçable conformément au NIST. Welch Allyn ne peut être tenu pour responsable si le testeur d'étalonnage 9600 Plus est étalonné auprès d'un centre de services non agréé. Envoyez le testeur d'étalonnage 9600 Plus à un centre de services agréé pour tout nouvel étalonnage.
  • Seite 79 Kalibriertester 9600 Plus...
  • Seite 80 © 2017 Welch Allyn. Alle Rechte vorbehalten. Zum Zwecke des bestimmungsgemäßen Gebrauchs des beschriebenen Produkts ist es dem Käufer des Produkts gestattet, dieses Dokument zur internen Weitergabe von dem von Welch Allyn bereit gestellten Medium zu kopieren. Darüber hinaus darf dieses Dokument ohne vorherige schriftliche Genehmigung von Welch Allyn weder ganz noch in Auszügen verwendet, vervielfältigt oder weitergegeben werden.
  • Seite 81 Vorsicht ......... 3 Auspacken des Kalibriertesters 9600 Plus ....4 Bedienelemente und Anzeigen .
  • Seite 83: Einführung

    Einführung Der Kalibriertester 9600 Plus überprüft die Kalibrierung der folgenden Thermometer: ® • Welch Allyn SureTemp -Modelle (678, 678 OEM, 679 und 986) ® • Welch Allyn SureTemp Plus-Modelle (690, 692 und 692 OEM) • Braun ThermoScan® Pro 3000, Pro 4000 und Pro 6000...
  • Seite 84: Symbole Und Beschreibungen

    Kapitel 1 Einführung Welch Allyn Kalibriertester 9600 Plus leisten, sollten Sie den Kalibriertester 9600 Plus einmal pro Jahr zur Kalibrierung ins Werk einschicken. Symbole und Beschreibungen Doppelt isoliert Gleichstrom Vorsichtig behandeln Achtung! Weitere Informationen finden Sie in der Gebrauchsanleitung. Transport-/Lagertemperatur...
  • Seite 85: Vorsicht

    Vorsicht Den Kalibriertester 9600 Plus nicht in Flüssigkeit eintauchen oder einweichen. Vorsicht Nur geschultes biomedizinisches Personal sollte den Kalibriertester 9600 Plus verwenden und die Kalibrierung von Thermometern damit überprüfen. Vorsicht Wenn die Anschlüsse für den Thermistor oder das Ohrmessgerät nicht verwendet werden, diese mit der Staubschutzkappe abdecken.
  • Seite 86: Auspacken Des Kalibriertesters 9600 Plus

    Kapitel 1 Einführung Welch Allyn Kalibriertester 9600 Plus Auspacken des Kalibriertesters 9600 Plus Den Kalibriertester 9600 Plus auspacken und den Lieferumfang auf Vollständigkeit überprüfen. Den Verpackungskarton aufbewahren, um das Gerät zur Rekalibrierung an Welch Allyn zurückzusenden. Folgende Teile gehören zum Lieferumfang: •...
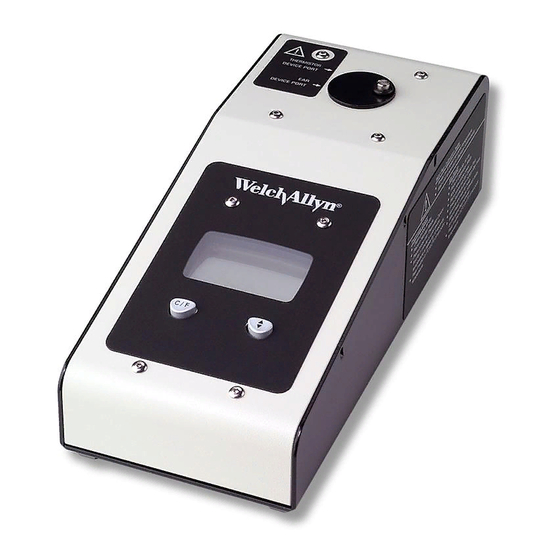
  • Seite 87: Bedienelemente Und Anzeigen

    Bedienelemente und Anzeigen Flüssigkristallanzeige Abbildung 1. LCD-Display und Tasten auf der Frontseite Sollwertmodus Temperatu- reinheit Kalibriersolltemperatur Aktuelle Innentemperatur Temperaturaus- Auswahltaste für °C/°F wahltaste Kalibriersolltemperatur Es gibt drei Kalibriersolltemperaturen, die zur Prüfung der Kalibrierung des Thermometers verwendet werden. Diese drei Temperaturen sind: 36 °C (96,8 °F), 38,5 °C (101,3 °F) und 41 °C (105,8 °F).
  • Seite 88: Aktuelle Innentemperatur

    Isttemperatur auf dem Display. Wenn das Gerät die Solltemperatur der Kalibrierung erreicht, blinkt die Temperaturanzeige in der Mitte des Displays nicht mehr. Temperatureinheiten Der Kalibriertester 9600 Plus kann die Temperaturen in °C oder in °F anzeigen. Sollwertmodus Auf dem LCD-Display wird entweder ein „D“ (Standardein- stellung) oder ein „L “...
  • Seite 89: Einschaltreihenfolge

    „°C“ oder „°F“ angezeigt (Abbildung Vorsicht Überprüfen Sie vor Durchführung des Tests, ob das zu prüfende Thermometer und der 9600 Plus auf dieselbe Temperaturskala eingestellt sind. Ziehen Sie die Gebrauchsanweisungen der Thermometer zu Rate, um dessen Temperaturskala zu ändern.
  • Seite 90 Kapitel 2 Bedienelemente und Anzeigen Welch Allyn Kalibriertester 9600 Plus Abbildung 2. Vorderseite des Kalibriertesters 9600 Plus Stromversorgungsstecker Anschluss für den Thermistor Staubschutzkappe Anschluss für das Ohrthermometer Staubschutzkappe Diese schwarze Kunststoffkappe verhindert, dass Staub in die Anschlüsse für Thermistor und Ohrthermometer gelangt. Zum Öffnen der Anschlüsse für Thermistor und Ohrthermometer die...
  • Seite 91: Anschlüsse Für Thermistor Und Ohrthermometer

    Gebrauchsanleitung Kapitel 2 Bedienelemente und Anzeigen Anschlüsse für Thermistor und Ohrthermometer Der Anschluss für das Ohrthermometer ist der größere der beiden Anschlüsse unter der Staubschutzkappe und eignet sich für die Ohrthermometer Braun ThermoScan Pro 3000 und Pro 4000 (Abbildung Der Anschluss für den Thermistor ist der kleinere Anschluss unter der Staubschutzkappe und für die Thermometer SureTemp und SureTemp Plus vorgesehen.
  • Seite 92 Kapitel 2 Bedienelemente und Anzeigen Welch Allyn Kalibriertester 9600 Plus...
  • Seite 93: Betrieb

    Betrieb Konfiguration des Kalibriertesters 9600 Plus Den Kalibriertester 9600 Plus auf eine ebene Fläche stellen, auf der er vor Sonnenlicht, Zugluft und anderen Wärme- oder Kältequellen geschützt ist. Der Kalibriertester 9600 Plus benötigt etwa 20 Minuten, bis die niedrigste Solltemperatur erreicht ist.
  • Seite 94 1. Den richtigen Netzgerätestecker auswählen und über die beiden Kontakte im Netzteil schieben (Abbildung 2. Das Netzteil mit dem Kalibriertester 9600 Plus und das andere Ende mit einer Wandsteckdose verbinden (Abbildung 3. Die Anzeige des Sollwertmodus in der oberen linken Ecke des...
  • Seite 95: Die Thermometer Suretemp Und Suretemp Plus Von Welch Allyn

    Hinweis Unterziehen Sie die Sonde vor Beginn des Prüfverfah- rens einer Sichtprüfung hinsichtlich physischer Schäden. Beschädigte Sonden müssen ersetzt werden. Abbildung 4. Der Kalibriertester 9600 Plus und die Thermometer SureTemp Plus von Welch Allyn Beginn der Überprüfung der Kalibrierung der Thermometer:...
  • Seite 96 4. Etwa eine Minute warten, bis die Temperatur am Thermometer 10 Sekunden lang stabil angezeigt wird. Die Thermometertemperaturanzeige mit der Solltemperatur des Kalibriertester 9600 Plus vergleichen. Wenn beide Temperaturen um maximal ± 0,1 °C (± 0,2 °F) voneinander abweichen, ist das Thermometer korrekt kalibriert.
  • Seite 97: Das Modell Thermoscan Pro 4000 Von Braun

    Vorsicht Längerer Körperkontakt mit dem Thermo- meter kann Messungen beeinflussen. Wenn Sie angewiesen werden, vor Durchführung des nächsten Schritts zu warten, legen Sie das Thermometer auf die Arbeitsfläche. Abbildung 5. Kalibriertester 9600 Plus mit Braun ThermoScan Pro 4000 Beginn der Kalibrierüberprüfung der Thermometer:...
  • Seite 98 Kapitel 3 Betrieb Welch Allyn Kalibriertester 9600 Plus 1. Prüfen Sie das Fenster der Sondenspitzenlinse hinsichtlich Verschiebungen. In der Naht zwischen Rahmen und Linsenfenster darf kein Abstand sein. Wenn ein Abstand vorhanden ist, ist die Einheit beschädigt und muss ersetzt werden.
  • Seite 99 7 . Warten Sie etwa 3 Sekunden, drücken Sie die Start-Taste des Thermometers, und warten Sie dann, bis die Lampe „Exac Temp“ blinkt. 8. Das Thermometer in dem Kalibriertester 9600 Plus lassen, bis ein Piepton zu hören ist. 9. Das Thermometer Pro 4000 aus dem Kalibriertester 9600 Plus herausnehmen und die Temperatur auf dem Display des Thermometers ablesen.
  • Seite 100: Modell Braun Thermoscan Pro 6000

    Sie angewiesen werden, vor Durchführung des nächsten Schritts zu warten, legen Sie das Thermometer auf die Arbeitsfläche. Vorsicht Bei älteren Versionen des 9600 Plus kann die Schraube des Staubschutzes bei der ordnungsgemäßen Positionierung des Braun 6000 im Anschluss für das Ohrthermometer stören.
  • Seite 101 Gebrauchsanleitung Kapitel 3 Betrieb Figure 6. Kalibriertester 9600 Plus mit Braun ThermoScan Pro 6000 Für die Verwendung mit älteren Kalibriertestern 9600 Plus, bei denen die Schraube des Staubschutzes bei der ordnungsgemäßen Ausrichtung des Braun 6000 im Anschluss für das Ohrthermometer stört, ist eine Kalibriervorrichtung für das Braun Pro 6000 erhältlich (Materialnummer 411690).
  • Seite 102 Kapitel 3 Betrieb Welch Allyn Kalibriertester 9600 Plus 2. Wischen Sie die Sondenspitze vorsichtig mit einem leicht mit Isopropyl- oder Ethylalkohol angefeuchteten Wattetupfer ab. Achten Sie dabei darauf, das Linsenfenster nicht zu verschieben. Entfernen Sie überschüssigen Alkohol mit einem sauberen Wattetupfer, und lassen Sie die Sondenspitze 5 Minuten lang an der Luft trocknen.
  • Seite 103 Plus, bis die Lampe „Exac Temp“ aufhört zu blinken und ein Piepton zu hören ist. 10. Entfernen Sie das Thermometer Pro 6000 aus dem Kalibriertester 9600 Plus, und lesen Sie die Temperatur auf dem Display des Thermometers ab. Wenn die Temperaturwerte innerhalb von ± 0,2 °C (± 0,4 °F) liegen, ist das Thermometer korrekt kalibriert.
  • Seite 104 Messungen können zu höheren Werten führen. Hinweis Halten Sie das Thermometer nicht, während Sie warten. So bleibt das Thermometer auf Raumtemperatur. 13. Wenn Sie nur einen Kalibriertester 9600 Plus verwenden, testen Sie alle für die Kalibrierprüfung verfügbaren Thermometer an der aktuellen Kalibrier-Sollwerttemperatur, bevor Sie mit der nächsten Kalibrier-Sollwerttemperatur...
  • Seite 105: Das Modell Thermoscan Pro 3000 Von Braun

    Durchführung des nächsten Schritts zu warten, legen Sie das Thermometer auf die Arbeitsfläche. Abbildung 7. Der Kalibriertester 9600 Plus mit dem ThermoScan Pro 3000 von Braun 1. Die Sondenspitze mit einem Tupfer reinigen, der mit etwas Isopropanol getränkt wurde. Den überschüssigen Alkohol mit einem sauberen Tupfer entfernen und 5 Minuten an der Luft trocknen lassen.
  • Seite 106 Kapitel 3 Betrieb Welch Allyn Kalibriertester 9600 Plus 2. Das Thermometer ThermoScan Pro 3000 von Braun mit den folgenden Schritten in die Kalibrierüberprüfung schalten. a. Solange warten, bis das Thermometer im Standby-Modus arbeitet (Display ist leer). b. Die Aktivierungstaste gedrückt halten und erst bei Schritt d loslassen.
  • Seite 107: Fehlerbehebung Bei Ungenauen Werten

    Gebrauchsanleitung Kapitel 3 Betrieb Fehlerbehebung bei ungenauen Werten 1. Achten Sie darauf, dass das Sensor-Fenster sauber und nicht verschmutzt ist. 2. Verwenden Sie bei Kalibrierprüfungen von Braun Thermometern stets neue Sondenhüllen. 3. Achten Sie darauf, dass sich die Ohr- und berührungslosen Thermometer im Kalibriermodus befinden.
  • Seite 108 Kapitel 3 Betrieb Welch Allyn Kalibriertester 9600 Plus...
  • Seite 109: Wartung

    Dabei sorgfältig darauf achten, dass weder Seife noch Wasser in die beiden Geräteanschlussöffnungen gelangen. 3. Das Tuch ausspülen und gründlich auswringen. 4. Seife und Wasser von dem Kalibriertester 9600 Plus abwischen. 5. Den Kalibriertester 9600 Plus 15 Minuten trocknen lassen.
  • Seite 110: Fehlerbehebung

    Kapitel 4 Wartung Welch Allyn Kalibriertester 9600 Plus Fehlerbehebung Fehler Problem Lösung Der Kalibriertester kann die Die Umgebungstemperatur und/oder Sollwerttemperatur nicht die Gerätetemperatur sollte innerhalb erreichen, weil die Raum- oder folgender Grenzwerte liegen: 18,3 °C Gerätetemperatur zu hoch ist. bis 26,7 °C (65 °F bis 80 °F). Vor den Tests 30 Minuten warten, damit die Geräte die Umgebungstemperatur...
  • Seite 111: Überprüfung Des Kalibriertesters 9600 Plus

    Rücksendung eines Geräts an eine Vertragswerkstatt von Welch Allyn die folgenden Überprüfungen durchführen. 1. Das Kalibrierdatum an der Seite des Kalibriertesters 9600 Plus überprüfen. Wurde der Kalibriertester 9600 Plus vor mehr als 12 Monaten kalibriert, diesen nicht verwenden. Das Gerät sofort an eine Vertragswerkstatt von Welch Allyn senden und kalibrieren lassen.
  • Seite 112 Kalibriereinstellungen und die Gewährleistung hinfällig. Das Gerät sofort an eine Vertragswerkstatt von Welch Allyn senden und kalibrieren lassen. 3. Der Kalibriertester 9600 Plus darf keinen extremen Tem- peraturen ausgesetzt werden, da diese den Präzisionsther- mistor beschädigen. Einwirkung hoher Temperaturen kann zu einer Verschiebung der Widerstands-Temperatur-Kennlinie des Geräts führen, sodass der Kalibriertester 9600 Plus nicht...
  • Seite 113: Technische Daten

    Betriebsumgebungstemperatur 18,3 °C bis 26,7 °C (65 °F bis 80 °F) Luftfeuchtigkeit während des Betriebs: 20 % bis 95 % rel. Luftfeuchtigkeit. Nicht kondensierend Betriebsdaten Regeltemperatur des Kalibriertesters 9600 Plus Untere Einstellung: 36 °C (96,8 °F) Mittlere Einstellung: 38.5 °C (101,3 °F) Obere Einstellung: 41°C (105,8 °F) Temperaturgenauigkeit: ±...
  • Seite 114: Elektromagnetische Verträglichkeit

    Kapitel 4 Wartung Welch Allyn Kalibriertester 9600 Plus Elektromagnetische Verträglichkeit Dieses Produkt wurde geprüft und erfüllt nachweislich alle zutreffenden Anforderungen der Richtlinie des europäischen Rates 89/336/EU und deren Ergänzungen. Dieses Gerät wurde geprüft und erfüllt nachweislich die Richtlinien zur Funkentstörung Teil 15.107 , Klasse B. Diese Grenzwerte sollen einen angemessenen Schutz gegen Störungen in einer typischen...
  • Seite 115: Gewährleistung Und Service

    Gewährleistung und Service Beschränkte Gewährleistung Für Instrumente, die von Welch Allyn neu gekauft werden, wird eine Freiheit von Material- und Verarbeitungsfehlern gewährt. Dies gilt nur für normale Verwendung und normalen Einsatz für eine Dauer von einem Jahr ab Datum des Erstversands von Welch Allyn.
  • Seite 116: Service

    NIST kalibriert. Welch Allyn übernimmt keine Haftung, wenn der Kalibriertester 9600 Plus in einem nicht autorisierten Kundendienstzentrum kalibriert wird. Senden Sie den Kalibriertester 9600 Plus an ein autorisiertes Kundendienstzentrum, wenn eine Rekalibrierung erforderlich ist. Ein Kundendienstzentrum in Ihrer Nähe finden Sie unter...
  • Seite 118 Welch Allyn, Inc. 4341 State Road P.O. Box 220 Skaneateles Falls, NY 13153-0220 Tel: (800) 535-6663 US only Fax: (315) 685-3361 www.welchallyn.com Printed in Mexico Mat’l No. 727004 Rev. A...