Kapitel
Inhaltsverzeichnis
Fehlerbehebung

Verwandte Anleitungen für AKG DMM 6


Inhaltszusammenfassung für AKG DMM 6
- Seite 1 DMM 6 BEDIENUNGSANLEITUNG ....... 2 Bitte vor Inbetriebnahme des Gerätes lesen! USER INSTRUCTIONS ......36 Please read the manual before using the equipment!
-
Seite 2: Inhaltsverzeichnis
Consult the dealer or an experienced radio/TV technician for help. Shielded cables and I/O cords must be used for this equipment to comply with the relevant FCC regulations. Changes or modifications not expressly approved in writing by AKG Acoustics may void the user’s authority to operate this equipment. -
Seite 3: Sicherheit Und Umwelt
Verwenden Sie das Gerät nur für die in dieser Bedienungsanleitung beschriebenen Anwendungen. Für Schäden infolge unsachgemäßer Handhabung oder missbräuchlicher Verwendung kann AKG keine Haftung übernehmen. Umwelt x Am Ende der Lebensdauer des Produkts trennen Sie Gehäuse, Elektronik und Kabel voneinander und entsorgen Sie alle Komponenten gemäß... -
Seite 4: Beschreibung
2 Beschreibung Einleitung Vielen Dank, dass Sie sich für ein Produkt von AKG entschieden haben. Bitte lesen Sie die Bedienungsanleitung aufmerksam durch, bevor Sie das Gerät benützen, und bewahren Sie die Bedienungsanleitung sorgfältig auf, damit Sie jederzeit nachschlagen können. Wir wünschen Ihnen viel Spaß... -
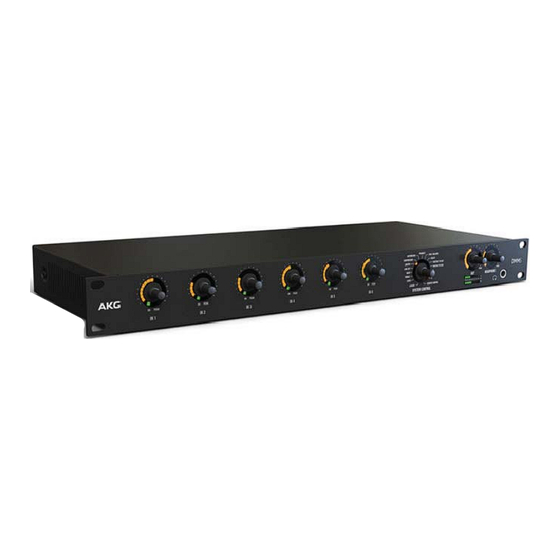
Seite 5: Frontseite
Empfänger für drahtlose Mikrofone. Für jeden Eingangskanal ist ein Drehregler vorhanden. Diese sind mit "IN 1" bis "IN 6" beschriftet. Bedienmodus / System Control Der DMM 6 verfügt über zahlreiche Funktionen wie Lautstärke, Höhenbereiche, Bass, Auto- Mischfunktionen usw. Diese Funktionen werden am Drehregler "SYSTEM CONTROL" ausgewählt. -
Seite 6: Rückseite
Ausgang kann nur einzeln, aber in Stereo abgehört werden. Beim Drücken auf eine andere Abhörquelle (Wechsel zwischen Eingängen und Ausgang), wird die vorherige abgeschaltet. Der Ausgang "REC (OUT)" kann nicht abgehört werden. Rückseite Abbildung 2: Rückseite des DMM 6 1, 5, 6, 10, 11, 15: Eingangskanäle 2, 4, 7, 9, 12, 14:... -
Seite 7: Gain-Regler
Das Gerät verfügt über einen symmetrischen Stereo Summen-Ausgangskanal. Er ist über zwei 3-polige XLR-Buchsen zugänglich. Die Ausgänge sind mit "OUT L" und "OUT R" beschriftet. Mit dem Drehregler "OUT" an der Frontseite können Einstellungen am Ausgangspegel des Stereo-Ausgangskanals vorgenommen werden. DMM 6... -
Seite 8: Stereo-Record-Ausgang
Verwendung: Anbindung zu PC, Firmware-Update, externe Steuerung Abbildung 9: RS232 Buchse Die Serielle Steuerung erfolgt durch eine 9-polige Sub-D-Buchse mit der Bezeichnung "RS232". Mit dieser Buchse besteht die Möglichkeit Software-Updates durchzuführen. Die Pinbelegung ist wie folgt: Funktion N.C. N.C. N.C. N.C. N.C. DMM 6... -
Seite 9: Erde/Ground Verbindung
Lautstärke entsprechend angepasst. Stellung links bedeutet 0%, Stellung rechts bedeutet 100%. Der Ausgangspegel ist abhängig vom Summenregler und Fernpegelregler. Der Fernpegelregler wirkt auf beide Summen gleich. Netzschalter Mit dem Netzschalter wird das Gerät in Betrieb genommen. DMM 6... -
Seite 10: Automix-Algorithmus
Dauerhaft vorhandene Störsignale, dessen Amplitude groß genug sind um als dominant bewertet zu werden, jedoch eine zu geringe Pegel- und Frequenzänderungen haben, werden als nicht dominant bewertet. Störsignale wie Lüfter- und Klimaanlagengeräusche werden erkannt und nicht als Aufschaltkriterium für die Mikrofonkanäle herangezogen. DMM 6... -
Seite 11: Montage Und Anschluss
Rackmontage Montieren Sie den DMM 6 in Ihrem 19"-Rack. Kaskadieren Zur Kaskadierung empfehlen wir ausschließlich Kabel aus dem AKG-Zubehör zu verwenden. HINWEIS Das Gerät verfügt über zwei 100 MBit/s-Ethernet-Schnittstellen. Diese dienen zur Steuerdaten- und Audio-Kommunikation zwischen bis zu 10 Geräten. Somit lässt sich ein Automisch-System mit bis zu 60 Eingangskanälen, 20 Ausgangskanälen und 10 Stereo-... -
Seite 12: Mikrofone Und Zusatzgeräte Anschließen
Lesen Sie für das Anschließen auch die Bedienungsanleitung Ihrer Mikrofone und Zusatzgeräte durch. HINWEIS Schließen Sie die Mikrofone und Zusatzgeräte an der Rückseite des DMM 6 an: Schließen Sie die Mikrofone und andere Signalquellen (z.B. Empfänger für drahtlose Mikrofone) an die "IN" - Eingangskanäle an. -
Seite 13: Bedienung
Schalten Sie das Gerät mit dem Netzschalter ein. DMM 6 bedienen So bedienen Sie die Drehregler an der Frontplatte des DMM 6: Abbildung 14: Bedienung des Drehreglers Drehen Sie die Drehregler im oder gegen den Uhrzeigersinn um Änderungen an Ein- und Ausgängen sowie Funktionseinstellungen vorzunehmen. -
Seite 14: System Control
Beeinflussen Sie den Stereo-Ausgangskanal für Kopfhörer mit dem Drehregler "HEADPHONE". Der Stereo-Record-Ausgang verfügt über keine Einstellmöglichkeiten. 5 Minuten nach der letzten Änderung springt der Drehregler "SYSTEM CONTROL" wieder in die Funktion "LEVEL". 1 Minute nach der letzten Änderung wird der eingestellte Wert automatisch gespeichert. HINWEIS DMM 6... -
Seite 15: Dsp Funktionen
Eine Ausnahme bildet hier der Drehregler "HEADPHONE". Der Stereo-Kopfhörer-Ausgang befindet sich immer im Modus "LEVEL", unabhängig von der Stellung des "SYSTEM CONTROL" Drehreglers. DSP Funktionen Folgende Funktionen zur Signalverarbeitung stehen für die Eingangskanäle und die Ausgangskanäle am Drehregler "SYSTEM CONTROL" zur Verfügung: DMM 6... - Seite 16 Abbildung 18: Teilung des LED - Kranzes der LEVEL Funktion Von -12 dB bis +15 dB ist die einstellbare Schrittweite 1 dB pro Raster. 3 dB entsprechen einer LED. Von -’ bis -12 dB ist die einstellbare Schrittweite 3 dB. 9 dB entsprechen einer LED. DMM 6...
- Seite 17 übrigen LED-Felder. Das LED-Feld leuchtet auf, sobald der 0dB-Pegel erreicht wird (nach dem dritten Rasten, siehe Detail „Level“). VU Funktion: Mit dem Drehregler "SYSTEM CONTROL" können die anliegenden Audiopegel der Eingänge angezeigt werden, siehe DMM 6 bedienen. HINWEIS TREBLE Abbildung 20: TREBLE Funktion Im Modus "TREBLE"...
- Seite 18 Die einstellbare Schrittweite beträgt 2 dB pro Raster, dies entspricht einer LED. Abbildung 23: Regelmöglichkeit der TREBLE Funktion BASS Abbildung 24: BASS Funktion Im Modus "BASS" können alle Eingangs- und Ausgangskanäle beeinflusst werden. Abbildung 25: Regelmöglichkeit der Funktion DMM 6...
- Seite 19 Seite auf. Je weiter der Drehregler nach rechts gedreht wird, desto mehr LEDs leuchten auf der rechten Seite auf. Abbildung 26: Teilung des LED - Kranzes der BASS Funktion Die einstellbare Schrittweite beträgt 2 dB pro Raster, dies entspricht einer LED. Abbildung 27: Regelmöglichkeit der BASS Funktion DMM 6...
- Seite 20 Uhrzeigersinn absenken. Die Einstellmöglichkeit reicht von 0 Hz (keine Wirkung) bis 150 Hz (maximale Grenzfrequenz). Bei 0 Hz leuchtet eine LED, bei 150 Hz leuchtet der komplette LED-Kranz. Abbildung 30: Teilung des LED - Kranzes der LOW CUT Funktion DMM 6...
- Seite 21 Die Einstellmöglichkeit reicht von +20 dBu bis -25 dBu. Bei +20 dBu leuchtet eine LED, bei - 25 dBu leuchtet der komplette LED-Kranz. Abbildung 33: Teilung des LED - Kranzes der LIMITER Funktion Die einstellbare Schrittweite beträgt 3 dB pro Raster, dies entspricht einer LED. DMM 6...
- Seite 22 1:2. Eine Drehung des Drehreglers im Uhrzeigersinn hebt die Wirkung an, eine Drehung gegen den Uhrzeigersinn schwächt die Wirkung ab. Die Einstellmöglichkeit reicht von +20 dBu bis -25 dBu. Bei +20 dBu leuchtet eine LED, bei - 25 dBu leuchtet der komplette LED-Kranz. DMM 6...
- Seite 23 Bedienung Abbildung 37: Teilung des LED - Kranzes der COMPRESSOR Funktion Die einstellbare Schrittweite beträgt 3 dB pro Raster, dies entspricht einer LED. Abbildung 38: Regelmöglichkeit der COMPRESSOR Funktion DMM 6...
- Seite 24 Mit einer Drehung eines Drehreglers im Uhrzeigersinn wird die Automatik-Mischfunktionen für den jeweiligen Kanal eingeschaltet. (LED-Kranz leuchtet komplett) Eine Drehung gegen den Uhrzeigersinn schaltet die Automatik-Mischfunktionen aus. (nur eine LED leuchtet) Durch Drücken auf den Drehregler wird die Funktion ebenfalls ein- bzw. ausgeschaltet. HINWEIS DMM 6...
- Seite 25 Durch Drücken auf den Drehregler wird die Funktion ebenfalls ein- bzw. ausgeschaltet. HINWEIS Ein Einschalten der "PRIORITY" Funktion an einem Eingangskanal bewirkt ein Ausschalten der Funktion an dem vorher aktivierten Kanal. Diese Funktion kann nur an einem einzigen Eingangskanal aktiv sein. HINWEIS DMM 6...
- Seite 26 Soll der linke Ausgangskanal eines Stereo-Ausgangs nicht mehr ausgeben werden, so ist der Balance-Regler nach rechts zu stellen. Bei Mono-Eingängen wird das Signal standardmäßig gleich auf Stereo-Links und -Rechts zugeteilt. Soll der Eingang nur links zugeteilt werden, so ist der Drehregler des Eingangs, bei aktiver PAN-Funktion, auf links zu stellen. DMM 6...
- Seite 27 Die Einstellmöglichkeit reicht von 0 m bis 75 m. Bei 0 m leuchtet eine LED, bei 75 m leuchtet der komplette LED-Kranz. Abbildung 47: Teilung des LED - Kranzes der DELAY Funktion Die einstellbare Schrittweite beträgt 1 m pro Raster. 5 m entsprechen einer LED. DMM 6...
- Seite 28 Kanal eingeschaltet (LED-Kranz leuchtet komplett). Eine Drehung gegen den Uhrzeigersinn schaltet die Funktion aus (nur eine LED leuchtet). Durch Drücken auf den Drehregler wird die Funktion ebenfalls ein- bzw. ausgeschaltet. HINWEIS Ein Einschalten legt diesen Eingangskanal auf die Summenschiene OUT. DMM 6...
- Seite 29 Durch kurzes Drücken eines Ein- oder Ausgangsdrehreglers, mit Ausnahme des Drehreglers "HEADPHONE", wird der entsprechende Kanal stumm geschaltet. Die MUTE Funktion wird durch gleichmäßiges Blinken des LED-Kranzes angezeigt. Ein weiteres kurzes Drücken oder Drehen des Drehreglers hebt die MUTE Funktion wieder auf. DMM 6...
- Seite 30 Lautstärke verändert werden. Durch Drücken auf den Drehregler des gewünschten Kanals (länger als 3 Sekunden!) wird dieser von der Sperrung ausgenommen. Durch wiederholtes Drücken (länger als 3 Sekunden!) wird er wieder gesperrt. Die eingestellten LOCK Zustände bleiben auch nach Ausschalten / Wiedereinschalten des DMM 6 erhalten! HINWEIS DMM 6...
-
Seite 31: Kopierfunktion Für Konfigurationsdaten
Der Kopiervorgang ist in beide Richtungen möglich. (“IN 1” bis “IN 6” und “IN 6” bis “IN 1”) HINWEIS Abbildung 54: Drehregler auswählen (Quelle) Abbildung 55: Kopierbereich definieren (Ziel) Abbildung 56: Drehregler gedrückt halten Abbildung 57: Kopiervorgang abgeschlossen DMM 6... - Seite 32 Warten Sie bis die Startsequenz des Automischers abgeschlossen ist (ca. 15 Sekunden). Lassen Sie den Drehregler "SYSTEM CONTROL" los. Das Gerät ist nun auf die Werkseinstellungen zurückgesetzt worden und kann für eine neue Systemkonstellation eingestellt werden. Durch das Rücksetzen auf Werkseinstellungen gehen alle gespeicherten Einstellungen verloren! HINWEIS DMM 6...
-
Seite 33: Reinigung
Reinigen Sie die Oberflächen des Gerätes mit einem mit Wasser befeuchteten, aber nicht nassen, Tuch. Verwenden Sie keinesfalls scharfe oder scheuernde Reinigungsmittel sowie keine, die Alkohol oder Lösungsmittel enthalten, da diese den Lack sowie die Kunststoffteile beschädigen könnten. ACHTUNG DMM 6... -
Seite 34: Technische Daten
Digital Analog Wandlung für Recording, Monitoring und Summen Ausgang Datenformat: 24 Bit Sample Frequenz: 48 kHz Dieses Produkt entspricht den in der Konformitätserklärung angegebenen Normen. Sie können die Konformitätserklärung auf http://www.akg.com nachlesen oder per E-Mail von sales@akg.com anfordern. DMM 6... -
Seite 35: Fehlerbehebung
Vorverstärkung stellen Verzerrte Signalwiedergabe Lautstärkeregler sind zu weit Lautstärke zurückregeln aufgedreht Eingangssignal hat zu hohen Eingangssignal dämpfen Pegel Falls der Fehler trotz dieser Anweisungen weiter besteht, melden Sie sich umgehend bei AKG Acoustics GmbH, oder Ihrem AKG-Händler. DMM 6... - Seite 36 Shielded cables and I/O cords must be used for this equipment to comply with the relevant FCC regulations. Changes or modifications not expressly approved in writing by AKG Acoustics may void the user’s authority to operate this equipment. This device complies with Part 15 of the FCC Rules. Operation is subject to the following two conditions: (1) this device may not cause harmful interference, and (2) this device must accept any interference received, including interference that may cause undesired operation.
-
Seite 37: Safety And Environment
Use the unit only for the purposes described in these operating instructions. AKG will accept no liability for damage caused by incorrect handling or improper use. -
Seite 38: Description
In addition to many digital signal processing functions, the DMM 6 also has innovative automatic mixing functions. Up to ten DMM 6 can be cascaded if the six balanced inputs are not sufficient for your application. DMM 6... -
Seite 39: Front Panel
These are labelled "IN 1" to "IN 6". Operating mode / system control The DMM 6 has a large number of functions, such as volume, treble ranges, bass, auto-mix functions, etc. The "SYSTEM CONTROL" rotary knob can be used to select these functions. -
Seite 40: Rear Panel
Description Rear panel Figure 2: Back of the DMM 6 1, 5, 6, 10, 11, 15: Input channels 2, 4, 7, 9, 12, 14: Gain control 3, 8, 13: Phantom power 16a: Stereo output channel, left 16b: Stereo output channel, right... -
Seite 41: Phantom Power
The allocation of the individual channels to the asymmetrical stereo recording output can be configured as desired. Expansion/cascading connections Figure 8: EXPANSION Two RJ-45 sockets are provided for expansion/cascading. These are labelled with "IN - EXPANSION - OUT". DMM 6... -
Seite 42: Earth/Ground Connection
A phoenix terminal connects the case with the 0 V potential of the power supply. Only bridge the 0 V potential with the grounding (factory setting) or connect it to the central system ground, as otherwise the phantom power has no reference point and will not function. NOTE DMM 6... -
Seite 43: Power Switch
Permanently present interfering signals, whose amplitude are large enough to be assessed as dominant, but whose level and frequency changes are too low, are not assessed as dominant. Interfering signals such as noise from fans and air-conditioning units are recognised and not used as activation criteria for microphone channels. DMM 6... -
Seite 44: Installation And Connection
Installation and Connection 3 Installation and Connection Mount the DMM 6 in your 19" rack. Rack mounting Cascading We recommend only using AKG accessory cables for cascading. NOTE The unit has two 100 MBit/s ethernet interfaces. These communicate the control data and audio between up to 10 units. -
Seite 45: Connecting Microphones And Accessories
Connecting microphones and accessories Before connecting, read the operating instructions for your microphones and accessories. NOTE Connect microphones and accessories to the back of the DMM 6: Connect microphones and other signal sources (e.g. wireless microphone receivers) to the "IN" input channels. -
Seite 46: Operation
Turn the unit on at the power switch. DMM 6 operation The rotary knobs on the front panel of the DMM 6 are operated as follows: Figure 14: Operation of the rotary knob Turn the rotary knob clockwise or counter-clockwise to make changes to inputs and outputs and function settings. - Seite 47 Control the headphone stereo output channel using the "HEADPHONE" rotary knob. The stereo recording output has no adjustment options. The "SYSTEM CONTROL" rotary knob returns to the "LEVEL" function five minutes after the last change. The set value is automatically stored one minute after the last change. NOTE DMM 6...
- Seite 48 Delay x Monitoring x Mute Stereo headphone output modes (output for monitoring) The "HEADPHONE" rotary knob is an exception. The stereo headphone output is always located in the "LEVEL" mode, regardless of the "SYSTEM CONTROL" rotary knob setting. DMM 6...
-
Seite 49: Dsp Functions
The adjustable increments are equal to 1 dB per click from -12 dB to +15 dB. One LED equals 3 dB. The adjustable increments are equal to 3 dB per click from -’ dB to -12. One LED equals 9 dB. DMM 6... - Seite 50 The LED field illuminates as soon as the 0 dB level is reached (after the third click, see "Level" detail). VU function: The "SYSTEM CONTROL" rotary knob can be used to display the current audio level of the inputs, see DMM 6 operation. NOTE DMM 6...
- Seite 51 More LEDs light up on the right side as the rotary knob is turned further to the right. Figure 22: Increments on the LED ring for the TREBLE function The adjustable increments are equal to 2 dB per click and also correspond to one LED. DMM 6...
- Seite 52 All the input and output channels can be controlled in the "BASS" mode. Figure 25: Adjustment range for the function The "BASS" function raises or lowers the audio signal's bass range. The filter is designed as a first order bass shelving filter. The cut-off frequency is 100 Hz. DMM 6...
- Seite 53 More LEDs light up on the right side as the rotary knob is turned further to the right. Figure 26: Increments on the LED ring for the BASS function The adjustable increments are equal to 2 dB per click and also correspond to one LED. Figure 27: Adjustment range for the BASS function DMM 6...
- Seite 54 The settings range from 0 Hz (no effect) to 150 Hz (severe attenuation). One LED is illuminated at 0 Hz, while the entire LED ring is illuminated at 150 Hz. Figure 30: Increments on the LED ring for the LOW CUT function DMM 6...
- Seite 55 The settings range from +20 dBu to -25 dBu. One LED is illuminated at +20 dBu, while the entire LED ring is illuminated at -25 dBu. Figure 33: Increments on the LED ring for the LIMITER function The adjustable increments are equal to 3 dB per click and also correspond to one LED. DMM 6...
- Seite 56 All the input channels can be controlled in the "COMPRESSOR" mode. Figure 36: Adjustment range for the function The compressor ratio is fixed. It has a value of 1:2. Turning the rotary knob in a clockwise direction increases the effect, while turning it counter-clockwise dampens the effect. DMM 6...
- Seite 57 LED ring is illuminated at -25 dBu. Figure 37: Increments on the LED ring for the COMPRESSOR function The adjustable increments are equal to 3 dB per click and also correspond to one LED. Figure 38: Adjustment range for the COMPRESSOR function DMM 6...
- Seite 58 (Entire LED ring is illuminated) Turning the rotary knob counter- clockwise switches the automatic mixing function off. (Only one LED is illuminated) Pressing the rotary knob also switches the function on or off. NOTE DMM 6...
- Seite 59 Pressing the rotary knob also switches the function on or off. NOTE Switching on the "PRIORITY" function on an input channel turns off the function on the previously activated channel. This function can only be active on a single input channel. NOTE DMM 6...
- Seite 60 In mono inputs, the signal is assigned equally to stereo left and right as standard. If the input is to be assigned to the left only, turn the rotary knob for the input to the left when the PAN function is active. DMM 6...
- Seite 61 The settings range from 0 m to 75 m. One LED is illuminated at 0 m, while the entire LED ring is illuminated at 75 m. Figure 47: Increments on the LED ring for the DELAY function The adjustable increments are equal to 1 m per click. 5 m is equal to one LED. DMM 6...
- Seite 62 (entire LED ring is illuminated). Turning the rotary knob counter-clockwise switches the function off (only one LED is illuminated). Pressing the rotary knob also switches the function on or off. NOTE Switching this on sets the input channel to the OUT master bus. DMM 6...
- Seite 63 The respective channel is switched to mute by briefly pushing the input or output rotary knob, with the exception of the "HEADPHONE" rotary knob. The MUTE function is indicated by the steady flashing of the LED ring. Another brief press or turn of the rotary knob removes the MUTE function. DMM 6...
- Seite 64 Pressing the rotary knob again (for longer than 3 seconds) relocks the channel. The set LOCK states are retained even after switching the DMM 6 off and on again! NOTE Copy function for configuration data The copy function can be used to copy individual or multiple setting values (LEVEL, TREBLE, BASS, LOW CUT, LIMITER and COMPRESSOR) from an input to one or more other inputs.
- Seite 65 The copy process can be performed in both directions. ("IN 1" to "IN 6" and "IN 6" to "IN 1") NOTE Figure 54: Select the rotary knob (source) Figure 55: Define the copy range (target) Figure 56: Hold down the rotary knobs Figure 57: Copy process complete DMM 6...
-
Seite 66: Resetting The Factory Settings
Wait until the automixer has completed its start sequence (approx. 15 seconds). Release the "SYSTEM CONTROL" rotary knob. The unit's factory settings have now been restored and a new system configuration can now be set up. Resetting the factory settings deletes all of the stored settings! NOTE DMM 6... -
Seite 67: Cleaning
Unplug the power supply cable from the socket. Clean the surface of the unit with a moistened (not wet) cloth. Never use caustic or scouring cleaners or cleaning agents containing alcohol or solvents, since these may damage the enamel and plastic parts. ATTENTION DMM 6... -
Seite 68: Specifications
Digital analogue conversion for recording, monitoring and master output Data format: 24 bit Sample frequency: 48 kHz This product conforms to the standards listed in the Declaration of Conformity. To view a copy of the Declaration of Conformity for this product, visit http://www.akg.com or contact sales@akg.com. DMM 6... -
Seite 69: Troubleshooting
Distorted signal Volume control turned up too Turn down volume reproduction Input signal level too high Reduce input signal If the error persists despite these instructions, contact AKG Acoustics GmbH or your AKG dealer immediately. DMM 6... - Seite 70 Lemböckgasse 21–25, A-1230 Vienna/AUSTRIA, phone: (+43-1) 86654-0 e-mail: sales@akg.com For other products and distributors worldwide visit www.akg.com Technische Änderungen vorbehalten. Specifications subject to change without notice. Ces caractéristiques sont susceptibles de modifications. Ci riserviamo il diritto di effettuare modifiche tecniche. Nos reservamos el derecho de introducir modificaciones técnicas. Especificações sujeitas a mudanças sem aviso prévio.