Herunterladen Inhalt Inhalt Diese Seite drucken

Werbung

Verfügbare Sprachen
  • DE

Verfügbare Sprachen

  • DEUTSCH, seite 29
Q U I CK S TA R T G U I D E

Werbung

Inhaltsverzeichnis
loading

Inhaltszusammenfassung für Replay XD 1080 Mini

  • Seite 1 Q U I CK S TA R T G U I D E...
  • Seite 2 Replay XD 1080 Mini Camera (A) Power On/Off, (B) Record, Stop (C) Removable Lens Cover (D) Removable End Cap (E) 15 Degree Markings (F) Power On/Off Blue LED (G) Record On/Off Red LED (H) Horizontal Sight Line (I) Vertical Sight Line...
  • Seite 3 Use only Replay XD approved SD cards. Visit www.replayxd.com for SD card compatibility list. Stop Recording: Hold down the rear button (B) for 4 sec. & release, the Replay XD 1080 Mini will vibrate 1 time to notify you that it is saving the file.
  • Seite 4: Rear View

    1. Slide the INT./EXT. switch (M) to choose audio option. a. Internal Mic (Default) b. External Line-in, disables internal Mic External Line-in is compatible with Replay XD 1080 Mini Audio Adapter or Replay XD 1080 Mini HW Kit, available at www.replayxd.com For Advanced Users and Setting Profiles visit www.replayxd.com/replay-XD1080MINI-advanced/...
  • Seite 5 5. Adjust swivel 360º or tilt ~8º by releasing the heim cam lever and position Replay XD At room temperature, 1080 Mini in desired direction, then lock the cam lever. Make sure the cam lever is tight. wait for at least 24 hours...
  • Seite 6 1. Find the best mounting location for your Replay XD 1080 Mini and check your angles. IMPORTANT Rigid surfaces are ideal for the best video quality. Note: You can make a test recording and Use rubbing alcohol to clean check it on an iPad/Mac/PC.
  • Seite 7 1. The Start and REC button should always point up or at the 12 o’ c lock position for a level horizon. 2. The front silver sight markers are horizontal and vertical which act as a level. 3. The laser etched marks on the side of the Replay XD 1080 Mini are spaced every 15 degrees to give you fine adjustment.
  • Seite 8 HEIMLOCK SWIVEL/TILT MOUNT LOWBOY MOUNT Mounting angle and setup: 1. When using a HeimLock mount or LowBoy mount it is important to mount them at an optimal position. Please reference the illustration on this page for possible positions. 2. When mounting to a helmet, most people have a tendency to lower their head from 15º to and excess of 20º. It is important to recognize what the natural angle or active position of your mounting locations are on items such as: helmets, hats, handlebars, vehicle bodies, etc.
  • Seite 9 PC/Mac USB port, damage to the Replay XD 1080 Mini or your computer may occur. The Replay XD 1080 Mini will record for approx. 130 min. on a full charge in optimal conditions. Extreme heat or cold can affect battery life.
  • Seite 10 SDHC compatible card reader to transfer your files to your computer. 3. Option (2): Download from the Replay XD 1080 Mini USB port. 4. Plug USB cable into Replay XD 1080 Mini and a PC/Mac USB 2.0 port. PC/MAC PC/MAC 5.
  • Seite 11 Your Replay XD 1080 Mini records and saves to a file called a MOV. Your video file is compatible with most current media players on a PC or Mac. Many video editing software titles are compatible out of the box such as: Adobe Premier, Apple Final Cut, iMovie, &...
  • Seite 12: Warranty

    STABLE IMAGING SOLUTIONS, LLC. LIMITED WARRANTY WHAT THE WARRANTY COVERS Stable Imaging Solutions, LLC. (SIS) warrants for 180 days from the date of purchase of product it will be free from defects in material and workmanship. WHAT IT DOES NOT COVER This warranty does not cover damage due to: •...
  • Seite 13 • All trademarks and registered trademarks mentioned herein are recognized as the property of their respective holders. Replay XD , Replay XD 1080 Mini is a product of Stable Imaging Solutions, LLC. in California. ® www.Replayxd.com ©2013 Stable Imaging Solutions, LLC., Replay XD All rights reserved.
  • Seite 14 FCC Compliance Statement This device complies with part 15 of the FCC Rules. Operation is subject to the following two conditions: (1) This device may not cause harmful interference, and (2) this device must accept any interference received, including interference that may cause undesired operation. Radio and TV Interference This equipment has been tested and found to comply with the limits for a Class B digital device in accordance with the specifications in Part 15 of FCC rules.
  • Seite 15 F R A N Ç A I S Caméra Replay XD 1080 Mini (A) Marche/Arrêt (B) Enregistrer, Stop (C) Couvercle de l’ o bjectif amovible (D) Couvercle arrière amovible (E) 15 marques de diplômes (F) DEL bleu d’alimentation Marche/Arrêt (G) DEL rouge d’ e nregistrement Marche/Arrêt...
  • Seite 16 ê tre enregistré. Eteindre : Appuyez sur le bouton (A) à l’avant pendant 4 sec. & arrêtez d’appuyer, le Replay XD 1080 Mini vibrera 1 fois & s’ é teindra automatiquement.
  • Seite 17 Micro interne (défaut) b. Entrée Micro externe, éteint automatiquement le micro interne. L’ e ntrée Micro externe est compatible avec l’adaptateur audio XD 1080 Mini ou le kit Replay XD 1080 Mini HW, disponible sur www.replayxd.com For Advanced Users and Setting Profiles visit www.replayxd.com/replay-XD1080MINI-advanced/ A L I G N M E N T M O D ES &...
  • Seite 18 Des surfaces sont idéales et produisent une meilleure qualité vidéo. Utilisez de l'alcool pour nettoyer la 2. Attachez la caméra Replay XD 1080 Mini dans le support de caméra en forme U, et tournez par 360º surface avant d'installer. Essuyez dans le sens désiré.
  • Seite 19 Posez le support de mon- 3. Lorsque la caméra Replay XD 1080 Mini est au centre du support LowBoy, tournez par 360º dans le sens désiré. tage VHB sur la surface. Appuyez 4.
  • Seite 20 2. Les marqueurs de visée d’argent avant sont horizontale et verticale qui agissent comme un niveau. 3. Les marques gravées au laser sur le côté de la rediffusion XD 1080 Mini sont espacés tous les 15 degrés pour vous donner un réglage fin.
  • Seite 21: Montage

    F R A N Ç A I S HEIMLOCK SWIVEL/TILT MOUNT LOWBOY MOUNT Angle de montage et installation : 1. Lorsque vous utilisez le support de montage HeimLock ou LowBoy, il est important de les monter dans la position optimale Référez-vous à...
  • Seite 22 2. Branchez le câble USB sur l'adaptateur mural CA fourni, un adaptateur pour voiture ou un port USB2.0 d'un PC/Mac. 3. Le voyant DEL d'état du chargement, à l'arrière du Replay XD 1080 Mini s'allumera pour indiquer le chargement en cours. Lorsque le voyant DEL vert s'éteint, la batterie est pleine et complètement chargée.
  • Seite 23 1. Enlevez le couvercle de protection arrière et utilisez option (1) ou option (2). 2. Option (1) : Retirez la carte micro SDHC du Replay XD 1080 Mini et utilisez un lecteur de cartes SDHC compatible pour transférer vos fichiers sur un ordinateur.
  • Seite 24 F R A N Ç A I S Votre Replay XD 1080 Mini enregistre et sauvegarde dans un fichier appelé MOV. Votre fichier vidéo est compatible avec la plupart des lecteurs multimédia sur un PC ou Mac. De nombreux logiciels d'édition sont directement compatibles, par ex. : Adobe Premier, Apple Final Cut, iMovie, &...
  • Seite 25: Garantie

    F R A N Ç A I S STABLE IMAGING SOLUTIONS, LLC. GARANTIE LIMITÉE CE QUI EST COUVERT PAR LA GARANTIE Stable Imaging Solutions, LLC. (SIS) garantie que ce produit est exempt de défaut matériel et de fabrication pendant une période de 180 jours à...
  • Seite 26 Replay XD , Replay XD1080 est un produit de Stable Imaging Solutions, LLC., Californie. ® www.Replayxd.com ©2013 Stable Imaging Solutions, LLC., Replay XD Tous droits réservés. ® A L I G N M E N T D I S CL A I M E R...
  • Seite 27 F R A N Ç A I S Déclaration de conformité à la FCC Cet appareil est conforme à la section 15 du règlement de la FCC. Son fonctionnement est soumis aux deux conditions suivantes : (1) Cet appareil ne doit pas provoquer d’interférence nuisibles, et (2) cet appareil doit accepter les interférences reçues, y compris les interférences qui peuvent causer un fonctionnement indésirable.
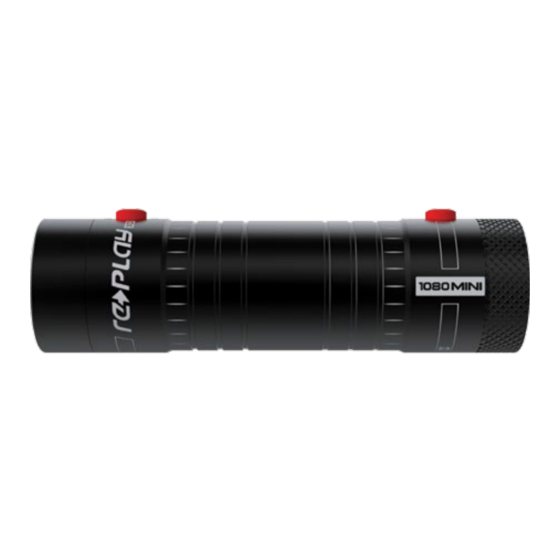
  • Seite 28 D E U T S C H Replay XD 1080 Mini-Kamera (A) Ein-/Ausschalten (B) Aufnahme, Stopp (C) Abnehmbare Objektivabdeckung (D) Abnehmbare rückseitige Kappe (E) 15 Grad Markierungen (F) Blaue Betrieb-LED (G) Rote Aufnahme-LED (H) Horizontale Sichtlinie (I) Vertikale Sichtlinie (J) microSDHC-Schlitz A L I G N M E N T (K) Grüne Lade-LED, rote SD-Karte-LED...
  • Seite 29 Replay XD 1080 Mini vibriert dreimal und die blaue Betrieb-LED leuchtet auf. Aufnahme starten: Halten Sie die Taste an der Rückseite (B) zwei Sekunden gedrückt und lassen sie dann los; die Replay XD 1080 Mini vibriert dreimal, die rote LED leuchtet auf und die Aufnahme startet automatisch.
  • Seite 30 Internes Mikrofon (Standard) b. Externer Mikrofoneingang, internes Mikrofon wird deaktiviert Der externe Mikrofoneingang ist mit dem Replay XD 1080 Mini Audio Adapter bzw. dem Replay XD 1080 Mini HW Kit kompatibel, erhältlich unter www.replayxd.com. Hinweise zu erweiterten Benutzereinstellungen und Einstellungsprofilen finden Sie unter www.replayxd.com/replay- xd1080-advanced/.
  • Seite 31 Säubern Sie die können eine Probeaufnahme machen und überprüfen Sie es auf Ihrem Mac oder PC. 2. Befestigen Sie die Replay XD 1080 Mini an der U-förmigen Kamerahalterung und drehen sie um 360 ° Montageoberfläche mit in die gewünschte Position.
  • Seite 32 Mini in die Halterung, wobei Sie die Tasten an den Aussparungen ausrichten. Sie die VHB-Halterung an der 3. Wenn die Replay XD 1080 Mini in der LowBoy-Halterung zentriert ist, drehen Sie sie um 360 ° auf die Oberfläche an. Halten Sie die gewünschte Position.
  • Seite 33 2. Die vorderen Silber Anblick Marker sind horizontal und vertikal, die wirken als Ebene. 3. Die gelaserten Logos an der Seite der Replay XD 1080 Mini sind auf gleichem Level und dienen als Anzeige des Neigungswinkels. 4. Zur Überprüfung der Ausrichtung Ihrer Replay XD 1080 Mini blicken Sie einfach an einem Gebäude entlang – als würden Sie durch ein Teleskop schauen.
  • Seite 34 D E U T S C H Schwenk-/neigbare HeimLock- Halterung LowBoy-Halterung Montagewinkel und Einrichtung: 1. Beim Einsatz einer HeimLock- oder LowBoy-Halterung ist es wichtig, diese an einer optimalen Position zu montieren. Mögliche Positionen entnehmen Sie bitte der Abbildung auf dieser Seite. 2.
  • Seite 35 2. Verbinden Sie das USB-Kabel mit dem mitgelieferten Netzteil, Fahrzeugadapter oder dem USB 2.0-Port eines PCs/Mac. 3. Die grüne Lade-LED an der Rückseite der Replay XD 1080 Mini leuchtet, das Gerät lädt. Sobald die grüne LED erlischt, ist der Akku vollständig geladen; der Ladevorgang ist abgeschlossen.
  • Seite 36 übertragen die Dateien mit Hilfe eines SDHC-kompatiblen Kartenlesers auf Ihren Computer. 3. Option (2): Laden Sie die Dateien über den USB-Port der Replay XD 1080 Mini herunter. 4. Schließen Sie das USB-Kabel an der Replay XD 1080 Mini und dem USB 2.0-Port eines PCs/Mac an.
  • Seite 37 D E U T S C H Ihre Replay XD 1080 Mini nimmt eine Datei auf und speichert diese als MOV. Ihre Videodatei ist mit den meisten aktuellen Medienwiedergabeprogrammen für PC oder Mac kompatibel. Viele Videobearbeitungsprogramme sind kompatibel und ohne Weiteres einsetzbar, z.
  • Seite 38 D E U T S C H Stable Imaging Solutions, LLC. Beschränkte Garantie Was unter die Garantie fällt Stable Imaging Solutions, LLC. (SIS) garantiert für die Dauer von 180 Tagen ab Kaufdatum des Produktes, dass dieses frei von Material- und Verarbeitungsfehlern ist. Was nicht unter die Garantie fällt Diese Garantie deckt Schäden aufgrund folgender Ursachen nicht ab: •...
  • Seite 39 • Alle hierin genannten Marken und eingetragenen Marken sind das Eigentum ihrer jeweiligen Inhaber. Replay XD , Replay XD 1080 Mini ist ein Produkt von Stable Imaging Solutions, LLC. in Kalifornien. ® www.replayxd.com ©2013 Stable Imaging Solutions, LLC., Replay XD Alle Rechte vorbehalten.
  • Seite 40 D E U T S C H FCC-Erklärung Dieses Gerät erfüllt Teil 15 der FCC-Regularien. Der Betrieb unterliegt den folgenden beiden Voraussetzungen: (1) Dieses Gerät darf keine Funkstörungen verursachen, und (2) Dieses Gerät muss jegliche empfangenen Funkstörungen hinnehmen, einschließlich Störungen, die zu unbeabsichtigtem Betrieb führen können.
  • Seite 41 E S PA Ñ O L Cámara Replay XD 1080 Mini (A) Encendido y apagado (B) Grabar, Detener (C) Tapa de la lente extraíble (D) Tapa del extremo posterior extraíble (E) 15 marcas de grados (F) LED azul de encendido y apagado (G) LED rojo de activación y desactivación de la grabación...
  • Seite 42 Encender el dispositivo (espera y selección de la configuración de modo): mantenga presionado el botón frontal (A) durante 2 segundos y suéltelo. La cámara Replay XD 1080 Mini vibrará 3 veces y el LED de encendido se iluminará en azul.
  • Seite 43: Vista Posterior

    La entrada de micrófono externa, deshabilita el micrófono interno La entrada de micrófono externa es compatible con el adaptador de audio HDMI de la cámara Replay XD 1080 Mini, disponible en www.replayxd.com. Para usuarios avanzados y obtener información sobre perfiles de configuración visite el sitio Web www.replayxd.com/ A L I G N M E N T replay-xd1080mini-advanced/.
  • Seite 44 En su Mac o PC limpiar la superficie de montaje. 2. Ajuste la cámara Replay XD 1080 Mini en su soporte con forma de U y gire 360º hasta tener la posición que desee. Pase un paño seco por la super- 3.
  • Seite 45 4. Deslice el soporte LowBoy introduciéndolo en el soporte SnapTray hasta que quede totalmente asentado y superficie. La intensidad de ad- se escuche un clic. El soporte LowBoy tiene cintas de goma para evitar que la cámara Replay XD 1080 Mini hesión aumentará con el paso gire cuando se asiente, lo que garantiza un ángulo de giro ideal.
  • Seite 46 2. Los marcadores de la vista frontal de plata son horizontales y verticales que actúan como un nivel. 3. Las marcas grabadas con láser en el lado de la repetición XD 1080 Mini están espaciados cada 15 grados para darle un ajuste fino.
  • Seite 47: I N S Ta L Aci Ó N

    E S PA Ñ O L SOPORTE HEIMLOCK SOPORTE LOWBOY Ángulo de instalación y colocación: 1. Cuando utilice un soporte HeimLock o un soporte LowBoy, es importante instalarlos en la posición correcta. Consulte la ilustración de esta página para conocer las diferentes posiciones. 2.
  • Seite 48: Vista Lateral

    AC Wall Adapter or Car Adapter. It is not recommended to record while charging through the PC/Mac USB port as the Replay XD 1080 Mini uses approximately the same power draw as the PC/Mac USB port, damage to the Replay XD 1080 Mini or your computer may occur.
  • Seite 49 4. Plug USB cable into Replay XD 1080 Mini and a PC/Mac USB 2.0 port. 5. Press and hold the Start/Stop button (B) and Power On your Replay XD 1080 Mini. 6. En un PC o Mac, la cámara Replay XD 1080 Mini se montará en el equipo PC/MAC PC/MAC como un dispositivo de almacenamiento masivo.
  • Seite 50 E S PA Ñ O L La cámara Replay XD 1080 Mini graba y guarda en un archivo denominado MOV. El archivo de vídeo es compatible con la mayoría de reproductores multimedia actuales de PC o Mac. Muchos títulos de software de edición de vídeo son directamente compatibles, como por ejemplo Adobe Premier, Apple Final Cut, iMovie y Windows Movie Maker.
  • Seite 51 E S PA Ñ O L STABLE IMAGING SOLUTIONS, LLC. GARANTÍA LIMITADA QUÉ CUBRE LA GARANTÍA Stable Imaging Solutions, LLC. (SIS) garantiza que el producto no presentará defectos materiales ni de mano de obra durante los 180 días posteriores a la fecha de compra.
  • Seite 52 • Todas las marcas comerciales y marcas registradas mencionadas en el presente documento son propiedad de sus respectivos propietarios. Replay XD , Replay XD 1080 Mini es un producto de Stable Imaging Solutions, LLC. en California. ® www.Replayxd.com ©2013 Stable Imaging Solutions, LLC., Replay XD Reservados todos los derechos.
  • Seite 53 E S PA Ñ O L Declaración de cumplimiento de las normas FCC Este dispositivo cumple la Sección 15 de la Normativa de la FCC. Su funcionamiento se encuentra sujeto a las dos condiciones siguientes: (1) Este dispositivo no puede causar interferencias perjudiciales, y (2) Este dispositivo debe aceptar cualquier interferencia recibida, incluyendo aquellas que pudieran provocar un funcionamiento no deseado.
  • Seite 54 P O R T U G U Ê S Câmara Replay XD 1080 Mini (A) Ligar/Desligar (B) Gravar, Parar (C) Tampa da lente amovível (D) Tampa de protecção amovível (E) 15 marcações de grau (F) LED azul de alimentação Ligado/Desligado (G) LED vermelho de gravação Ligado/Desligado...
  • Seite 55 Arquivo Clip (disponível em arquivo de texto avançado): Durante a gravação prima e liberte rapidamente o botão traseiro (B). A câmara Replay XD 1080 Mini irá vibrar 1 vez para notificar que está a recortar e a guardar o ficheiro, e começará automaticamente a gravar ou a capturar A L I G N M E N T novamente.
  • Seite 56: Vista Traseira

    P O R T U G U Ê S VISTA TRASEIRA Modo de Vídeo ou Modo de Foto 1. Deslize o botão de Modo Vídeo (L) para alterar quadros de resolução de vídeo por segundo. a. 1080p 30 FPS (Full HD) b.
  • Seite 57 Mac ou PC. Utilize álcool para limpar a 2. Encaixe a câmara Replay XD 1080 Mini no suporte em forma de U e rode 360º para a colocar na posição superfície de montagem. Seque desejada.
  • Seite 58 Coloque o suporte 3. Centre a câmara Replay XD 1080 Mini no suporte LowBoy e rode 360º para a posição desejada. VHB na superfície. Mantenha 4. Deslize o suporte LowBoy para encaixar no SnapTray até que esteja totalmente encaixado. O suporte LowBoy...
  • Seite 59 2. Os marcadores de vista de prata dianteiros são horizontal e vertical, que atuam como um nível. 3. As marcas gravadas a laser na lateral o replay XD 1080 Mini são espaçadas a cada 15 graus, para dar-lhe um ajuste fino.
  • Seite 60 P O R T U G U Ê S SUPORTE HEIMLOCK COM ROTAÇÃO/ INCLINAÇÃO SUPORTE LOWBOY Ângulo de montagem e configuração: 1. É importante que os suportes HeimLock ou LowBoy sejam montados numa posição ideal. Consulte a ilustração nesta página onde se apresentam possíveis posições.
  • Seite 61 AC ou o adaptador para veículo.Não recomendamos a gravação durante o carregamento através da porta USB de um PC/Mac, pois a câmara Replay XD 1080 Mini utiliza aproximadamente a mesma quantidade de energia fornecida pela porta USB do PC/Mac.
  • Seite 62: Como Apagar Ficheiros

    3. Opção (2): Transfira utilizando a porta USB da câmara Replay XD 1080 Mini. 4. Ligue o cabo USB à câmara Replay XD 1080 Mini e à porta USB 2.0 de um PC/Mac. 5. Pressione e segure o botão Start / Stop (B) e Power On sua repetição XD 1080 Mini.
  • Seite 63 P O R T U G U Ê S A câmara Replay XD 1080 Mini grava e guarda para um ficheiro MOV. O ficheiro de vídeo é compatível com a maioria dos leitores multimédia num PC ou Mac. Existem diversos programas de edição de vídeo que são totalmente compatíveis, tais como: Adobe Premier, Apple Final Cut, iMovie e o Windows Movie Maker.
  • Seite 64 P O R T U G U Ê S STABLE IMAGING SOLUTIONS, LLC. GARANTIA LIMITADA O QUE COBRE A GARANTIA A Stable Imaging Solutions, LLC. (SIS) oferece garantia durante 180 dias a partir da data da compra do produto para defeitos de material e de fabrico.
  • Seite 65: Exclusão De Responsabilidade

    Todas as marcas comercias e marcas comerciais registadas aqui mencionadas são reconhecidas como propriedade dos respectivos proprietários. Replay XD , Replay XD 1080 Mini é um produto da Stable Imaging Solutions, LLC. na Califórnia. ® www.Replayxd.com ©2011 Stable Imaging Solutions, LLC., Replay XD Todos os direitos reservados.
  • Seite 66 P O R T U G U Ê S Declaração de compatibilidade com as regras da FCC Este dispositivo está de acordo com o Artigo 15º das Normas da FCC. O seu funcionamento está sujeito às duas condições seguintes: (1) Este dispositivo não pode causar interferências prejudiciais, e (2) este dispositivo deve aceitar qualquer tipo de interferência recebida, incluindo interferências que possam causar um funcionamento indesejado.
  • Seite 67 I TA L I A N O Videocamera Replay XD 1080 Mini (A) Accensione/spegnimento (B) Registrazione, Stop (C) Coperchio obiettivo rimovibile (D) Coperchio terminale rimovibile (E) 15 Marcature di laurea (F) LED blu alimentazione attiva/disattiva (G) LED rosso registrazione attiva/disattiva...
  • Seite 68 3 volte ed il LED blu si accenderà. Nota: fotocamera si spegne dopo 5 secondi se nessuna scheda SD è presente. Fotocamera si spegne dopo 5 minuti di inattività. Avviare la registrazione: Tenere premuto per 2 secondi il tasto posteriore (B), Replay XD 1080 Mini vibrerà 3 volte, il LED rosso si accenderà e si avvierà automaticamente la registrazione o l’acquisizione.
  • Seite 69 Internal Mic (Default) b. External Line-in, disabilita microfono interno External Line-in è compatibile con Replay XD 1080 Mini adattatore audio o Replay XD 1080 Mini Kit HW, disponibile presso www.replayxd.com A L I G N M E N T Visitare il sito www.replayxd.com/replay-xd1080mini-advanced/ per informazioni sulle impostazioni...
  • Seite 70 4. Fare scorrere il supporto HeimLock nel supporto SnapTray finché è completamente inserito e scatta. tempo. At temperatura am- 5. Regolare la rotazione di 360° o l’inclinazione di +8º sbloccando la leva e collocando Replay XD 1080 Mini biente, attendere almeno 24 nella posizione voluta, quindi bloccare la leva.
  • Seite 71 4. Fare scorrere il supporto LowBoy nel supporto SnapTray finché è completamente inserito e scatta. Il supporto all’adesivo di incollarsi alla super- LowBoy è dotato di strisce di gomma che impediscono a Replay XD 1080 Mini di ruotare quando è installata, ficie. L’aderenza aumenterà col assicurando così...
  • Seite 72 3. Il laser incisi segni sul lato dei Replay XD 1080 Mini sono distanziati di 15 gradi per dare una regolazione fine. 4. Per accertarsi di puntare Replay XD 1080 Mini nella direzione voluta, guardare lungo la telecamera da dietro a davanti come se si guardasse attraverso un telescopio.
  • Seite 73: Installazione

    I TA L I A N O SUPPORTO HEIMLOCK SUPPORTO LOWBOY Installazione e regolazione dell’angolazione: 1. Quando si usa un supporto HeimLock o LowBoy, è importante eseguire l’installazione nella posizione ottimale. Usare l’illustrazione di questa pagina come riferimento per le possibili posizioni d’installazione. 2.
  • Seite 74 2. Collegare il cavo USB all’adattatore AC fornito in dotazione, ad un adattatore per veicoli, oppure ad una porta USB 2.0 del PC/Mac. 3. Il LED verde, sulla parte posteriore di Replay XD 1080 Mini, si accenderà per avvisare che è in corso la procedura di caricamento. Quando il LED verde si spegne, significa che la batteria è...
  • Seite 75 3. Opzione (2): Eseguire il download dalla porta USB di Replay XD 1080 Mini. 4. Plug USB cable into Replay XD 1080 Mini and a PC/Mac USB 2.0 port. 5. Premere e tenere premuto il pulsante Start / Stop (B) e Power On Replay XD 1080 Mini.
  • Seite 76 I TA L I A N O Replay XD 1080 Mini registra e salva le registrazioni in un file chiamato MOV. Il file video è compatibile con la maggior parte dei lettori multimediali correnti installati su PC o Mac. Molti software d’elaborazione video sono immediatamente compatibili, come: Adobe Premier, Apple Final Cut, iMovie e Windows Movie Maker.
  • Seite 77: Garanzia

    I TA L I A N O STABLE IMAGING SOLUTIONS, LLC. GARANZIA LIMITATA CHE COSA COPRE LA GARANZIA Stable Imaging Solutions, LLC. (SIS) garantisce per 180 giorni dalla data di acquisto che il prodotto sarà esente da difetti dei materiale e di fabbricazione. CHE COSA NON È...
  • Seite 78 • Tutti i marchi e i marchi registrati qui citati sono riconosciuti come proprietà dei loro rispettivi titolari. Replay XD , Replay XD 1080 Mini è un prodotto della Stable Imaging Solutions, LLC. in California. ® www.Replayxd.com ©2013 Stable Imaging Solutions, LLC., Replay XD Tutti i diritti riservati.
  • Seite 79 I TA L I A N O Dichiarazione di conformità FCC: Questo prodotto è conforme alla Parte 15 delle Norme FCC. Il funzionamento è soggetto alle seguenti due condizioni: (1) Questo dispositivo non può provocare interferenze dannose, e (2) Questo dispositivo deve accettare tutte le interferenze ricevute, incluse le interferenze che possono provocare operazioni indesiderate.
  • Seite 80 S V E N S K Kamera Replay XD 1080 Mini (A) På/Av (B) Inspelning, Stopp (C) Borttagbart linsskydd (D) Borttagbart skyddslock (E) 15 Degree Märkningar (F) På/Av - blå LED-indikator (G) Inspelning På/Av - röd LED-indikator (H) Horisontell siktlinje...
  • Seite 81 Obs: Kameran stängs av efter 5 sekunder om inget SD-kort finns. Kameran stängs av efter fem minuter utan aktivitet. Starta inspelningen: Håll ner den bakre knappen (B) i 2 sekunder och släpp. Replay XD 1080 Mini vibrerar 3 gånger, den röda LED- indikatorn tänds och inspelningen eller fotograferingen startar.
  • Seite 82 Ett. Skjut INT. / EXT. byta (M) för att välja ljud alternativ. a. Intern Mic (standard) b. Extern Line-in, inaktiverar intern Mic Extern Line-in är kompatibel med Replay XD 1080 Mini Audio Adapter eller Replay XD 1080 Mini HW Kit, finns på www.replayxd.com Avancerade användare kan besöka www.replayxd.com/replay-xd1080mini-advanced/ för t.ex.
  • Seite 83 5. Ställ in riktningen (kan vridas 360º) och/eller lutningen ~8º genom att lossa låsspaken och placera Replay XD 1080 Mini i önskad riktning och vinkel. Lås sedan fästet med låsspaken. Se till att låsspaken är Vänta minst 24 timmar i helt intryckt .
  • Seite 84 Solida ytor är idealiska för bästa filmkvalitet. Obs: Du kan göra en provinspelning och kontrollera det på Använd tvättsprit för att rengöra din Mac eller PC. 2. Vänd LowBoy-fästet upp och ned och sprid ut försiktigt. För in Replay XD 1080 Mini i hållaren så fästytan. Torka av ytan. Sätt dit att knapparna passerar genom skåran.
  • Seite 85 2. De främre silver sight markörer är horisontell och vertikal som fungerar som en nivå. 3. De laseretsad märken på sidan av Replay XD 1080 Mini är placerade var 15 grader för att ge dig finjustering. 4. För att kontrollera kamerariktningen tittar du bara längs kamerahuset bakifrån som om du tittade i ett teleskop. Det är så enkelt.
  • Seite 86 S V E N S K HEIMLOCK VRID- /LUTNINGSFÄSTE LOWBOY-FÄSTE Fästvinkel och inställning: 1. Vid användning av ett HeimLock-fäste eller LowBoy-fäste är det viktigt att sätta fast dem på en optimal plats. Se illustrationen på den här sidan för möjliga fästpunkter. 2.
  • Seite 87 Det rekommenderas inte att spela in under laddning via en USB-port eftersom Replay XD 1080 Mini använder ungefär lika mycket ström som USB-porten ger, vilket kan skada Replay XD 1080 Mini eller datorn. Inspelningstiden för Replay XD 1080 Mini är ca 130 min. vid full laddning under ideala förhållanden.
  • Seite 88 4. Anslut en USB-kabel mellan Replay XD 1080 Mini och en PC/Mac USB 2.0-port. 5. Tryck och håll in Start / Stop (B) och Power On din Replay XD 1080 Mini. 6. På en PC/Mac visas Replay XD 1080 Mini som en masslagringsenhet. Du kan ladda ner filmfiler till DCIM-mappen som skapats på...
  • Seite 89 S V E N S K Replay XD 1080 Mini sparar filmfiler med MOV som filändelse. Filmfilen är kompatibel med de flesta aktuella mediaspelare på en PC eller Mac. Många filmredigeringsprogram är kompatibla utan tillägg eller uppgradering, t.ex.: Adobe Premier, Apple Final Cut, iMovie och Windows Movie Maker.
  • Seite 90 S V E N S K STABLE IMAGING SOLUTIONS, LLC. BEGRÄNSAD GARANTI VAD GARANTIN OMFATTAR Stable Imaging Solutions, LLC. (SIS) garanterar att produkten är fri från defekter i material och utförande under 180 dagar från inköpsdatumet. VAD GARANTIN INTE OMFATTAR Denna garanti omfattar inte skada orsakad av: •...
  • Seite 91 SIS-produkt. • Alla varumärken och registrerade varumärken som nämns häri tillhör respektive ägare av varumärket. Replay XD och Replay XD 1080 Mini tillhör Stable Imaging Solutions, LLC. i Kalifornien. ® www.Replayxd.com ©2013 Stable Imaging Solutions, LLC., Replay XD Alla rättigheter förbehålls.
  • Seite 92 S V E N S K Överensstämmelse med FCC Denna utrustning överensstämmer med artikel 15 i regelverket FCC. Utrustningen får användas på följande två villkor: (1) Utrustningen får inte orsaka skadliga störningar och (2) denna enhet måste klara alla störningar, inklusive störningar som kan orsaka oönskad funktion. Radio- och TV-störningar.
  • Seite 93 HardCore Billet Tripod Mount VIEW ALL OF OUR ACCESSORIES AT WWW.REPLAYXD.COM Billet SuctionCup Short Arm Mount VHB SnapTrays - 5 Pack ProLens 37mm Adapter Replay XD 1080 Mini Hardwire Kit Replay XD Mic Replay XD Tshirt ACCESS O R I ES...
  • Seite 94 Replay XD a fine brand of Stable Imaging Solutions, LLC. Sales & Technical Support: Phone: +1-805-480-9800 Sales: sales@replayxd.com Support: support@replayxd.com Office & Administration: Monday–Friday, 9am–5pm (PST) Corporate Address: Stable Imaging Solutions, LLC. 3709 Old Conejo Road Newbury Park, CA 91320...

Inhaltsverzeichnis