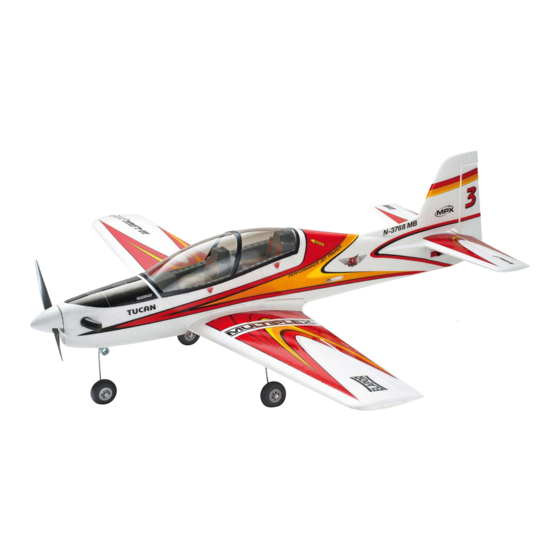
Herunterladen Diese Seite drucken

Werbung

Verfügbare Sprachen
  • DE

Verfügbare Sprachen

  • DEUTSCH, seite 1
Bauanleitung
Bauanleitung
D
D
Building instructions
GB
Notice de construction
F
Instruzioni di montaggio
I
ES
Instrucciones de montaje
Abbildungen
Illustrations
Illustrations
Illnstrazioni
Iiustraciónes
© Copyright by MULTIPLEX Modellsport GmbH & Co. KG 2013
... 30-39
# 21 4284
Ersatzteile
Replacement parts
Pièces de rechanges
Parti di ricambio
Repuestos
# 26 4284
2 ... 11
2
11
12 ... 21
22 ... 41
42... 51
52 ... 60
61-64
Version 1.0

Werbung

loading

Inhaltszusammenfassung für Multiplex TUCAN

  • Seite 1 Instruzioni di montaggio 42... 51 Instrucciones de montaje 52 ... 60 Ersatzteile Abbildungen Replacement parts Illustrations ... 30-39 61-64 Pièces de rechanges Illustrations Parti di ricambio Illnstrazioni Repuestos Iiustraciónes © Copyright by MULTIPLEX Modellsport GmbH & Co. KG 2013 Version 1.0...
  • Seite 2 WERDEN! ABNEHMBARE KLEINTEILE DES MODELLS KÖNNEN VON KINDERN UNTER 3 JAHREN VERSCHLUCKT WERDEN. ERSTICKUNGSGEFAHR! Beim Betrieb des Modells müssen alle Warnhinweise der BETRIEBSANLEITUNG beachtet werden. Die Multiplex Mo- dellsport GmbH & Co. KG ist nicht haftungspfl ichtig für Verluste und Beschädigungen jeder Art, die als Folge falschen Betriebes oder Missbrauches dieses Produktes, einschließlich der dazu benötigten Zubehörteile entstehen.
  • Seite 3 Modell, des Akkus und des Ladegerätes beachten, Elektronik vor Wasser schützen. Auf ausreichende Kühlung bei Regler und Akku achten. Die Anleitungen unserer Produkte dürfen nicht ohne ausdrückliche Erlaubnis der Multiplex Modellsport GmbH & Co. KG (in schriftlicher Form) - auch nicht auszugsweise in Print- oder elektronischen Medien reproduziert und / oder veröffentlicht werden.
  • Seite 4 Machen Sie sich mit dem Bausatz vertraut! MULTIPLEX – Modellbaukästen unterliegen während der Produktion einer ständigen Materialkontrolle. Wir hoffen, dass Sie mit dem Baukasteninhalt zufrieden sind. Wir bitten Sie jedoch, alle Teile (nach Stückliste) vor Verwendung zu prü- fen, da bearbeitete Teile vom Umtausch ausgeschlossen sind. Sollte ein Bauteil einmal nicht in Ordnung sein, sind wir nach Überprüfung gern zur Nachbesserung oder zum Umtausch bereit.
  • Seite 5 Wichtiger Hinweis Dieses Modell ist nicht aus Styropor ™! Daher sind Verklebungen mit Weißleim, Polyurethan oder Epoxy nicht möglich. Diese Kleber haften nur oberfl ächlich und platzen im Ernstfall einfach ab. Verwenden Sie nur Cyanacrylat-/Sekunden- kleber mittlerer Viskosität, vorzugsweise Zacki -ELAPOR® # 85 2727, der für ELAPOR® Partikelschaum optimierte und angepasste Sekundenkleber.
  • Seite 6 1. Vorbereitungen zum Bau des Modells 5. Verkleben des Rumpfes (pic. 11) Zum Bau des Modells Tucan benötigen Sie eine saube- Den fertig montierten M-Frame in die rechte Rumpfhälfte re, gerade Unterlage. An Werkzeugen sind erforderlich: positionieren, ausrichten und mit dem Schaumteil ver- scharfes Cuttermesser, mittelgroßer Kreuzschlitzschrau-...
  • Seite 7 13. Verkleben der Tragfl ächen mit dem Mittelstück Alle hierzu benötigten Teile fi nden Sie in dem Beutel „Fahr- (pic. 24) werkssatz Tucan“. Auf die Verbindungsfl ächen Kleber aufbringen. Tragfl äche rechts 8 von oben auf das Mittelstück 9 aufsetzen und Bohren Sie in die Kunststoff-Hauptfahrwerkshalterungen 62 ausrichten.
  • Seite 8 die Fahrwerke gemäß den Bildern an die Tragfl ächen 7&8 Sie noch die Pilotenfi guren # 73 3351 und # 73 3352 in das montieren, verwenden Sie dazu die Blechschrauben 67 Cockpit kleben. Rauhen Sie die Pilotenfi guren zum Kleben (2,9x9,5).
  • Seite 9 23. Montage der Abgasrohre (pic. 51) Die Abgasrohre, welche Sie vom Seitenleitwerk 11 abge- trennt haben, links und rechts am Rumpf in den hierfür vorgesehenen Vertiefungen positionieren, ausrichten und verkleben. 24. Montage des Empfängers (pic. 52) Der Empfänger wird mit einem Stück des beiliegenden Klettbandes 48 und 49 an der vorgegebenen Position festgeheftet.
  • Seite 10 Stückliste KIT und KIT+ Tucan # 21 4284 lfd. Nr Stück Bezeichnung Material Abmessungen Bauanleitung Tucan Papier DIN A4 Reklamationsbearbeitung Papier DIN A5 Dekorbogen A Tucan (Oben) Bedruckte Folie Fertigbogen Dekorbogen B Tucan (Unten) Bedruckte Folie Fertigbogen Schaumteile Rumpfhälfte links Tucan Elapor geschäumt...
  • Seite 11 Ø 1,3 x 510 mm Zusätzlich bei KIT+ Verlängerungskabel Kunststoff/ Metall 300 mm Servo Tiny-MG Kunststoff/ Metall 30 x 12 x 30 mm Servo Tiny-S Kunststoff/ Metall 30 x 12 x 30 mm Antriebssatz „Tucan & Mentor“ Li-BATT powered Seite 11...
  • Seite 12 UNDER THREE YEARS. CHOKING HAZARD! All the warnings in the OPERATING INSTRUCTIONS must be observed whenever the model is operated. Multiplex Modellsport GmbH & Co. KG accepts no liability for loss or damage or any kind which occurs as a result of incorrect operation or misuse of this product, including the accessories required for its operation.
  • Seite 13 Ensure that the speed controller and battery are adequately cooled. The instructions which accompany our products must not be reproduced and / or published, in full or in part, in print or any electronic medium, without the express written approval of Multiplex Modellsport GmbH & Co. KG. Seite 13...
  • Seite 14 Examine your kit carefully! MULTIPLEX model kits are subject to constant quality checks throughout the production process, and we sincerely hope that you are completely satisfi ed with the contents of your kit. However, we would ask you to check all the parts before you start construction, as we cannot exchange components which you have already worked on.
  • Seite 15 Paint must always be applied thinly and evenly, otherwise the component will warp. Then you really will have bent parts, and they will also be heavy and perhaps even unusable. We have found that matt-fi nish paints produce the best visual effect. Technical information Tucan Wingspan 1300 mm...
  • Seite 16 1. Preparations for building the model 5. Joining the fuselage shells (pic. 11) To build the Tucan you will need a clean, perfectly fl at table Position the assembled M-frame in the right-hand fuselage or building board. The following tools are required: sharp...
  • Seite 17 All the parts required for this stage can be found in the bag above, and position it carefully. It is a good idea to spray a marked “Tucan undercarriage set”. little activator on the surfaces to ensure that the joints cure quickly.
  • Seite 18 19. Installing the steerable fi xed noseleg unit (included Allow the glue to set for about ten minutes before removing it from the fuselage again. Complete the job by applying in the kit) (pic. 34-42) high-quality adhesive tape, e.g. insulating tape, all round Slip one collet 68 / 69 onto the noseleg.
  • Seite 19 25. Final assembly of the model Thread the Velcro tape 50 once through the bottom of the M-frame in the fuselage, forward of the wing retaining screw, and position it in such a way that it projects by the same length on both sides.
  • Seite 20 Parts List - Tucan KIT and KIT+ # 21 4284 Part Number Description Material Dimensions Tucan building instructions Paper DIN A4 Model complaint form Paper DIN A5 Tucan decal sheet A (top) Printed fi lm Tucan decal sheet B (bot.) Printed fi lm Foam parts Tucan L.H.
  • Seite 21 Socket-head cheesehead screw M3 x 16 Washer Metal 12 mm Ø, 3 mm Tucan aluminium motor bulkhead Die-cut aluminium Spacer pillar aluminium 6 Ø x 54- 2 x M3 Elapor 5/6 driver with M6 hex. Nut with 5mm shaft/6mm bore Undercarriage set L.H.
  • Seite 22 Lors de l’utilisation de votre modèle il est impératif de respecter toutes les indications relatives aux dangers décrits dans la NOTICE D’UTISATION. La société Multiplex Modellsport GmbH & Co. KG ne peut pas être tenue pour responsable concernant la perte ou tout type d’endommagement de votre modèle résultant à un abus ou une mauvaise utilisation de ce produit, ainsi que des accessoires.
  • Seite 23 Toute reproduction / publication sous forme papier ou électronique, même partielle, des notices de nos différents produits sont strictement interdit sauf par autorisation exclusive de le société Multiplex Modellsport GmbH & Co. KG (sous forme écrite).
  • Seite 24 Famillarisez-vous avec le kit d’assemblage! Les kits d’assemblages MULTIPLEX sont soumis pendant la production à des contrôles réguliers du matériel. Nous espérons que le contenu du kit répond à vos espérances. Nous vous prions de vérifi er le contenu (suivant la liste des pièces) du kit avant l’assemblage, car les pièces utilisées ne sont pas échangées.
  • Seite 25 MPX Primer # 602700, de telle manière à nettoyer le modèle. Les couches de laques ne doivent surtout pas être vapo- risées d’une manière trop épaisse et irrégulière, sinon le modèle se déforme. Celui-ci sera déformé, lourd et souvent même inutilisable! Des laques satinées procurent un plus bel effet optique. Données techniques Tucan Envergure: 1300 mm...
  • Seite 26 1. Préparation du modèle pour l’assemblage vous n’en avez pas il est également possible d’utiliser du vernis à ongle. Pour l’assemblage de votre modèle vous devez travailler sur une surface de travail propre et plane. Concernant les outils, il vous faut: un cutter bien affuté, tournevis cruciforme 5.
  • Seite 27 9. Collage de l’aile et de l’empennage sur le fuselage 13. Collage de l’aile et de la pièce centrale (pic. 24) (pic. 16 & 17) Appliquez de la colle sur la zone de jointure. Mettez en Positionnez la profondeur 10 sur le fuselage et collez place l’aile de droite 8 par le haut sur la pièce centrale 9 l’ensemble.
  • Seite 28 12. Toutes les pièces nécessaires pour cette étape se trouvent dans le sachet „kit de train d’atterrissage Tucan“. Pour la préparation du cockpit nous vous conseillons de laquer ceux-ci avec de la peinture en bombe ELAPOR- Percez respectivement un trou Ø...
  • Seite 29 22. Montage de l’hélice (pic. 49 & 50) Enlevez l’écrou de l’entraineur d’hélice 57, engagez une hélice équilibrée et mettez en place le support de cône en plastique 52. Remettez en place l’écrou sur l’entraineur, placez l’ensemble sur l’axe moteur et serrez fortement l’écrou.
  • Seite 30 pic. 01 Für Einziehfahrwerk / For retractable landing gear pic. 02 Seite 30...
  • Seite 31 pic. 03 pic. 04 Seite 31...
  • Seite 32 pic. 06 pic. 05 pic. 07 pic. 08 pic. 10 pic. 09 Seite 32...
  • Seite 33 pic. 11 pic. 12 pic. 13 pic. 14 pic. 15 pic. 16 Seite 33...
  • Seite 34 pic. 17 pic. 18 pic. 19 pic. 20 pic. 21 pic. 22 Seite 34...
  • Seite 35 pic. 23 pic. 24 pic. 25 pic. 26 pic. 27 pic. 28 Seite 35...
  • Seite 36 pic. 29 pic. 30 pic. 31 pic. 32 68 & 69 pic. 33 pic. 34 Seite 36...
  • Seite 37 68 & 69 68 & 69 pic. 35 pic. 36 68 & 69 100 mm 68 & 69 pic. 37 pic. 38 pic. 39 pic. 40 Seite 37...
  • Seite 38 pic. 41 pic. 42 pic. 44 pic. 43 pic. 46 pic. 45 Seite 38...
  • Seite 39 pic. 47 Drive set # 33 3663 pic. 48 Drive set # 33 3663 pic. 49 pic. 50 Sensor / MULTIlight Battery Motor pic. 51 pic. 52 Seite 39...
  • Seite 40 Liste de pièces KIT et KIT+ Tucan # 21 4284 Désignation Matériel Dimensions Numérotation Quantité continue Notice d‘assemblage Papier DIN A4 Formulaire de réclamation Papier DIN A5 Planche de décoration A Film Complet Planche de décoration B Film Complet Pièces en mousse Moitié...
  • Seite 41 Cylindre de blocage 4mm Métal Vis de serrage six pans Métal M 3 x 3 Tringle longue/ tringle de commande de servo BFW Tucan 1,5x151mm Clé d‘aile Tube fi bre de carbone Fibre de carbone Ø 8 x 5,4 x 470 Tube fi...
  • Seite 42 Sicurezza per gli aeromodelli MULTIPLEX Il modello NON È UN GIOCATTOLO nel senso comune del termine. Con la messa in funzione del modello l’utente dichiara di conoscere e aver capito il contenuto delle istruzioni per l’uso, in particolare le avvertenze sulla sicurezza, gli interventi di manutenzione, le limitazioni di funzionamento e i vizi.
  • Seite 43 Le istruzioni dei nostri prodotti non devono essere riprodotte e /o pubblicate senza espressa autorizzazione della Multiplex Modellsport GmbH & Co. KG (per iscritto) - neanche solo in parte né sotto forma di stampa né in formato elettronico. Seite 43...
  • Seite 44 Familiarizzate con il contenuto della scatola di montaggio! Le scatole di montaggio per modelli della MULTIPLEX vengono sottoposte costantemente a controlli del materiale du- rante la produzione. Speriamo che siate soddisfatti del contenuto della scatola di montaggio. Vi preghiamo tuttavia, di controllare tutte le parti (consultando la lista materiale) prima dell’utilizzo, visto che le parti già...
  • Seite 45 602700 come se voleste pulire il modello. Gli strati di vernice non devono essere in alcun caso troppo grossi o ir- regolari , altrimenti il modello si deforma. Diventa curvo, pesante e spesso perfi no inutilizzabile! Vernici opache danno spesso il miglior risultato estetico. Dati tecnici Tucan Apertura alare: 1300 mm...
  • Seite 46 Come alternativa potete anche prendere dello smalto 1. Preparazioni per costruire il modello per unghie. Per montare il modello Tucan avete bisogno di un appoggio pulito e piano. Avete bisogno dei seguenti utensili: taglierino tagliente, un cacciavite con punta a croce di media gran- 5.
  • Seite 47 Posizionare e incollare l‘impennaggio direzionale 11 alla fu- 13. Incollare le superfi ci alari con il il pezzo centrale soliera. Fare attenzione che l‘allineamento dell‘impennaggio (pic. 24) direzionale rispetto all‘impennaggio elevatore sia a forma di angolo retto. Applicare colla sulle superfi ci di collegamento. Poggiare e allineare la superfi...
  • Seite 48 Tutti i componenti necessari a tal scopo si trovano nel sac- cabina 45 (parte più spessa) a raso nella fusoliera. chetto „Set carrello Tucan“. Incollare l‘arresto della cabina 28 nella vasca del cockpit Praticare nei supporti del carrello principale in plastica 62 12 sulla parte anteriore nell‘apposita cavità.
  • Seite 49 22. Assemblaggio dell‘elica (pic. 49 & 50) Svitare il dado del mozzo dell‘elica 57 e poggiarci l‘elica equilibrata e quindi il supporto dell‘ogiva in plastica 52 . Av- vitare quindi il dado nuovamente sul mozzo, inserire questa unità sull‘albero motore e serrare bene il dado. Inserire ora l’ogiva in Elapor 13 sul supporto dell’ogiva 52.
  • Seite 50 Distinta base KIT e KIT+ Tucan # 21 4284 Designazione Materiale Dimensioni Numero Pezzo ascendente Istruzioni per il montaggio Carta DIN A4 Evasione reclamo modelli Carta DIN A5 Decal A Decal già fi nito Decal B Decal già fi nito...
  • Seite 51 Cavo prolunga uni 300mm Plastica/metallo 300 mm Servo Tiny-MG Plastica/metallo 30 x 12 x 30 mm Servo Tiny-S Plastica/metallo 30 x 12 x 30 mm Set di motorizzazione „Tucan & Mentor“ Li-BATT powered,Divers 374 x 128 x 63 Seite 51...
  • Seite 52 MENORES DE 3 AÑOS! ¡PELIGRO DE ASFIXIA! Al manejar el modelo deben respetarse todas las advertencias del MANUAL DE INSTRUCCIONES. Multiplex Modellsport GmbH & Co. KG no será responsable de las pérdidas y daños de cualquier tipo que puedan ocurrir debido a un manejo erróneo y/o indolente de este producto, incluyendo cualquiera de los accesorios necesarios para su uso.
  • Seite 53 Otros riesgos Incluso utilizando el modelo según las normas y respetando todos los aspectos de seguridad, siempre hay un riesgo determinado. Por tanto, un seguro de responsabilidad civil es obligatorio. En caso de que vaya a entrar en un club o una asociación, puede realizar la gestión del seguro por esa vía.
  • Seite 54 ¡Familiarícese con su Kit! Durante la producción, los materiales de los kits MULTIPLEX se someten a continuos controles. Esperamos que el contenido del kit sea de su agrado. Aun así, le rogamos, que compruebe que todas las piezas (según la lista de com- ponentes) están incluidas antes de empezar a montar, ya que cualquier pieza que haya sido manipulada no podrá...
  • Seite 55 Bajo ningún concepto debe aplicar gruesas capas o de manera irregular, podría estropear su modelo. ¡Se torcerá, se volverá pesado y a menudo hasta frágil! Con una pintura mate conseguirá los mejores resultados. Características técnicas Tucan Envergadura:...
  • Seite 56 1. Preparativos para el montaje del modelo ilustración. Compruebe que se consigue un pegado sin torceduras. Para montar el modelo Tucan necesitará una superfi cie plana y limpia. En cuanto a herramientas necesitará: Una 6. Preparar los horns (pic. 12) cuchilla afi...
  • Seite 57 Todas las piezas necesarias para ello las encontrará en la Inserte lateralmente el tubo de carbono 72 (Ø 8x370 mm.) bolsa „Tren de aterrizaje Tucan“. en la espuma y páselo a través de los agujeros del bloqueo de las alas. Remate con cuidado ambos extremos del tubo.
  • Seite 58 40. A continuación, fi je el soporte completo del tren de cola del fuselaje según la posición de la imagen 52. Ya que el 64 que ya ha montado con los tornillos rosca chapa 66. velcro adhesivo tiene una gran „fuerza de unión“, le reco- mendamos que aplique unas gotas de Zacki en los puntos Fije ahora el servo Tiny-MG # 6 5122 con el brazo el servo de pegado donde vaya a unirlo al fuselaje.
  • Seite 59 Lista de partes KIT y KIT+ Tucan # 21 4284 Ordinal Pieza Descripción Material Dimensiones Manual de instrucciones Tucan Papel Papel Hoja de reclamaciones de modelos Papel DIN A5 Lámina decorativa A Tucan Lámina preparada Lámina decorativa B Tucan Lámina preparada...
  • Seite 60 Plástico/Metal 300 mm. Servo Tiny-MG (UNI) Plástico/Metal 30 x 12 x 30 mm Servo Tiny-S (UNI) Plástico/Metal 30 x 12 x 30 mm. Kit de propulsión “Tucan / Mentor“ Li-BATT powered, Diverso 374 x 128 x 63 mm Seite 60...
  • Seite 61: Ersatzteile / Spare Parts

    Tragfl ächensatz Tucan mit CFK-Holmen / Wings Tucan with carbon fi ber tubes / Ailes Tucan avec des tubes de fi bre de carbone / Ali Tucan con tubi in fi bra di carbonio/ Alas Tucan con tubos de fi bra de carbono...
  • Seite 62 # 22 4289 Kleinteilesatz Tucan / Small items set Tucan / Set de petits accessoires Tucan / Minuteria Tucan / pequeñas piezas Tucan # 22 4290 Fahrwerkssatz Tucan / Under- carriage Tucan / Train dátter- rissage Tucan / Set Carrello...
  • Seite 63 Seite 63...
  • Seite 64 Seite 64...

Diese Anleitung auch für:

21 428426 4284