pichler Domino 2 Bedienungsanleitung
Quicklinks
Bedienungsanleitung
RTF (Mode 2):
RTF (Mode1):
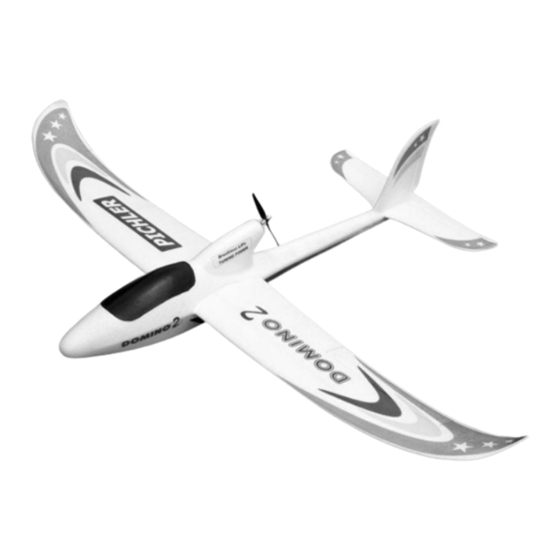
Technische Daten:
Spannweite:
1.420 mm
Länge:
960 mm
Abfluggewicht:
590 g
Flächeninhalt.
23,1 dm
Flächenbelastung:
25,5 g/ dm
Servos:
4 x Servo 9 g, 1,5 kg/cm
Akku (empf.):
LiPo 3S (11,1V), 1300 mAh
Motor:
D2604-kV 1950 Brushless
Außenläufer
Controller:
20 A Brushless Regler
Domino 2
# C6986
# C6987
2
2
Instruction Manual
PNP:
Specifications:
Specifications:
Wingspan:
Length:
Flying weight:
Total surface area:
Total surface area loading: 25,5 g/ dm²
Servos:
4 x Servo 9 g, 1,5 kg/cm
Battery (rec.):
Motor:
ESC:
# C6988
1.420 mm
960 mm
590 g
2
23,1 dm
LiPo 3S (11,1 V), 1300 mAh
D2604-kV 1950 Out runner
Brushless Motor
20A Brushless ESC

Verwandte Anleitungen für pichler Domino 2


Inhaltszusammenfassung für pichler Domino 2
- Seite 1 Instruction Manual Bedienungsanleitung Domino 2 RTF (Mode 2): # C6986 PNP: # C6988 RTF (Mode1): # C6987 Technische Daten: Specifications: Specifications: Spannweite: 1.420 mm Länge: 960 mm Wingspan: 1.420 mm Abfluggewicht: 590 g Length: 960 mm Flächeninhalt. 23,1 dm Flying weight: 590 g Flächenbelastung:...
- Seite 2 Dear customer, Congratulations on your choice of a factory-assembled model Domino 2 and thank you for placing your trust in us. Very little preparation work is required to get this model ready to fly. To operate your new model safely it is important to read through all the instructions and the safety information with your model, before you fly the Domino 2 for the first time.
- Seite 3 The radio control system To fly the 1400 mm Domino 2 glider you will need a radio control system with at least four channels. 2.4 GHz radios systems are recommended, similar to the unit included in our RTF version. The servos for the ailerons and the elevators are factory- installed.
- Seite 4 Bedienungsanleitung RTF (Mode 2) C6986 Instruction Manual RTF (Mode 1) C6987 Domino 2 PNP C6988 Kit contents (Abbildung ähnlich / Pictures may vary) Lieferumfang / Rumpf Fuselage Wing Set – One left and one right – Wing panel Tragflächen (rechte und linke Seite) Höhenleitwerk...
- Seite 5 By means of the speed control of the drive motor the speed and potential climb rate of the model are determined. The stronger the motor, the faster can fly the model and rise. The model Domino 2 is suitable for beginners, do not fly it too fast and too steep upward.
- Seite 6 Bedienungsanleitung RTF (Mode 2) C6986 Instruction Manual RTF (Mode 1) C6987 Domino 2 PNP C6988 Assembly of the Domino 2 Montage des Domino 2 / Abb. 1: Das Bild zeigt die linke Tragflächenhälfte sowie die Komponenten der Querruderanlenkung. Fig. 1: Photo shows One Left Wing Panel and Control Rods Set.
- Seite 7 Bedienungsanleitung RTF (Mode 2) C6986 Instruction Manual RTF (Mode 1) C6987 Domino 2 PNP C6988 Abb. 5: Abbildung 5 zeigt die fertigen Tragflächenhälften und das Verbin- dungsrohr. Fig. 5: The Photo show the main wing and carbon fiber tube are ready.
- Seite 8 Bedienungsanleitung RTF (Mode 2) C6986 Instruction Manual RTF (Mode 1) C6987 Domino 2 PNP C6988 Abb. 9: Abbildung 9 zeigt das fertige Höhenleitwerk. Fig. 9: The photo shows the horizontal tail are ready. Abb. 10: Das Bild zeigt, wie das Höhenleitwerk mit dem Rumpf verbunden wird.
- Seite 9 Bedienungsanleitung RTF (Mode 2) C6986 Instruction Manual RTF (Mode 1) C6987 Domino 2 PNP C6988 Abb. 13: Das Bild zeigt wie das Seitenleitwerk am Rumpf angebracht wird. Fig. 13: Photo show the vertical tail plug up to the fuselage. Abb. 14: Das Bild zeigt das fertig montierte Seitenleitwerk.
- Seite 10 Bedienungsanleitung RTF (Mode 2) C6986 Instruction Manual RTF (Mode 1) C6987 Domino 2 PNP C6988 Abb. 17: Befestigen Sie das Ruderhorn und schrauben es fest. Fig. 17: Fix control rods by screws. Abb. 18: Abbildung 18 zeigt die fertige Höhenruderanlenkung.
- Seite 11 Bedienungsanleitung RTF (Mode 2) C6986 Instruction Manual RTF (Mode 1) C6987 Domino 2 PNP C6988 Abb. 21: Abbildung 21 zeigt die fertige Ansicht der Seitenruderanlenkung. Fig. 21: The photo show the finised view. Abb. 22: Das Bild zeigt die beigefügten Reduzierungsringe. Bitte entnehmen Sie den passenden Ring, damit die Luftschraube auf der Motorwel- le richtig zentriert ist.
- Seite 12 Bedienungsanleitung RTF (Mode 2) C6986 Instruction Manual RTF (Mode 1) C6987 Domino 2 PNP C6988 Abb. 25: Dieses Bild zeigt den Luftschraubenaufnehmer. Fig. 25: Photo show the clamp of the propeller. Abb. 26: Setzen Sie die Luftschraube auf den Mitnehmer.
- Seite 13 Bedienungsanleitung RTF (Mode 2) C6986 Instruction Manual RTF (Mode 1) C6987 Domino 2 PNP C6988 Abb. 29: Bringen Sie das V-Kabel für die Querruder Servos am Empfänger Fig. 29: Connect the V-lead to the receiver. Abb. 30: Abbildung 30 zeigt das Anstecken des V-Kabels an das Tragflä- chenkabel.
- Seite 14 Bedienungsanleitung RTF (Mode 2) C6986 Instruction Manual RTF (Mode 1) C6987 Domino 2 PNP C6988 Abb. 33: Das Bild zeigt den eingesetzten Antriebsakku im Rumpf. Fig. 33: Photo shows the battery is installed in the fuslage. Abb. 34: Abbildung 34 zeigt das Anstecken der Akkukabel an den Motorcon- troller.
- Seite 15 Bedienungsanleitung RTF (Mode 2) C6986 Instruction Manual RTF (Mode 1) C6987 Domino 2 PNP C6988 Abb. 37: Das Foto zeigt das fertig gestellte Modell. Gratulation! Sie haben das Modell erfolgreich fertigestellt. Holm- und Rippenbruch! Fig. 37: Photo show the finished view. Congratulations, you hve completed the assembly process.
- Seite 16 Bedienungsanleitung RTF (Mode 2) C6986 Instruction Manual RTF (Mode 1) C6987 Domino 2 PNP C6988 Prüfen Sie, ob die Servos den richtigen Empfängerausgängen zugeordnet sind und ob die richtigen Ruder vom Sender angesteuert werden. Sollte das nicht der Fall sein, tauschen Sie die Servostecker am Empfän- ger.
- Seite 17 Switch the motor on, and launch the airplane strongly into the wind, with the fuselage and wings level. Allow the Domino 2 glider to fly straight and level initially; don’t try to turn it when it is close to ground.
- Seite 18 Flugsimulator für PC / Flight Simulator for PC Flightstabilizer System AX3 Wir wünschen Ihnen viel Spaß und Erfolg mit Ihrem Domino 2. We wish you many safe and enjoyable flights with your Domino 2. Irrtümer und Änderungen stets vorbehalten. Abbildungen und Lieferumfang können abweichen.