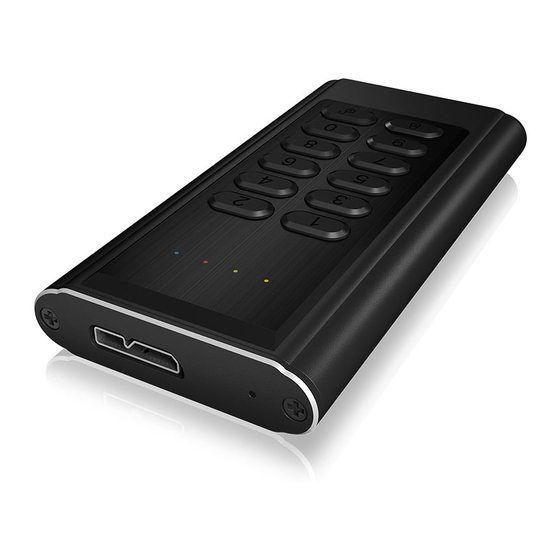
Icy Box IB-189U3 Handbuch
Quicklinks
Manual / Handbuch: IB-189U3
Manual: IB-189U3
Main Features
•
Strong AES 256-bit Hardware Encryption
1.
•
m.2 SATA SSD up to 42 mm length, B-key or B+M-key
2.
•
Encrypts all data on the drive in real-time
3.
•
Built-in independent keypad for password input
4.
(up to 12-digit PIN Password)
•
USB 3.0, microUSB interface to USB Type-A at host PC
•
Backwards compatible with USB 2.0 and 1.1
Package content
IB-189U3, Silicone sleeve, USB 3.0 cable (microUSB to Type-A),
Screw driver, Manual
5.
SSD M.2 installation
Step 1: Take out the two screws on the back, and then pull out the key-
board panel from the aluminium-shell.
6.
7.
1.
Password creating or changing indicator (orange) /
Anzeige für Passworterstellung und –wechsel (orange)
2.
Unlock and button pressed indicator (green) /
Entsperranzeige und Tastenverwendung (grün)
Step 2: Insert the SSD to NGFF connector on the PCBA corresponding. Fix
3.
Lock and error indicator (red) / Sperr- und Fehleranzeige (rot)
it by the screw
4.
Power and data access indicator (blue) /
Strom- und Datenzugriffsanzeige (blau)
5.
Lock button / Sperrtaste
6.
Unlock button / Entsperrtaste
7.
Number buttons / Zahlentasten
1.
1.
USB 3.0, MicroUSB interface / USB 3.0, MicroUSB Schnittstelle
Manual: IB-189U3
Manual: IB-189U3
Step 3: Insert the keyboard panel into the aluminium-shell. Close the rear
Change password operation
cover and fix it by two screws. SSD Installation completed
Step 1: Keep press „Lock" button, and then connect Encrypted SSD enclo-
sure to computer by USB cable.
Step 2: Keep press „Lock" button wait for 10 seconds until the red LED and
orange LED bright at the same time, then loosen „Lock" button.
Step 3: Enter existing password, then press „Unlock" button to confirm it,
at this time the orange LED goes off.
Step 4: Enter NEW password, then press „Unlock" button to confirm it.
Step 5: Enter NEW password again, then press „unlock" button to confirm it.
Step 6: At this time, red LED goes off, green LED bright, now it changed
the password successfully.
The LED indicators
Additional Information
1.
Blue LED continuously brightens when the device is powered on, and
Unlock the device
blink when in the data access mode.
1.
Connect the device via USB cable to the host of computer, and wait
2.
Green LED blink 1 time when presses the button, and continuously
until blue and red LED light keep continuous bright.
brighten when the disk is unlocked.
2.
Enter existing password, then press „Unlock" button (6) to confirm it.
3.
Orange LED continuous brightens when user mode for password crea-
3.
At this time the red LED light goes off, then green LED light bright and
ting or password changing is active, and turns off when the new pass-
you can access your drive as usual.
word is completed to create or the old password keyed in is correct.
4.
Red LED blinks when the password or operation is incorrectly. It does
Lock the device
continuously brighten for lock mode, and turn off after unlock.
•
by „unmounting" the device
•
Keep press „Lock" button (5) for a second until blue and red LED light
Set-up password operation
keep continuous bright.
Step 1: Install a new disk or used disk without data.
Attention!
Note! Please backup your data of old SSD first. All the data on a used SSD
If the password is entered incorrectly more than 99 times, the data at the
would be lost after set-up.
installed HDD/SSD are blocked permanently for security reasons and not
Step 2: Keep press buttons "1" and "3" at the same time, then plug the
accessible anymore.
USB cable into the host of computer,
and wait for 10 seconds until blue and red LED light keep continuous bright.
Step 3: Keep press „Lock" button for 10 seconds until the Orange LED light
keep continuous bright.
Step 4: Enter your password (1~12 digits), then press „Unlock" button to
confirm it.
Step 5: Enter the password again (the same as first time), then press
„Unlock" button to confirm it.
At this time the red LED light goes off, then green LED light bright, it means
successfully set up password.
Note! Make a note of your password and store it in a safe place to prevent
misuse. It's not possible to restore the disk, if you lost the password. For this
reason, we recommend to backup your data of encrypted disk periodically.
Step 6: Complete the setting inside Disk management of your system.
Handbuch: IB-189U3
Handbuch: IB-189U3
Hauptmerkmale
Schritt 3: Schieben Sie die Tasteneinheit wieder in das Aluminiumgehäuse
•
Starke AES 256-bit Hardware Verschlüsselung
herein und schließen die Abdeckung mittels der beiden Schrauben. Die M.2
•
m.2 SATA SSD bis zu 42 mm Länge, B-key oder B+M-key
SSD Installation ist abgeschlossen.
•
Verschlüsselt alle Daten auf der Festplatte in Echtzeit
•
Integriertes Tastenfeld für sichere Passworteingabe (bis zu 12-stelli-
ges PIN Passwort)
•
Beschützt und sichert Ihre wertvollen Daten
•
USB 3.0 Host, abwärtskompatibel mit USB 2.0 und 1.1
Verpackungsinhalt
IB-189U3, Silikon Schutzhülle, USB 3.0 Kabel (microUSB zu Type-A),
Schraubendreher, Handbuch
Laufwerkseinbau
LED Anzeige
Schritt 1: Entfernen Sie die beiden Schrauben auf der Rückseite und schie-
1.
Die blaue LED leuchtet durchgehend, wenn das Gerät per USB mit
ben dann die Tasteneinheit aus dem Aluminiumgehäuse heraus.
Strom versorgt wird, und blinkt bei Datenzugriff.
2.
Die grüne LED blinkt bei Tastendruck einmal auf, und leuchtet durch-
gehend, wenn das Gerät entsperrt ist.
3.
Die orange LED leuchtet durchgehend, wenn der Modus für Passwort
setzen oder ändern aktiv ist, und erlischt, wenn das neue Passwort
gesetzt wurde oder die alte Passworteingabe korrekt war.
4.
Die rote LED blinkt, wenn das Passwort falsch eingegeben wurde,
oder eine andere Fehlbedienung vorgenommen wurde. Sie leuchtet
durchgehend, wenn das Gerät gesperrt ist und erlischt nach dem ent-
sperren.
Vorgehensweise zur Passworteinrichtung
Schritt 1: Installieren Sie ein neues Laufwerk oder verwenden ein benutz-
Schritt 2: Setzen Sie die M.2 SSD in der richtigen Ausrichtung in den m.2
tes Laufwerk ohne Dateninhalt.
Anschluss wie unten dargestellt ein und fixieren diese mittels der Schraube.
Hinweis! Bitte sichern Sie erst alle Daten, wenn Sie ein benutztes Laufwerk
verwenden. Alle Daten auf dem Laufwerk gehen während des Einrichtungs-
vorganges verloren.
Schritt 2: Halten Sie die Tasten 1 und 3 gedrückt und stecken währenddes-
sen das USB Kabel an Ihren laufenden Computer und warten bis die blaue
und die rote LED durchgehend leuchten.
Schritt 3: Halten Sie nun die "Sperrtaste" für etwa 10 Sekunden gedrückt,
bis die orange LED durchgehend leuchtet.
Schritt 4: Geben Sie Ihr Passwort ein (1 - 12 Zahlen) und drücken an-
schließend die „Entsperr" Taste um die Eingabe zu bestätigen.
Schritt 5: Geben Sie Ihr Passwort erneut ein (das Gleiche wie vorher) und
drücken anschließend die „Entsperr" Taste um die Eingabe zu bestätigen.
Nun erlischt die rote LED und die grüne LED leuchtet auf und zeigt damit die
erfolgreiche Passworteinrichtung an.
Hinweis! Notieren Sie sich das gewählte Passwort und legen es an einer
sicheren Stelle ab, damit kein Missbrauch möglich ist. Es ist NICHT möglich
Handbuch: IB-189U3
Εγχειρίδιο: IB-189U3
die Festplatteninhalte wiederherzustellen, wenn Sie das Passwort vergessen
Περιεχόμενα συσκευασίας
und/oder verloren haben. Aus diesem Grunde empfehlen wir zusätzlich in
IB-189U3, θήκη σιλικόνης, καλώδιο USB 3.0 (MicroUSB - Type-A),
regelmäßigen Abständen ein Backup der verschlüsselten Daten zu erstellen.
κατσαβίδι, οδηγίες χρήσης
Schritt 6: 4. Schließen Sie die Einrichtung des Laufwerks unter der Daten-
trägerverwaltung Ihres Betriebssystems ab (initialisieren und formatieren).
Οι λυχνίες LED
1.
Η μπλε λυχνία LED ανάβει συνεχώς όταν η συσκευή είναι ενεργοποιημένη
Vorgehensweise zur Passwortänderung
και αναβοσβήνει κατά τη λειτουργία πρόσβασης σε δεδομένα.
Schritt 1: Halten Sie die Sperrtaste gedrückt und schließen dann das ver-
2.
Η πράσινη λυχνία LED αναβοσβήνει 1 φορά όταν πατάτε το κουμπί και
schlüsselte Gerät per USB Kabel an Ihren Computer an.
ανάβει συνεχώς όταν ο δίσκος δεν είναι κλειδωμένος.
Schritt 2: Halten Sie die Sperrtaste weiterhin für etwa 10 Sekunden ge-
3.
Η πορτοκαλί λυχνία LED ανάβει συνεχώς όταν είναι ενεργή η
drückt, bis die rote und orange LED gleichzeitig leuchten und lassen dann
λειτουργία χρήστη για τη δημιουργία ή την αλλαγή του κωδικού
die Taste los.
πρόσβασης και σβήνει όταν έχει ολοκληρωθεί η δημιουργία του
Schritt 3: Geben Sie nun das vorhandene Passwort ein und drücken an-
νέου κωδικού πρόσβασης ή όταν ο παλαιός κωδικός πρόσβασης που
schließend die „Entsperr" Taste um die Eingabe zu bestätigen. Nun erlischt
πληκτρολογήθηκε είναι σωστός.
die orange LED.
4.
Η κόκκινη λυχνία LED αναβοσβήνει όταν ο κωδικός πρόσβασης
Schritt 4: Geben Sie nun das neue Passwort ein und drücken anschließend
ή η λειτουργία είναι λανθασμένα. Ανάβει συνεχώς σε λειτουργία
die „Entsperr" Taste um die Eingabe zu bestätigen.
κλειδώματος και σβήνει μετά το ξεκλείδωμα.
Schritt 5: Geben Sie nun das neue Passwort erneut ein und drücken an-
schließend die „Entsperr" Taste um die Eingabe zu bestätigen.
Λειτουργία καθορισμού κωδικού πρόσβασης
Schritt 6: Nun erlischt die rote LED und die grüne LED leuchtet auf und
Βήμα 1: Εγκαταστήστε έναν νέο σκληρό δίσκο ή έναν μεταχειρισμένο
zeigt damit die erfolgreiche Passwortänderung an.
σκληρό δίσκο που δεν περιέχει δεδομένα.
Σημείωση! Πρώτα δημιουργήστε εφεδρικό αντίγραφο των δεδομένων του
Zusatzinformation
μεταχειρισμένου σκληρού δίσκου. Όλα τα δεδομένα σε μεταχειρισμένους
Gerät entsperren
σκληρούς δίσκους θα χάνονται μετά τη διαμόρφωση.
1.
Verbinden Sie das Gerät per USB Kabel mit Ihrem Rechner und war-
Βήμα 2: Πατήστε τα πλήκτρα «1» και «3» ταυτόχρονα και μετά συνδέστε το
ten bis die blaue und die rote LED durchgehend leuchten.
καλώδιο USB στον υπολογιστή και περιμένετε 10 δευτερόλεπτα έως ότου η
2.
Geben Sie das zuvor festgelegte Passwort ein und drücken die Ent-
μπλε και η κόκκινη ενδεικτικές λυχνίες είναι συνεχώς αναμμένες.
sperrtaste (6)
Βήμα 3: Συνεχίστε να πατάτε το πλήκτρο «Lock» (Κλείδωμα) για 10
3.
Nun erlischt die rote LED und die grüne LED leuchtet auf und Sie
δευτερόλεπτα έως ότου η πορτοκαλί λυχνία LED ανάβει συνεχώς.
können den Datenträger wie gewohnt verwenden.
Βήμα 4: Εισαγάγετε τον κωδικό πρόσβασής σας (1 έως 12 ψηφία) και μετά
πατήστε το πλήκτρο «Unlock» (Ξεκλείδωμα) για να τον επιβεβαιώσετε.
Gerät sperren
Βήμα 5: Εισαγάγετε ξανά τον κωδικό πρόσβασης (τον ίδιο που εισαγάγατε
•
durch „auswerfen" des Gerätes
την πρώτη φορά) και μετά πατήστε το πλήκτρο «Unlock» (Ξεκλείδωμα) για
•
durch Drücken und kurz halten der Sperrtaste (5) bis die blaue und
να τον επιβεβαιώσετε.
die rote LED durchgehend leuchten.
Στη συνέχεια, η κόκκινη λυχνία LED σβήνει και ανάβει η πράσινη λυχνία LED,
ACHTUNG!
κάτι που σημαίνει ότι ο καθορισμός του κωδικού πρόσβασης ήταν επιτυχής.
Falls das Passwort mehr als 99 Mal falsch eingegeben wird, sind die Daten
Σημείωση! Σημειώστε τον κωδικό πρόσβασής σας και αποθηκεύστε τον σε
auf der installierten Festplatte/SSD aus Sicherheitsgründen unwiderruflich
ασφαλές σημείο για να αποτρέψετε τυχόν κατάχρησή του. Δεν είναι δυνατή
gesperrt und nicht wieder herstellbar.
η επαναφορά του σκληρού δίσκου εάν χάσετε τον κωδικό πρόσβασης.
Για τον λόγο αυτό, συνιστάται η δημιουργία αντιγράφων ασφαλείας των
δεδομένων του κρυπτογραφημένου δίσκου σας σε περιοδική βάση.
Βήμα 6: Ολοκληρώστε τη ρύθμιση στη «Διαχείριση δίσκου» του συστήματός σας.
Λειτουργία αλλαγής κωδικού πρόσβασης
Βήμα 1: Κρατήστε πατημένο το πλήκτρο «Lock» (Κλείδωμα) και μετά
Handbuch: IB-189U3
συνδέστε το περίβλημα κρυπτογραφημένου σκληρού δίσκου σε υπολογιστή
μέσω καλωδίου USB.
Manual: IB-189U3
Βήμα 2: Συνεχίστε να πατάτε το πλήκτρο «Lock» (Κλείδωμα) για 10
δευτερόλεπτα έως ότου η κόκκινη και η πορτοκαλί λυχνίες ανάψουν
ταυτόχρονα και μετά αφήστε το.
USB 3.0 Keypad Encrypted Enclosure
Βήμα 3: Εισαγάγετε τον υφιστάμενο κωδικό πρόσβασης και μετά πατήστε
το πλήκτρο «Unlock» (Ξεκλείδωμα) για να τον επιβεβαιώσετε, οπότε και η
πορτοκαλί λυχνία LED θα σβήσει.
Handbuch
Βήμα 4: Εισαγάγετε έναν ΝΕΟ κωδικό πρόσβασής σας και μετά πατήστε το
USB 3.0 Gehäuse mit Tastenverschlüsselung
πλήκτρο «Unlock» (Ξεκλείδωμα) για να τον επιβεβαιώσετε.
Βήμα 5: Εισαγάγετε ξανά τον ΝΕΟ κωδικό πρόσβασης και μετά πατήστε το
Manuel
πλήκτρο «Unlock» (Ξεκλείδωμα) για να τον επιβεβαιώσετε.
Boîtier de lecteur SSD chiffré avec clavier USB 3.0
Βήμα 6: Στη συνέχεια, η κόκκινη λυχνία LED σβήνει, η πράσινη λυχνία LED
ανάβει και ο κωδικός πρόσβασης έχει αλλάξει επιτυχώς.
Manuale
USB 3.0 Keypad Encrypted Enclosure
Πρόσθετες πληροφορίες
Εάν ο κωδικός πρόσβασης εισαχθεί λάθος περισσότερες από 99 φορές, τότε
Manual
τα δεδομένα στον εγκατεστημένο δίσκο HDD/SSD θα αποκλειστούν οριστικά
Carcasa de unidad de disco duro cifrado con teclado USB 3.0
για λόγους ασφαλείας και δεν θα είναι πλέον προσβάσιμα.
Handleiding
USB 3.0 Keypad Encrypted SSD Enclosure
Podręcznik obsługi
Szyfrowana obudowa na dyski twarde USB 3.0 z klawiaturą
Návod k použití
Kryt na klávesnici pro šifrovanou jednotku pevného disku USB 3.0
Használati utasítás
USB 3.0 Billentyűzetes Kódolt Merevlemez Tok
Εγχειρίδιο
Περίβλημα σκληρού δίσκου USB 3.0 με πληκτρολόγιο ρυπτογράφησης

Verwandte Anleitungen für Icy Box IB-189U3


Inhaltszusammenfassung für Icy Box IB-189U3
- Seite 1 Starke AES 256-bit Hardware Verschlüsselung herein und schließen die Abdeckung mittels der beiden Schrauben. Die M.2 und/oder verloren haben. Aus diesem Grunde empfehlen wir zusätzlich in IB-189U3, θήκη σιλικόνης, καλώδιο USB 3.0 (MicroUSB - Type-A), μέσω καλωδίου USB. Manual: IB-189U3 •...
- Seite 2 Megjegyzés! Régi merevlemezén lévő adatairól először készítsen biztonsá- Étape 1 : Installez un lecteur SSD neuf ou un lecteur SSD déjà utilisé mais IB-189U3, Capa de silicone, Cavo USB 3.0 (microUSB - Ty- Fase 4: Immettere la NUOVA password, premere il pulsante „Sblocca“ per En el mismo momento en que el indicador LED rojo se apague, el indicador LED ver- woord correct is.