Herunterladen Inhalt Inhalt Diese Seite drucken
Medion LIFE P82009 Bedienungsanleitung

Medion LIFE P82009 Bedienungsanleitung

Scanner 3 in 1 mit lcd
Inhaltsverzeichnis

Werbung

Verfügbare Sprachen

Verfügbare Sprachen

Escáner 3 en 1 con LCD
Scanner 3 in 1 with LCD
Scanner 3 in 1 mit LCD
MEDION® LIFE®
P82009 (MD 86372)
Manual de instrucciones
Instruction manual
Bedienungsanleitung

Werbung

Inhaltsverzeichnis
loading

Inhaltszusammenfassung für Medion LIFE P82009

  • Seite 1 Escáner 3 en 1 con LCD Scanner 3 in 1 with LCD Scanner 3 in 1 mit LCD MEDION® LIFE® P82009 (MD 86372) Manual de instrucciones Instruction manual Bedienungsanleitung...
  • Seite 2: Inhaltsverzeichnis

    Índice   Acerca de las presentes instrucciones ..........3 Los símbolos y palabras de advertencia utilizados en este manual de   instrucciones ....................3   Uso conforme a lo prescrito ................4   Indicaciones de seguridad ..............5 El uso de este aparato comporta peligros para los niños y las personas  ...
  • Seite 3   Modo de diapositivas/negativos ............17   Escanear diapositivas/negativos ..............17   Menú de configuración del modo de diapositivas/negativos ....... 18   Modo de reproducción ..............22   Transferir los datos al ordenador ............ 25   Instalación del software ..............26  ...
  • Seite 4: Acerca De Las Presentes Instrucciones

    Acerca de las presentes instrucciones Antes de la puesta en marcha del aparato, lea atentamente las presentes advertencias de seguridad. Preste atención a las advertencias que aparecen en el propio aparato y en las instrucciones de funcionamiento. Mantenga siempre a su alcance las instrucciones de funcionamiento. Si vende o cede el aparato a otra persona, entréguele sin falta también las presentes instrucciones y la tarjeta de garantía.
  • Seite 5: Uso Conforme A Lo Prescrito

    Uso conforme a lo prescrito Este aparato sirve para digitalizar sus diapositivas o negativos. Las imágenes registradas se transfieren a un ordenador para seguir procesándolas y se guardan ahí. Con el software suministrado podrá modificar las imágenes registradas en formato digital. El aparato ha sido diseñado sólo para uso particular y no para fines comerciales.
  • Seite 6: Indicaciones De Seguridad

    Indicaciones de seguridad El uso de este aparato comporta peligros para los niños y las personas discapacitadas. Este aparato no ha sido concebido para ser utilizado por personas (incluyendo niños) con discapacidades físicas, sensoriales o psíquicas, o por aquéllas que no tengan la suficiente experiencia o conocimientos, a no ser que, para su propia seguridad, sean supervisadas por una persona responsable o reciban de ella las correspondientes instrucciones sobre su utilización.
  • Seite 7: Temperatura Ambiental

    No intente en ningún caso abrir o reparar usted mismo el aparato. ¡Existe riesgo de descarga eléctrica!  Con el fin de evitar accidentes, en caso de mal funcionamiento del aparato diríjase al Medion Service Center o a otro taller especializado.
  • Seite 8: Volumen De Suministro

    Volumen de suministro Compruebe que el suministro esté completo, y, si no fuera éste el caso, avísenos dentro de un plazo de 14 días después de su compra. Con el pack adquirido ha recibido:  Escáner digital  Cepillo de limpieza ...
  • Seite 9: Esquema Del Aparato

    Esquema del aparato Ranura para el soporte de fotos Ranura para el soporte de diapositivas/negativos Tecla EV: Ajuste del valor de exposición; en el menú: salida del menú Tecla COPY/ENTER: En modo de escaneo: inicio del proceso de escaneo; en el menú: confirmación de la selección Ranura para tarjetas SD/SDHC Conector USB Salida AV...
  • Seite 10: Puesta En Funcionamiento

    Puesta en funcionamiento Conexión a la corriente  Conecte el cable USB con el adaptador de red USB.  Enchufe el adaptador de red en una toma de corriente de fácil acceso.  Conecte la miniclavija USB con el conector USB del frontal del aparato. ¡NOTA! Siempre que se conecta el aparato a la corriente eléctrica se pone en marcha el aparato automáticamente.
  • Seite 11: Funcionamiento

    Funcionamiento Aspectos generales Manipule las fotos, diapositivas y negativos con especial cuidado. Cualquier impureza, arañazo y huella quedarán claramente visibles al escanearlos. Por ello debería evitar tocar la superficie de la imagen. Si es posible, limpie cuidadosamente los soportes antes de insertarlos en el escáner. Escanear fotos ...
  • Seite 12: Diapositivas Y Negativos

    Diapositivas y negativos  Abra el soporte de diapositivas/negativos e inserte las diapositivas o negativos. Desde su ángulo de visión, los soportes deben estar en la posición correcta (es decir, no invertidos).  Cierre el soporte de diapositivas/negativos e insértelo en la ranura para diapositivas del lado derecho del aparato.
  • Seite 13: Corrección De La Exposición

    ¡NOTA! El soporte de negativos cumple el estándar ISO. En caso de un formato no estandarizado, los orificios de transporte de una película podrían no coincidir con el soporte de negativos. En tal caso, podrían generarse bandas negras en el escaneo que, no obstante, pueden eliminarse fácilmente con un software de edición de imágenes.
  • Seite 14: Modo De Fotografía

    Modo de fotografía Escanear fotos  Si es necesario, encienda el escáner de diapositivas.  Extraiga por completo la unidad de escaneo con la pantalla y coloque el conmutador de modo en la posición PHOTO para escanear fotos.  Inserte una foto en el soporte de fotos correspondiente, tal como se describe en el capítulo “...
  • Seite 15: Menú De Configuración Del Modo De Fotografía

    Funcionamiento”, página 10, e inserte el soporte en la ranura de la parte superior del aparato. El tamaño de la foto que se va a escanear se reconoce automáticamente y se ajusta en función del soporte de fotos utilizado.  Ajuste la corrección de la exposición correspondientemente; para ello, pulse la tecla y seleccione un valor entre +2.0 y -2.0.
  • Seite 16  Seleccione la norma NTSC o PAL con las teclas PLAYBACK y MENU, y confirme la selección con la tecla COPY/ENTER.
  • Seite 17: Corrección De La Exposición

    Corrección de la exposición Seleccione en esta opción el valor de exposición adecuado para la captura.  Pulse la tecla para ajustar la corrección de la exposición o elija la opción EV en el menú de configuración del modo de escaneo correspondiente. ...
  • Seite 18: Modo De Diapositivas/Negativos

    Modo de diapositivas/negativos Escanear diapositivas/negativos  Si es necesario, encienda el escáner de diapositivas.  Inserte por completo la unidad de escaneo con la pantalla y coloque el conmutador de modo en la posición FILM para escanear diapositivas o negativos. ...
  • Seite 19: Menú De Configuración Del Modo De Diapositivas/Negativos

    Funcionamiento”, página 10, e inserte el soporte en la ranura del lado derecho del aparato.  Pulse ahora la tecla MENU y seleccione la opción Tipo de película.  Indique aquí si desea escanear diapositivas, una tira de imágenes en blanco y negro o una tira de negativos.
  • Seite 20: Tipo De Película

    Modo de captura (HOME) Con esta opción volverá al modo de captura. Tipo de película  Establezca con esta opción el tipo de película de la imagen que va a escanear. Podrá seleccionar entre diapositivas, película en blanco y negro, y película negativa.
  • Seite 21 Formateo Con esta opción se formatea la memoria interna o la tarjeta de memoria (si hay una insertada).   Seleccione ( ) para formatear la memoria o (X) para cancelar el proceso. Salida de TV Seleccione la norma de televisión del televisor que tenga conectado. ...
  • Seite 22 Corrección de la exposición Seleccione en esta opción el valor de exposición adecuado para la captura.  Pulse la tecla para ajustar la corrección de la exposición o elija la opción EV en el menú de configuración del modo de escaneo correspondiente. ...
  • Seite 23: Modo De Reproducción

    Modo de reproducción En el modo de reproducción se pueden observar, girar, borrar y copiar las imágenes escaneadas.  Pulse la tecla PLAYBACK para iniciar el modo de reproducción.  Con las teclas PLAYBACK y MENU se puede ir de una captura a otra. ...
  • Seite 24: Borrar Todo

    Borrar Seleccione esta opción para borrar la imagen visualizada. Borrar todo Con esta opción se borran todas las imágenes guardadas. Girar 90° (en sentido antihorario) Con esta opción se puede girar la imagen escaneada 90° en sentido antihorario. Esta opción se puede repetir tantas veces como se desee.
  • Seite 25 Girar 90° (en sentido horario) Con esta opción se puede girar la imagen escaneada 90° en sentido horario. Esta opción se puede repetir tantas veces como se desee. Copiar en una tarjeta SD Esta opción permite copiar en una tarjeta SD todas las imágenes escaneadas que haya en la memoria interna.
  • Seite 26: Transferir Los Datos Al Ordenador

    Transferir los datos al ordenador Para transferir las capturas de la memoria interna, el escáner ofrece dos posibilidades. Copiar todos los datos de la memoria interna en una tarjeta SD y utilizar ésta para transferir los datos. Conectar el escáner al ordenador con el cable USB suministrado. Si conecta el escáner directamente al ordenador mediante USB, se reconocerá...
  • Seite 27: Instalación Del Software

    Instalación del software El programa suministrado es “ArcSoft MediaImpression”, un programa con el que se pueden editar las imágenes posteriormente. Tenga en cuenta los siguientes puntos para instalar el programa correctamente: ¡ATENCIÓN! Al instalar programas o controladores pueden quedar sobrescritos y/o modificados algunos archivos importantes.
  • Seite 28: Limpieza Y Mantenimiento

    Limpieza y mantenimiento Limpieza  Limpie la carcasa con un paño húmedo.  Utilice el cepillo de limpieza suministrado para limpiar el campo de escaneo de dentro.  Elimine con cuidado el polvo que haya en el campo de escaneo con la superficie aterciopelada del cepillo.
  • Seite 29: Eliminación

    Eliminación Embalaje Su aparato está embalado para protegerlo contra eventuales daños durante el transporte. Los embalajes están hechos a partir de materiales que pueden desecharse de forma ecológica y ser entregados al circuito de reciclaje. Aparato No tire bajo ningún concepto el aparato al final de su vida útil a la basura doméstica normal.
  • Seite 30: Especificaciones Técnicas

    Especificaciones técnicas Escáner Conexión USB 1.1 Sensor de imágenes Sensor CMOS de 5 megapíxeles Diafragma F = 5,5 Monitor LCD Pantalla LCD de 6,1 cm / 2,4" Resolución de escaneo 1.800 dpi (3.600 dpi interpolados) Dimensiones (largo x altura x anchura) 235 x 165 x 160 mm Memoria gráfica: Memoria interna de 32 MB...
  • Seite 32 Inhaltsverzeichnis ES    Hinweise zu dieser Anleitung ............3   In dieser Anleitung verwendete Symbole und Signalwörter ......3   Bestimmungsgemäßer Gebrauch ..............4 EN    Sicherheitshinweise ................5 Gefahren für Kinder und Personen mit eingeschränkter Fähigkeit, Geräte zu   bedienen ......................
  • Seite 33   Dia- / Negativ-Modus ............... 16   Dia/Negativ scannen ................... 16   Einstellungsmenü Dia-/Negativ-Modus ............16   Wiedergabe Modus ................20   Übertragen der Daten auf den Computer ........23   Installation der Software ..............24   Reinigung & Wartung ..............25  ...
  • Seite 34: Hinweise Zu Dieser Anleitung

    Hinweise zu dieser Anleitung ES  Lesen Sie vor Inbetriebnahme die Sicherheitshinweise aufmerksam durch. Beachten Sie die Warnungen auf dem Gerät und in der Be- dienungsanleitung. Bewahren Sie die Bedienungsanleitung immer in Reichweite auf. EN  Wenn Sie das Gerät verkaufen oder weiter geben, händigen Sie unbedingt auch diese Anleitung und die Garantiekarte aus.
  • Seite 35: Bestimmungsgemäßer Gebrauch

    Bestimmungsgemäßer Gebrauch Dieses Gerät dient zur Digitalisierung Ihrer Dias oder Negative. Die Aufzeich- nungen werden auf einen Computer zur Weiterverarbeitung übertragen und dort gespeichert. Mit der mitgelieferten Software können Sie die Aufzeichnun- gen in digitaler Form verändern. Das Gerät ist nur für den privaten Gebrauch bestimmt und nicht zur gewerbli- chen Nutzung geeignet.
  • Seite 36: Sicherheitshinweise

    Sicherheitshinweise ES  Gefahren für Kinder und Personen mit eingeschränkter Fähigkeit, Geräte zu bedienen Dieses Gerät ist nicht dafür bestimmt, durch Personen (einschließlich Kinder) EN  mit eingeschränkten physischen, sensorischen oder geistigen Fähigkeiten oder mangels Erfahrung und/oder mangels Wissen benutzt zu werden, es sei denn, sie werden durch eine für Ihre Sicherheit zuständige Person beaufsichtigt oder erhielten von Ihnen Anweisungen, wie das Gerät zu benutzen ist.
  • Seite 37: Umgebungstemperatur

    Versuchen Sie auf keinen Fall, das Gerät selbst zu öffnen oder zu reparieren. Es besteht die Gefahr des elektrischen Schlags!  Wenden Sie sich im Störungsfall an das Medion Service Center oder eine andere geeignete Fachwerkstatt, um Gefährdungen zu vermeiden.
  • Seite 38: Lieferumfang

    Lieferumfang ES  Bitte überprüfen Sie die Vollständigkeit der Lieferung und benachrichtigen Sie uns bitte innerhalb von 14 Tagen nach dem Kauf, falls die Lieferung nicht kom- plett ist. Mit dem von Ihnen erworbenen Paket haben Sie erhalten: EN   Digitaler Scanner ...
  • Seite 39: Geräteübersicht

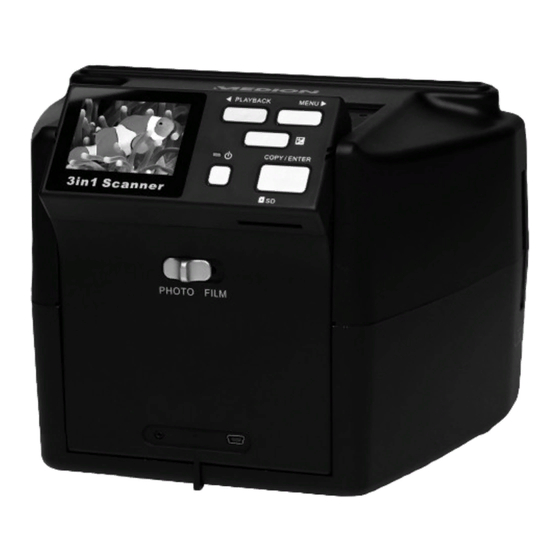
    Geräteübersicht Einschub für Fotohalter Einschub für Diapositiv/Negativ-Halter EV-Taste: Einstellung des Belichtungswerts; in den Menüs: verlassen der Menüs COPY/ENTER-Taste: Im Scan-Modus: auslösen des Scanvorgangs; in den Menüs: bestätigen der Auswahl SD/SDHC-Karten Einschub USB-Anschluss AV-Ausgang Moduswahlschalter STANDBY-Schalter Betriebs-LED LC-Display /PLAYBACK-Taste: In den Menüs: Steuerung nach links/Im Diaschau- Modus: Starten der Wiedergabe /MENÜ-Taste: Im Menü: Steuerung nach rechts/Im Scan-Modus: auf- rufen des Menüs...
  • Seite 40: Inbetriebnahme

    Inbetriebnahme ES  Stromanschluss  Verbinden Sie das USB-Kabel mit dem USB-Netzadapter.  Stecken Sie den Netzadapter in eine leicht zugängliche Steckdose.  Verbinden Sie den Mini-USB-Stecker mit dem USB-Anschluss an der Geräte- EN  front. HINWEIS! Immer wenn das Gerät an das Stromnetz angeschlossen wird, startet das Gerät automatisch.
  • Seite 41: Bedienung

    Bedienung Allgemeines Behandeln Sie Fotos, Dias und Negative mit besonderer Vorsicht. Jede Ver- schmutzung, jeder Kratze und jeder Fingerabdruck wird auf dem späteren Scan deutlich erkennbar sein. Versuchen Sie daher, eine Berührung der eigentlich Bildoberfläche zu vermeiden. Falls möglich, säubern Sie die Medien vor dem Einlegen in den Scanner vorsichtig.
  • Seite 42: Dias Und Negative

    Dias und Negative ES   Öffnen Sie den Dia- oder Negativ-Halter und legen Sie die Dais oder Negati- ve ein. Von Ihrem Blickwinkel aus müssen die Medien in der korrekten Posi- tion liegen (also nicht seitenverkehrt). EN   Schließen Sie den Dia- oder Negativ-Halter und schieben Sie ihn in den Diaschacht an der rechten Seite des Geräts.
  • Seite 43: Belichtungskorrektur

    HINWEIS! Der Negativ-Halter entspricht dem ISO-Standard. Im Fall eines nicht standardisierten Formates stimmen die Förderlöcher eines Films möglicherweise nicht mit dem Negativ-Halter überein. Dies kann zu schwarzen Balken auf dem Scan führen, diese lassen sich mit einer Bildbearbeitungssoftware leicht entfernen. Der Diahalter fasst Dias mitsamt des Rahmens, die Dias müssen also nicht aus dem Rahmen entfernt werden.
  • Seite 44: Foto Modus

    Foto Modus ES  Foto scannen  Schalten Sie den Diascanner ggf. ein.  Ziehen Sie die Scan-Einheit mit dem Display komplett heraus und schieben Sie den Moduswahlschalter in die Position PHOTO, wenn sie Fotos einscan- EN  nen möchten.  Legen Sie ein Foto wie im Kapitel „Bedienung“ auf Seite 10 beschrieben in einen entsprechenden Foto-Halter und schieben Sie diesen in den Einschub auf der Geräteoberseite.
  • Seite 45 Format Mit dieser Option formatieren Sie den internen Speicher bzw. falls eine Spei- cherkarte eingelegt ist, diese Speicherkarte.  Wählen Sie (  ), um den Speicher zu formatieren oder (X), um den Vor- gang abzubrechen. TV-Ausgabe Wählen Sie hier die Fernsehnorm für ein angeschlossenes TV-Gerät aus. ...
  • Seite 46 Belichtungskorrektur ES  Wähle Sie in dieser Option den passenden Belichtungswerts für die Aufnahme aus. EN   Drücken Sie die Taste ,um die Belichtungskorrektur einzustellen oder wählen Sie im Einstellungsmenü des jeweiligen Scan-Modus die Option EV.  Wählen Sie mit den Tasten PLAYBACK und MENU, den gewünschten Wert und bestätigen Sie die Auswahl mit der Taste COPY/ENTER.
  • Seite 47: Dia- / Negativ-Modus

    Dia- / Negativ-Modus Dia/Negativ scannen  Schalten Sie den Diascanner ggf. ein.  Schieben Sie die Scan-Einheit mit dem Display komplett herein und schie- ben Sie den Moduswahlschalter in die Position FILM, wenn Sie Dias oder Negative einscannen wollen.  Legen Sie die Dias oder Negativfilme wie im Kapitel „Bedienung“ auf Seite 10 beschrieben in einen entsprechenden Halter und schieben Sie diesen in den Einschub an der rechten Geräteseite.
  • Seite 48 Aufnahmemodus (HOME) ES  Mit dieser Option kehren Sie in den Aufnahmemodus zurück. EN  Filmtyp  Legen Sie mit dieser Option fest, welchen Filmtyp das zu scannende Bild hat. Sie können zwischen Dia, Schwarz/Weiß-Film und Negativfilm wählen. Auflösung  Sie können die Auflösung des gescannten Bildes auf 1800 oder 3600 DPI einstellen.
  • Seite 49 Format Mit dieser Option formatieren Sie den internen Speicher bzw. falls eine Spei- cherkarte eingelegt ist, diese Speicherkarte.  Wählen Sie (  ), um den Speicher zu formatieren oder (X), um den Vor- gang abzubrechen. TV-Ausgabe Wählen Sie hier die Fernsehnorm für ein angeschlossenes TV-Gerät aus. ...
  • Seite 50 Belichtungskorrektur ES  Wähle Sie in dieser Option den passenden Belichtungswerts für die Aufnahme aus. EN   Drücken Sie die Taste ,um die Belichtungskorrektur einzustellen oder wählen Sie im Einstellungsmenü des jeweiligen Scan-Modus die Option EV.  Wählen Sie mit den Tasten PLAYBACK und MENU, den gewünschten Wert und bestätigen Sie die Auswahl mit der Taste COPY/ENTER.
  • Seite 51: Wiedergabe Modus

    Wiedergabe Modus Im Wiedergabe-Modus können Sie die gescannten Bilder betrachten, drehen, löschen und kopieren.  Drücken Sie die Taste PLAYBACK, um den Wiedergabe-Modus zu star- ten.  Mit den Tasten PLAYBACK und MENU können Sie zwischen den ein- zelnen Aufnahmen wechseln. ...
  • Seite 52 Löschen ES  Wählen Sie diese Option um das angezeigte Bild zu löschen. EN  Alle Löschen Mit dieser Option löschen Sie alle gespeicherten Bilder. Drehen 90° (gegen den Uhrzeigersinn) Drehen Sie mit Hilfe dieser Option das gescannte Bild um 90° gegen den Uhr- zeigersinn.
  • Seite 53: Drehen 90° (Im Uhrzeigersinn)

    Drehen 90° (im Uhrzeigersinn) Drehen Sie mit Hilfe dieser Option das gescannte Bild um 90° im Uhrzeigersinn. Dies können Sie beliebig oft wiederholen. Auf SD-Karte kopieren Diese Option ermöglicht es Ihnen alle gescannten Bilder im internen Speicher auf eine SD-Karte zu kopieren. Exit Um das Menü...
  • Seite 54: Übertragen Der Daten Auf Den Computer

    Übertragen der Daten auf den Computer ES  Um die Aufnahmen aus dem internen Speicher zu übertrage, bietet Ihnen der Scanner zwei Möglichkeiten. Kopieren Sie alle Daten aus dem internen Speicher auf eine SD-Karte und nutzen diese zur Datenübertragung. EN  Schließen Sie den Scanner mit dem mitgelieferten USB-Kabel an den Rechner an.
  • Seite 55: Installation Der Software

    Installation der Software Bei dem mitgeliefertem Programm handelt es sich um „ArcSoft MediaImpressi- on“, ein Programm mit dem Sie Ihre Bilder nachträglich bearbeiten können. Bitte beachten Sie folgende Punkte um die Installation des Programmes erfolg- reich durchzuführen: ACHTUNG! Bei der Installation von Programmen oder Treibern können wichtige Dateien überschrieben und verändert werden.
  • Seite 56: Reinigung & Wartung

    Reinigung & Wartung ES  Reinigung  Reinigen Sie das Gehäuse mit einem angefeuchteten Tuch.  Verwenden Sie die mitgelieferte Reinigungsbürste, um das innenliegende Scanfeld zu säubern. EN   Wischen Sie vorsichtig mit der Samtoberfläche der Bürste den Staub vom Scanfeld. ...
  • Seite 57: Entsorgung

    Entsorgung Verpackung Ihr Gerät befindet sich zum Schutz vor Transportschäden in einer Verpackung. Verpackungen sind aus Materialien hergestellt, die um- weltschonend entsorgt und einem fachgerechten Recycling zugeführt werden können. Gerät Werfen Sie das Gerät am Ende seiner Lebenszeit keinesfalls in den normalen Hausmüll.
  • Seite 58: Technische Daten

    Technische Daten ES  Scanner Anschluss USB 1.1 Bild-Sensor 5 Megapixel CMOS-Sensor Blende F = 5,5 EN  LCD Monitor 6,1 cm / 2,4“ LC-Display Scan-Auflösung 1800 dpi (3600 dpi interpoliert) Maße (L x H x B) 235 x 165 x 160 mm Bildspeicher: 32 MB interner Speicher Extern:...
  • Seite 60 Table of contents   How to use these instructions ............3 DE    Symbols and key words used in these instructions ........3   Proper use ....................4 EN    Safety instructions ................5   Dangers for children and people with reduced ability to operate machinery . 5  ...
  • Seite 61   Playback mode ................22   Transferring data onto your computer ..........25   Installing the software ..............26   Cleaning and maintenance .............. 27   Cleaning ...................... 27   Repairs ......................27   Disposal ................... 28   Technical specifications ..............29...
  • Seite 62: How To Use These Instructions

    How to use these instructions Read the safety instructions carefully before use. Note the warnings DE  on the unit and in the operating instructions. Always keep the operating instructions close to hand. If you sell the unit or give it away, make sure to also provide these instructions and EN ...
  • Seite 63: Proper Use

    Proper use This device lets you digitalise your slides or negatives. Scanned images are transferred to your computer for editing and stored there. The software included with the device lets you modify scanned images digitally. The device is intended for personal use only and is not suitable for commercial use.
  • Seite 64: Safety Instructions

    Safety instructions Dangers for children and people with reduced ability to DE  operate machinery This device is not intended for use by people (including children) with reduced EN  physical, sensory or mental abilities or those without experience and/or knowledge unless they are supervised by a person responsible for their safety or they have been instructed in its use.
  • Seite 65: Room Temperature

    Never conduct repairs yourself WARNING! Never try to open or repair the appliance yourself, as this may cause electric shock.  In case of a failure, contact the MEDION Service Centre or other suitable repair shop.
  • Seite 66: Box Contents

    Box contents Please check your purchase to ensure that all items are included and contact us DE  within 14 days of purchase if any components are missing. The following items are included in the box: EN   Digital scanner  Cleaning brush ...
  • Seite 67: Equipment Overview

    Equipment overview Photo holder slot Slide/negative holder slot EV button: Used to set the exposure value / In menus: exit menu COPY/ENTER button: In Scan mode: start scanning / In menus: confirm selection SD/SDHC card slot USB port AV output Mode switch STANDBY button Operating LED...
  • Seite 68: Initial Operation

    Initial operation Connecting the power supply DE   Connect the USB cable to the USB power adapter.  Plug the power adapter into an easy-to-access wall socket.  Plug the mini USB cable into the USB port on the front of the device. EN ...
  • Seite 69: Operation

    Operation General Be sure to handle photos, slides and negatives with care. Any dirt, scratches or fingerprints will be clearly visible on the scan. Try to avoid touching the surface of the image. If possible, clean the medium before inserting it into the scanner. Scanning photos ...
  • Seite 70: Slides And Negatives

    Slides and negatives  Open the slide or negative holder and insert the slides or negatives. Make sure the slides or negatives are facing the right direction. DE  EN   Close the slide or negative holder and insert it into the slide slot on the right side of the device.
  • Seite 71: Correcting The Exposure

    PLEASE NOTE! The negative holder meets the ISO standard. In the case of non- standard negative sizes, the perforations on the film may not line up with the negative holder. This can lead to black stripes on the scan, which can be easily removed with image editing software. The slide holder can accommodate slides including the frame, so you don't need to remove the slide from the frame.
  • Seite 72: Photo Mode

    Photo mode Scanning photos DE   Switch on the slide scanner if necessary.  Remove the scanning unit completely, including the display, and slide the mode switch to the PHOTO position to scan photos. EN   Place the photo inside a matching photo holder as described in the section entitled “...
  • Seite 73: Photo Mode Settings Menu

    Operation  ” on page 10 and insert the holder into the slot on the top of the device. The size of the photo to be scanned is detected and the settings are adjusted automatically based on the selected photo holder. ...
  • Seite 74 DE  EN   Using the PLAYBACK and MENU buttons, select either the NTSC or PAL standard and confirm your selection by pressing COPY/ENTER.
  • Seite 75 Exposure correction This option lets you select the desired exposure value for the photo.  Press the button to correct the exposure or select the EV option from the settings menu in Scan mode.  Using the PLAYBACK and MENU buttons, select the desired value and confirm your selection by pressing COPY/ENTER.
  • Seite 76: Slide/Negative Mode

    Slide/negative mode Scanning slides/negatives DE   Switch on the slide scanner.  Insert the scanning unit completely, including the display, and slide the mode switch to the FILM position to scan slides or negatives. EN   Place the slides or negatives inside a matching holder as described in the section entitled “...
  • Seite 77: Slide/Negative Mode Settings Menu

    Operation  ” on page 10 and insert the holder into the slot on the right side of the device.  Now press the MENU button and select Film Type.  Select whether you’d like to scan a slide, a black and white film strip or a negative film strip.
  • Seite 78 Scan mode (HOME) This option takes you back to Scan mode. DE  EN  Film Type  Use this option to select the film type be scanned. You can choose between slide, black and white film and negative film. Resolution  You can set the resolution of the scanned image to 1800 or 3600 DPI.
  • Seite 79 Format This option lets you format the internal memory or inserted memory card.  Select (  ) to format the memory or (X) to cancel. TV output This option lets you select the appropriate TV standard for a connected TV. ...
  • Seite 80 Exposure correction This option lets you select the desired exposure value for the scan. DE  EN   Press the button to correct the exposure or select the EV option from the settings menu in Scan mode.  Using the PLAYBACK and MENU buttons, select the desired value and confirm your selection by pressing COPY/ENTER.
  • Seite 81: Playback Mode

    Playback mode In Playback mode, you can view, rotate, delete and copy scanned images.  Press the PLAYBACK button to start Playback mode.  Use the PLAYBACK and MENU buttons to scroll back and forth between images.  The COPY/ENTER button takes you to the settings menu, where you will find several editing options.
  • Seite 82 Delete Select this option to delete the displayed image. DE  EN  Delete all Use this option to delete all saved images. Rotate 90° (counterclockwise) Use this option to rotate the scanned image 90° counterclockwise. You can repeat this action as many times as you like.
  • Seite 83 Rotate 90° (clockwise) Use this option to rotate the scanned image 90° clockwise. You can repeat this action as many times as you like. Copy to an SD card This option lets you copy all scanned images from the internal memory to an SD card.
  • Seite 84: Transferring Data Onto Your Computer

    Transferring data onto your computer The scanner offers you two options for transferring scanned images from the DE  internal memory to your computer. Copy all data from the internal memory to an SD card and then use the card to transfer the data. EN ...
  • Seite 85: Installing The Software

    Installing the software The ArcSoft MediaImpression software included with your scanner lets you edit your images once they are scanned. To install the software correctly, follow these steps: CAUTION! Important files may be modified or overwritten when installing programs or drivers. Before installing the software, back up your original files so you can access them later if problems occur after installation.
  • Seite 86: Cleaning And Maintenance

    Cleaning and maintenance Cleaning DE   Clean the outside of the scanner using a soft, moist cloth.  Use the cleaning brush included with your scanner to clean the scan bed. EN   Carefully wipe the scan bed with the velvet side of the brush to remove dust.
  • Seite 87: Disposal

    Disposal Packaging Your device has been packaged to protect it from becoming damaged in transit. The packaging is made of environmentally-friendly, recyclable materials. Device At the end of its life, do not dispose of device with the household rubbish. Please enquire about options for environmentally-friendly disposal.
  • Seite 88: Technical Specifications

    Technical specifications Scanner DE  Connection USB 1.1 Image sensor 5 megapixel CMOS sensor Aperture F = 5.5 EN  LCD monitor 6.1 cm / 2.4” LC display Scan resolution 1800 dpi (3600 dpi interpolated) Dimensions (L x H x W): 235 x 165 x 160 mm Memory: 32 MB internal memory External:...
  • Seite 89 Medion Service Center Visonic S.A. c/ Miguel Faraday, 6 Parque Empresarial "La Carpetania", N-IV Km. 13 28906 Getafe, Madrid España Hotline: 902196437 · Fax: 914604772 E-Mail: service-spain@medion.com www.medion.es...

Diese Anleitung auch für:

Md 86372P82009

Inhaltsverzeichnis