Herunterladen Inhalt Inhalt Diese Seite drucken

Werbung

Verfügbare Sprachen
  • DE

Verfügbare Sprachen

  • DEUTSCH, seite 34
S.A. SEB SELONGEY CEDEX • RC. DIJON B 302 412 226 • REF. 5083125
mise à jour le 02-2007 par : BATOT - T

Werbung

Inhaltsverzeichnis
loading

Inhaltszusammenfassung für TEFAL PRO FRY OLEOCLEAN FR 7009

  • Seite 1 S.A. SEB SELONGEY CEDEX • RC. DIJON B 302 412 226 • REF. 5083125 mise à jour le 02-2007 par : BATOT - T...
  • Seite 2 É PROFRY OL OCLEAN Mode d’emploi, Instructions for use, Gebruiksaanwijzing, Gebrauchsanleitung, Istruzioni d'uso, Modo de empleo, Modo de Utilização...
  • Seite 6 Français ....................................... English ........................................Nederlands ....................................Deutsch ....................................... Italiano ........................................Español ........................................ Português .......................................
  • Seite 7: Consignes De Sécurité

    CONSIGNES DE SÉCURITÉ Lire attentivement ces instructions et les conserver soigneusement. Consignes de sécurité Cet appareil est conforme aux règles de sécurité et normes en vigueur. Vérifier que la tension du réseau correspond bien à celle indiquée sur l’appareil (courant alternatif). Compte tenu de la diversité...
  • Seite 8 • Ne jamais mettre la matière grasse solide directement dans le panier sinon l’appareil risque d’être détérioré. • Ne pas mélanger plusieurs sortes de matières grasses. • Ne pas surcharger votre panier, respecter les quantités limites de sécurité. Recommandations • Limiter la température de cuisson à 170°C spécialement pour les pommes de terre. •...
  • Seite 9 Description Bouton de commande Oil box Jupe Couvercle Oil box : bac à huile a. Filtre permanent a. Couvercle b. Bouchon de filtre b. Bouchon c. Poignée Pieds anti-dérapants d. Hublot Tableau de bord électronique Boîtier électrique amovible a. Indicateur changement d’huile Panier b.
  • Seite 10: Avant La Première Utilisation

    Filtration, vidange et stockage automatique de l’huile PRO FRY OLEOCLEAN est équipé d’un système exclusif et breveté de filtration et de vidange automatique, adapté à tous les types de matières grasses alimentaires. La vidange de l’huile est automatique et totalement sécuritaire. Grâce à...
  • Seite 11 • Nettoyez le couvercle, la cuve, la jupe, le panier et le bac à huile avec une éponge humide et du liquide vaisselle ou dans un lave-vaisselle. (Fig.6) Nettoyez le boîtier électrique avec une éponge humide. (Fig.7) Séchez bien. • Après chaque nettoyage, appuyez sur le bouton rouge situé sous la cuve pour laisser échapper l’eau restée à...
  • Seite 12 Cuisson • Mettez le bouton de commande Oil box sur la position Fry. (Fig.17) • Après avoir rempli la cuve avec de l'huile, branchez votre friteuse sans le panier, le voyant lumineux Power s'allume. (Fig.18-19) Ne branchez jamais la friteuse sans matière grasse. •...
  • Seite 13: Entretien Et Nettoyage

    • Retirez le couvercle. Pour éviter des éclaboussures, ne faites pas retomber les condensats du couvercle dans votre bain d'huile mais égoutter soigneusement au dessus d'un linge ou d'un papier absorbant placé à coté de votre friteuse.Egouttez les aliments en plaçant le panier sur la fixation prévue à...
  • Seite 14 • Transportez le bac à huile avec soin. • Pour réutiliser la matière grasse, prenez le bac à huile avec précaution. Dévissez le bouchon, puis videz l'huile dans la cuve.(Fig.32-33) • Pour la matière grasse solide, retirez le couvercle. Retourner le bac à huile et appuyez dessus afin de décoller la matière grasse.
  • Seite 15: Si Votre Friteuse Ne Fonctionne Pas Bien

    Si votre friteuse ne fonctionne pas bien Problèmes et causes possibles Solutions La friteuse ne chauffe pas L’appareil n’est pas branché. Branchez l’appareil. La température de cuisson n’est pas sélectionnée. Appuyez sur le bouton pendant 3 secondes et sélectionnez la température désirée par impul- sion.
  • Seite 16: Safety Instructions

    SAFETY INSTRUCTIONS Read and follow the instructions for use carefully. Safety instructions This appliance complies with the safety regulations and directives in effect at the time of manufacture. Check that the power supply voltage corresponds to that shown on the appliance (alternating current). Given the diverse standards in effect, if the appliance is used in a country other than that in which it is purchased, have it checked by an approved Service Centre.
  • Seite 17 0845 602 1454 - UK (01) 4751947 - Ireland or consult our website - www.tefal.co.uk Environment protection first ! Your appliance contains valuable materials which can be recovered or recycled. Leave it at a local civic waste collection point.
  • Seite 18 Description Body a. Permanent filter Oil box b. Filter cover a. lid c. handle b. Oil box cap d. viewing window Feet Removable control unit Electronic panel Frying basket a. Change oil indicator light a. handle b. Digital timer b. MAX. food level marking c.
  • Seite 19: Before First Use

    Filtration, drainage and automatic storage of oil/fat Your fryer is fitted with an exclusive and patented system for filtration and automatic drainage, suitable for most types of oils and fats used for cooking. The drainage of oil is completely automatic and safe. The automatic patented filtration system ensures your oil/fat stays clean and lasts longer for healthier frying.
  • Seite 20 Clean the control unit and the heating element with a damp cloth. (Fig.7) Dry thoroughly. • After cleaning, press on the red button under the fryer to release any water in the bowl. (Fig.8) Check that the red button has gone back to its original position •...
  • Seite 21 Frying process • Place the Oil Box control button on the Fry position. (Fig.17) • After the bowl has been filled with oil, plug in the fryer without the frying basket ; the Power indicator light will come on. (Fig.18-19) Do not plug in the fryer without oil.
  • Seite 22: Cooking Tables

    • Remove the lid. In order to avoid any oil splashes, never let the condensation drops from the lid fall into the oil but drain the lid on a cloth or paper towel placed near the fryer. Allow excess oil to drain by hooking the basket on the support on the inner bowl. (Fig.26) •...
  • Seite 23 Carry the container with both hands. Store it in a cool dry place away from the light. • Wait at least 2 hours before taking the full container out of the appliance. Transport it with care. • To re-use the oil, take out the container with care. Unscrew the oil box cap and empty the oil in the fryer bowl.
  • Seite 24 If you have any product problems or queries, please contact our Customer Relations Team first for expert help and advice. Consult our web site: www.tefal.co.uk Any repairs must only be carried out by a Tefal Approved Service Centre with the manufacturer’s own replacement parts.
  • Seite 25: Veiligheidsvoorschriften

    VEILIGHEIDSVOORSCHRIFTEN Lees deze instructies aandachtig door en bewaar ze zorgvuldig. Veiligheidsvoorschriften Dit apparaat voldoet aan de geldende veiligheidsvoorschriften en -voorwaarden Controleer of de netspanning overeenkomt met die op het apparaat vermeld staat (wisselstroom). Rekening houdend met de grote verscheidenheid aan geldende normen, dient u het apparaat door een erkende Servicedienst te laten controleren als u het in een ander land gebruikt dan waar u het gekocht heeft.
  • Seite 26 Bereiding • Nooit de stekker in het stopcontact steken wanneer de friteuse leeg is (geen vet). Neem de minimale en maximale hoeveelheid vet in acht. • Indien u niet-vloeibaar vet gebruikt, snijd dit dan in stukken en laat het op zacht vuur in een aparte pan smelten en giet het daarna langzaam in de binnenpan.
  • Seite 27 Omschrijving Koele handgrepen Bedieningsknop filterbak Deksel Behuizing a. Permanent filter Filterbak b. Stoomrooster a. Deksel c. Handgreep b. Dop d. Kijkvenster Anti-slipvoetjes Afneembaar elektrisch gedeelte Elektronisch bedieningspaneel Mandje a. Controlelampje vet vervangen a. Handgreep b. Display timer b. Max. niveau voor het voedsel c.
  • Seite 28: Vóór De Eerste Ingebruikname

    Automatisch filteren/verversen en bewaren van het vet PRO FRY OLEOCLEAN is voorzien van een gepatenteerd automatisch filter- en ver- verssysteem dat geschikt is voor alle soorten vet. Het vet wordt op volkomen veilige wijze automatisch gefilterd. Dankzij het automatische filteren blijft het vet schoon en gaat het langer mee: gezonder en voordeliger.
  • Seite 29 • Reinig het deksel, de binnenpan, de behuizing, het mandje en de filterbak met een vochtige spons en afwasmiddel of in de vaatwasmachine. (fig.6) Reinig het elektrische gedeelte met een vochtige doek of spons. (fig.7) Goed afdrogen. • Druk na iedere reinigingsbeurt op de rode knop onder de binnenpan, zodat het achtergebleven water eruit kan lopen.
  • Seite 30 Bakken • Zet de bedieningsknop op de stand Fry. (fig.17) • Steek na het vullen van de binnenpan met vet de stekker van uw friteuse zonder mandje in het stopcontact, het controlelampje "Power" gaat branden. (fig.18-19) Nooit de friteuse inschakelen als er geen vet in zit. •...
  • Seite 31: Onderhoud En Reiniging

    De timer geeft het einde van de baktijd aan, maar schakelt het apparaat niet uit. • Verwijder het deksel. Zorg, om spatten te voorkomen, dat er geen condenswater uit het deksel in het vet terecht komt, door dit goed uit te laten lekken boven een doek of een stuk keukenpapier dat u naast de friteuse heeft gelegd.
  • Seite 32 - Buiten het apparaat: wacht 3 uur, draai de bedieningsknop in de stand Oil box en verwijder de filterbak. (fig.30-31) Berg de filterbak altijd horizontaal op met het deksel er bovenop, in een droge, donkere ruimte op kamertemperatuur. Wacht minstens 3 uur alvorens de filterbak te verwijderen. Vervoer het voorzichtig.
  • Seite 33 Wanneer uw friteuse niet goed werkt Problemen en mogelijke oorzaken Oplossingen De friteuse wordt niet warm De stekker zit niet in het stopcontact. Steek de stekker in het stopcontact. De baktemperatuur is niet geselecteerd. Houd de knop 3 seconden ingedrukt en selecteer de gewenste temperatuur door meerdere malen te drukken.
  • Seite 34: Sicherheitshinweise

    SICHERHEITSHINWEISE Lesen Sie diese Anweisungen aufmerksam durch und heben Sie sie gut auf. Sicherheitshinweise Dieses Gerät entspricht den geltenden Sicherheitsvorschriften und Bestimmungen. Die Spannung gemäß dem Typenschild des Gerätes prüfen (Wechselstrom). Aufgrund der Vielzahl geltender Vorschriften ist es ratsam, bei der Benutzung im Ausland, das Gerät durch ein zugelassenes Service Center prüfen zu lassen.
  • Seite 35 Garen • Schließen Sie das Gerät nicht leer (ohne Fett) an das Stromnetz an. Halten Sie die Mindest- und Höchstmengen für Öl ein. • Falls Sie festes Fett benutzen, muss dieses in Stücke geschnitten, bei niedrigen Temperaturen in einem gesonderten Gefäß geschmolzen und anschließend langsam in den Frittierbehälter gegossen werden.
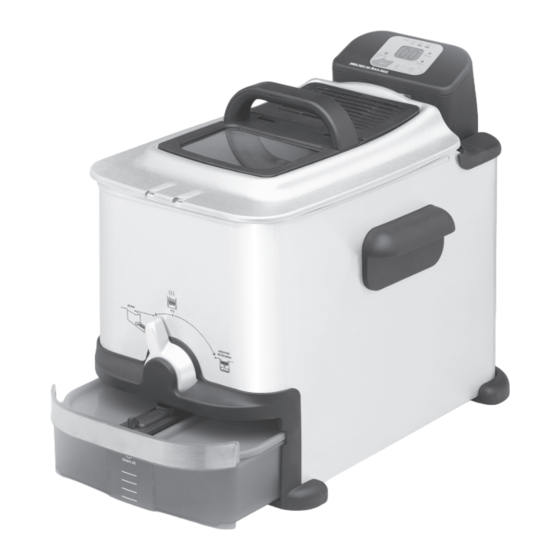
  • Seite 36 Beschreibung Transportgriffe Entleerungsregler Deckel Thermogehäuse a. Dauerfilter Oil Box: Öl-Aufbewahrungsbox b. Filterverschluss a. Deckel c. Filtergriff b. Verschluss d. Sichtfenster Anti-Rutsch Füße Abnehmbares elektrisches Elektrisches Bedienelement Bedien- und Heizelement a. Anzeige „Öl Austauschen“ Frittierkorb b. Timeranzeige/Display a. Griff c. Temperatur-Kontrollleuchte b.
  • Seite 37: Gebrauch Des Entleerungsreglers

    Automatische Öl-Filtration, Öl-Entleerung und Öl-Aufbewahrung PRO FRY OLEOCLEAN ist mit einem exklusiven und patentierten automatischen System zur Filtration, Entleerung und Aufbewahrung des Öls ausgestattet, das an alle Speisefette angepasst ist. Die Entleerung des Frittierbehälters erfolgt automatisch und ist völlig sicher. Dank der automatischen Filterung bleibt Ihr Frittierfett sauber, Sie können es über längere Zeit benutzen und Ihre Speisen bleiben bekömmlich.
  • Seite 38 • Reinigen Sie den Deckel, den Frittierbehälter, das Thermogehäuse, den Frittierkorb und die Öl-Aufbewahrungsbox mit einem Schwamm unter Zusatz von Spülmittel oder in der Geschirrspülmaschine. (Abb. 6) Reinigen Sie das elektrische Bedienelement mit einem feuchten Schwamm. (Abb. 7) Lassen Sie die Teile gut trocknen. •...
  • Seite 39 Garen • Stellen Sie den Entleerungsregler auf die Position „Fry“. (Abb. 17) • Füllen Sie den Frittierbehälter mit Öl, schließen Sie Ihre Fritteuse ohne den Frittierkorb ans Stromnetz an und die Betriebsanzeige „Power" leuchtet auf. (Abb. 18-19) Schließen Sie die Fritteuse niemals ohne vorheriges Einfüllen von Fett ans Stromnetz an.
  • Seite 40: Pflege Und Reinigung

    Der Timer zeigt das Ende der Garzeit an, schaltet aber nicht das Gerät aus • Nehmen Sie den Deckel ab. Lassen Sie das Kondenswasser nicht vom Deckel in das Frittierbad tropfen, um das Auftreten von Spritzern zu verhindern. Lassen Sie den Deckel vielmehr gut auf einem Tuch oder Küchenkrepp neben der Fritteuse abtropfen.
  • Seite 41 Bewahren Sie die Öl-Aufbewahrungsbox immer waagerecht und mit geschlossenem Deckel an einem kühlen Ort ohne Lichteinwirkung auf. • Warten Sie mindestens 2 Stunden, bevor Sie die Öl-Aufbewahrungsbox herausnehmen. Transportieren Sie sie vorsichtig. • Zur Wiederverwendung des Fetts: nehmen Sie die Öl-Aufbewahrungsbox vorsichtig auf.
  • Seite 42 Falls Ihre Fritteuse nicht richtig funktioniert Probleme und mögliche Ursachen Lösungen Die Fritteuse funktioniert nicht Das Gerät ist nicht angeschlossen. Schließen Sie das Gerät an. Die Fetttemperatur ist nicht eingestellt. Drücken Sie 3 Sekunden lang auf die Taste und stellen Sie die gewünschte Temperatur durch mehrmaliges Drücken ein.
  • Seite 43: Norme Di Sicurezza

    NORME DI SICUREZZA Leggere attentamente queste istruzioni e conservarle con cura. Norme di sicurezza Il presente apparecchio è conforme alle norme di sicurezza e alle condizioni in vigore. Verificare che la tensione di rete corrisponda a quella indicata sull'apparecchio (corrente alternata). Tenuto conto della differenza delle norme in vigore, se questo apparecchio viene utilizzato in un paese diverso da quello nel quale è...
  • Seite 44 • In caso di utilizzo di grassi solidi, questi devono essere tagliati a pezzetti e fatti fondere a fuoco moderato in un recipiente a parte e successivamente versati lentamente nella vasca. Non introdurre in nessun caso grassi solidi direttamente nella vasca o nel cestello per non danneggiare l'apparecchio.
  • Seite 45 Descrizione Maniglie per il trasporto Manopola Oil box Coperchio Base a. Filtro permanente Oil box: contenitore per olio/grassi b. Tappo del filtro a. Coperchio c. Maniglia b. Tappo d. Oblò Piedini anti-scivolo Unità elettrica amovibile Pannello di controllo elettronico Cestello a.
  • Seite 46: Al Primo Utilizzo

    Filtraggio, drenaggio e conservazione automatica dell'olio PRO FRY OLEOCLEAN è dotato di un sistema esclusivo e brevettato di filtraggio e drenaggio automatico adatto a tutti i tipi di olii e grassi alimentari. Il drenaggio dell'olio è automatico e totalmente sicuro. Grazie al sistema di filtraggio automatico, l'olio rimane pulito e dura più...
  • Seite 47 • Lavare il coperchio, la vasca, la base, il cestello e il contenitore per l'olio con una spugna umida e detergente per i piatti o in lavastoviglie. (fig. 6) Pulire l'unità elettrica con una spugna umida. (fig. 7) Asciugare con cura. •...
  • Seite 48 Cottura • Portare la manopola Oil box in posizione Fry. (fig. 17) • Dopo aver riempito la vasca con olio, collegare la friggitrice senza il cestello: la spia luminosa "Power" si accende. (fig. 18-19) Non collegare mai il cavo di alimentazione quando la friggitrice è senza olio o grasso. •...
  • Seite 49: Manutenzione E Pulizia

    Il timer segnala il termine del tempo di frittura ma non arresta l'apparecchio. • Rimuovere il coperchio. Per evitare spruzzi, non fate ricadere la condensa del coperchio nell'olio ma fatela sgocciolare accuratamente sopra un panno o una carta assorbente messa accanto alla friggitrice.
  • Seite 50 Il contenitore per l'olio deve sempre essere conservato coperto, in pozione orizzontale, in luogo fresco e asciutto e al riparo dalla luce. • Prima di rimuovere il contenitore per l'olio attendere almeno 2 ore. Trasportarlo con attenzione. • Per riutilizzare il grasso/olio, prendere in mano il contenitore con attenzione. Svitare il tappo, poi vuotare l'olio nella vasca.
  • Seite 51 Cosa fare se la friggitrice non funziona? Problemi e possibili cause Soluzioni La friggitrice non si scalda L'apparecchio non è collegato. Collegare la spina. La temperatura di cottura non è selezionata. Premere il tasto per 3 secondi e selezio- nare la temperatura desiderata. L'olio che frigge fuoriesce Si è...
  • Seite 52: Instrucciones De Seguridad

    INSTRUCCIONES DE SEGURIDAD Leer atentamente estas instrucciones y conservarlas cuidadosamente. Instrucciones de seguridad Este aparato cumple las normas de seguridad y condiciones en vigor. Compruebe que el voltaje corresponde correctamente con el mostrado en el aparato (corriente alterna). Debido a la diversidad de las normas en vigor, si el aparato se va a utilizar en otro país diferente al de su compra, deberá...
  • Seite 53 • No ponga nunca la grasa sólida directamente en la cuba o en el cestillo, si lo hace el aparato podría dañarse. • No mezcle diferentes tipos de grasa. • No sobrecargue el cestillo, respete la cantidad límite de seguridad. Recomendaciones •...
  • Seite 54 Descripción Botón de mando Oil box Cuerpo del aparato Tapa Oil box: contenedor de aceite a. Filtro permanente a. Tapa b. Tapón del filtro b. Tapón c. Asa Pies anti-deslizantes d. Ventana Cuadro de mandos electrónico Resistencia extraíble a. Indicador de cambio de aceite Cestillo b.
  • Seite 55: Antes De La Primera Utilización

    Filtración, vaciado y almacenamiento automático del aceite PRO FRY OLEOCLEAN está equipada con un sistema exclusivo y patentado de fil- tración y drenaje automático, recomendado para todos los tipos de aceites y gra- sas alimentarias. El vaciado de aceite/grasa es automático y totalmente seguro. Gracias a la filtración automática, el aceite/grasa está...
  • Seite 56 • Limpie la tapa, la cuba, el cuerpo del aparato, el cestillo y el contenedor de aceite con una esponja húmeda y jabón líquido para vajillas o lávelos en el lavavajillas. (fig.6) Limpie la resistencia eléctrica con una esponja húmeda. (fig.7) Seque bien.
  • Seite 57 Cocción • Coloque el botón de mando Oil box en la posición Fry. (fig.17) • Después de que haya llenado la cuba con aceite, conecte la freidora sin el cestillo, el indicador luminoso "Power" se encenderá. (fig.18-19) No enchufe nunca la freidora sin aceite/grasa. •...
  • Seite 58: Cuadro De Cocción

    El reloj señala el final del tiempo de cocción pero no detiene el funcionamiento del aparato. • Retire la tapa. Para evitar salpicaduras, no deje caer el vapor condensado de la tapa en el baño de aceite. Escurra cuidadosamente encima de un paño o de un papel absorbente colocado al lado de la freidora.
  • Seite 59 Guarde siempre el contenedor de aceite en posición horizontal con la tapa y en un lugar seco y templado protegido de la luz. • Espere al menos 2 horas antes de retirar el contenedor de aceite. Transpórtelo con precaución. • Para reutilizar el aceite/grasa, coja el contenedor de aceite con cuidado. Desenrosque el botón, y vacíe el aceite en la cuba.(fig.32-33) •...
  • Seite 60 Si su freidora no funciona bien Problemas y causas posibles Soluciones La freidora no calienta El aparato no está conectado. Conecte el aparato. La temperatura de cocción no ha sido seleccionada. Presione el botón durante 3 segundos y seleccione la temperatura deseada mediante impulsión.
  • Seite 61: Conselhos De Segurança

    CONSELHOS DE SEGURANÇA Leia atentamente o manual de instruções e guarde-o para futuras utilizações. Conselhos de segurança Este aparelho está em conformidade com as regras de segurança e condições em vigor. Certifique-se de que a tensão da sua instalação eléctrica está em conformidade com a tensão indicada no aparelho (corrente alterna).
  • Seite 62 • Se utilizar uma matéria gorda sólida, corte-a aos pedaços derreta em lume brando, num recipiente à parte e, de seguida, deite-a lentamente na cuba. • Nunca coloque a matéria gorda sólida directamente no cesto por forma a não danificar o aparelho.
  • Seite 63 Descrição Botão de comando Oil box Corpo da fritadeira Tampa Oil box: reservatório para matéria a. Filtro permanente gorda b. Tampa do filtro a. Tampa c. Pega b. Rolha d. Visor de observação Pés anti-derrapantes Painel de comandos amovível Painel de comandos electrónico Cesto a.
  • Seite 64: Antes Da Primeira Utilização

    Filtragem, purga e armazenamento automático do óleo A PRO FRY OLEOCLEAN está equipada com um sistema exclusivo e patenteado de filtragem e purga automática do óleo, adaptado a qualquer tipo de matéria gorda alimentar. O escoamento do óleo é automático e totalmente seguro. Graças à...
  • Seite 65 • Limpe a tampa, a cuba, o corpo do aparelho, o cesto e o reservatório de óleo com uma esponja húmida e detergente para a loiça ou coloque-os na máquina de lavar a loiça. (fig.6) Limpe o painel de comandos com uma esponja húmida. (fig.7) Seque todas as partes cuidadosamente.
  • Seite 66 Cozedura • Regule o botão de comando Oil box para a posição Fry. (fig.17) • Depois de ter enchido a cuba com óleo, ligue a sua fritadeira sem o cesto; a luz piloto "Power" acende-se. (fig.18-19) Nunca ligue a fritadeira sem matéria gorda. •...
  • Seite 67: Manutenção E Limpeza

    O temporizador assinala o fim do tempo de cozedura mas não pára o aparelho. • Retire a tampa. Para evitar salpicos, não deixe cair a água condensada na tampa para o interior do óleo. Limpe cuidadosamente a tampa com um pano ou papel absorvente colocado ao lado da sua fritadeira.
  • Seite 68 Guarde sempre o reservatório de óleo na horizontal, com a tampa sobre a parte de cima, num local seco e temperado e ao abrigo da luz. • Aguarde pelo menos 3 horas antes de retirar o reservatório de óleo. Transporteocom cuidado. •...
  • Seite 69 A sua fritadeira não funciona correctamente Problemas e causas possíveis Soluções A fritadeira não aquece O aparelho não está ligado. Ligue o aparelho. A temperatura de cozedura não foi seleccionada. Carregue no botão durante 3 segundos e seleccione a temperatura pretendida por impulso. O óleo transborda A marca máxima de enchimento da cuba foi Verifique o nível do óleo e retire a quantidade em...

Inhaltsverzeichnis