PeakTech 4250 Bedienungsanleitung
Vorschau ausblenden
Andere Handbücher für 4250:
- Bedienungsanleitung (24 Seiten) ,
- Bedienungsanleitung (43 Seiten) ,
- Betriebsanleitung (20 Seiten)

Verwandte Anleitungen für PeakTech 4250

Inhaltszusammenfassung für PeakTech 4250
- Seite 1 ® PeakTech 4250 / 4300 Bedienungsanleitung / Operation manual AC/DC – Zangenadapter / Clamp Adapters...
-
Seite 2: Sicherheitshinweise Zum Betrieb Des Gerätes
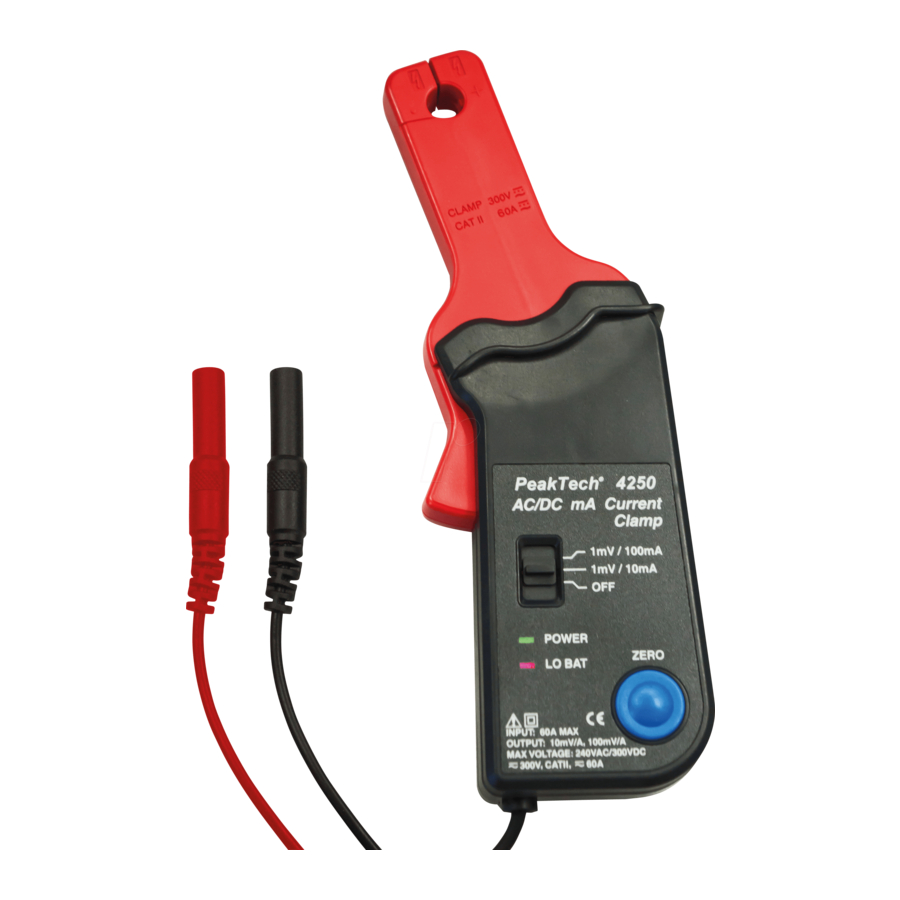
Messungen in Anlagen der Überspannungskategorie II, entsprechend IEC 664 Keine Leiter mit Spannungen über 1000 V DC oder 750 V ACeff (P 4300) / 300 V DC oder 240 V ACeff (P 4250) in die Zange nehmen. - 1 –... - Seite 3 Diese Geräte können hohe Ströme bis 1000 A (P 4300); 60 A (P 4250) in Leitern messen, in denen gleichzeitig auch hohe Spannungen vorkommen. Falsche Bedienung der Geräte können daher u. U. zu schweren Verletzungen und Zerstörung der Geräte führen.
- Seite 4 AC/DC-Zangenadaptern handelt sich Messwandler, die Messungen bis 1000 A (P 4300)/ 60 A (P 4250) AC oder DC mit einer Frequenz bis zu 400 Hz (P 4300) / 20 kHz (P 4250) in Verbindung mit einem Multimeter ermöglichen. Bei Strommessungen unter Verwendung der Zangenadapter ist keine Schaltungsunterbrechung bzw.
-
Seite 5: Technische Daten
LED leuchtet auf Spannungsversorgung: 9 V Batterie (NEDA 1604) Batterielebensdauer: 100 Stunden typ. Abmessungen: P 4250: 195 x 70 x 33 mm (HxBxT) P 4300: 244 x 100 x 44 mm Gewicht: ca. 250 g (P 4250) ca. 520 g (P 4300) - Seite 6 (P4250) 1 mV/1 A (P 4300) Genauigkeit System-Genauigkeit: Genauigkeit des Zangenadapters + Genauigkeit des Multimeters P 4250 : Genauigkeit des Zangenadapters DC A-Bereich: 1 mV/10 mA ± (1.5 % ± 5 mA) 10 mA ~ 20 A 1 mV/100 mA ± (2 % ± 20 mA) 100 mA ~ 40 A ±...
- Seite 7 400 A ~ 1000 A (61 Hz ~ 400 Hz): ± (3.5 % + 3 A) Überlastschutz: 1200 A für max. 60 Sek. 4. Messbetrieb P 4250: 1. Schwarzen Bananenstecker in die COM-Buchse und roten Bananenstecker in die V-Ω-Buchse eines Multimeters mit einem minimalen Eingangswiderstand von 10 kΩ anschließen.
- Seite 8 6. Im Bereich 1 mV/10 mA des Zangenadapters, muss die Anzeige des Multimeters mit x10 multipliziert werden um den gemessenen Wert in mA zu erhalten. Dies bedeutet, dass zum Beispiel eine Anzeige von 10 mV des Multimeters einem gemessenen Strom von 100 mA entspricht (10 x 10 = 100 mA). Im Bereich 1 mV/100 mA muss die Anzeige des Multimeters mit x 100 multipliziert werden um den gemessenen Wert in mA zu er- halten.
-
Seite 9: Auswechseln Der Batterie
6. Zu messenden Leiter in die Zange nehmen und Messwert gem. Punkt 4. oder 5. ermitteln (abhängig vom gewählten Bereich). Hinweis: 1. Bei DC-Strommessungen ist der Ausgang positiv, wenn der Strom im Leiter von der Oberseite (mit “+” markiert) der Zange zur Unterseite fließt. - Seite 10 Gerätes, welche dem Fortschritt dienen, vorbehalten. Hiermit bestätigen wir, dass alle Geräte, die in unseren Unterlagen genannten Spezifikationen erfüllen und werkseitig kalibriert geliefert werden. Eine Wiederholung der Kalibrierung nach Ablauf von 1 Jahr wird empfohlen. © PeakTech® 07/2012/Th/pt - 9 -...