Herunterladen Inhalt Inhalt Diese Seite drucken

Werbung

Verfügbare Sprachen
  • DE

Verfügbare Sprachen

Werbung

Inhaltsverzeichnis
loading

Inhaltszusammenfassung für Briteq BT-METEOR

  • Seite 3: Before Use

     Multiple working modes:  DMX-control: via 5, 11 or 14 channels  DMX-master/slave: several BT-METEOR units can work in audio synchronized master/slave, while the user only needs 5 DMX-channels to keep full control over colors, gobos, strobe, dimming and pan/tilt speed.
  • Seite 4: Safety Instructions

     Please use the original packing when the device is to be transported.  Due to safety reasons it is prohibited to make unauthorized modifications to the unit. Important: Never look directly into the light source! Don’t use the effect in the presence of persons suffering from epilepsy. BRITEQ 2/74 BT-METEOR ®...
  • Seite 5: Overhead Rigging

    ) and balanced signal (XLR 3pin) in one cable. Different lengths are available: 1.3m, 3m, 5m and 10m, very convenient! 5. DMX IN/OUTPUTS: used for DMX512 linking, you can use good quality balanced signal cables with 3pin XLR-connectors. BRITEQ 3/74 BT-METEOR ®...
  • Seite 6 90° (vertically, front 75°; back 15°)  Once the right mode is shown on the display, press the [ENTER] button to confirm.  Press the [MODE] button for about 2 seconds to store the setting and to return to running mode. BRITEQ 4/74 BT-METEOR ®...
  • Seite 7  Press the [MODE] button and use the ▼/▲ buttons until the display shows [Display].  Press the [ENTER] button to start editing.  Use the ▼/▲ buttons to select “On” (display always lit) or “Off” (display dark when not used). BRITEQ 5/74 BT-METEOR ®...
  • Seite 8  Use the ▼/▲ buttons to select one of the available options:  Once the dimmer curve is shown on the display, press the [ENTER] button to confirm.  Press the [MODE] button for about 2 seconds to store the setting and to return to running mode. BRITEQ 6/74 BT-METEOR ®...
  • Seite 9 Specified by the user Split color mode Specified by the user Slave mode SL 1 SL 1 Specified by the user No DMX mode Freeze Sound Specified by the user Sound sensitivity Specified by the user BRITEQ 7/74 BT-METEOR ®...
  • Seite 10  Press the [MODE] button for about 2 seconds to store the setting and to return to running mode. If you don’t do this, the setting will not be stored and after some time, the fixture will return to the previous running mode. BRITEQ 8/74 BT-METEOR ®...
  • Seite 11  Make sure that all units are connected to the mains.  Done! Remark: if there’s no output, please make sure to set the option [No DMX] of the projector to [SOUND] (audio mode) and sound sensitivity [Sound] to a value over 50 (see previous chapter). BRITEQ 9/74 BT-METEOR ®...
  • Seite 12  Each light effect in the chain needs to have its proper starting address so it knows which commands from the controller it has to decode. In the next section you will learn how to set the DMX addresses. BRITEQ 10/74 BT-METEOR ®...
  • Seite 13 075 - 082 COLOR 6: Blue 083 - 089 COLOR 6 + 7 090 - 097 COLOR 7: Magenta 098 - 104 COLOR 7 + 8 105 - 112 COLOR 8: Light Blue 113 - 119 COLOR 8 + 9 BRITEQ 11/74 BT-METEOR ®...
  • Seite 14 Note (*): by default [function delay] (is set to 3seconds: the selected function will only be active while the corresponding DMX-value is received during at least 3seconds. You can change the [function delay] time in the setup menu. BRITEQ 12/74 BT-METEOR ®...
  • Seite 15: Maintenance

    290 x 180 x 435 mm (LxBxH) – head facing upward, see drawing Size: Weight: 8,5 kg Every information is subject to change without prior notice You can download the latest version of this user manual on our website: www.briteq-lighting.com BRITEQ 13/74 BT-METEOR ®...
  • Seite 16: Caractéristiques

    FRANÇAIS GUIDE D’UTILISATION GUIDE D’UTILISATION ® Nous vous remercions d’avoir acheté ce produit Briteq . Pour tirer pleinement profit de toutes les possibilités du produit et pour votre propre sécurité, lisez attentivement ce mode d’emploi avant d’utiliser cet appareil. CARACTÉRISTIQUES ...
  • Seite 17: Consignes De Sécurité

     Ne réparez jamais un fusible et ne court-circuitez jamais le porte-fusible. Remplacez toujours un fusible endommagé par un fusible de même type ayant les mêmes spécifications électriques !  En cas de problème de fonctionnement important, cessez d’utiliser l’appareil et contactez immédiatement votre revendeur. BRITEQ 15/74 BT-METEOR ®...
  • Seite 18 Les installations doivent être inspectées chaque année par une personne qualifiée pour s’assurer que la sécurité est toujours optimale. C. Trous pour fixer l’attache spéciale Omega (incluse) D. Trous pour fixer le câble de sécurité facultatif BRITEQ 16/74 BT-METEOR ®...
  • Seite 19: Panneau De Commande

     Une fois la bonne adresse affichée à l’écran, appuyez sur la touche [ENTER] pour confirmer.  Maintenez la touche [MODE] enfoncée pendant environ deux secondes pour mémoriser les réglages et revenir en mode de fonctionnement normal. BRITEQ 17/74 BT-METEOR ®...
  • Seite 20  Une fois que le bon mode apparaît à l’écran, appuyez sur la touche [ENTER] pour confirmer.  Maintenez la touche [MODE] enfoncée pendant environ deux secondes pour mémoriser les réglages et revenir en mode de fonctionnement normal. BRITEQ 18/74 BT-METEOR ®...
  • Seite 21 [Display] s’affiche à l’écran.  Appuyez sur la touche [ENTER] pour commencer l’édition.  Utilisez les touches▼/▲ pour sélectionner « On » (écran toujours allumé) ou « Off » (écran noir lorsqu’il n’est pas utilisé). BRITEQ 19/74 BT-METEOR ®...
  • Seite 22  Appuyez sur la touche [MODE] et utilisez les touches ▼/▲ jusqu’à ce que [FanSpeed] s’affiche à l’écran.  Appuyez sur la touche [ENTER] pour commencer l’édition.  Utilisez les touches ▼/▲ pour sélectionner l’une des options disponibles : BRITEQ 20/74 BT-METEOR ®...
  • Seite 23 Réglages par défaut UTILISATEUR défaut PRO AUTO Mode canal DMX 14 canaux 5 MSL Spécifié par l’utilisateur Mode Show Spécifié par l’utilisateur Mode couleurs adjacentes Spécifié par l’utilisateur Mode Esclave SL 1 SL 1 Spécifié par l’utilisateur BRITEQ 21/74 BT-METEOR ®...
  • Seite 24  Appuyez sur la touche [MODE] et utilisez les touches ▼/▲ jusqu’à ce que [FanSpeed] s’affiche à l’écran.  Appuyez sur la touche [ENTER] pour faire apparaître la version du logiciel sur l’afficheur.  Pour retourner aux fonctions, appuyez sur la touche [MODE]. BRITEQ 22/74 BT-METEOR ®...
  • Seite 25  Utilisez les touches ▼/▲ pour régler la valeur du décalage.  Appuyez sur la touche [ENTER] pour sélectionner le réglage. Une fois les réglages de décalage effectués, maintenez le bouton [MODE] enfoncé pendant deux secondes pour les enregistrer et retourner en mode de fonctionnement normal. BRITEQ 23/74 BT-METEOR ®...
  • Seite 26 Remarque : afin d’être synchronisé avec le rythme de la musique, assurez-vous de régler le mode [No DMX] du projecteur MAÎTRE sur [SOUND] et la sensibilité sonore [Sound] sur une valeur supérieure à 50 (voir chapitre précédent). BRITEQ 24/74 BT-METEOR ®...
  • Seite 27 Malheureusement, il est impossible de vous dire dans ce manuel quelles adresses de départ vous devez définir, car cela dépend entièrement du contrôleur que vous utilisez. Reportez-vous au manuel de votre contrôleur DMX pour savoir quelles adresses de départ vous devez définir. BRITEQ 25/74 BT-METEOR ®...
  • Seite 28 COULEUR 9 : Rose Roue chromatique tournant dans le sens horaire (rapide → lent) 128 - 189 Roue chromatique s’arrêtant de tourner 190 - 193 Roue chromatique tournant dans le sens antihoraire (lent → rapide) 194 - 255 BRITEQ 26/74 BT-METEOR ®...
  • Seite 29 Remarque (*) : par défaut, [function delay] (est réglé sur trois secondes : la fonction sélectionnée ne sera active que lorsque la valeur DMX correspondante sera reçue pendant au moins trois secondes. Vous pouvez changer la durée de [function delay] dans le menu de configuration. BRITEQ 27/74 BT-METEOR ®...
  • Seite 30: Entretien

    290 x 180 x 435 mm (L x l x H) – tête orientée vers le haut, voir Dimensions : schéma Poids : 8,5 kg Toutes les informations peuvent être modifiées sans préavis Vous pouvez télécharger la dernière version de ce manuel sur notre site Web : www.briteq-lighting.com BRITEQ 28/74 BT-METEOR ®...
  • Seite 31: Gebruiksaanwijzing

     Meerdere bedrijfsmodi:  DMX-regeling: via 5, 11 of 14 kanalen  DMX-master/slave: er kunnen diverse BT-METEOR-projectoren in de op het geluid gesynchroniseerde master/slave stand werken, terwijl de gebruiker slechts 5 DMX-kanalen nodig heeft om volledige controle te houden over kleuren, gobo's, stroboscoop, dimmen en pan-/tiltsnelheid.
  • Seite 32: Veiligheidsinstructies

     Open de afdekking niet, om elektrische schokken te voorkomen. Er bevinden zich geen door de gebruiker te repareren onderdelen in het apparaat.  Repareer nooit een zekering en overbrug de zekeringhouder niet. Vervang een kapotte zekering altijd door een zekering van hetzelfde type en met dezelfde elektrische specificaties! BRITEQ 30/74 BT-METEOR ®...
  • Seite 33 E. Gaten voor de bevestiging van de speciale Omegaklem (inbegrepen) F. Gaten voor de bevestiging van een optionele veiligheidskabel BRITEQ 31/74 BT-METEOR ®...
  • Seite 34  Druk zodra het juiste adres op het scherm wordt weergegeven de [ENTER]-toets om dit te bevestigen.  Houd de [MODE]-toets gedurende ongeveer 2 seconden ingedrukt om de instellingen op te slaan en terug te keren naar de bedrijfsmodus. BRITEQ 32/74 BT-METEOR ®...
  • Seite 35  Druk zodra de juiste modus op het scherm verschijnt, de [ENTER]-toets om dit te bevestigen.  Houd de [MODE]-toets gedurende ongeveer 2 seconden ingedrukt om de instellingen op te slaan en terug te keren naar de bedrijfsmodus. BRITEQ 33/74 BT-METEOR ®...
  • Seite 36  Druk op de [MODE]-toets en gebruik de toetsen ▼/▲ totdat er [Display] op het scherm wordt weergegeven.  Druk op de [ENTER]-toets om het bewerken te beginnen.  Gebruik de toetsen ▼/▲ om “On” (scherm altijd verlicht) of BRITEQ 34/74 BT-METEOR ®...
  • Seite 37  Druk op de [MODE]-toets en gebruik de toetsen ▼/▲ totdat er [FanSpeed] op het scherm wordt weergegeven.  Druk op de [ENTER]-toets om het bewerken te beginnen.  Gebruik de toetsen ▼/▲ om één van de beschikbare opties te selecteren: BRITEQ 35/74 BT-METEOR ®...
  • Seite 38  [USER def]: u kunt uw eigen set met voorkeursinstellingen opslaan/oproepen. Naam PARAMETER instellingen PRO instellingen AUTO instellingen GEBRUIKER DMX-kanaalmodus 14 kan 5 MSL Door de gebruiker gespecificeerd. Showmodus Vloer Vloer Door de gebruiker gespecificeerd. Gescheiden kleurmodus Door de gebruiker gespecificeerd. BRITEQ 36/74 BT-METEOR ®...
  • Seite 39  Druk op de [MODE]-toets en gebruik de toetsen ▼/▲ totdat er [Firmware] op het scherm wordt weergegeven.  Druk de [ENTER]-toets om de softwareversie op het scherm weer te geven.  Druk op de [MODE]-toets om terug te keren naar de functies. BRITEQ 37/74 BT-METEOR ®...
  • Seite 40  Druk op de [ENTER]-toets om uw keuze te bevestigen. Druk wanneer alle aanpassingen voor het uitlijnen zijn uitgevoerd gedurende ongeveer 2 seconden op de [MODE]-toets om de instellingen op te slaan en terug te keren naar de bedrijfsmodus. BRITEQ 38/74 BT-METEOR ®...
  • Seite 41 Opmerking: zorg ervoor om de [No DMX] van de MASTER-projector in te stellen op [SOUND] en de geluidsgevoeligheid [Sound] in te stellen op een waarde van meer dan 50 (zie het vorige hoofdstuk), zodat het apparaat goed werkt op het ritme van de muziek. BRITEQ 39/74 BT-METEOR ®...
  • Seite 42 000 - 255 Fijnafstelling pan (minst significante bit) 000 - 255 Tilt Fijnafstelling tilt (minst significante bit) 000 - 255 000 - 255 Pan-/tiltsnelheid (000 = snel ~ 255 = traag) 000 - 255 Dimmer (0 tot 100%) BRITEQ 40/74 BT-METEOR ®...
  • Seite 43 GOBO 6 GOBO 1 – Schudden 064 - 073 GOBO 2 – Schudden 074 - 082 GOBO 3 – Schudden 083 - 091 GOBO 4 – Schudden 092 - 100 GOBO 5 – Schudden 101 - 109 BRITEQ 41/74 BT-METEOR ®...
  • Seite 44 Opmerking (*): de [function delay] is standaard op 3 seconden ingesteld: de geselecteerde functie is alleen actief terwijl de overeenkomstige DMX-waarde gedurende ten minste 3 seconden wordt ontvangen. U kunt de tijd voor [function delay] in het instellingenmenu wijzigen. BRITEQ 42/74 BT-METEOR ®...
  • Seite 45 290 x 180 x 435 mm (L x B x H) - naar boven gerichte kop; zie tekening Gewicht: 8,5 kg Alle informatie is onderhevig aan wijzigingen zonder voorafgaande kennisgeving U kunt de nieuwste versie van deze handleiding downloaden van onze website: www.briteq-lighting.com BRITEQ 43/74 BT-METEOR ®...
  • Seite 46: Vor Gebrauch

     Hervorragende voreingestellte Programme für wunderschöne, abwechslungsreiche Lightshows.  Verschiedene Betriebsmodi:  DMX-Steuerung: via 5, 11 oder 14 Kanälen  DMX-Master/Slave: Mehrere BT-METEOR-Einheiten können als Musik-synchronisierte Master/Slave arbeiten, während für die volle Kontrolle von Farben, Gobos, Stroboskop, Dimmen und Schwenk/Kipp- Geschwindigkeit nur 5 DMX-Kanäle benötigt werden.
  • Seite 47: Sicherheitshinweise

     Zur Vorbeugung gegen elektrische Schläge keine Abdeckungen entfernen. Im Geräteinneren befinden sich keine zu wartenden Teile.  Eine Sicherung niemals reparieren oder überbrücken. Eine durchgebrannte Sicherung immer durch eine Sicherung gleichen Typs und mit gleichen elektrischen Spezifikationen ersetzen! BRITEQ 45/74 BT-METEOR ®...
  • Seite 48: Überkopf-Montage

    Installationen vor Erstbetrieb fachmännisch vorgenommen worden sind. Installationen sollten jährlich durch qualifiziertes Fachpersonal überprüft werden, um jederzeit einen sicheren Betrieb zu gewährleisten. G. Öffnungen zur Befestigung der speziellen Omega-Klammer (mitgeliefert) H. Öffnungen zur Befestigung eines optionalen Sicherheitskabels BRITEQ 46/74 BT-METEOR ®...
  • Seite 49: Einrichten Des Geräts

     Sobald die richtige Adresse im Display angezeigt wird, bestätigen Sie mit der Taste [ENTER].  Halten Sie die Taste [MODE] für etwa 2 Sekunden gedrückt, um die Einstellung zu speichern und zum normalen Betriebsmodus zurückzukehren. BRITEQ 47/74 BT-METEOR ®...
  • Seite 50  Sobald der richtige Modus im Display angezeigt wird, bestätigen Sie mit der Taste [ENTER].  Halten Sie die Taste [MODE] für etwa 2 Sekunden gedrückt, um die Einstellung zu speichern und zum normalen Betriebsmodus zurückzukehren. BRITEQ 48/74 BT-METEOR ®...
  • Seite 51 Display-Hintergrundbeleuchtung ein oder aus Hintergrundbeleuchtung ein: Das Display ist immer beleuchtet. Hintergrundbeleuchtung aus: Das Display wird schwarz, wenn es nicht benötigt wird.  Drücken Sie die Taste [MODE] und die Tasten ▼/▲, bis [Display] auf dem Display angezeigt wird. BRITEQ 49/74 BT-METEOR ®...
  • Seite 52  Wählen Sie mit den Tasten ▼/▲ eine der verfügbaren Optionen aus:  Sobald die Dimmerkurve im Display angezeigt wird, bestätigen Sie mit der Taste [ENTER].  Halten Sie die Taste [MODE] für etwa 2 Sekunden gedrückt, um die Einstellung zu speichern und zum normalen Betriebsmodus zurückzukehren. BRITEQ 50/74 BT-METEOR ®...
  • Seite 53 Standardeinstellungen in der Tabelle.  [USER def]: Zusätzlich können Sie Ihren eigenen Satz von Lieblingseinstellungen auch speichern oder laden. PARAMETER-Name PRO- AUTO- BENUTZER-Standardeinstellungen Standardeinstellungen Standardeinstellungen DMX-Kanalmodus 14 Kanäle 5 MSL Vom Benutzer festgelegt Show-Modus Boden Boden Vom Benutzer festgelegt BRITEQ 51/74 BT-METEOR ®...
  • Seite 54 200 bis 209 auf dem Kanal „Sonderfunktionen“ (Kanal 11 oder 14), siehe für weitere Informationen die DMX-Tabelle. Firmware-Version Zeigt die Versionsnummer der installierten Software an  Drücken Sie die Taste [MODE] und die Tasten ▼/▲, bis [Firmware] auf dem Display angezeigt wird. BRITEQ 52/74 BT-METEOR ®...
  • Seite 55  Ändern Sie den Offsetwerte mit den Tasten ▼/▲.  Wählen Sie Ihre Einstellung mit der Taste [ENTER]. Sobald Sie alle Offseteinstellungen gemacht wurden, halten Sie die Taste [MODE] ungefähr für 2 Sekunden gedrückt, um zum Betriebsmodus zurückzukehren. BRITEQ 53/74 BT-METEOR ®...
  • Seite 56 Anmerkung: Stellen Sie für einen gute Funktion im Takt der Musik sicher, dass die Option [No DMX] des MASTER-Projektors auf [SOUND] (Musikmodus) und die Musikempfindlichkeit [Sound] auf einen Wert größer 50 (Siehe vorigen Abschnitt) eingestellt ist. BRITEQ 54/74 BT-METEOR ®...
  • Seite 57 000 - 255 Kippen 000 - 255 Leichtes Kippen (niederwertigstes Bit) 000 - 255 Schwenk-/Kippgeschwindigkeit (000 = schnell bis 255 = langsam) 000 - 255 Dimmer (0 bis 100 %) Strobe/Shutter-Effekt 000 - 007 Shutter geschlossen (keine Ausgabe) BRITEQ 55/74 BT-METEOR ®...
  • Seite 58 083 - 091 GOBO 3 - Zittern 092 - 100 GOBO 4 - Zittern 101 - 109 GOBO 5 - Zittern 110 - 127 GOBO 6 - Zittern 128 - 189 Goborad dreht sich im Uhrzeigersinn (schnell → langsam) BRITEQ 56/74 BT-METEOR ®...
  • Seite 59  Reinigen Sie die externen optischen Teile mindestens einmal alle 30 Tage.  Reinigen Sie die internen optischen Teile mindestens alle 90 Tage. Achtung: Wir empfehlen dringend, die Reinigung des Geräteinneren nur von qualifiziertem Personal durchführen zu lassen! BRITEQ 57/74 BT-METEOR ®...
  • Seite 60: Technische Daten

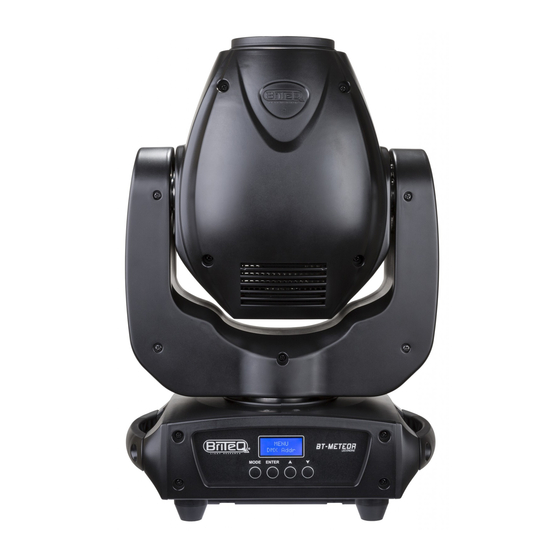
    290 x 180 x 435 mm (LxBxH) – Kopf nach oben, siehe Zeichnung Abmessungen: Gewicht: 8,5 kg Diese Angaben können sich ohne gesonderten Hinweis ändern Sie können sich die neueste Version dieses Benutzerhandbuches von unserer Website herunterladen: www.briteq-lighting.com BRITEQ 58/74 BT-METEOR ®...
  • Seite 61: Manual Del Usuario

     Control-DMX: Por medio de 5, 11 o 14 canales  Maestro/esclavo por DMX: varias unidades BT-METEOR pueden trabajar sincronizadas con el audio en modo maestro/esclavo, mientras que el usuario solo necesita 5 canales DMX para tener el control total de los colores, gobos, estrobos, atenuación y velocidad de movimiento en orientación y elevación.
  • Seite 62: Instrucciones De Seguridad

     Para evitar descargas eléctricas, no abra la cubierta. Dentro no hay componentes que puedan ser reparados por el usuario.  Nunca repare un fusible o puentee el soporte del fusible. Siempre sustituya un fusible dañado con otro del mismo tipo y las mismas especificaciones eléctricas! BRITEQ 60/74 BT-METEOR ®...
  • Seite 63 Las instalaciones deben inspeccionarse anualmente por una persona con experiencia para asegurarse de que la seguridad es óptima. Agujeros para fijar el anclaje tipo ‘omega’ (incluido) J. Agujeros para fijar un cable de seguridad opcional BRITEQ 61/74 BT-METEOR ®...
  • Seite 64: Panel De Control

     Utilice los botones ▼/▲ para cambiar la dirección DMX512.  Una vez aparezca en la pantalla la dirección correcta, pulse el botón [ENTER] para confirmar.  Presione el botón [MODE] durante 2 segundos para guardar la nueva configuración y regresar al modo de funcionamiento. BRITEQ 62/74 BT-METEOR ®...
  • Seite 65  Una vez aparezca en la pantalla el modo correcto, pulse el botón [ENTER] para confirmar.  Presione el botón [MODE] durante 2 segundos para guardar la nueva configuración y regresar al modo de funcionamiento. BRITEQ 63/74 BT-METEOR ®...
  • Seite 66 Activar/Desactivar luz de fondo de la pantalla Luz de fondo conectada: la pantalla siempre está encendida. Luz de fondo apagada: la pantalla está oscuro cuando no se utiliza.  Pulse el botón [MODE] y utilice los botones ▼/▲ hasta que BRITEQ 64/74 BT-METEOR ®...
  • Seite 67  Una vez aparezca en la pantalla la cueva de atenuación, pulse el botón [ENTER] para confirmar.  Presione el botón [MODE] durante 2 segundos para guardar la nueva configuración y regresar al modo de funcionamiento. BRITEQ 65/74 BT-METEOR ®...
  • Seite 68  [AUTO def]: configuración básica para usar de manera sencilla el modo maestro/esclavo, vea la lista de los parámetros en la tabla.  [USER def]: puede guardar/recuperar los parámetros con sus ajustes preferidos. BRITEQ 66/74 BT-METEOR ®...
  • Seite 69 Si desea volver al modo de funcionamiento normal: pulse el botón [MODE] durante aproximadamente 2 segundos. Nota: también se puede realizar un reinicio completo usando DMX. Elija un valor DMX 200-209 en el canal de las “Funciones especiales” (canal 11 o 14), vea la tabla DMX para más información. BRITEQ 67/74 BT-METEOR ®...
  • Seite 70  Utilice los botones ▼/▲ para ajustar el valor de la compensación.  Pulse el botón [ENTER] para seleccionar su parámetro. Una vez finalizados todos los ajustes, presione el botón [MODE] durante 2 segundos para guardar la nueva configuración y regresar al modo de funcionamiento. BRITEQ 68/74 BT-METEOR ®...
  • Seite 71 Observación: para trabajar correctamente al ritmo de la música, asegúrese de configurar el modo [No DMX] del proyector maestro en [SOUND] y la sensibilidad del sonido [Sound] en un valor superior a 50 (vea el capítulo anterior). BRITEQ 69/74 BT-METEOR ®...
  • Seite 72 000 - 255 Ajustar inclinación (Bit menos importante) 000 - 255 Velocidad en Orientación/Inclinación (000 = rápida ~ 255 = lenta) 000 - 255 Atenuador (0 a 100%) Efecto estroboscópico/obturador 000 - 007 Obturador cerrado (sin emisión) BRITEQ 70/74 BT-METEOR ®...
  • Seite 73 092 - 100 GOBO 4 – Vibrando 101 - 109 GOBO 5 – Vibrando 110 - 127 GOBO 6 – Vibrando 128 - 189 Rueda de gobos girando en sentido de las agujas del reloj (rápido → lento) BRITEQ 71/74 BT-METEOR ®...
  • Seite 74 Nota (*): predeterminado [function delay] (está ajustado a 3 segundos: la función seleccionada solo se activará cuando el valor DMX correspondiente recibido dure al menos 3 segundos. Se puede cambiar el tiempo [function delay] en el menú de configuración. BRITEQ 72/74 BT-METEOR ®...
  • Seite 75: Mantenimiento

    290 x 180 x 435 mm (LxAnxAl) – cabezal hacia arriba, ver figura Tamaño: Peso: 8,5 kg Esta información está sujeta a cambios sin notificación previa Puede descargar la versión más reciente de este manual de usuario en nuestro sitio Web: www.briteq-lighting.com BRITEQ 73/74 BT-METEOR ®...
  • Seite 76 TECHNICAL SPECS APPENDIX DIMENSIONS LUX CHART GOBO WHEEL  GOBO EXTERNAL DIAMETER: 22,9 mm  IMAGE DIAMETER: 19,50 mm  Both metal and thicker glass gobos can be used. BRITEQ 74/74 BT-METEOR ®...

Inhaltsverzeichnis