Werbung
Verfügbare Sprachen
Verfügbare Sprachen
Quicklinks
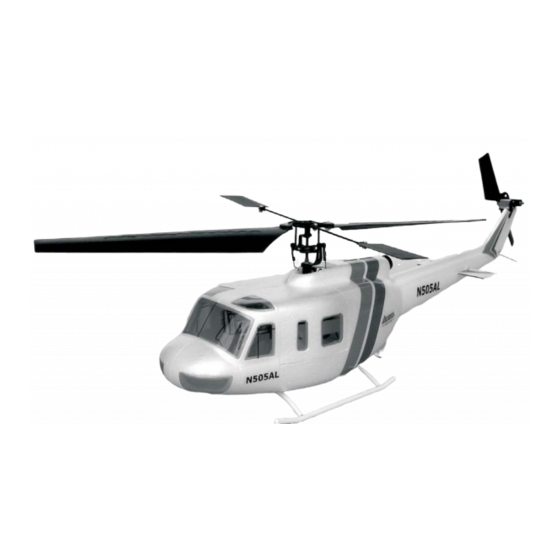
BELL UH-1D
www.ikarus.net
# 68350
Norbert Grüntjens
68350-0303
Bauanleitung
BELL UH-1D
#68350
Der Orginal Bell UH-1D,auch als Teppichklopfer bekannt,war ein
Mehrzweckhubschrauber. Er wurde in sehr hoher Stückzahl produziert und war
mit einem 1100 PS starkem Lycoming Triebwerk ausgestattet.
Werbung

Verwandte Anleitungen für iKarus BELL UH-1D


Inhaltszusammenfassung für iKarus BELL UH-1D
- Seite 1 BELL UH-1D www.ikarus.net # 68350 Norbert Grüntjens 68350-0303 Bauanleitung BELL UH-1D #68350 Der Orginal Bell UH-1D,auch als Teppichklopfer bekannt,war ein Mehrzweckhubschrauber. Er wurde in sehr hoher Stückzahl produziert und war mit einem 1100 PS starkem Lycoming Triebwerk ausgestattet.
- Seite 2 35mm langes Stück ab, und kleben Sie dieses, ohne die Kabel des Heckrohr auf Der Original Bell UH-1D, auch als “Teppichklopfer” bekannt, war 35 mm kürzen ein Mehrzweckhubschrauber . Er wurde in sehr hoher Stückzahl produziert und war mit einem 1100 PS starkem Lycoming- Triebwerk ausgestattet.
- Seite 3 Mechanik so aus, dass der Rotormast auf Höhe der Rumpf- darf. oberkante mittig zur Rumpfnaht steht, und markieren Sie die Position der Auflage mit einem weichen Bleistift. Da das Loch nach links versetzt ist, steht die Mechanik nun bereits um ca. 3,5° nach rechts geneigt.
- Seite 4 Schneiden Sie am Heckrotorgehäuse die Aufnahme für den Sporn ab und stecken Sie dann das Gehäuse in die Aussparung am Heck. Richten Sie den Heckantrieb zur Hoch- und Längsachse aus und verkleben Sie ihn sparsam mit Epoxydharz. Montieren Sie das Heckgetriebe wie in der Piccoloanleitung S.18 u.
- Seite 5 Gummiring Setzen Sie die Mechanik ein und sichern Sie sie mit Hilfe eines Gummirings. Bohren Sie mit einem spitzen Gegenstand ein Loch in den Rumpfboden und führen Sie die Antenne durch selbiges nach außen. Legen Sie den Akku in den Rumpf, setzen Sie die Haube auf, und wiegen Sie das Modell (wie in der Piccoloanleitung S.24 beschrieben) durch verschieben des Akkus aus.
-
Seite 6: Mounting Instructions
Mounting instructions BELL UH-1D #68350 The original Bell UH-1D, also called “Carpet XXX” was a multi purpose helicopter. They have been built in high quantities and an 1100 HP Lycoming engine was used for power. - Seite 7 Cut a 35 mm long piece The original Bell UH-1D, also called “Carpet XXX” was a multi purpose helicopter. They have been built in high quantities and an 1100 HP Lycoming engine was used for power.
- Seite 8 angle (see photo). Mark the position of the triangle with a soft pencil. Tail rotor assembly hole Main rotor mast assembly hole Cut away from both body sides, the main rotor mast Tail boom hole Triangle and tail rotor assembly holes. Left side frame Perfectly aligned...
- Seite 9 Cut the spur from the tail box assembly and put it in the slot in the tail of the fuselage. Arrange the tail box on the horizontal and longitudinal axis and glue with very little epoxy. Remount all tail box parts as described in the manual page 18 &...
- Seite 10 Grommet Put the mechanics in the fuselage and secure them with the grommets on the CF rod . Use a sharp needle to make a small hole to guide the antenna through the fuselage to the outside. Lay the battery in the fuselage, put the front canopy part on, and balance the model (as described in the piccolo manual on page 24) by shifting the battery.
- Seite 11 Mounting instructions BELL UH-1D #68350 The original Bell UH-1D, also called “Carpet XXX” was a multi purpose helicopter. They have been built in high quantities and an 1100 HP Lycoming engine was used for power.
- Seite 12 Cut a 35 mm long piece The original Bell UH-1D, also called “Carpet XXX” was a multi purpose helicopter. They have been built in high quantities and an 1100 HP Lycoming engine was used for power.
- Seite 13 angle (see photo). Mark the position of the triangle with a soft pencil. Tail rotor assembly hole Main rotor mast assembly hole Cut away from both body sides, the main rotor mast Tail boom hole Triangle and tail rotor assembly holes. Left side frame Perfectly aligned...
- Seite 14 Cut the spur from the tail box assembly and put it in the slot in the tail of the fuselage. Arrange the tail box on the horizontal and longitudinal axis and glue with very little epoxy. Remount all tail box parts as described in the manual page 18 &...
- Seite 15 Grommet Put the mechanics in the fuselage and secure them with the grommets on the CF rod . Use a sharp needle to make a small hole to guide the antenna through the fuselage to the outside. Lay the battery in the fuselage, put the front canopy part on, and balance the model (as described in the piccolo manual on page 24) by shifting the battery.