Herunterladen Diese Seite drucken

Werbung

Verfügbare Sprachen
  • DE

Verfügbare Sprachen

  • DEUTSCH, seite 1
TFA_No. 35.1136_Anleitung_09_16
20.09.2016
10:12 Uhr
Seite 1
Bedienungsanleitung
Instruction manual
Mode d'emploi
Instrucciones de uso
Gebruiksaanwijzing
Istruzioni per l'uso
RoHS
Kat. Nr. 35.1136

Werbung

loading

Inhaltszusammenfassung für TFA Primavera

  • Seite 1 TFA_No. 35.1136_Anleitung_09_16 20.09.2016 10:12 Uhr Seite 1 Bedienungsanleitung Instruction manual Mode d’emploi Instrucciones de uso Gebruiksaanwijzing Istruzioni per l'uso RoHS Kat. Nr. 35.1136...
  • Seite 2 TFA_No. 35.1136_Anleitung_09_16 20.09.2016 10:12 Uhr Seite 2 Fig. 1 Fig. 2...
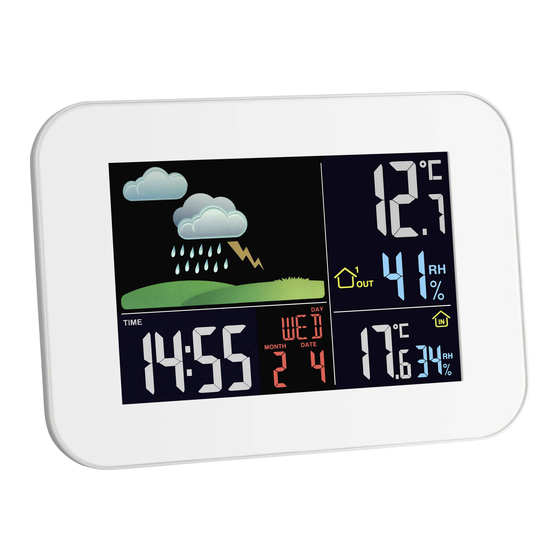
  • Seite 3 Fig. 3 PRIMAVERA - Funkwetterstation Vielen Dank, dass Sie sich für dieses Gerät aus dem Hause TFA entschieden haben. 1. Bevor Sie mit dem Gerät arbeiten • Lesen Sie sich bitte die Bedienungsanleitung genau durch. So werden Sie mit Ihrem neuen Gerät vertraut, lernen alle Funktionen und Bestandteile kennen, erfahren wichtige Details für die Inbetriebnahme und den...
  • Seite 4 TFA_No. 35.1136_Anleitung_09_16 20.09.2016 10:12 Uhr Seite 4 PRIMAVERA - Funkwetterstation PRIMAVERA - Funkwetterstation 6. Inbetriebnahme Vorsicht! 6.1 Anschließen der Basisstation an das Netzteil Verletzungsgefahr: • Legen Sie die Geräte in einem Abstand von ca. 1,5 Metern voneinander auf einen Tisch. Vermeiden Sie die Nähe zu möglichen Störquellen (elektronische Geräte und Funkanlagen).
  • Seite 5 TFA_No. 35.1136_Anleitung_09_16 20.09.2016 10:12 Uhr Seite 5 PRIMAVERA - Funkwetterstation PRIMAVERA - Funkwetterstation • Falls die Funkuhr kein DCF-Funksignal empfangen kann (z.B. wegen Störungen, Übertragungsdistanz, etc.), 7.1.2 Einstellung der 12- und 24-Stunden-Anzeige kann die Zeit manuell eingestellt werden. Das DCF-Empfangszeichen verschwindet und die Uhr arbeitet •...
  • Seite 6: Fehlerbeseitigung

    TFA_No. 35.1136_Anleitung_09_16 20.09.2016 10:12 Uhr Seite 6 PRIMAVERA - Funkwetterstation PRIMAVERA - Funkwetterstation Wichtiger Hinweis! • Sie können auch einen automatischen Kanalwechsel einstellen. Nach Kanal 3 erscheint bei erneuter Bedie- nung der CH Taste AUTO für automatischen Kanalwechsel. Bitte beachten Sie, dass die Symbolvorhersage sich im Laufe des Betriebs präzisiert. Die Symbolvorhersage ist •...
  • Seite 7: Batterien Wechseln

    Gewicht 290 g (nur das Gerät) Diese Anleitung oder Auszüge daraus dürfen nur mit Zustimmung von TFA Dostmann veröffentlicht werden. Die technischen Daten ent- sprechen dem Stand bei Drucklegung und können ohne vorherige Benachrichtigung geändert werden. Die neuesten technischen Daten und Informationen zu Ihrem Produkt finden Sie unter Eingabe der Artikel-Nummer auf unserer Homepage.
  • Seite 8 10:12 Uhr Seite 8 PRIMAVERA - Wireless weather station PRIMAVERA - Wireless weather station Thank you for choosing this instrument from TFA. Caution! 1. Before you start using it Risk of injury: • Please make sure to read the instruction manual carefully.
  • Seite 9 TFA_No. 35.1136_Anleitung_09_16 20.09.2016 10:12 Uhr Seite 9 PRIMAVERA - Wireless weather station PRIMAVERA - Wireless weather station 6. Getting started • If the clock cannot detect the DCF-signal (for example due to disturbances, transmitting distance, etc.), the time can be set manually. The DCF symbol disappears and the clock will then work as a normal quartz clock.
  • Seite 10 20.09.2016 10:12 Uhr Seite 10 PRIMAVERA - Wireless weather station PRIMAVERA - Wireless weather station 7.2 Setting of the alarm time • You can now get the highest values for the indoor and outdoor temperature and humidity since the last reset.
  • Seite 11: Troubleshooting

    ➜ Change the batteries Incorrect indication No part of this manual may be reproduced without written consent of TFA Dostmann. The technical data are correct at the time of going 15. Waste disposal to print and may change without prior notice. The latest technical data and information about your product can be found by entering your product number on our homepage.
  • Seite 12 10:12 Uhr Seite 12 PRIMAVERA - Station météo radio-pilotée PRIMAVERA - Station météo radio-pilotée Nous vous remercions d'avoir choisi l'appareil de la Société TFA. Attention! 1. Avant d'utiliser votre appareil Danger de blessure: • Veuillez lire attentivement le mode d'emploi.
  • Seite 13 TFA_No. 35.1136_Anleitung_09_16 20.09.2016 10:12 Uhr Seite 13 PRIMAVERA - Station météo radio-pilotée PRIMAVERA - Station météo radio-pilotée 6. Mise en service • Si votre horloge radio-pilotée ne peut pas recevoir le signal DCF (par exemple en cas de perturbations, d'une distance de transmission excessive etc.), vous pouvez régler l'horaire manuellement.
  • Seite 14 TFA_No. 35.1136_Anleitung_09_16 20.09.2016 10:12 Uhr Seite 14 PRIMAVERA - Station météo radio-pilotée PRIMAVERA - Station météo radio-pilotée 7.1.2 Réglage de l'affichage 12 heures ou 24 heures Remarque! • En mode de réglage, vous pouvez configurer le système horaire de 12 heures ou de 24 heures.
  • Seite 15: Dépannage

    TFA_No. 35.1136_Anleitung_09_16 20.09.2016 10:12 Uhr Seite 15 PRIMAVERA - Station météo radio-pilotée PRIMAVERA - Station météo radio-pilotée • Appuyez de nouveau sur la touche CH pour désactiver le changement de canal automatique et pour afficher ➜ Aucun émetteur installé Pas de réception de à...
  • Seite 16 • La stazione base e l’alimentatore non devono venire a contatto con acqua o umidità. Adatto solo all'uso in La reproduction, même partielle du présent mode d'emploi est strictement interdite sans l'accord explicite de TFA Dostmann. Les spécifi- ambienti asciutti.
  • Seite 17 TFA_No. 35.1136_Anleitung_09_16 20.09.2016 10:12 Uhr Seite 17 PRIMAVERA - Stazione meteorologica radiocontrollata PRIMAVERA - Stazione meteorologica radiocontrollata 6. Messa in funzione Attenzione! 6.1 Collegare la stazione base all' alimentatore Pericolo di lesioni: • Posizionare gli apparecchi su un tavolo ad una distanza di circa 1,5 metri l'uno dell'altro. Tenerli lontano da eventuali fonti di interferenza (dispositivi elettronici e impianti radio).
  • Seite 18 20.09.2016 10:12 Uhr Seite 18 PRIMAVERA - Stazione meteorologica radiocontrollata PRIMAVERA - Stazione meteorologica radiocontrollata • Nel caso in cui l’orologio non riesca a ricevere il segnale DCF (a causa di guasti, della distanza di trasmissione, 7.1.2 Impostazione del display 12 o 24 ore ecc.), l'ora può...
  • Seite 19: Funzionamento A Batteria

    TFA_No. 35.1136_Anleitung_09_16 20.09.2016 10:12 Uhr Seite 19 PRIMAVERA - Stazione meteorologica radiocontrollata PRIMAVERA - Stazione meteorologica radiocontrollata 10. Termometro e igrometro 12. Posizionamento della stazione base e fissaggio del trasmettitore 10.1 Funzione massima/minima • Con il supporto pieghevole situato nella parte posteriore è possibile disporre la stazione base in posizione verticale oppure fissarla a parete con i fori di sospensione.
  • Seite 20 Frequenza di trasmissione 433 MHz Massima potenza a È vietata la pubblicazione delle presenti istruzioni o di parti di esse senza una precedente autorizzazione della TFA Dostmann. I dati tecni- radiofrequenza trasmessa < 10mW ci corrispondono allo stato del prodotto al momento della stampa e possono cambiare senza preavviso.
  • Seite 21 10:12 Uhr Seite 21 PRIMAVERA - Radiografisch weerstation PRIMAVERA - Radiografisch weerstation Hartelijk dank dat u voor dit apparaat van de firma TFA hebt gekozen. Voorzichtig! 1. Voordat u met het apparaat gaat werken Kans op letsel: • Leest u a.u.b. de gebruiksaanwijzing aandachtig door.
  • Seite 22 TFA_No. 35.1136_Anleitung_09_16 20.09.2016 10:12 Uhr Seite 22 PRIMAVERA - Radiografisch weerstation PRIMAVERA - Radiografisch weerstation 6. Inbedrijfstelling • Als de zendergestuurde klok geen DCF-signaal ontvangt (wegens storingen, afstand, enz.), kunt u de tijd ook handmatig instellen. De DCF-ontvangsymbool verdwijnt en de klok werkt dan als een gewone kwart- 6.1 Basisapparaat met stroomadapter aansluiten...
  • Seite 23 TFA_No. 35.1136_Anleitung_09_16 20.09.2016 10:12 Uhr Seite 23 PRIMAVERA - Radiografisch weerstation PRIMAVERA - Radiografisch weerstation 7.1.2 Instelling van de 12- of 24 uurtijdsysteem 10. Thermometer en hygrometer • In de instelmodus kunt u tussen de weergave van de 24- of de 12-uurtijdsystem kiezen.
  • Seite 24 TFA_No. 35.1136_Anleitung_09_16 20.09.2016 10:12 Uhr Seite 24 PRIMAVERA - Radiografisch weerstation PRIMAVERA - Radiografisch weerstation ➜ Zoek een nieuwe opstellingsplaats voor buitenzender en/of basisapparaat 12. Opstellen en bevestigen van het basisapparaat en de buitenzender ➜ Afstand tussen buitenzender en basisapparaat verminderen •...
  • Seite 25 EU-conformiteitsverklaring el dispositivo por un largo periodo de tiempo. Hierbij verklaar ik, TFA Dostmann, dat het type radioapparatuur 35.1136 conform is met Richtlijn 2014/53/EU. De volledige tekst van de • Utilice únicamente la fuente de alimentación suministrada. EU-conformiteitsverklaring kan worden geraadpleegd op het volgende internetadres: •...
  • Seite 26 TFA_No. 35.1136_Anleitung_09_16 20.09.2016 10:12 Uhr Seite 26 PRIMAVERA - Estación meteorológica inalámbrica PRIMAVERA - Estación meteorológica inalámbrica 6. Puesta en marcha ¡Precaución! 6.1 Conexión de la estación básica a la fuente de alimentación Riesgo de lesiones: • Coloque los dispositivos sobre una mesa a una distancia de 1,5 metros aprox. entre sí. Evite las fuentes de interferencias próximas (aparatos electrónicos y sistemas de radio).
  • Seite 27 20.09.2016 10:12 Uhr Seite 27 PRIMAVERA - Estación meteorológica inalámbrica PRIMAVERA - Estación meteorológica inalámbrica • Si su reloj radiocontrolado no es capaz de recibir la señal DCF (p. ej, debido a interferencias, distancia de 7.1.2 Ajuste de la indicación de sistema de 12 y 24 horas transmisión, etc.), puede ajustar la hora manualmente.
  • Seite 28 TFA_No. 35.1136_Anleitung_09_16 20.09.2016 10:12 Uhr Seite 28 PRIMAVERA - Estación meteorológica inalámbrica PRIMAVERA - Estación meteorológica inalámbrica Nota! • Una vez registrado el sensor exterior (canales), que no son necesarios, puede borrar manualmente mante- niendo pulsada la tecla CH durante tres segundos. Cuando se recibe un nuevo sensor exterior, aparece una Tenga en cuenta que el símbolo de pronóstico sea preciso durante el curso de la operación.
  • Seite 29 Sensor exterior Estas instrucciones o extractos de las mismas no pueden ser publicados sin la autorización de la TFA Dostmann. Los datos técnicos de este producto corresponden al estado en el momento de la impresión y pueden ser modificados sin previo aviso.
  • Seite 30 Seite 30 Fig. 4 PRIMAVERA - Funkwetterstation Wettervorhersagesymbole / Weather forecast symbols / Symboles météo PRIMAVERA - Wireless weather station Simboli meteorologici / Weersymbolen / Símbolos meteorológicos PRIMAVERA - Station météo radio-pilotée PRIMAVERA - Stazione meteorologica radiocontrollata PRIMAVERA - Radiografisch weerstation sonnig / sunny / ensoleillé...