
Inhaltszusammenfassung für Dyancord CMS 1000-3
- Seite 1 CMS 1000-3 | 1600-3 | 2200-3 COMPACT MIXING SYSTEM Owner‘s Manual | Bedienungsanleitung...
- Seite 44 WICHTIGE SICHERHEITSHINWEISE Das Blitzsymbol innerhalb eines gleichseitigen Dreiecks soll den Anwender auf nicht isolierte Lei- tungen und Kontakte im Geräteinneren hinweisen, an denen hohe Spannungen anliegen, die im Fall einer Berührung zu lebensgefährlichen Strom- schlägen führen können. Das Ausrufezeichen innerhalb eines gleichseitigen Dreiecks soll den Anwender auf wichtige Bedie- nungs- sowie Servicehinweise in der zum Gerät gehörenden Literatur aufmerksam machen.
-
Seite 45: Einführung
1 Einführung 1.2 Garantie Die Compact Mixing Systeme CMS 1000-3, CMS 1600-3 und CMS 2200-3 sind professionelle Mischpulte die aufgrund der vielen integrierten Features, wie Equalizer Bewahren Sie neben der Garantiekarte auch den und Effektgeräte, eine optimierte Komplettlösung für un- terschiedlichste Einsatzgebiete darstellen. -
Seite 46: Bedienelemente Und Anschlüsse
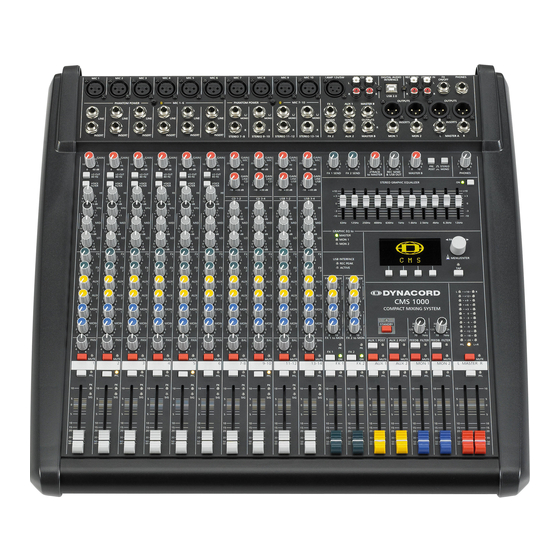
2 Bedienelemente und Anschlüsse 2.1 Input Mono HINWEIS: Achten Sie bitte darauf, dass vor dem Anschluss von Signalquellen die jeweiligen Kanalregler, mindestens jedoch die beiden Masterregler, geschlossen sind, oder der STANDBY-Schalter gedrückt ist. Sie ersparen sich selbst, Ihrem Publikum und Ihrem Equipment unnötige Beanspruchungen durch Knackgeräusche. -
Seite 47: Gain-Regler
HINWEIS: Betreiben Sie bitte keine E-Gitarre bzw. E-Bass mit passiver Elektronik und hochohmigem Ausgang direkt an einem Mischpult Line-Eingang. Diese Eingänge sind typischerweise, auch bei allen andern Herstellern, für relativ niedrige Quellimpedanzen ausgelegt, wie sie elektronische Geräte aufweisen. Das Klangergebnis wird unbefriedigend sein und der Klangcharakteristik der Instrumente nicht gerecht werden. - Seite 48 5 - LO CUT 80 H CHALTER Mit dem LO CUT 80 Hz-Schalter können Bassfrequenzen unterhalb 80 Hz mit einer Flankensteilheit von 18 dB pro Oktave unterdrückt werden. Sinnvoll ist die Benutzung des LO CUT-Filters bei allen Mikro- fonanwendungen, wobei hier die Abnahme von Bassdrum oder Bass gesondert zu betrachten ist. Mit diesem Filter werden wirkungsvoll alle Rumpel- oder Poppgeräusche als auch tieffrequente Feedback- signale unterdrückt.
-
Seite 49: Klangregelung (Hi-, Mid-, Lo-Regler )
7 - K (HI-, MID-, LO-R LANGREGELUNG EGLER Die Klangregelung erlaubt eine sehr umfangreiche und effektive Beeinflussung des Eingangssignals innerhalb unter- schiedlicher Frequenzbereiche. Eine Drehung der Klangregler nach rechts bewirkt eine Anhebung/Verstärkung des ent- sprechenden Frequenzbereichs. Eine Drehung nach links bewirkt eine Absenkung/Abschwächung des entsprechenden Frequenzbereichs. -
Seite 50: Mute-Schalter
zurück. Weiter Informationen finden Sie in den Abschnitten EFFEKT 1/2. Wenn Sie die eingebauten Effekteile nicht, bzw. zusätzliche externe Effektgeräte benutzen wollen, steht das jeweilige FX- Summensignal auch im Masterbereich an den FX 1/2-Buchsen zur Verfügung. 9 - AUX 1/2-R EGLER Die AUX 1- bzw. - Seite 51 14 - SIG/PK-A NZEIGE Die Signal / Peak-Anzeige hat eine Schlüsselfunktion bei der Pegelkontrolle im Betrieb. Durch Aufleuchten der PK-LED (Peak) sehen Sie bereits wenn Übersteuerungsgefahr besteht und müssen die Verzerrung nicht erst akustisch wahrnehmen. Wie bereits in den Einstellhinweisen (Seite 47) beschrieben, sollte die SIG-LED (Signal) rhythmisch dem eingespielten Signal folgen.
-
Seite 52: Input Stereo
2.2 Input Stereo Wir wollen Sie hier bei der Beschreibung des STEREO-INPUTS nicht langweilen, viele Funktionsgrup- pen wie AUX-Regler, MON-Regler, Kanalfader sind im STEREO INPUT identisch zum MONO INPUT aufgebaut und wurden dort bereits ausführlich erklärt. Wir wollen hier nur die wesentlichen Unter- schiede herausarbeiten. - Seite 53 Abbildung 2-10: Unsymmetrische bzw. symmetrische Belegung von Klinkensteckern UNBALANCED BALANCED SHIELD SHIELD COLD Verwendung von Cinch-Steckern Die Cinch-Eingänge CD 1-2 und CD 3-4 sind den Klinken-Eingängen parallel geschaltet. Um gegenseitige Beeinflussung zu vermeiden sollte nur an den Cinch- oder den Klinken-Eingängen eine Quelle eingesteckt sein. Abbildung 2-11: Cinch-Eingangsbuchsen Je nach Gerätevariante sind die Eingänge CD 1-2 bzw.
- Seite 54 19 - GAIN LINE CD / USB-R EGLER Mit diesem Regler wird das Signal an den Line-Eingängen bzw. Cinch-/USB-Eingängen im Stereokanal an den internen Arbeitspegel des Mischpultes angepasst. Der Regelbereich liegt bei 30 dB. Die Unity- Gain-Position, also 0 dB Durchgangsverstärkung, ist hier bei der Markierung 0 dB. Sie können mit die- sem Regler das Signal um bis zu 10 dB abschwächen bzw.
- Seite 55 23 - MON 1/2-R EGLER Mit diesen Reglern wird das aus dem linken und rechten Kanal summierte Signal PRE-FADER auf die MON 1- bzw. MON 2-Summenschienen ausgespielt. Die Funktionsweise wurde bereits im Abschnitt Input Mono erläutert. 24 - BAL-R EGLER Ähnlich wie beim Panorama-Regler im Monokanal, wird hier die Balance des Signals im Stereobild angepasst.
-
Seite 56: Auswahl Eines
2.3 FX 1/2 Das CMS ist mit zwei unabhängig voneinander regelbaren 24bit-Stereo-Effektteilen FX 1 und FX 2 aus- gestattet. Die beiden Effektteile sind völlig identisch aufgebaut. Es stehen je Effektsektion 100 Presets zur Auswahl, die über das Display selektiert werden. Darüber hinaus besteht die Möglichkeit aus- gehend von den Preset-Programmen einzelne Parameter der Effekte zu verändern und in 20 User- Presets (Programmnummer 101-120) abzuspeichern. - Seite 57 30 - FX 1/2 SENDS-B UCHSEN An der Buchse FX 1 bzw. FX 2 steht die Abmischung, die Sie über die jeweilige FX-Schiene erstellt haben, parallel zum Effektteil zur Verfügung. Sie können hier z. B. ein externes Effektgerät anschließen. Das extern erzeugte Effektsignal kann dann über einen Stereo-Input zurückgeführt werden.
-
Seite 58: Aux 1/2
2.4 AUX 1/2 Die Kanalzüge AUX 1/AUX 2 können beliebig zum Monitoring oder als zusätzliche FX Sends (bei gedrückter AUX 1/2 POST Taste) betrieben werden. Zusätzlich sind AUX 1 bzw. AUX 2 auf den Ka- nälen USB 3 bzw. USB 4 des DIGITAL AUDIO INTERFACE verfügbar. 38 - AUX 1/2 SENDS-B UCHSEN Hier schließen Sie entweder ein Effektgerät oder im Monitorbetrieb eine Monitorendstufe bzw. - Seite 59 Terz- oder Oktavequalizer, Kompressor, Limiter, De-Esser, usw. in den MON-Kanal. Der Einschleifpunkt liegt schaltungs- technisch vor den MON-Fadern. Hier sind, wie auch bei den Inserts in den Monokanälen, verschiedene DIRECT OUT Funktionen möglich. Beachten Sie hierzu den entsprechenden Abschnitt auf Seite 47. 44 - FEEDBACK FILTER-S CHALTER Das Feedback-Filter ist ein spezielles Notch-Filter zur schmalbandigen Unterdrückung eines rückkopplungs-...
-
Seite 60: Master Mit Geq
2.6 MASTER mit GEQ 49 - MASTER LED-D ISPLAY Die Aussteuerungsanzeige im CMS besteht aus zwei LED-Ketten für den rechten bzw. linken Kanal mit je 12 LEDs pro Kette. Der Anzeigebereich liegt bei 40 dB und stellt den Pegel in dBu an den Master Outputs dar. -
Seite 61: Pre/Post-Schalter Für Master B
54 - MASTER A OUT L/R-B UCHSEN Dies sind die elektronisch symmetrischen Hauptausgänge des Mixers, die nach den Masterfader L/R angeordnet sind. Hier wird die Haupt-Beschallungsanlange angeschlossen. Die MASTER Ausgänge sind mit Ausgangsrelais ausgestattet, durch die Knackgeräusche beim Ein- bzw. Ausschalten des Gerätes unterdrückt werden. Bitte beachten Sie, dass das Mastersignal erst ca. -
Seite 62: 2Track In L/R-Buchsen
ACHTUNG: Viele Recorder spielen bei der Aufnahme gleichzeitig über den PLAY- BACK-Weg das Signal wieder zurück. Sollten Sie nun zu den REC SEND-Buch- sen auch die 2TRACK RETURN Buchsen angeschlossen haben, wird das Aufnahme-Signal bei geöffnetem 2TRACK to MASTER-Regler wieder dem Hauptmix zugeführt. -
Seite 63: Display Mit Funktions-Tasten
Abbildung 2-17: Belegung der LAMP 12V/5W-Buchse 67 - 11-BAND STEREO GRAPHIC EQUALIZER In den Masterkanal (oder wahlweise in die Monitorkanäle) kann ein 11-Band Equalizer über die ON-Taste eingeschaltet werden. Der EQ liegt dann schaltungstechnisch nach den Master-Schiebereglern und vor den MASTER A OUT L/R-Buch- sen. - Seite 64 Effekt-Betriebsart Das Display zeigt in der Effekt-Betriebsart die aktuell eingestellte Programmnummer des jeweiligen Effektteils an. Mit den vier Tasten unter dem Display werden die Effektprogramme angewählt. Weitere Informationen finden Sie im Abschnitt “Effekt-Betriebsart” auf Seite 66. Menü-Betriebsart Durch Drücken des MENU/ENTER-Drehencoders wechselt die Anzeige von der Effekt-Betriebsart in die Menü-Betriebs- art.
-
Seite 65: Rückseite
2.8 Rückseite 73 - N ETZBUCHSE Die Spannungsversorgung des CMS erfolgt ausschließlich mit dem mitgelieferten IEC-Netzkabel über eine verriegelnde Netzbuchse. Schließen Sie das CMS nur an eine geeignete Netzversorgung an, die den auf dem Typenschild angegebenen Anforderungen entspricht. HINWEIS: Zum Abziehen des Netzkabels drücken Sie die gelbe Entriegelung-Taste am Stecker. 74 - N (POWER) ETZSCHALTER... -
Seite 66: Display & Funktionen
3 Display & Funktionen Das CMS ist mit einem hochwertigen OLED-Display ausgestattet. Im Vergleich zu üblichen LC-Displays sind OLED-Dis- plays wesentlich heller, kontrastreicher und sind unabhängig vom Blickwinkel optimal abzulesen. 3.1 Effekt-Betriebsart Nach dem Einschalten des CMS wird der Startbildschirm Nummer Beschreibung angezeigt. - Seite 67 ENÜ Abbildung 3-5: Menüstruktur des CMS REC STUDIO MIDI PEAK AUX 1 BRIGHT HALL MONO DELAY Main Menu Large Hall 3 230 ms 40% Edit FX 1 Device Setup FX Control Setup Footswitch Ctrl. Edit FX 2 Display Brightness TAP Button Ctrl. USB Record Routing Screensaver FX1 Start Preset...
- Seite 68 MENU/ENTER-Drehencoders übernimmt die gewählte Zu- Parameter Beschreibung ordnung. Drücken der BACK-Funktionstaste führt in das Footswitch Ctrl. Ein angeschlossener Fußschalter kann für die Bedienung Menü zurück. Drücken der ESC-Funktionstaste führt in eines einzelnen oder beider Effektteile verwendet wer- die Effekt-Betriebsart zurück. den.
-
Seite 69: Device Setup
Abbildung 3-13: FX Control Setup nach links, um die Zeit bis zur Aktivierung zu verkürzen bzw. den Bildschirmschoner zu deaktivieren (Off). FX Control Setup Drehen Sie den MENU/ENTER-Drehencoder nach rechts, um die Zeit bis zur Aktivierung zu verlängern. Drücken des Footswitch Ctrl. -
Seite 70: Effekte
ders zwischen YES und NO gewählten werden. Bei Wahl Parameter Wert von YES werden durch den Rücksetzvorgang auch alle USB Record Routing Live vorhandenen FX User Presets gelöscht. Bei Wahl von NO Equalizer Routing Linker und rechter Kanal des Master-Ausgangs werden die vorhandenen FX User Presets nicht gelöscht. -
Seite 71: Digital Audio Interface
4 DIGITAL AUDIO INTERFACE Die USB 2.0-Schnittstelle dient als digitale Audio-Schnitt- HINWEIS: Verwenden Sie hochwertige USB 2.0-Kabel stelle des CMS für einen PC oder Mac. Das DIGITAL AU- für optimale Signalübertragung. DIO INTERFACE kann gleichzeitig als Eingang und ACHTUNG: Für mögliche Datenverluste infolge der Ausgang verwendet werden. -
Seite 72: Funktionsanzeige Im Display
Abbildung 4-1: Konfiguration von Cubase LE 4.3 Funktionsanzeige im Display Das Display des CMS zeigt in der Effekt-Betriebsart Sta- Anzeige Beschreibung tusinformationen des DIGITAL AUDIO INTERFACE an. PEAK AUX 1, Falls es in einem der vier Aufnahmekanäle zu einer Über- PEAK AUX 2, steuerung kommt, reduzieren Sie den Ausgabepegel des Abbildung 4-2: DIGITAL AUDIO INTERFACE-Anzeige im Display... -
Seite 73: Anwendungsbeispiele (Wiedergabe)
Abbildung 4-4: Übertragung von MIDI-Daten vom PC/Mac zu Abbildung 4-5: Übertragung von MIDI-Daten von einem Master einem Synthesizer Keyboard zum PC/Mac MIDI MIDI USB from PC/Mac USB to PC/Mac MIDI OUT MIDI IN MIDI MIDI to Synthesizer Master Keyboard HINWEIS: Sollen MIDI-Daten mit der Medienwiedergabe von Windows an externen Geräten wiedergegeben wer- den, müssen Sie in der Windows-Systemsteuerung den Dialog "Sounds und Audiogeräte"... -
Seite 74: Anwendungsbeispiele (Aufnahme)
Auf diese Weise wird einer Klangverfälschung vor- gebeugt, die entstehen könnte, wenn das USB-Signal über die Stereofader und gleichzeitig den 2TRACK IN- Regler auf den Master gelangen würde. 4.6 Anwendungsbeispiele (Aufnahme) Bei den folgenden Anwendungen wird Ihr PC/Mac zur HINWEIS: Beachten Sie, dass bei der Aufnahme die Aufnahme verwendet, das CMS fungiert hierbei als hoch- Signale der Raummikrofone nicht in die... -
Seite 75: Midi-Klangerzeuger Und Multieffektgerät
Fader des Mischpultes dazu verwenden, die Monito- wieder zum Mischpult zurückgeleitet werden muss. Letz- rabmischung für die Musiker zu erstellen. Für das Monito- teres ist prinzipbedingt immer mit einer gewissen Durch- ring sollten Sie selbstverständlich Kopfhörer verwenden, laufverzögerung (Latenz) verbunden. da Lautsprecher auch immer auf die Aufnahmemikrofone einwirken. -
Seite 76: Aufbau Einer Standard-Pa
5 Aufbau einer Standard-PA 5.1 Verkabelung Das Netzkabel haben Sie mit dem CMS erhalten. Für alle meisten Audiogeräte wie Endstufen, Equalizer, Effekt- anderen Kabel sind Sie selbst verantwortlich und je sorg- geräte, Mischpulte und auch einige Keyboards verfügen fältiger Sie bei der Auswahl der Kabel vorgehen, um so über symmetrisch aufgebaute Eingänge bzw. -
Seite 77: Aufbau
5.2 Aufbau Stellen Sie das CMS so auf, dass Sie auch im darauf, dass nicht eines der Mikrofone direkt auf Betrieb leichten Zugriff haben und schließen Sie die die Monitore zielt. Beachten Sie auch die Charakte- Netzkabel an. ristik der verwendeten Mikrofone. Suchen Sie die günstigste Position für Ihre PA- Verkabeln Sie die Bassboxen, Monitorboxen und Boxen. - Seite 78 Überprüfen Sie nun, ob bei allen nicht benötigten ETZTE ORREKTUREN Eingängen die Kanalfader und die GAIN-, GAIN MIC-, LINE CD- bzw. LINE USB-Regler geschlossen sind. Sie ver- Spielen Sie nun im komplett Setup und hören Sie die meiden dadurch unnötiges Rauschen auf den Ausgängen. Haupt-PA aus verschiedenen Entfernungen ab.
-
Seite 79: Aufbaubeispiele
6 Aufbaubeispiele 6.1 CMS mit D-Lite activeone Abbildung 6-1: CMS mit D-Lite activeone (2 x D 8A, 1 x PowerSub 212) als Haupt-PA, zusätzlich 2 x D 8A für die Monitorwege CMS 1000 COMPACT MIXING SYSTEM... -
Seite 80: Cms Mit D-Lite Activetwo
6.2 CMS mit D-Lite activetwo Abbildung 6-2: CMS mit D-Lite activetwo (2 x D 8A + 2 x PowerSub 112) als Haupt-PA, zusätzlich 2 x D 8A für die Monitorwege CMS 1000 COMPACT MIXING SYSTEM... -
Seite 81: Cms Mit D-Lite Activefour
6.3 CMS mit D-Lite activefour Abbildung 6-3: CMS mit D-Lite activefour (2 x D 11A + 2 x PowerSub 212) als Haupt-PA, zusätzlich 2 x D 11A für die Monitorwege CMS 1000 COMPACT MIXING SYSTEM... -
Seite 82: Cms Mit Xa-2 System
6.4 CMS mit Xa-2 System Abbildung 6-4: CMS mit Xa-2 System (2 x FX 12, 4 x FX20, 2 x Xa 4000) als Haupt-PA, zusätzlich 2 x D 8A für die Monitorwege Xa 4000 Xa 4000 CMS 1000 COMPACT MIXING SYSTEM... -
Seite 83: Cms Mit Corus-Evolution System
6.5 CMS mit CORUS-Evolution System Abbildung 6-5: CMS mit CORUS-Evolution System (2 x C 25.2, 2 x Sub 2.18, 2 x LX 3000, 1 x DSP 260) als Haupt-PA, zusätzlich 2 x D 11A für die Monitorwege LX 3000 LX 3000 DSP 260 CMS 1000 COMPACT MIXING SYSTEM... -
Seite 84: Cms Mit Variline System
6.6 CMS mit VariLine System Abbildung 6-6: CMS mit VariLine System (2 x VL 152, 2 x Sub 18, 3 x LX 3000, 1 x DSP 600) als Haupt-PA, zusätzlich 2 x VL 122 und 1 x LX 2200 für die Monitorwege LX 3000 LX 3000 LX 3000... -
Seite 87: Dimensions
7.1 Dimensions... - Seite 90 Notes...
- Seite 91 Notes...