Fiamma Vent F Pro Gebrauchs- Und Montageanleitung
Comfort

Verwandte Anleitungen für Fiamma Vent F Pro


Inhaltszusammenfassung für Fiamma Vent F Pro
- Seite 1 fi amma.com fi amma.com Montage- und DACHHAUBE Gebrauchsanleitung Installation and ROOFLIGHT usage instructions Instructions de montage et LANTERNEAU mode d’emploi CLARABOYA Instruciones de montaje y uso OBLÓ Istruzioni di montaggio e d’uso Vent F Pro Quality Motorhome Products COMFORT...
- Seite 2 Verpackungsinhalt Package contents Contenu de l’emballage Contenido del embalaje Contenuto dell’imballo Kontrolle bei der Übernahme Goods receipt inspection Contrôle à la réception Control al recibimiento Controllo al ricevimento Bitte kontrollieren Sie, dass alle Einzelteile einwandfrei sind und nicht während dem Transport beschädigt wurden.
- Seite 3 Montageanleitung Installation instructions Instructions de montage Instrucciones de montaje Istruzioni di montaggio COMFORT...
- Seite 4 Gebrauchsanweisungen und Ratschläge Maintenance instructions Instructions et conseils Recomendaciones Avvertenze e suggerimenti Um das Produkt optimal nutzen zu können, lesen Sie bitte die Bedienungsanleitung aufmerksam durch und bewahren Sie sie zur späteren Verwendung auf. To use the product in the best way, read the user’s instructions carefully and keep them to hand for future consultation.
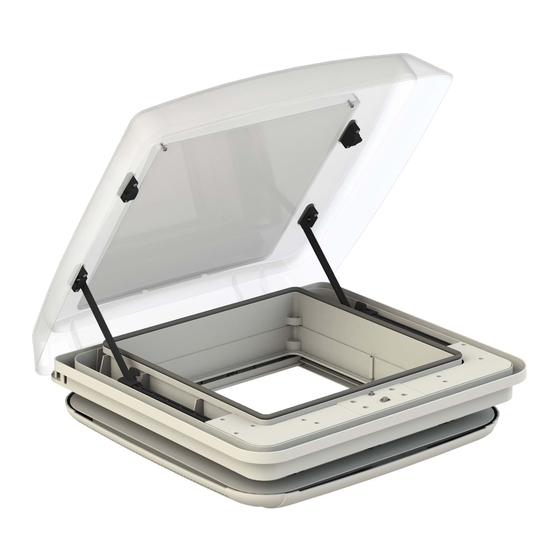
- Seite 5 Technische Daten Technical specifi cations Données techniques Datos tecnicos Dati Tecnici Dimensions de perçage en mm. 400 x 400 mm. Encombrement externe en mm. 566 x 531 x h92 mm. Encombrement interne en mm. 490 x 486 x h35 mm. Lumière interne 344 x 344 mm.
- Seite 6 Montageanleitung Installation instructions Instructions de montage Instrucciones de montaje Istruzioni di montaggio Sicherheits- und Montagehinweise: • Es ist verboten auf der Aussenhaube zu gehen. • Vor dem Starten des Fahrzeuges die korrekte Schliessung der Dachhaube kontrollieren. • Regelmässig kontrollieren, dass die Abdeckung keine Risse aufweist. •...
- Seite 7 Montageanleitung Installation instructions Instructions de montage Instrucciones de montaje Istruzioni di montaggio Nachdem festgelegt wurde wo die Dachhaube angebracht werden soll, einen Ausschnitt am Dach vornehmen. Die Dachoberfl äche reinigen um die vom Hersteller empfohlene Dichtungsmasse anbringen zu können. Die Dichtungsmasse (SikaLastomer710) am Aussenrahmen auf der dafür vorgesehenen Schiene anbringen.
- Seite 8 Montageanleitung Installation instructions Instructions de montage Instrucciones de montaje Istruzioni di montaggio Safety and installation instructions: • It is forbidden to walk on the cover of the product. • Before starting your journey, check that the roofl ight is locked properly. •...
- Seite 9 Montageanleitung Installation instructions Instructions de montage Instrucciones de montaje Istruzioni di montaggio Once the roofl ight installation location has been chosen, make a hole on the roof. Clean the roof mounting area, which will be in contact with the seal according to the manufacturer.
- Seite 10 Montageanleitung Installation instructions Instructions de montage Instrucciones de montaje Istruzioni di montaggio Consignes de sécurité et installation : • Ne pas marcher sur le capot. • Avant tout démarrage du véhicule, vérifi er que le lanterneau est bien fermé. • Contrôler périodiquement que le capot ne présente aucune fi ssure. •...
- Seite 11 Montageanleitung Installation instructions Instructions de montage Instrucciones de montaje Istruzioni di montaggio Une fois déterminé le lieu de pose du lanterneau, effectuer une ouverture sur le toit. Nettoyer la surface du toit qui sera en contact avec le mastic en suivant les recommandations du producteur.
- Seite 12 Montageanleitung Installation instructions Instructions de montage Instrucciones de montaje Istruzioni di montaggio Modo de instalación y seguridad: • No pisar la cupola de vidrio. • Antes del comienzo del viaje ,controlar si la claraboya está correctamente cerrada. • Periódicamente controlar que la claraboya no presente grietas en el vidrio. •...
- Seite 13 Montageanleitung Installation instructions Instructions de montage Instrucciones de montaje Istruzioni di montaggio Una vez defi nido el lugar de montaje de la claraboya, practicar una abertura en el techo. Limpiar la superfi cie del techo en contacto con el sellador de masilla según las indicaciones del fabricante.
- Seite 14 Montageanleitung Installation instructions Instructions de montage Instrucciones de montaje Istruzioni di montaggio Indicazioni di sicurezza e montaggio: • E’ vietato camminare sulla copertura del prodotto. • Prima di mettere in moto il veicolo controllare la corretta chiusura dell’oblò. • Periodicamente controllare che la copertura non presenti incrinature. •...
- Seite 15 Montageanleitung Installation instructions Instructions de montage Instrucciones de montaje Istruzioni di montaggio Defi nito il punto di installazione dell’oblò praticare un’apertura sul tetto. Procedere con la pulizia della superfi cie del tetto che verrà a contatto con il sigillante come da indicazioni del produttore stesso. Applicare il mastice sigillante (SikaLastomer710) sul telaio esterno seguendo l’apposito binario.
- Seite 16 Montageanleitung Installation instructions Instructions de montage Instrucciones de montaje Istruzioni di montaggio COMFORT...
- Seite 17 Montageanleitung Installation instructions Instructions de montage Instrucciones de montaje Istruzioni di montaggio COMFORT...
- Seite 18 Montageanleitung Installation instructions Instructions de montage Instrucciones de montaje Istruzioni di montaggio Anziehen max 1.5 Nm Tightening max 1.5 Nm Serrage max 1.5 Nm Apriete max 1.5 Nm Serraggio max 1.5 Nm COMFORT...
- Seite 19 Montageanleitung Installation instructions Instructions de montage Instrucciones de montaje Istruzioni di montaggio COMFORT...
- Seite 20 Montageanleitung Installation instructions Instructions de montage Instrucciones de montaje Istruzioni di montaggio COMFORT...
- Seite 21 Gebrauchsanweisungen und Ratschläge Maintenance instructions Instructions et conseils Recomendaciones Avvertenze e suggerimenti COMFORT...
- Seite 22 Gebrauchsanleitung Instructions for use Mode d’emploi Instrucciones de montaje Istruzioni d’uso ÖFFNUNG UND SCHLIESSUNG DER HAUBE Öffnung: Die Kurbel aus der Vorrichtung herausziehen und in Pfeilrichtung drehen, 8 Drehungen für die komplette Öffnung der Haube. Schliessung: Die Kurbel aus der Vorrichtung herausziehen und in Pfeilrichtung drehen: ein hörbares Einrasten bedeutet, dass die Haube komplett geschlossen ist.
- Seite 23 Gebrauchsanleitung Instructions for use Mode d’emploi Instrucciones de montaje Istruzioni d’uso COMFORT...
- Seite 24 Gebrauchsanleitung Instructions for use Mode d’emploi Instrucciones de montaje Istruzioni d’uso ÖFFNUNG UND SCHLIESSUNG DER VERDUNKLUNG: - Durch den vorgesehenen Griff bei der Verdunklung kann dies in die entsprechende Position geschoben werden. - Im Falle von starker Sonneneinstrahlung kann, um einer Überhitzung vorzubeugen, das Verdunklungsrollo nur zu ⅔...
- Seite 25 Gebrauchsanleitung Instructions for use Mode d’emploi Instrucciones de montaje Istruzioni d’uso COMFORT...
-
Seite 26: Troubleshooting
Gebrauchsanweisungen und Ratschläge Maintenance instructions Instructions et conseils Recomendaciones Avvertenze e suggerimenti REPARATURHILFEN Mangel Mögliche Ursache Lösung Die Aussenhaube Mögliche Fremdkörper Fremdkörper (Blätter oder schliesst nicht zwischen Abdeckung und Äste) entfernen. einwandfrei. Rahmen oder auch in der Kabelschiene vorhanden. Verdunklung läuft Zu hohe Spannung Die Führung mit nicht gleichmässig in... - Seite 27 Gebrauchsanweisungen und Ratschläge Maintenance instructions Instructions et conseils Recomendaciones Avvertenze e suggerimenti INTERVENCION EN CASO DE PROBLEMAS Defecto Causa probable Solución La tapa de la Presencia de cuerpos Quitar posibles hojas o claraboya no se extraños entre tapa y ramas. cierra.
- Seite 28 Gebrauchsanweisungen und Ratschläge Maintenance instructions Instructions et conseils Recomendaciones Avvertenze e suggerimenti 1) Kontrollieren Sie regelmäßig, dass alle an der Dachhaube vorhandenen Schrauben korrekt angezogen sind, da sich diese durch die Vibrationen während der Fahrt lockern könnten. 2) Bei Verhärtung des Griffes zum Öffnen und Schließen, was sehr unwahrscheinlich ist, diesen mit etwas Schmierfett einschmieren.
- Seite 29 Wartung Maintenance Entretien Mantenimento Manutenzione PFLEGE UND INSTANDHALTUNG: - Die Innen- und Aussenreinigung der Dachhaube muss mit neutralen und nicht Die Innen- und Aussenreinigung der Dachhaube muss mit neutralen und nicht aggressiven Reinigungsmitteln sowie einem weichen Lappen erfolgen, um die Oberfl äche aggressiven Reinigungsmitteln sowie einem weichen Lappen erfolgen, um die Oberfl...
- Seite 30 Warranty Fiamma Garantie Fiamma Garantie Fiamma Garantía Fiamma Garanzia Fiamma Im Falle einer Vertragswidrigkeit der Ware, kann der Verbraucher unter den erforderlichen Voraussetzungen gegenüber dem Verkäufer von dem Garantieanspruch zu den festgelegten Bedingungen gemäss den lokalen Rechtsvorschriften Gebrauch machen. In case of defects with regards to materials and manufacturing, the customer is entitled to the warranty in accordance with local laws and regulations of the country in which the product was purchased.
- Seite 31 Ersatzteile Spare parts Pièces detachées Recambios Ricambi Vent F Pro 98683-130 98683-131 98683-132 98683-133 COMFORT...
- Seite 32 fi amma.com All rights reserved. Fiamma S.p.A. reserves the right to modify at any time, without notice, prices, materials, specifi cations and models or to cease production of any model. 07380-01- Fiamma SpA - Italy E0_IS_98690-325_revB Via San Rocco, 56...