Amewi 22415 Bedienungsanleitung

Verwandte Anleitungen für Amewi 22415


Inhaltszusammenfassung für Amewi 22415
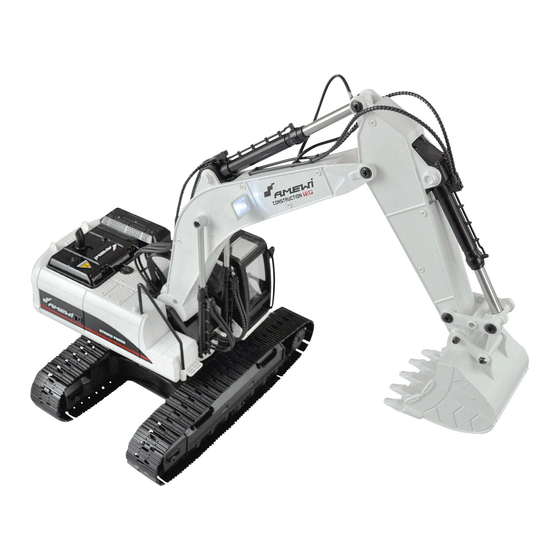
- Seite 1 Bedienungsanleitung - Instruction Manual Artikel | Item: 22415 Artikel I Item: 22415 www.amewi.com FULL METAL RI C Fullyfunctional PROFESSIONAL E XCAVATOR AMEWI Trade e.K. Nikolaus-Otto-Str. 18 33178 Borchen Germany www.amewi.com info@amewi.com Facebook https://www.facebook.com/amewicom/...
-
Seite 2: Willkommen
Herzlich willkommen AMEWI TRADE e.K. ist ein junges, international tätiges Import- und Großhandelsunternehmen im Bereich RC Modellbau und Spielwaren, mit Sitz in Borchen bei Paderborn. Unsere Produktpalette beinhaltet über 6.000 Artikel. Dazu gehören vor allem ferngesteuerte Auto-, Hubschrauber-, Boots- und... - Seite 3 Sie sich an den Hersteller. ntsorgungshinweise Die Firma AMEWI ist unter der WEEE Reg. Nr. DE93834722 bei der Stiftung EARangemeldet und recycelt alle gebrauchten elektronischen Bauteile ordnungsgemäß. Elektrische und elektronische Geräte dürfen nicht in den Hausmüll! Entsorgen Sie das Produkt am Ende seiner Lebensdauer gemäß den geltenden gesetzlichen Vorschriften.
-
Seite 4: Funktionen
Funktionen Fernbedienung Passwort Bestätigungsknopf Stoppuhr Greifen 00:00 EIN/AUS Sound Rauch Öffnen Mittlerer heben senken Plattform Plattform Greifer hebt Greifer senkt sich links drehen rechts drehen sich Mittlerer senken heben links vorwärts rechts vorwärts rückwärts links rückwärts rechts... -
Seite 5: Fernsteuerung
Einsetzen des Akkus Öffnen Sie den Deckel mit der Verschlusskappe (Pfeil), setzen Sie den Akku wie im Bild gezeigt ein. Schliessen Sie den Deckel wieder. Akku / Rauchölfach Deckelverschluss Akkuhalter 7.4V Lithium lonen Akku AUS IAN Power Anschluss Fernsteuerung - Batterieen Sie benötigen 3x 1.5V Batterieen. - Seite 6 Laden des Akkus ademethode Akku / USB Daten Akku Daten: 18650 Zelien Stecken Sie den USB-Stecker 7.4V 2000mAh LITHIUM Ladekabels in einen USB 5V Anschluss. Stecken Sie den weißen Akkustecker SMART USBLaderegler m it Überladeschutz in die weiße Ladekabelbuchse. Eingang: 5V 1-2A Ausgang: 4.2V 800mAh x2 USB-LadekabeI USB Status (Ladevorgang):...
-
Seite 7: Modell Einschaltreihenfolge
Modell Einschaltreihenfolge 1. Modell 2. Fernsteuerung Fahrbetrieb zuende: 3. Modell 4. Fernsteuerung aus Das Display zeigt den Startbildschirm, 00 blinkt. Sie können nun Fahren. Batterieanzeige Signalstärke Fernsteuerung Zeit TINE OISPLRY Akkuanzeige Passwort Modell (Graph 1) (Graph 2) Dieser Bagger hat 2 Betriebsmodi, im 2. Modus kann der Spielbetrieb sobald derTimer abläuft erst nach erneuter Passworteingabe aufgenommen werden. -
Seite 8: Spielzeiteinstellung
Spielzeiteinstellung 1. Drücken Sie die Taste 3 Sekunden lang um in den Zeitmodus zu gelangen (I) (Graph 1) 2. Die Minutenanzeige blinkt (2), mit dem rechten Joystick -> Knüppel nach rechts (4) , vvählen Sle die Sekunden. Joystick (3) nach oben / unten ändert den Zahlen Wert. Bewegen Sie den rechten Joystick nach links, können Sie die Minuten einstellen. -
Seite 9: Steuerung
Steuerung Schaufel/ Arm/ Plattform Schaufel hebt sich Schaufel senkt sich Der mittlere Der mittlere hebt sich senkt sich Plattform links drehen Plattform rechts drehen... - Seite 10 Fahrfunktionen rechts rückwärts rechts rückwärts links rückwärts 360 Grad Drehung rechts 360 Grad Drehung links (lange drücken) (lange drücken)
- Seite 11 Licht Soundfunktionen Drücken Sie den Knopf um das Licht ein- Oder auszuschalten. Rauchfunktion Drücken Sie den Knopf um die Rauchfunktion ein- Oder auszuschalten. Rauchöl nachfüllen ÖffnenSiedie hintereAbdeckungundfüllen Sie ca.2ml Rauchöl in die Öffnung des Rauchgenerators. Falls Sie einmal versehentlich zu viel ÖL einfüllen müssen Sie das Gehäuse öffnen...
- Seite 12 Zubehör auswechseln 1. Entfernen Sie die Schraube (1) und entfernen Sie die Schaufel (2). Setzen Sie den Greifer / Hammer wie gezeigt ein und montieren Sie die Schrauben. im Arm Hammer Holzgreifer Funktionen des Zubehörs Hämmern AUF/AB Holz greifen Greifen Loslassen...
- Seite 13 Boats and Tanks including a lot of extra parts and all needed spare parts Our distribution network contains over 600 specialist dealers and online shops AMEWI Trade e.K. is an Wholesale Company We only distribute our goods to retailers. IF you are an End-Customer...
-
Seite 14: Declaration Of Conformity
This product has been manufactured according to actual technical standards. The product is matching the requirements of the existing european and national guidelines. The Declaration of Conformity has been proofed. AMEWI Trade e.K. declares that this product is matching the basic requirements and remaining regulations Of the guideline 2014/53/EU (RED). - Seite 15 Remote Control Transmitter Operation Indicator light Password confirmation key Time confirmation key Caught RY CO:OO pwcco switch Sound Smoke Release switch switch middle rises down The platform bucket The platform bucket rises drops rotates right turns left In the down Arm rising Right forward Left...
-
Seite 16: Battery Installation
Remote control model battery installation Model using 7.4V2000mAh lithium battery (battery included) first twist the lock to open the battery cover, refer to the method shown Do connect the battery into the battery compartment. Close the battery cover and twist the lock. battery cover Battery cover... -
Seite 17: Battery Charging
Battery charging instructions Charging method Battery I USB parameters Connect the white port of the lithium battery Battery Specifications: 18650 to the USB charging port as shown and 7 4V2000mAh lithium battery ensure that the port is tight and correct, Smart USB balanced with overcharge protection and then plug the USB charging head into... -
Seite 18: Remote Control
Remote control frequency matching and boot I. This product uses 2.4GHz frequency remote control Model Remote control The user first use the operation, first model and power switch power switch remote control to install the battery to ensure that power, turn on the power, boot automatically on the frequency, and have issued on the frequency of sound, "drop"... - Seite 19 Play time setting I. Press and hold the time confirmation key for three seconds (Graph I), enter the set time mode, (Graph I) 2. At this time, the number of digits per minute is flashing (Graph 2), and the right joystick (switch from 0-9) to the right shunt (switch from 0-9) (Graph 3) After selecting the number two seconds,...
- Seite 20 Mining arm and platform control The bucket drops bucket rises middle In the down rises The platform The platform turns left rotates right...
- Seite 21 [sseld 51101 91!LIM] [ssæd 61-101 el!L4M] LIO!1e10J seeu6ep nus ul uone10J seeu6ep eoeld [sseud Ouol [sseld 61101 91!VM] peeqe 06 spue,wpeg [1146!]bioeq ssæd 61107] [uonelou bioeq ssad 6uon] spuen•yoeq ypeq Luone10J ssæd 61101] [u0!1e10J penuo; ssad 61101] IOJ1uoo 'epon...
- Seite 22 Lighting and sound control After the model starts with lights and sound, press the sound key to turn off the sound and light at the same time, then press it to open. About smoke After the model starts in the play project, press the smoke button to open the smoke function, then press it to close.
-
Seite 23: Accessories
Accessories replacement 1. Remove the bucket fixing screw (Graph 1) and remove the bucket (Graph 2) (Graph 2) (Graph I) 2. Attach the fitting to the center arm and insert the screw on the nut to tighten (Graph 1) (the mounting method is the same) In the (Graph I)