krick Katja Bauanleitung
Verfügbare Sprachen
Verfügbare Sprachen
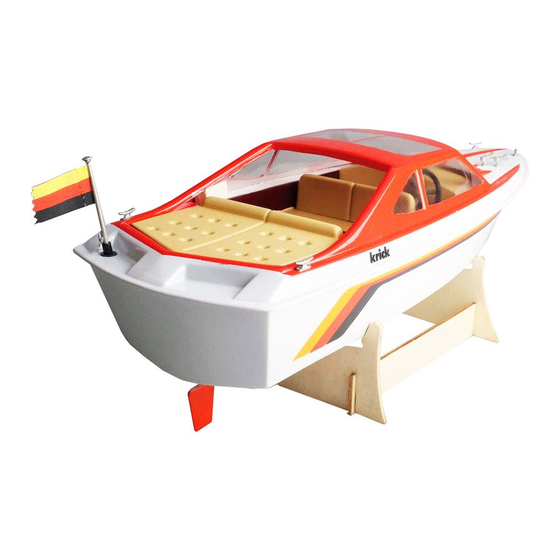
Technische Daten: Länge:
Allgemeine Bauhinweise zu Katja
Das Sportboot Katja kann sowohl für Freifahrt als auch für RC-Betrieb gebaut werden.
Welche Teile für die gewünschte Version zusätzlich benötigt werden, entnehmen Sie bitte
den nachstehenden Tabellen.
Nicht enthaltenes, jedoch erforderliches Zubehör für Freifahrt
Stück
Bezeichnung
1
Taschenlampenbatterie
2
Anschlussklemme (Büroklammer)
1
Schalter (im Elektrofachhandel erhältlich 40
Nicht enthaltenes, jedoch erforderliches Zubehör für RC-Betrieb
Stück
Bezeichnung
1
Fernsteueranlage ab 2 Kanälen in
Verbindung
kleinem Empfänger
1
Fahrtregler
1
Fahrakku
Stück
Bezeichnung
1
Ladegerät
1
Stahldraht, Ø 0,8 mm für Antenne falls Fernsteuerung nicht 2,4 GHz
Bauanleitung
Breite:
Gewicht fahrfertig: ca. 1100 g mit RC-Anlage
mit einem Servo
Katja
520 mm
180 mm
Stückl.-Nr.
38
39
Stückl.-Nr.
43, 44, 46
und
49, 50
45
51
Stückl.-Nr.
Best.-Nr.
67051
667218
Best.-Nr.

Verwandte Anleitungen für krick Katja


Inhaltszusammenfassung für krick Katja
- Seite 1 180 mm Gewicht fahrfertig: ca. 1100 g mit RC-Anlage Allgemeine Bauhinweise zu Katja Das Sportboot Katja kann sowohl für Freifahrt als auch für RC-Betrieb gebaut werden. Welche Teile für die gewünschte Version zusätzlich benötigt werden, entnehmen Sie bitte den nachstehenden Tabellen.
- Seite 2 Buchse mit Isolierung Stecker mit Isolierung Elektromotor 42235 Entstörsatz 3, 4 42128 Motoranschlusskabel Benötigte Werkzeuge und Hilfsmittel Balsamesser, Schere, Bohrer, Lötkolben mit Zubehör, Feilen, Schraubenzieher, Kombi- Zange, feines Schmirgelpapier, Pinsel, Wäscheklammern, Abklebeband. Erforderliche Lacke Porenfüller zum Grundieren der Holzteile. Lacke und Verdünnung für die Lackierung des Bootes.
- Seite 3 Nun den Kupplungsschlauch 14 so auf Schiffswelle und Motorwelle aufschieben, dass er ca. 10 mm auf beiden Wellen sitzt. Ganze Antriebseinheit nochmals ausrichten und sowohl Stevenrohr als auch Motorhalterung Sekundenkleber anpunkten. Anschließend werden die Teile 6 und 10 gut mit UHU acrylit im Rumpf vermufft.
- Seite 4 Zusammenfügen von Rumpf und Deck Um das bereits vorbereitete Deck beim Aufkleben einwandfrei fixieren zu können, sollten Sie sich einige Holz-Wäscheklammern an den Spitzen so bearbeiten, dass sie an dem schmalen Kleberand von Rumpf und Deck nicht abrutschen können. Bitte Zeichnung D beachten. Rumpf und Deck genau aufeinander setzen, ausrichten und die Passung prüfen.
- Seite 5 Sollte dies nicht der Fall sein, so müssen die Anschlusskabel am Motor vertauscht werden. Sind diese Prüfungen durchgeführt, steht der Jungfernfahrt nichts mehr im Wege. Viel Freude beim Bauen und Fahren Ihrer "Katja". Stück- und Materialliste zum Baukasten "Katja" Stückl.-Nr. Bezeichnung Material Maße in mm...
- Seite 6 Stückl.-Nr. Bezeichnung Material Maße in mm Stück Bemerkungen Kupplungsschlauch Gummi Ø1xØ5x30 Abstützung für Stevenrohr 1 nach Plan aus Abfall Abstützung für Ruderlager Sperrholz 3 nach Plan Ruderlager Ø3,2 mm innen 1 Rohrniet Ruder mit Schaft MS./Ku. Fertigteil U-Scheibe Ø3,2 mm innen 1 O-Ring Gummi Ø3 mm innen...