Herunterladen Inhalt Inhalt Diese Seite drucken
Vorschau ausblenden Andere Handbücher für LD 400:
Inhaltsverzeichnis

Werbung

Verfügbare Sprachen
  • DE

Verfügbare Sprachen

  • DEUTSCH, seite 1
Bedienungsanleitung
Laserentfernungsmesser
Operating manual
EN
Laser distance meter
Mode d'emploi
Télémètre Laser
Bedieningshandleiding
NL
Laserafstandsmeter
Istruzione d'uso
Misuratore al laser
Wöhler LD 400

Werbung

Inhaltsverzeichnis

Fehlerbehebung

loading

Inhaltszusammenfassung für Wohler LD 400

  • Seite 1 Bedienungsanleitung Laserentfernungsmesser Operating manual Laser distance meter Mode d'emploi Télémètre Laser Bedieningshandleiding Laserafstandsmeter Istruzione d'uso Misuratore al laser Wöhler LD 400...
  • Seite 2: Inhaltsverzeichnis

    Inhalt Inhalt Allgemeines .......... 4       Informationen zur Bedienungsanleitung ..4     Hinweise in der Bedienungsanleitung ... 4     Bestimmungsgemäße Verwendung ....4       Lieferumfang ..........5   Transport ............5       Entsorgung ............
  • Seite 3 Inhalt   Strecken addieren und subtrahieren .... 18   Messdatenverwaltung ....... 19       Messwerte speichern ........19     Gespeicherte Messwerte anzeigen ....19     Gespeicherte Messwerte löschen ....19   Störungen ........... 20     Wartung ..........20  ...
  • Seite 4: Allgemeines

    Allgemeines Allgemeines Informationen zur Be- Diese Bedienungsanleitung ermöglicht Ihnen die sichere Bedienung des Wöhler LD 400 Laserent- dienungsanleitung fernungsmessers. Bewahren Sie diese Bedie- nungsanleitung dauerhaft auf. Der Wöhler LD 400 Laserentfernungsmesser darf grundsätzlich nur von fachkundigem Personal für den bestimmungsgemäßen Gebrauch eingesetzt werden.
  • Seite 5: Lieferumfang

    Allgemeines Lieferumfang Gerät Lieferumfang Wöhler LD 400 Laserentfernungs- messer Schutztasche 3 AAA Batterien Transport ACHTUNG! Durch unsachgemäßen Transport kann das Gerät beschädigt werden! Um Transportschäden zu vermeiden, muss das Gerät stets in der dafür vorgesehenen Schutzta- sche transportiert werden. Entsorgung Elektronische Geräte dürfen nicht im Hausmüll...
  • Seite 6: Technische Daten

    Technische Daten Technische Daten Beschreibung Angabe Messbereich 0,2 bis 40 m Messgenauigkeit typ. ± 2 mm Einheiten mm / in / ft Speicher 99 Messwerte Laserklasse Laserdiode 635 nm, < 1 mW Automatisches Aus- 20 s schalten des Laser- strahls Automatisches Aus- 150 s schalten des Messge-...
  • Seite 7: Sicherheitshinweise

    Sicherheitshinweise Sicherheitshinweise WARNUNG! Richten Sie den Laserstrahl niemals auf die Augen! Verletzungsgefahr! WARNUNG! Richten Sie den Laserstrahl niemals auf sehr stark reflektierende Flächen. Der reflek- tierte Laserstrahl kann die Augen schädigen. WARNUNG! Schalten Sie das Messgerät nicht in Flugzeugen, in der Nähe von medizinischen Gerä- ten oder in Umgebung, in der Explosionsgefahr besteht, ein.
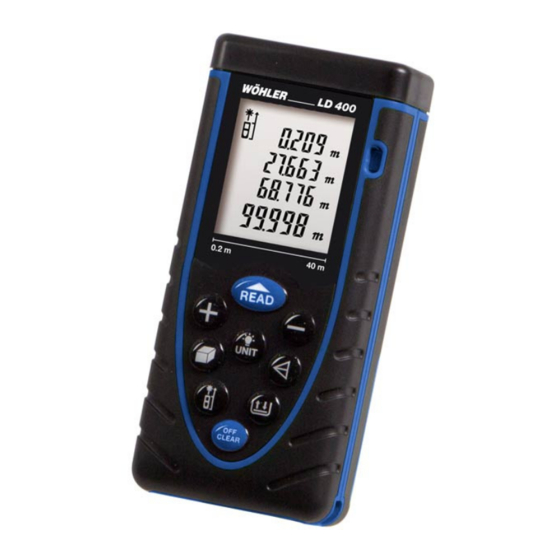
  • Seite 8: Aufbau Und Funktion

    Aufbau und Funktion Aufbau und Funktion Bedienfeld EINHEITEN-Taste (kurz) READ-Taste HINTERGRUNDBE- LEUCHTUNG-Taste (lang) PLUS-Taste MINUS-Taste FLÄCHEN-Taste INDIREKTE MESSUNG- VOLUMEN-Taste Taste MESSANFANGS- SPEICHER-Taste PUNKT-Taste CLEAR-Taste Abb. 1: Bedienfeld  READ-Taste Einschalten  Messen  CLEAR-Taste Ausschalten (gedrückt halten)  Einen Schritt zurück gehen (kurz) ...
  • Seite 9: Display

    Zwischenwerte Minimalwert der Dauermessung Ergebnisanzeige Abb. 2: Display Wöhler LD 400 Symbolzeile oben Die Symbole oben im Display geben Hinweise auf den Anfangspunkt der Messung (Kapitel 6.1), den Laserpointer (Kapitel 5.2.3), die Batteriespannung und den Speicher (Kapitel 7).
  • Seite 10: Besonderheiten

    Aufbau und Funktion Besonderheiten Rechts neben dem Display befindet sich eine Libelle zur horizontalen oder vertikalen Ausrich- tung des Messgerätes. Für eine korrekte waagerechte Position des Messgerätes muss sich die Luftblase in Mittelstel- lung befinden. Abb. 3: Libelle mit Pfeil markiert Auf der Rückseite des Messgerätes befindet sich ein Stativanschluss.
  • Seite 11: Vor Der Messung

    Vor der Messung Vor der Messung Einlegen und Wechsel Nach dem Einschalten des Messgerätes zeigt ein Batteriesymbol oben im Display den Batteriestand der Batterien an. Bei niedriger Batteriespannung ist das Batte- riesymbol kaum noch gefüllt. In diesem Fall müs- sen die Batterien gewechselt werden. ...
  • Seite 12: Auswahl Der Maßeinheit

    Vor der Messung  Auswahl der Maßein- Um zwischen den Maßeinheiten zu wechseln, drücken Sie bei eingeschaltetem Gerät die heit UNIT-Taste. Nach dem Ausschalten und erneutem Einschalten des Gerätes erscheint die zuletzt gewählte Einheit im Display. Folgende Einheiten stehen zur Auswahl: Länge Fläche Volumen...
  • Seite 13: Messen

    Messen Messen HINWEIS! Messungen können nur bei aktiviertem Laserpointer durchgeführt werden. Nach der Messung ist der Laserpointer grundsätzlich deaktiviert.  Messanfangspunkt Drücken Sie die Anfangspunkt-Taste, um auszuwählen, ob der Anfangspunkt der Mess- setzen strecke an der Vorderkante oder an der Hin- terkante des Gerätes liegen soll.
  • Seite 14: Flächenmessung

    Messen  Flächenmessung Drücken Sie die Flächen-/Volumentaste. Das Gerät befindet sich nun im Flächenmodus und der Laserpointer ist aktiviert. Im Display er- scheint links ein Rechteck mit einer blinkenden Längsseite.  Richten Sie das Gerät auf das Zielobjekt und drücken Sie die READ-Taste, um die Länge der Fläche zu messen.
  • Seite 15: Indirekte Messung

    Indirekte Messung Ist die direkte Messung einer Strecke aufgrund ihrer Länge oder aufgrund von Hindernissen nicht möglich, so kann das Wöhler LD 400 die Strecke indirekt auf der Grundlage des Satzes des Pytha- goras bestimmen. In diesem Fall misst der Benut- zer die Längen von zwei Seiten eines rechtwinkli-...
  • Seite 16: Indirekte Messung, Modus 2

    Messen  Drücken Sie die READ-Taste, um die Länge (b) der Kathete zu messen. Die Länge der Kathete (b) wird darunter ange- zeigt. Das Messgerät berechnet nun automatisch die Länge (x) und zeigt diese in der Ergebniszeile an.  Drücken Sie so oft die CLEAR-Taste, bis Sie wieder in den normalen Messmodus gelan- gen.
  • Seite 17: Indirekte Messung, Modus 3

    Messen  6.6.3 Indirekte Messung, Drücken Sie im normalen Messmodus die Indirekte Messung -Taste dreimal. Modus 3 (3 x) In diesem Modus wird die Länge (x) einer Kathete des oberen Dreiecks ermittelt. Im Display erscheinen links zwei übereinanderlie- gende rechtwinkliges Dreiecke mit einer blinken- Abb.
  • Seite 18: Strecken Addieren Und Subtrahieren

    Messen Das Messgerät berechnet nun automatisch die Länge (x) und zeigt diese in der Ergebniszeile an. Strecken addieren und Gemessene Strecken können mit der PLUS-Taste addiert und mit der MINUS-Taste subtrahiert wer- subtrahieren den.  Drücken Sie im einfachen Entfernungsmess- modus die PLUS-Taste.
  • Seite 19: Messdatenverwaltung

    Messdatenverwaltung Messdatenverwaltung  Messwerte speichern Um einen aktuell angezeigten Messwert zu speichern, halten Sie die SPEICHER-Taste 3 Sekunden lang gedrückt, bis das Speicher- symbol kurz oben im Display aufleuchtet. (gedrückt halten) Der Messwert ist nun im internen Speicher ge- speichert. Die gespeicherten Werte bleiben auch dann erhalten, wenn das Messgerät aus und wie- der eingeschaltet wird.
  • Seite 20: Störungen

    Störungen Störungen Störungshinweis Mögliche Ursache Behebung Err1 Signal zu schwach Suchen Sie einen Zielpunkt auf einer stärker reflektie- renden Oberfläche. Err2 Signal zu stark Suchen Sie einen Zielpunkt auf einer schwächer reflek- tierenden Oberfläche. Err3 Batteriespannung zu niedrig Ersetzen Sie die Batterie. Err4 Messung wurde unterhalb Nutzen Sie das Messgerät...
  • Seite 21: Garantie Und Service

    Garantie und Service Garantie und Service 10.1 Garantie Jedes Wöhler LD 400 wird im Werk in allen Funk- tionen geprüft und verlässt unser Werk erst nach einer ausführlichen Qualitätskontrolle.. Bei sachgemäßem Gebrauch beträgt die Garan- tiezeit auf den Wöhler LD 400 12 Monate ab Ver- kaufsdatum, ausgenommen sind Batterien.
  • Seite 22: Zubehör

    Stativ mit Adapterplatte und Gewinde Best.-Nr. 56707 Konformitätserklärung Das Produkt Wöhler LD 400 Laserentfernungsmesser entspricht den wesentlichen Schutzanforderungen, die in den Richtlinien des Rates zur Angleichung der Rechtsvorschriften der Mitgliedsstaaten über die elektromagnetische Verträglichkeit (2004/108/EG) festgelegt sind. Zur Beurteilung des Produkts hinsichtlich der elektromagnetischen Ver-träglichkeit wur-...
  • Seite 23: Kurzanleitung

    Kurzanleitung Kurzanleitung  Messgerät einschalten (kurz)  Laserpointer ein- und ausschalten (kurz)  Messen (kurz)  Messgerät ausschalten (lang)  Einen Schritt zurückgehen (kurz)  Alle gespeicherten Daten löschen (lang, im Speichermodus)  Einheit auswählen (lang)  Hintergrundbeleuchtung ein- und ausschalten (kurz) ...
  • Seite 24 Contents Contents   General Information ......26       Operation Manual Information ..... 26     Notes ............26     Intended Use ..........26     Scope of supply ........... 27     Transport ............. 27     Information on disposal .......
  • Seite 25 Contents 6.6.3   Indirect measurement, mode 3 ....39       6.6.4 Indirect measurement, mode 4 ....39   Add and Subtract Measurement ....40   Storage and Browse ......41         Store Measurements ........41  ...
  • Seite 26: General Information

    General Information General Information Operation Manual In- This operation manual allows you to work safely with the Wöhler LD 400 Laser Distance Meter. formation Please keep this manual for your information. The Wöhler LD 400 Laser Distance Meter should be employed by professionals for its intended use only.
  • Seite 27: Scope Of Supply

    General Information Scope of supply Device Scope of supply Wöhler LD 400 Laser Distance Meter Protective bag 3 AAA batteries Transport ATTENTION! Improper transport can harm the instrument. To avoid damage occurring during transport it is imperative that the instrument is transported in the original protective bag designed for the purpose.
  • Seite 28: Technical Data

    Technical Data Technical Data Description Data Range 0,2 - 40 m Accuracy, typical ± 2 mm Units mm / in / ft Memory capacity 99 values Laser class Laser type 635 nm, < 1 mW Automatic deactivation 20 s of the laser Automatic deactivation 150 s of the meter...
  • Seite 29: Safety Information

    Safety information Safety information WARNING! It is strictly prohibited to shoot eyes with the laser! Danger of injury! WARNING! It is not allowed to take the laser to shoot any highly reflective surfaces. The reflected laser beam may harm the eyes. WARNING! Due to electromagnetic radiation interference to other equipment and devices, please do not use the meter in the plane or around medical equipment.
  • Seite 30: Design And Function

    Design and function Design and function Keyboard UNIT conversion - key READ-key (short) BACKLIGHT - key (long) PLUS - key MINUS - key AREA - key INDIRECT VOLUME - key MEASUREMENT - key BENCHMARK - key MEMORY - key CLEAR - key Fig.
  • Seite 31: Screen

    Measurement Instructions intermediate results Minimum (continuous measurement) Result Fig. 2: Wöhler LD 400 Display Icons in the upper line: Benchmark of the measurement (chapter 6.1), Laser pointer (chapter 5.2.3), Battery voltage Memory (chapter 7). Measurement Instructions This icon appears in surface area mode, volume mode and indirect measurement mode.
  • Seite 32: Special Features

    Design and function Special features On the right side of the screen there is a level tube that helps to align the meter exactly. For a correct horizontal position of the meter the air bubble must be located exactly in the center. Fig.
  • Seite 33: Before The Measurement

    Before the measurement Before the measurement Inserting and replacing When the meter is switched on, a battery icon in the upper screen indicates the battery voltage. the batteries When the battery voltage is low, the battery icon will be empty. In this case change the batteries. ...
  • Seite 34: Unit Setting

    Before the measurement  Unit setting When the meter is switched on, press the UNIT-key to change the unit. After the meter has been switched off and on again, the last selected unit will appear. Optional units are as below: Length Area Volume...
  • Seite 35: Measuring Method

    Measuring Method Measuring Method NOTE! The meter will only measure, when the laser pointer is switched on. After the measure- ment the laser pointer will always be switched off.  Measurement bench- Press the benchmark-key to enter into setting of switching between front benchmark and mark setting end benchmark.
  • Seite 36: Area Measurement

    Measuring Method  Area Measurement Press the AREA key. The meter enters the area measurement mode and the laser pointer is switched on. A rectangle with one edge flashing will appear.  Point the laser to the target and long press the READ-key, to measure the first edge (length).
  • Seite 37: Indirect Measurement

    MENT length or because of an obstacle. In this case the Wöhler LD 400 can determine the distance by applying the Pythagorean theorem. The user measures two edges of a right angle triangle and the Wöhler LD 400 calculates automatically the...
  • Seite 38: Indirect Measurement, Mode 2

    Measuring Method  Press the READ-key to measure the length (b) of the right side. The length of the right side (b) is shown in the second line of the display. The length (x) will be calculated automatically by the meter, and the result is shown in the result line.
  • Seite 39: Indirect Measurement, Mode 3

    Measuring Method  6.6.3 Indirect measurement, In normal mode, press the INDIRECT MEAS- UREMENT-key three times. mode 3 (3 x) In this mode the meter calculates the length (x) of a right side of the upper right angled triangle. Two right angled triangles with a hypotenuse (a) flashing will appear.
  • Seite 40: Add And Subtract Measurement

    Measuring Method The length (x) will be calculated automatically by the meter, and the result is shown in the result line. Add and Subtract Mea- Single distance measurement can be done through adding/subtracting to get accumulated surement add or subtract operation. ...
  • Seite 41: Storage And Browse

    Storage and Browse Storage and Browse  Store Measurements To store a current reading, long press the MEMORY-key for 3 seconds, until the memory icon appears on screen. The reading will be automatically stored into the (long press) meter's built in memory. The stored values will not be lost after the meter has been switched off and on again.
  • Seite 42: Troubleshooting

    Troubleshooting Troubleshooting Problem Possible reason Solution Err1 Signal too weak Measure target locations which are with stronger reflecting capability. Err2 Signal too strong Measure target locations which are with weaker re- flecting capability. Err3 Battery voltage is too low Replace battery. Err4 Beyond working Carry out measurement...
  • Seite 43: Warranty And Service

    Warranty and Service Warranty and Service 10.1 Warranty Each Wöhler LD 400 will be tested in all functions and will leave our factory only after extensive quality control testing. If used properly, the warranty period for the Wöhler LD 400 will be twelve month from the date of sale.
  • Seite 44: Accessories

    Declaration of conformity The product Wöhler LD 400 Laser Distance Meter complies with the key safety requirements set down in the guidelines of the Council for the Harmonization of the Legal Requirements of the Member States in relation to the electromagnetic compatibility (2004/108/EG).
  • Seite 45: Short Manual

    Short manual: Short manual:  Switch on the meter (short)  Switch on and off the laser pointer (short)  Measure (short)  Switch off the meter (long)  Return to last display (short)  Delete all stored data (long, in memory mode) ...
  • Seite 46 Sommaire Sommaire Informations Générales ..... 48       Informations relatives au mode d'emploi ..48     Remarques ..........48     Usage ............48       Composants ..........49   Transport ............. 49       Traitement des déchets ....... 49  ...
  • Seite 47 Sommaire   Addition et soustraction ......62   Gestion des données ......63         Enregistrer les valeurs de mesure ....63     Afficher les valeurs enregistrées ....63     Effacer les valeurs enregistrées ....63 Mesures correctives de défaillance ..
  • Seite 48: Informations Générales

    Télémètre Laser Wöhler au mode d'emploi TD 400. Il doit être conservé à titre d'information. Le Wöhler LD 400 Télémètre Laser ne peut être utilisé que par un personnel dûment qualifié aux fins prévues. Nous déclinons toute responsabilité pour des dommages dus à...
  • Seite 49: Composants

    Informations Générales Composants Appareil Composants Wöhler LD 400 Télémètre Laser Étui de transport 3 piles AAA Transport Attention ! Un transport inadapté peut endommager l'appa- reil. Transportez l'appareil dans l'étui prévue à cet effet pour éviter de le détériorer. Traitement des déchets Les composants électroniques ne sont pas des...
  • Seite 50: Données Techniques

    Données techniques Données techniques Désignation Spécification Plage 0,2 à 40 m Précision (typique- ± 2 mm ment): Unités mm / in / ft Mémoire 99 valeurs mesurées Catégorie du laser Diode laser 635 nm, < 1 mW Désactivation automa- 20 s tique du rayon laser Désactivation automa- 150 s...
  • Seite 51: Instructions De Sécurité

    Instructions de sécurité Instructions de sécurité DANGER ! Ne jamais diriger le laser vers les yeux ! Risque de blessures. DANGER ! Ne jamais diriger le laser vers des surfaces très réfléchissantes. Le rayon laser reflété peut endommager les yeux. DANGER ! Ne pas mettre en marche l'appareil dans les avions, près des dispositifs médicaux ou dans une zone qui est sujette à...
  • Seite 52: Description Des Pièces

    Description des pièces Description des pièces Tableau de commande  Touche UNITÉS  Touche READ (brièvement)  Touche ÉCLAIRAGE DE FOND (long)  Touche PLUS  Touche MOINS  Touche  Touche MESURE SURFACE INDIRECTE  Touche VOLUME  Touche POINT DE ...
  • Seite 53: Écran D'affichage

    Valeurs intermédiaires Valeur minimal de la mesure continue Affichage du résultat Image 2: Écran d'affichage Wöhler LD 400 Icônes Les icônes situés en haut de l'écran informent sur le point de départ de la mesure (chapitre 6.1), le pointeur laser (chapitre 5.2.3) la tension de la pile et la mémoire (chapitre 7).
  • Seite 54: Particularité

    Description des pièces Particularité A droite de l'écran il y a une fiole pour orienter l'appareil dans une position horizontale ou verti- cale. La bulle d'air doit se trouver dans une position centrale pour que l'appareil se trouve dans une position correcte.
  • Seite 55: Avant De Mesurer

    Avant de mesurer Avant de mesurer Insérer ou changer les Si l'appareil est mis en marche, un icône de pile dans le haute de l'écran indique l'état de charge piles de la pile. Lorsque la pile est déchargée, l'icône est vide. Dans ce cas, les piles doivent être rem- placées.
  • Seite 56: Sélection De L'unité De Mesure

    Avant de mesurer  Sélection de l’unité de Pour changer l'unité de mesure appuyez sur la touche UNITÉ lorsque l'appareil est allumé. mesure Après l'arrêt de l'appareil, la dernière unité sélec- tionnée apparaîtra à l'écran lorsqu’il sera remis en marche. Les unités suivantes sont proposées.
  • Seite 57: Mesurer

    Mesurer Mesurer REMARQUE ! Avant de mesurer il est nécessaire d'allumer le pointeur laser. Après la mesure le poin- teur laser est toujours éteint.  Déterminer le point de Appuyez sur la touche POINT DE DÉPART pour déterminer si la mesure de la distance départ commence au bord avant ou au bord arrière de l'appareil.
  • Seite 58: Mesure De La Surface

    Mesurer  Mesure de la surface Appuyez sur la touche SURFACE / VOLUME. Maintenant, l'appareil se trouve en mode de sur- face et le pointeur du laser est activé. Un rec- tangle avec une côté longitudinale clignotante apparait a gauche de l'appareil. ...
  • Seite 59: Mesure Indirecte

    S'il n'est pas possible de mesurer une distance à cause de sa longueur ou à cause des obstacles, le Wöhler LD 400 peut déterminer la distance de manière indirecte sur la base du théorème de Pythagore. Dans ce cas là, l'utilisateur mesure la longueur de deux côtés d'un triangle rectangulaire...
  • Seite 60: Mesure Indirecte, Mode 2

    Mesurer  Appuyez sur la touche CLEAR jusqu'à ce que vous reveniez au mode normal de mesure.  6.6.2 Mesure indirecte, Dans le mode normal de mesure, appuyez deux fois sur la touche MESURE INDIRECTE. mode 2 (2 fois) Dans ce mode, l'appareil calcule la longueur (x) de l'hypoténuse d'un triangle rectangulaire.
  • Seite 61: Mesure Indirecte, Mode 3

    Mesurer  6.6.3 Mesure indirecte, Dans le mode normal de mesure, appuyez trois fois sur la touche MESURE INDIRECTE. mode 3 (3 fois) Ce mode détermine la longueur (x) de la cathète du triangle supérieure. Deux triangles rectangulaires avec une hypoté- nuse (a) clignotante apparaissent a gauche de Image 10: Mesure indirecte, mode 3 l'écran.
  • Seite 62: Addition Et Soustraction

    Mesurer L'appareil calcule automatiquement la longueur (x) et l'affiche dans la ligne inférieure de l’écran. Addition et L'appareil peut additionner (Touche PLUS) et soustraire (Touche MOINS) des valeurs de dis- soustraction tance.  Dans le mode normal de mesure, appuyez sur la touche PLUS.
  • Seite 63: Gestion Des Données

    Gestion des données Gestion des données  Enregistrer les valeurs Pour enregistrer la valeur actuelle maintenez enfoncée la touche MÉMOIRE pendant 3 se- de mesure condes, jusqu'à ce que l'icône de mémoire soit affiché brièvement à l'écran. Maintenant la valeur est enregistrée dans la mé- (maintenir enfoncée) moire interne de l'appareil.
  • Seite 64: Mesures Correctives De Défaillance

    Mesures correctives de défaillance Mesures correctives de défaillance Message d'erreur Cause possible Mesures correctives de défaillance Err1 Signal trop faible Cherchez un cible sur une surface plus réfléchissante. Err2 Signal trop fort Cherchez un cible sur une surface moins réfléchis- sante.
  • Seite 65: Garantie Et Service

    En cas d'utilisation correcte, la période de garan- tie pour le Wöhler LD 400 est de 12 moins à compter de la date de vente. En cas de réparation, les frais de port et d'embal- lage de l'appareil ne sont pas couverts par la ga- rantie.
  • Seite 66: Accessoires

    Article 56707 Déclaration de conformité Le produit: Wöhler LD 400 Télémètre Laser est conforme aux exigences de protection essentielles fixées dans les directives du Conseil portant sur l'alignement des prescriptions juridiques, dans les Etats membres, sur la compatibilité électromagnétique (204/108/EG).
  • Seite 67: Récapitulatif

    Récapitulatif Récapitulatif  Allumer l'appareil (brièvement)  Allumer / éteindre le laser (brièvement)  Mesurer (brièvement)  Éteindre l'appareil (longuement)  Revenir à l' affichage précédent (brièvement)  Effacer toutes les valeurs enregistrées (longuement, en mode de mémoire)  Sélectionner l'unité (longuement) ...
  • Seite 68 Inhoud Inhoud Algemeen ..........70       Informatie over de bedieningshandleiding ... 70     Aanwijzingen in de bedieningshandleiding .. 70     Gebruik volgens de bestemming ....70       Omvang van de levering ......71   Transport .............
  • Seite 69 Inhoud 7.1.4   Indirecte meting, modus 4 ......83     Afstanden optellen en aftrekken ....84   Meetdatabeheer ......... 85       Meetwaarden opslaan ......... 85       Opgeslagen meetwaarden aangeven ..85   Opgeslagen meetwaarden wissen ....85  ...
  • Seite 70: Algemeen

    Wöhler LD 400 bedieningshandleiding laserafstandsmeter mogelijk. Bewaar deze bedieningshandleiding blijvend. De Wöhler LD 400 laserafstandsmeter mag in principe alleen door vakkundig personeel voor gebruik volgens de bestemming worden gebruikt. Voor schade, die ontstaat op grond van het niet in acht nemen van deze bedieningshandleiding, aanvaarden wij geen aansprakelijkheid.
  • Seite 71: Omvang Van De Levering

    Algemeen Omvang van de Apparaat Omvang van de levering levering Wöhler LD 400 Laserafstandsmeter Beschermtas 3 AAA batterijen Transport PAS OP! Door ondeskundig transport kan het apparaat beschadigd raken! Om transportschade te voorkomen, moet het apparaat altijd in de daarvoor bestemde beschermtas vervoerd worden.
  • Seite 72: Technische Gegevens

    Technische gegevens Technische gegevens Beschrijving Opgave Meetbereik 0,2 tot 40 m Meetnauwkeurigheid ± 2 mm type. Eenheden mm / in / ft Opslag 99 meetwaarden Laserklasse Laserdiode 635 nm, < 1 mW Automatisch 20 s uitschakelen van de laserstraal Automatisch 150 s uitschakelen van het meetapparaat...
  • Seite 73: Veiligheidsaanwijzingen

    Veiligheidsaanwijzingen Veiligheidsaanwijzingen WAARSCHUWING! Richt de laserstraal nooit op de ogen! Gevaar voor letsel! WAARSCHUWING! Richt de laserstraal nooit op zeer sterk reflecterende oppervlakken. De gereflecteerde laserstraal kan de ogen beschadigen. WAARSCHUWING! Schakel het meetapparaat niet in vliegtuigen, in de buurt van medische apparaten of in een omgeving, waarin explosiegevaar bestaat, in.
  • Seite 74: Constructie En Werking

    Constructie en werking Constructie en werking Bedieningspaneel  EENHEDEN-toets  READ-toets (kort)  ACHTERGRONDVE RLICHTINGS-toets (lang)  PLUS-toets  MIN-toets  OPPERVLAKKE  INDIRECTE METING- N-toets toets  VOLUME-toets  MEETBEGINPUNT-  OPSLAG-toets toets  CLEAR-toets Afb. 1: Bedieningspaneel  READ-toets Inschakelen ...
  • Seite 75: Display

    Minimale waarde van de meting voor langere duur Weergave resultaat Afb. 2: Display Wöhler LD 400 Symboolregel boven De symbolen boven in het display geven aanwijzingen voor het beginpunt van de meting (hoofdstuk 6.1), de laserpointer (hoofdstuk 5.2.3), de batterijspanning en het geheugen (hoofdstuk...
  • Seite 76: Bijzonderheden

    Constructie en werking Bijzonderheden Rechts naast het display bevindt zich een waterpas voor horizontale of verticale uitrichting van het meetapparaat. Voor een correcte horizontale stand van het meetapparaat dient de luchtbel zich in de middenstand bevinden. Afb. 3: Waterpas met pijltje gemarkeerd Op de rugzijde van het meetapparaat bevindt zich een statiefaansluiting.
  • Seite 77: Voor De Meting

    Voor de meting Voor de meting Plaatsing en Na het inschakelen van het meetapparaat geeft een batterijsymbool boven in het display de vervanging van de batterijstand aan. Bij lage batterijspanning is het batterijen batterijsymbool nauwelijks nog gevuld. In dit geval moeten de batterijen worden vervangen.
  • Seite 78: Keuze Van De Maateenheid

    Voor de meting  Keuze van de Om tussen de maateenheden te wisselen, dient u bij ingeschakeld apparaat op de UNIT- maateenheid toets drukken. Na het uitschakelen en opnieuw inschakelen van het apparaat verschijnt de laatst gekozen eenheid in het display. Er valt te kiezen uit de volgende eenheden: Lengte Oppervlak...
  • Seite 79: Meten

    Meten Meten WENK! Metingen kunnen alleen bij geactiveerde laserpointer worden verricht. Na de meting is de laserpointer in principe gedeactiveerd.  Beginpunt meting Druk op de beginpunt-toets, om te kiezen, of het beginpunt van de meetafstand aan de instellen voorkante of aan de achterkant van het apparaat moet liggen.
  • Seite 80: Oppervlaktemeting

    Meten  Oppervlaktemeting Druk op de oppervlak-/volumetoets. Het apparaat bevindt zich nu in de oppervlakmodus en de laserpointer is geactiveerd. In het display verschijnt links een rechthoek met een knipperende lange zijde.  Richt het apparaat op het doelobject en drukt u op de READ-toets, om de lengte van het oppervlak te meten.
  • Seite 81: Indirecte Meting

    Indirecte meting Als de rechtstreekse meting van een afstand vanwege zijn lengte of vanwege hindernissen niet mogelijk is, kan de Wöhler LD 400 de afstand indirect op basis van de stelling van Pythagoras bepalen. In dat geval meet de gebruiker de lengten van twee zijden van een imaginaire Afb.
  • Seite 82: Indirecte Meting, Modus 2

    Indirecte meting  Druk op de READ-toets, om de lengte (b) van de rechthoekszijde te meten. De lengte van de rechthoekszijde (b) wordt daaronder aangegeven. Het meetapparaat berekent nu automatisch de lengte (x) en geeft deze in de uitkomstenregel aan. ...
  • Seite 83: Indirecte Meting, Modus 3

    Indirecte meting  7.1.3 Indirecte meting, Druk in de normale meetmodus driemaal op de Indirecte meting-toets. modus 3 (3 x) In deze modus wordt de lengte (x) van een rechthoekszijde van de bovenste driehoek berekend. In het display verschijnen links twee boven elkaar Afb.
  • Seite 84: Afstanden Optellen En Aftrekken

    Indirecte meting  Druk op de READ-toets, om de lengte van de hypotenusa (c) te meten. Het meetapparaat berekent nu automatisch de lengte (x) en geeft deze in de uitkomstenregel aan. Afstanden optellen en Gemeten afstanden kunnen met de PLUS-toets worden opgeteld en met de MIN-toets aftrekken afgetrokken.
  • Seite 85: Meetdatabeheer

    Meetdatabeheer Meetdatabeheer  Meetwaarden opslaan Om een op dat moment weergegeven meetwaarde op te slaan, houdt u de OPSLAG-toets 3 seconden lang ingedrukt, tot het opslagsymbool kort boven in het display (ingedrukt houden) oplicht. Der meetwaarde is nu in het interne geheugen opgeslagen.
  • Seite 86: Storingen

    Storingen Storingen Storingsaanwijzing Mogelijke oorzaak Verhelpen Err1 Signaal te zwak Zoek een richtpunt op een sterker reflecterend opper- vlak. Err2 Signaal te sterk Zoek een richtpunt op een zwakker reflecterend oppervlak. Err3 Batterijspanning te laag Vervang de batterij. Err4 Meting is verricht onder de Gebruik het meetapparaat arbeidstemperatuur.
  • Seite 87: Garantie En Service

    Garantie en Service Garantie en Service 11.1 Garantie Iedere Wöhler LD 400 wordt in de fabriek op alle functies getest en verlaat onze fabriek pas na een uitvoerige kwaliteitscontrole. De eindcontrole wordt in een testverslag gedetailleerd vastgelegd en samen met een kalibreerverslag bij ieder meetapparaat gevoegd.
  • Seite 88: Toebehoren

    Statief met adapterplaat en schroefdraad Best.-nr. 56707 Conformiteitsverklaring Het product Wöhler LD 400 Laserafstandsmeter voldoet aan de essentiële veiligheidseisen, die in de richtlijnen van de Raad betreffende de harmonisatie van de wetgevingen van de lidstaten inzake elektromagnetische compatibiliteit (2004/108/EG) zijn vastgelegd.
  • Seite 89: Korte Handleiding

    Korte handleiding Korte handleiding  meetapparaat inschakelen (kort)  laserpointer in- en uitschakelen (kort)  meten (kort)  meetapparaat uitschakelen (lang)  een stap teruggaan (kort)  alle opgeslagen data wissen (lang, in de opslagmodus)  eenheid kiezen (lang)  Achtergrondverlichting in- en uitschakelen (kort) ...
  • Seite 90 Indice Indice Informazioni generali ......92       Informazioni importanti per le istruzioni d‘uso ..............92       Indicazioni nelle istruzioni d‘uso ....92   Impiego previsto .......... 92       Fornitura ............93   Trasporto ............. 93  ...
  • Seite 91 Indice 6.6.3   Misura indiretta, metodo 3 ......105       6.6.4 Misura indiretta 4 ........105   Sommare e la sottrazione di distanze ..106   Gestione memorie ......107       Memorizzare le misurazioni ....... 107  ...
  • Seite 92: Informazioni Generali

    Le raccomandiamo di custodire bene que- sto libretto. Il Wöhler LD 400 deve solo essere usato per lo scopo previsto da personale esperto e in confor- mità ai dati specificati. Si escludono qualsiasi responsabilità o garanzia per danni risultanti dall’uso inappropriato dello...
  • Seite 93: Fornitura

    Informazioni generali Fornitura Strumento Fornitura Wöhler LD 400 Strumento Custodia 3 AAA pile Trasporto AVVISO! Un trasporto non adatto può danneggiare lo stru- mento! Per evitare danneggiamenti si deve trasportare lo strumento nella sua apposita custodia. Smaltimento Strumenti elettronici non devono essere smaltiti...
  • Seite 94: Dati Tecnici

    Dati tecnici Dati tecnici Descrizione Indicazione Campo di misura 0,2 fino 40 m Precisione tipica ± 2 mm Unità di misura mm / in / ft Memoria 99 Valori misurati Classe laser Diodo laser 635 nm, < 1 mW Spegnimento automa- 20 s tico del raggio laser Spegnimento automa-...
  • Seite 95: Indicazioni Di Sicurezza

    Indicazioni di sicurezza Indicazioni di sicurezza ATTENZIONE! Mai indicare il raggio laser sugli occhi! Pericolo di lesioni! ATTENZIONE! Non indicare il raggio mai su superfici fortemente riflettenti, perché il raggio potrebbe essere riflesso verso gli occhi e danneggiarli. ATTENZIONE! Non usare lo strumento in aeroplani, vicino a strumenti medicali o in ambienti con peri- colo di esplosione.
  • Seite 96: Costruzione E Funzioni

    Costruzione e funzioni Costruzione e funzioni Tastiera  Tasto UNITÁ (breve)  Tasto READ  Tasto LLUMINAZIONE (lungo)  Tasto PIÙ  Tasto MENO  Tasto SUPERFICIE  Tasto misura indiretta  Tasto VOLUME con calcolo secondo PI- TAGORA  Tasto PUNTO DI ...
  • Seite 97: Display

    Valori intermedi Valore minimo della misura Risultato Ill. 2: Display Wöhler LD 400 Riga simboli alta I simboli sopra nel display danno indicazione al punto d’inizio della misura (vedi cap. 6.1), il punto laser (vedi cap. 5.2.3), la carica della pila e la memoria (vedi cap.
  • Seite 98: Particolarità

    Costruzione e funzioni Particolarità A destra del display si trova una bolla per il posi- zionamento in verticale ed orizzontale. Per una misura si deve mettere in bolla lo stru- mento. Ill. 3: Bolla indicata dalla freccia Sul retro dello strumento si trova il filetto per uno stativo.
  • Seite 99: Prima Della Misura

    Prima della misura Prima della misura Dopo l’accensione sul display appare il simbolo Inserimento e sostitu- batteria che indica la carica della pila. Una pila zione delle pile scarica viene indicata dal simbolo quasi vuoto. In questo caso si deve cambiare la pila. ...
  • Seite 100: Selezione Dell'unità Di Misura

    Prima della misura  Selezione dell’unità di Per passare da un’unità di misura all’altra basta premere il tasto UNIT con strumento misura acceso. All’accensione appare sempre l’ultima unità di misura utilizzata. Sono disponibili le seguenti unità di misura: Lunghezza Superficie Volume 0,000 m 0,000 m...
  • Seite 101: Misurare

    Misurare Misurare AVVISO! Le misurazioni possono essere eseguite solamente con il puntatore laser attivo. Dopo la misura il puntatore laser viene sempre spento. Punto di misura iniziale  Premere il tasto del punto di misura iniziale per selezionare se il punto d’inizio per la misu- ra della distanza deve trovarsi sul lato anterio- re o posteriore dello strumento.
  • Seite 102: Misura Di Superfici

    Misurare  Misura di superfici Premere il tasto superficie e volume. Lo strumento si trova nella funzione di calcolo superficie ed il puntatore laser è attivo. Nel display appare il simbolo del rettangolo con un lato lampeggiante.  Portare il puntatore sull’oggetto e premere READ per misurare una lunghezza della su- perficie.
  • Seite 103: Misura Indiretta

    Pitagora. In questo caso si misura due lati di un triangolo Ill. 7: Esempio di calcolo misura Pitagora immaginario e il Wöhler LD 400 calcola il lato im- maginario (x). INDICAZIONE! L’ipotenusa deve essere sempre più lunga del cateto, altrimenti appare una segnalazione di erro- re (ERR 5).
  • Seite 104: Misura Indiretta, Metodo 2

    Misurare  6.6.2 Misura indiretta, Premere il tasto 2 volte. metodo 2 (2 x) In questo metodo viene calcolata l’ipotenusa (x) di un triangolo ipotetico. Nel display appare un triangolo con un cateto lampeggiante. Ill. 9: Misura indiretta, metodo 2 ...
  • Seite 105: Misura Indiretta, Metodo 3

    Misurare  6.6.3 Misura indiretta, Premere il tasto 3 volte. metodo 3 (3 x) In questo metodo viene calcolato la lunghezza (x) di un cateto del triangolo superiore. Nel display appaiono a sinistra due triangoli so- vrapposti con una ipotenusa (a) lampeggiante. Ill.
  • Seite 106: Sommare E La Sottrazione Di Distanze

    Misurare Sommare e la sottra- Distanze misurate possono essere sommate con il tasto PIÙ e possono essere sottratte con il tasto zione di distanze MENO.  Premere il tasto PIÙ nel normale metodo di misura. Nella riga dei risultati appare un +. ...
  • Seite 107: Gestione Memorie

    Gestione memorie Gestione memorie  Memorizzare le misura- Per memorizzare una misurazione attuale si deve tener premuto il tasto MEMORIA per ca. zioni 3 secondi, fino quando il simbolo della memo- rizzazione appare brevemente sul display. Il valore è ora memorizzato. La memoria rimane (tenere premuto) attiva anche quando lo strumento viene spento ed acceso.
  • Seite 108: Errori

    Errori Errori Sigla dell‘errore Possibili cause eliminazione Err1 Segnale troppo debole Cercare un punto più riflet- tente sulla superficie. Err2 Segnale troppo forte Cercare un punto meno riflettente sulla superficie. Err3 Tensione pile bassa Cambiare le pile. Err4 Misura eseguita oltre la Usare lo strumento sempre temperatura di lavoro entro i limiti di temperatura...
  • Seite 109: Garanzia Ed Assistenza

    Garanzia ed assistenza Garanzia ed assistenza Ogni Wöhler LD 400 viene controllato in fabbrica 10.1 Garanzia e lascia lo stabilimento dopo il test di qualità. I risultati del test finale sono riportati nel certificato di calibrazione che è a corredo di ogni strumento.
  • Seite 110: Accessori

    Stativo con piastra di fissaggio e filetto Cod. 56707 Dichiarazione di conformità Il prodotto Wöhler LD 400 misuratore al laser risponde alla alle prescrizioni di costruzione di strumenti elettronici, come previsto dalla legislazione nazionale e della Comunità Europea sulla compatibilità elettromagnetica (2004/108/EG).
  • Seite 111: Istruzioni Brevi

    Istruzioni brevi Istruzioni brevi  Accendere lo strumento (breve)  Accendere e spegnere il puntatore laser (breve)  Misurare (breve)  Spegnere lo strumento (lungo)  Ritornare indietro di una funzione (breve)  Cancellare tutte le memorie (lungo, nel menu memorie) ...
  • Seite 112: Points Of Sale And Service

    Points of sale and service Points of sale and service Germany Wöhler West Castroper Str. 105 Wöhler Messgeräte Kehrgeräte 44791 Bochum GmbH Tel.: +49 234 516993-0 Schützenstr. 41 Fax: +49 234 516993-99 33181 Bad Wünnenberg west@woehler.de Tel.: +49 2953 73-100 Fax: +49 2953 73-96100 Wöhler Süd mgkg@woehler.de...

Inhaltsverzeichnis