
Verwandte Anleitungen für DAITEM DP8406


Inhaltszusammenfassung für DAITEM DP8406
- Seite 1 DP8000 Sirène flash p. 2 Sirena con lampeggiante p. 7 DP8406 DP8407 Alarmsirene DP8408 mit Blitzlampe S. 13 Siren and flashing p. 20...
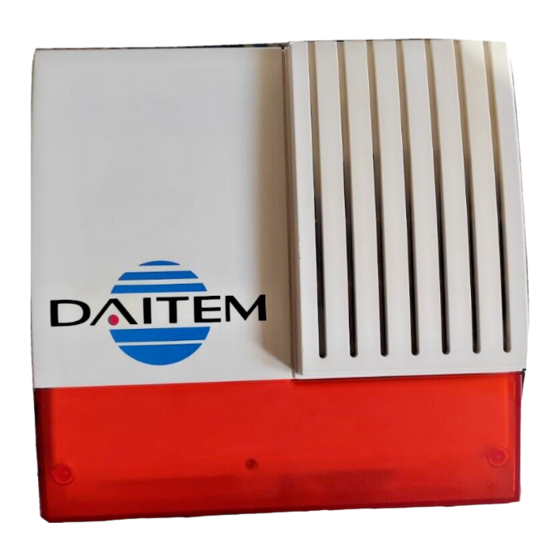
- Seite 2 Socle Vis de serrage boîtier et collez-la sur la demande d’exten- du socle sion de garantie fournie. Pion d’autoprotection Vue interne de la sirène Vignette de garantie Pion d’autoprotection Touche test Daitem...
- Seite 3 C o d a g e DP8406/DP8407/DP8408 Choix des options N° Micro-interrupteur Options de fonctionnement de fonctionnement Durée de sonnerie 20 s, clignotement du flash 20 s Les 7 micro-interrupteurs placés près de la pile permettent de choisir les options de la Durée de sonnerie 40 s, clignotement du flash 40 s...
- Seite 4 2 ordres d’“Arrêt” à partir du clavier par un bip long de la sirène jusqu’à la réponse de la sirène de validation de programmation à son début. Touche test Daitem...
- Seite 5 I n s t a l l a t i o n DP8406/DP8407/DP8408 G Installez-la : Sur le support une figurine (cf. Fig. 1) indique le sens de fixation. ❍ à plus de 5 m de la centrale, du Prévoyez un dégagement de 20 cm environ sous la sirène afin de faciliter l’ouverture.
- Seite 6 G Déconnectez la pile et attendez 5 mn avant de connecter la nouvelle G Fixez la sirène G Envoyez un ordre de marche (partielle ou totale) puis un ordre d’arrêt. G Faites un test réel de déclenchement. La sirène est de nouveau prête à fonctionner. Daitem...
- Seite 7 P r e p a r a z i o n e DP8406/DP8407/DP8408 G Togliete la vite di bloccaggio della base Vista dal basso della sirena (v. Vista dal basso della sirena). Lampeggiante Altoparlante G Togliete la sirena dalla sua base.
- Seite 8 Attivazione della sirena solo su intrusione confermata (2 rivelatori sollecitati in meno di 70 secondi) Volume dei riporti sonori (se abilitati): normale Volume dei riporti sonori (se abilitati): forte Attivazione della sirena su intrusione: immediata Attivazione della sirena su intrusione: ritardata di 10 secondi Daitem...
- Seite 9 DP8406/DP8407/DP8408 Apprendimento del codice impianto sulla sirena G Portate la centrale in modo test. G Collegate la pila della sirena. Il codice impianto non viene programmato direttamente sulla sirena ma appreso da uno degli organi di comando (telecomando, tastiera) dell’impianto su cui sia già stato preventi- vamente programmato.
- Seite 10 “Spento” un bip lungo senza digitare nuovamente il codice), fino alla risposta della sirena La sirena segnala un errore nella procedura emettendo 3 bip corti; in questo caso, ripetete la procedura dall’inizio. Daitem...
- Seite 11 I n s t a l l a z i o n e DP8406/DP8407/DP8408 G Installate la sirena: Sul supporto un omino stilizzato (v. fig. 1) indica il verso di fissaggio. ❍ ad almeno 5 metri di distanza dalla Lasciate uno spazio di almeno 20 cm al di sotto della sirena per facilitarne l’apertura centrale, dal combinatore telefonico, da in occasione di manutenzioni o cambio della pila.
- Seite 12 G Richiudete il vano pila e fissate la sirena sul supporto. G Trasmettete un comando di Acceso (parziale o Totale) e poi subito uno di Spento. G Effettuate una prova reale di attivazione. La sirena è di nuovo in funzionamento normale. Daitem...
- Seite 13 V o r b e r e i t e n DP8406/DP8407/DP8408 G Entfernen Sie die Befestigungsschraube G 2-Frequenz-Verfahren Ansicht der Sirene von unten G 1000fach variierbarer Anlagencode des Sockels, siehe “Ansicht der Sirene von Blitzlampe Lautsprecher G 2 Modulationsarten mit 106 dB (A) unten”.
-
Seite 14: Wahl Der Betriebsarten
Auslösung bei einfachem und bestätigtem Einbruch Auslösung nur bei bestätigtem Einbruch (Detektion von 2 unterschiedlichen Meldern in weniger als 70 Sek.) Akustische Quittierung: normal Akustische Quittierung: laut Bei Einbruch sofortige Alarmauslösung der Sirene Bei Einbruch Alarmauslösung der Sirene um 10 Sek. verzögert Daitem... -
Seite 15: Übertragen Des Anlagencodes
DP8406/DP8407/DP8408 Übertragen des Anlagencodes G Die Zentrale muss im Testmodus sein. G Dann die Batterie der Sirene anschließen. G Der Anlagencode wird mittels bereits codiertem Handsender oder einer Code- Einrichtung übertragen. Die Zentrale muss hierzu im Testmodus sein. G Übertragen des Anlagencodes mit einem Handsender: “BIP”... - Seite 16 Die Sirene bestätigt die Test-Taste geben, bis die Sirene die korrekte Übertragung der Sirene antwortet durch ein langes drücken akustisches Signal Die Sirene meldet einen Bedienfehler durch 3 kurze akustische Signale. In diesem Fall die Programmierung nochmals komplett durchführen. Daitem...
- Seite 17 DP8406/DP8407/DP8408 G Montieren Sie die Sirene Ein Symbol auf der Wandhalterung zeigt die korrekte Montagerichtung (Abb. 1). ❍ mindestens 5 m von Zentrale, Lassen Sie mindestens 20 cm Freiraum unterhalb der Sirene, um diese später wieder Telefonwählgerät, anderen Sirenen oder öffnen zu können.
- Seite 18 G Klemmen Sie die verbrauchte Batterie ab und warten Sie 5 Minuten, bevor Sie die neue Batterie anschließen. G Befestigen Sie die Sirene. G Geben Sie einen Ein-Befehl (Teil oder Gesamt) und anschließend wieder einen Aus- Befehl. G Testen Sie die Sirene, indem Sie einen Alarm auslösen. Die Sirene ist wieder betriebsbereit. Daitem...
- Seite 19 O p e r a t i o n F e a t u r e s G TwinPass As a supplement to the control panel’s ® radio transmission G Learning of the personalized radio code integrated siren, the external alarm siren G 106dB output alerts the neighborhood in the event of G 2 choices of siren modulation:...
-
Seite 20: Necessary Materials
(see view of the bottom of the siren). Strobe Speaker G Unlock the battery cover in the base of the siren. G Open the battery cover. Rear view of the siren Base Housing set screw Auto protection tab Battery cover locking screw Battery cover Guarantee label Daitem... - Seite 21 L e a r n i n g t h e p e r s o n a l r a d i o c o d e DP8406/DP8407/DP8408 G Put the central unit in test mode G Connect the 7,2 V lithium battery NB: when you connect the battery, the siren emits a 3 sec confirmation tone and automati- cally goes into test mode.
- Seite 22 Loud sound level of audible not reported signal reports Control panel audible signals Immediate triggering reported in the event of break-in Shrill alarm sound Siren delayed by 10 sec (for interior use) in the event of break-in Battery Mode connector switches Daitem...
-
Seite 23: Installation Precautions
M o u n t i n g Installation precautions G Use the wall bracket as a template to determine the fixing points (see Fig. 1). G Install it: ❍ more than 5 m from the control panel, NB: Leave a 20 cm gap under the siren to facilitate future lid removal. phone dialler, another siren or command G Remove the detachable washer and to insert it into the position marked A. - Seite 24 T e s t i n g C h e c k i n g a n d r e p l a c i n g t h e b a t t e r y G Arm the control panel. G Remove the siren from it’s wall bracket The alarm siren constantly checks the G Wait for the end of the exit delay (1 min...