Costway GT4224 Handbuch
Außenlagerschuppen
Inhaltsverzeichnis
Quicklinks
USA office: Fontana
AUS office: Truganina
DEU office: FDS GmbH, Neuer Höltigbaum 36, 22143 Hamburg, Deutschland
GBR office: FDS Corporation Limited,Unit 4, Blackacre Road, Great Blakenham,Ipswich, Ip6 0FL,United Kingdom
ITA office: Milano
POL office: Gdańsk
FRA office: Saint Vigor d'Ymonville
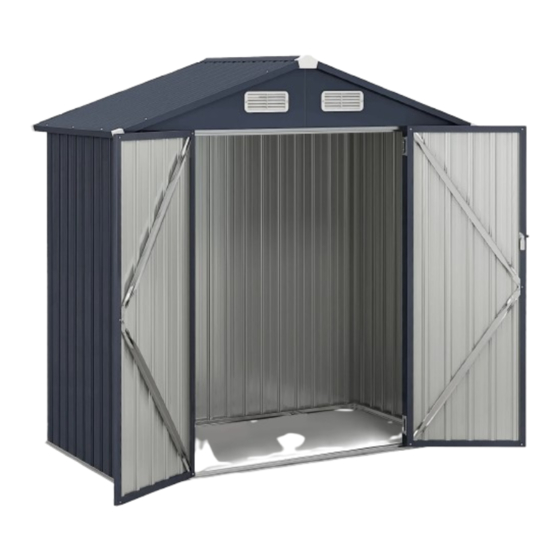
Outdoor Storage Shed
Außenlagerschuppen
Abri de Stockage Extérieur
Cobertizo de Almacenaje Exterior
Capanno da Esterno
Metalowa szopa ogrodowa
GT4224
THIS INSTRUCTION BOOKLET CONTAINS IMPORTANT SAFETY INFORMATION.
PLEASE READ AND KEEP FOR FUTURE REFERENCE.
Inhaltsverzeichnis

Verwandte Anleitungen für Costway GT4224


Inhaltszusammenfassung für Costway GT4224
- Seite 1 Outdoor Storage Shed Außenlagerschuppen Abri de Stockage Extérieur Cobertizo de Almacenaje Exterior Capanno da Esterno Metalowa szopa ogrodowa GT4224 THIS INSTRUCTION BOOKLET CONTAINS IMPORTANT SAFETY INFORMATION. USA office: Fontana AUS office: Truganina ITA office: Milano POL office: Gdańsk PLEASE READ AND KEEP FOR FUTURE REFERENCE.
-
Seite 2: Before You Start
Before You Start Avant de Commencer Please read all instructions carefully. Veuillez lire attentivement toutes les instructions. Retain instructions for future reference. Conservez les instructions pour vous y référer ultérieurement. Separate and count all parts and hardware. Vérifiez toutes les pièces et les accessoires. Read through each step carefully and follow the proper order. -
Seite 3: Prima Di Iniziare
Prima di Iniziare Si prega di leggere attentamente tutte le istruzioni. Conservare le istruzioni per riferimento futuro. Separare e contare tutte le parti e gli accessori. Leggere attentamente ogni passo e seguire l'ordine corretto. Si consiglia, ove possibile, di assemblare tutti gli articoli vicino alla zona in cui verranno posti in uso, per evitare di spostare inutilmente il prodotto una volta assemblato. -
Seite 4: Installation Notes
Installation Notes Please check the quantity of all parts before installation (Please Outdoor Furniture refer to the Parts Lists) and the appearance of the products. Please make sure the product is correct before installation. lf there is any problem, please contact us directly. We are a professional furniture provider with top-notch factories and outstanding designs. -
Seite 5: Außenmöbel
WARNING For your safety concern, please do not stand under the metal shed Außenmöbel in heavy wind or snow days. For safety, please use expansion screws to reinforce the posts to Wir sind ein professioneller Möbelanbieter mit the ground. erstklassigen Fabriken und herausragendem Design. In extreme weather conditions, you can use a rope to pull the four Unser Ziel ist es, den Verbrauchern einen neuen corners of the product to keep it stable. -
Seite 6: Montagehinweise
Montagehinweise ACHTUNG Bitte überprüfen Sie vor der Installation die Menge aller Teile (siehe Aus Sicherheitsgründen sollten Sie sich bei starkem Wind oder an Teileliste) und das Aussehen der Produkte. Bitte vergewissern Sie Schneetagen nicht unter dem Metallschuppen aufhalten. sich vor der Installation, dass das Produkt korrekt ist. Sollte es ein Problem geben, kontaktieren Sie uns bitte direkt. -
Seite 7: Remarques Sur L'installation
Remarques sur l'Installation Veuillez vérifier la quantité de toutes les pièces avant l'installation Meubles de Jardin (veuillez vous référer aux listes de pièces) et l'apparence des produits. Assurez-vous que le produit est correct avant de l'installer. En cas de problème, veuillez nous contacter directement. Nous sommes un fournisseur de mobilier Assurez-vous que les panneaux colorés sont orientés vers professionnel doté... - Seite 8 AVERTISSEMENT Pour votre sécurité, ne vous tenez pas sous l'abri métallique les Mueble de Exterior jours de vent ou de neige. Pour votre sécurité, utilisez des boulons d'expansion pour Somos un proveedor profesional de muebles con renforcer les poteaux au sol. fábricas de primera categoría y diseños En cas de conditions météorologiques extrêmes, vous pouvez excepcionales.
-
Seite 9: Precauciones De Seguridad
Notas sobre la Instalación ADVERTENCIA Por favor, compruebe la cantidad de todas las piezas antes de la Para su seguridad, no se ponga debajo del cobertizo metálico en instalación (Por favor, consulte las Listas de Piezas) y el aspecto de días de mucho viento o nieve. -
Seite 10: Precauzioni Di Sicurezza
Note di Installazione Prima dell'installazione, si prega di verificare la quantità di tutte le Mobile per Esterno parti ( Si prega di fare riferimento alle Liste delle Parti) e l'aspetto dei prodotti. Si prega di assicurarsi che il prodotto sia corretto prima dell'installazione. - Seite 11 AVVERTENZA Per motivi di sicurezza, si consiglia di non sostare sotto la casetta Meble ogrodowe metallica in caso di forte vento o di neve. Per sicurezza, si prega di utilizzare viti a espansione per rinforzare Nasza firma projektuje meble w nowoczesnych i pali al terreno.
-
Seite 12: Ostrzeżenia
Uwagi dotyczące montażu OSTRZEŻENIA Przed przystąpieniem do montażu sprawdź, czy w zestawie Ze względów bezpieczeństwa, nie stawaj pod szopą ogrodową znajdują się wszystkie części (sprawdź listę części) oraz czy części podczas intensywnych opadów deszczu lub śniegu. nie są uszkodzone. Przed przystąpieniem do użytku upewnij się, że Ze względów bezpieczeństwa, użyj śrub rozporowych, aby produkt nie jest uszkodzony. - Seite 13 PARTS /TEILE /PIÈCES /PIEZAS /PARTI /CZĘŚCI PARTS /TEILE /PIÈCES /PIEZAS /PARTI /CZĘŚCI Before installation, please place the parts in the position as shown in the Before installation, please place the parts in the position as shown in the figure below. figure below.
- Seite 14 TOOLS REQUIRED /ERFORDERLICHES WERKZEUG PARTS /TEILE /PIÈCES /PIEZAS /PARTI /CZĘŚCI /OUTILS NÉCESSAIRES /HERRAMIENTAS REQUERIDAS Before installation, please place the parts in the position as shown in the /STRUMENTI NECESSARI /WYMAGANE NARZĘDZIA figure below. /Bringen Sie die Teile vor dem Einbau in die in der nachstehenden Abbildung gezeigte Position.
- Seite 15 HARDWARE /HARDWARE /ACCESSOIRES /ACCESORIO /ACCESSORIO /CZĘŚCI MONTAŻOWE PRODUCT ASSEMBLY /PRODUKTMONTAGE /INSTALLATION DU PRODUIT /INSTALACIÓN DEL PRODUCTO /MONTAGGIO DEL PRODOTTO /MONTAŻ PRODUKTU Link the two " K46-1L" "K68-1R" and " K35-2" to each other, and reinforce the four corners with "T-F". /Verbinden Sie die beiden "...
- Seite 16 Note:The larger hole is always covered over the small hole. Note:Please pay attention to the ground Shed side panels assembly. Mount the 4 "W5-C” on the shed base frame as level when installing shown. /Hinweis: Das größere Loch wird immer /Montage der Schuppenseitenwände.
- Seite 17 1.Connectthe fitting “K46-4R” and fitting “K68-4L" with F1 screws. 2.Install two "K36-3" on "W5-C" as shown. Link "K46-4R" and "K68-4L" with "K36-3" using 4 "C2” 3.Note: Install "C2" on "K36-3" first. /1. Verbinden Sie den Fitting "K46-4R" und den Fitting "K68-4L" mit den Schrauben F1.
- Seite 18 Install four "W5" on "K46-4R, K68-4L” Install two "W3” on "K36-3”. /Vier "W5" auf "K46-4R, K68-4L" installieren /Installez quatre "W5" sur "K46-4R, K68-4L". /Installieren Sie zwei "W3" auf "K36-3". /Instale cuatro "W5" en "K46-4R, K68-4L". /Installez deux "W3" dans "K36-3". /Installare quattro "W5"...
- Seite 19 Install two "W3" on "K46-4R, K68-4L" Install "UA" on the Left/Right side of the door frame. /Zwei "W3" auf "K46-4R, K68-4L" installieren /Installieren Sie "UA" auf der linken/rechten Seite des Türrahmens. /Installez deux "W3" sur "K46-4R, K68-4L". /Installez "UA" sur le côté gauche/droit du cadre de la porte. /Instale dos "W3"...
- Seite 20 Install the "GF" window in the position shown in the figure. Combine two "K36-6" into beams. Fix the beams install them in the position shown in the picture. Put "K46-5L" and "K46-5R" together as shown in the picture, and then install 4 pieces of "C3"...
- Seite 21 Install the shed top frame as shown. Install the shed top panels in the order as shown. /Montieren Sie den oberen Rahmen des Schuppens wie abgebildet. /Montieren Sie die Dachplatten des Schuppens in der gezeigten Reihenfolge. /Installez le cadre supérieur de l'abri de jardin comme indiqué. /Installez les panneaux supérieurs de l'abri dans l'ordre indiqué.
- Seite 22 1.Install "K46-8" and "K36-9" around the roof. 2.Install "K36-10" at the highest part of the roof, and install "GE" at the front and rear. 3.Install corner "GC" on the four corners of the roof. /1. Montieren Sie "K46-8" und "K36-9" um das Dach herum. 2.
- Seite 23 Combine "W5-K” and “W2-HL" to make the door panel on the left. / Kombinieren Sie "W5-K" und "W2-HL", um die linke Türverkleidung herzustellen. /Combinez "W5-K" et "W2-HL" pour fabriquer le panneau de porte gauche. /Combine "W5-K" y "W2-HL" para hacer el panel de la puerta de la izquierda. /Unire "W5-K"...
- Seite 24 Please follow the steps 1-2-3-4 to install. Combine "W5-K" and "W2-HR" to make the door panel on the right. The final fixation should be done after all parts are aligned. /Kombinieren Sie "W5-K" und "W2-HR", um die Türverkleidung auf der /Bitte befolgen Sie die Schritte 1-2-3-4 zur Installation.
- Seite 25 Please follow the steps 1-2-3-4 to install. Install the latch "DC", hinge "DH" and door lock "GL" in the designated The final fixation should be done after all parts are aligned. position as shown in the figure. /Bitte befolgen Sie die Schritte 1-2-3-4 zur Installation. /Bringen Sie den Riegel "DC", das Scharnier "DH"...
- Seite 26 Mount the door to the door frame using "F3" screws. Install protective caps "SL" for those exposing screws. /Befestigen Sie die Tür mit Schrauben "F3" am Türrahmen. /Bringen Sie Schutzkappen "SL" für die freiliegenden Schrauben an. /Fixez la porte au cadre à l'aide des vis "F3". /Installez les capuchons de protection SL pour les vis exposées.
-
Seite 27: Rücksendung / Beschädigung Anweisungen
Instructions De Retour / Réclamation De Dommages Return / Damage Claim Instructions NE PAS jeter la boîte/l'emballage d'origine. DO NOT discard the box / original packaging. Dans le cas où un retour est requis, l'article doit être retourné dans sa boîte In case a return is required, the item must be returned in original box. - Seite 28 Istruzioni Per La Restituzione / Reclamo Per Danni NON scartare la scatola / confezione originale. Nel caso in cui sia richiesto un reso, l'articolo deve essere restituito nella scatola originale. Senza la scatola originale il tuo reso non sarà accettato. Fare una foto dei contrassegni sulla scatola.