Herunterladen Diese Seite drucken
MAJORITY Humboldt Bedienungsanleitung

MAJORITY Humboldt Bedienungsanleitung

Internet radio dab+ cd player music system
Vorschau ausblenden Andere Handbücher für Humboldt:

Werbung

Verfügbare Sprachen
  • DE

Verfügbare Sprachen

  • DEUTSCH, seite 36
Hu m bol dt
Internet Radio DAB+ CD Player Music System
Instructions Guide
EN

Werbung

loading

Inhaltszusammenfassung für MAJORITY Humboldt

  • Seite 1 Hu m bol dt Internet Radio DAB+ CD Player Music System Instructions Guide...
  • Seite 2 Sleep Setting ..................................28 Setting the Alarm ................................29 Cancelling the Alarm ................................29 Specifications and Warranty ....................30 Specification ..................................30 Support ....................................31 Warranty ....................................31 Safety Information ........................32 SAFETY PRECAUTIONS ..............................32 YEAR Register your product online for a FREE 3 year extended warranty at: www.majority.co.uk WARRANTY...
  • Seite 3 Controls And Functions Front View 1. Remote Control Sensor 8. AUDIO IN Jack 2. q/VOLUME Dial 9. MODE Button 3. CD door 10. SCAN/ 12 /INFO Button 11. BACK/ 3 /MENU Button 4. Display 5. TUNING/SELECT Dial 12. 7 Button 6.
  • Seite 4 Controls And Functions Rear view 15. Mains Connection Cable 16. DAB/FM Antenna...
  • Seite 5 Controls And Functions Remote control 1. q Button 2. SLEEP Button 3. CLOCK Button 4. INTRO Button 5. RANDOM Button 6. MODE Button 7. 12 w Button 8. 7 Button 9. SELECT Button 10. EQ Button 11. VOL +/− Buttons 12.
  • Seite 6 What's in the Box? Box Contents A. Humboldt unit B. Instruction Manual C. Remote...
  • Seite 7 Instructions Guide Battery Replacement for the Remote Control 1. Press down the battery cover at “ ” and push the battery cover outwards in the direction of the arrow. 2. Insert 2 x AAA 1.5V batteries (not included). Make sure to match the (+) and ( - ) ends of the battery with the (+) and ( - ) ends indicated in the battery compartment.
  • Seite 8 Instructions Guide Connecting to the mains socket Unwind the mains cable to its full length. Connect the mains plug to the mains socket. The unit is now connected and ready to use Be sure to connect the power cord to an AC outlet that supplies the correct voltage. Hold the power plug when plugging it into an outlet or unplugging it.
  • Seite 9 Instructions Guide Getting Started This instruction manual explains the basic instruction for operating this unit. Unless otherwise stated, all operations described are based on remote control use. Powering ON/OFF Press the q/VOLUME dial on the unit or q button on the remote to turn On/Off the unit. Selecting Modes Press the MODE button on the unit or remote control to access the MODE Menu.
  • Seite 10 ● Humboldt, will now scan for your wireless network; this may take a few seconds, then a list of all the wireless networks will appear on the screen. Select the WLAN network you know and whether to use WPS (Push Button/Pin) or Skip WPS to enter the password using the displayed keyboard.
  • Seite 11 ● Press SELECT button to continue. Connecting using your wireless network password When using a router with no WPS, connect Humboldt to your wireless network using a password. Select SKIP WPS to go to password screen. ● Typing password. Press 12 w/s 3 / 7 / 8 buttons to select letter/number of your password.
  • Seite 12 Instructions Guide Network ● While in ‘System Settings’ , press 12 w/s 3 to select Network. Press the SELECT button to confirm. ● Press 12 w/s 3 buttons to select from the following settings, press the SELECT button to confirm Network wizard SSID –...
  • Seite 13 Factory reset would be recommended when experiencing issues with radio reception, moving houses, moving to a different part of the country, when the Humboldt may pick up the local and national DAB stations in that area, therefore previously tuned channels may no longer be available.
  • Seite 14 Instructions Guide Software update To access Software update page, press MENU to go to System settings. While on System settings, press 12 w/s 3 buttons to select Software update and then press the SELECT button to confirm. Press 12 w/s 3 buttons to select "Auto-check setting" or "Check now", and then press the SELECT button to confirm.
  • Seite 15 Instructions Guide Internet Radio To listen to internet radio your radio must be connected to the internet. Try to position your radio as close as possible to your router to get the best connection speeds. When Internet Radio mode is selected, the radio connects with the Frontier Silicon Internet radio portal to download a list of stations.
  • Seite 16 Instructions Guide Preset Stations ● To store an Internet Radio station, press and hold the PRESET button on the unit, or remote control until the display shows the "Save to Preset". ● Select one of the 30 presets to store the radio station. Use the 12 w/s 3 buttons to select the preset number of your choice.
  • Seite 17 Instructions Guide Podcasts To listen to Podcasts your radio must be connected to the internet. Try to position your radio as close as possible to your router to get the best connection speeds. Press MODE button on unit or remote control to access Menu. Turn the TUNING/SELECT dial on unit or press 7 / 8 buttons on remote control to select Podcasts mode, then press TUNING/SELECT dial on unit or SELECT button on remote control to confirm.
  • Seite 18 Instructions Guide Spotify Connect Use your phone, tablet or computer as a remote control for Spotify. Go to spotify.com/connect to learn how. Licenses The Spotify Software is subject to third party licenses found here: https://www.spotify.com/connect/third-party-licenses DAB- Operations Press MODE button on unit or remote control to access Mode Menu. Turn the TUNING/SELECT dial on unit or press 7 / 8 buttons on remote control to select DAB Radio mode.
  • Seite 19 Instructions Guide Auto Scan - Press the SCAN/12 button on unit or SCAN button on remote control to activate auto scan. Alternatively, - Press the MENU button, and then press 12 w/s 3 buttons to select Scan. Press the SELECT button to confirm.
  • Seite 20 Instructions Guide Prune Invalid You may remove all unavailable stations from the list by following these steps. 1. While on DAB mode, press the MENU button and press 12 w/s 3 buttons to select Prune invalid and the press SELECT button to confirm. 2.
  • Seite 21 Instructions Guide FM Operation Press MODE button on unit or remote control to access Mode Menu. Turn the TUNING/SELECT dial on unit or press 7 / 8 buttons on remote control to select FM Radio mode, then press TUNING/SELECT dial on unit or SELECT button on remote control to confirm.
  • Seite 22 Instructions Guide Date This displays the current date provided automatically by the broadcaster. Scan Setting 1. Press the MENU button to access FM menu. 2. Press 12 w/s 3 buttons to select Scan setting and then press the SELECT button to confirm. 3.
  • Seite 23 Instructions Guide CD and MP3 Operation Compatible Disc Types Disc Types Disc Logo Recorded Content CD-R (CD Recordable - Audio/MP3) AUDIO/MP3 CD-RW (CD-Rewritable - Audio/MP3) AUDIO/MP3 AUDIO-CD (Compact Disc Digital Audio) AUDIO ● Some recorded files may not be able to be played due to the type and format of disc or condition of the recording.
  • Seite 24 Instructions Guide Repeat Playback Press the REPEAT button repeatedly to choose a function. Audio CD ● 1. While playing a CD, press the REPEAT button once on the remote control. The display will show “ ”. The unit will play the current track repeatedly. 2.
  • Seite 25 Instructions Guide Intro Playback While playback, if you would like to listen to the introduction of each track, press the INTRO button on the remote control. The first 10 seconds of each track will be played. USB Operation To play unprotected audio files stored on a connected USB mass storage device via the device, press MODE button on unit or remote control to access Mode Menu.
  • Seite 26 3. Activate your Bluetooth device and select the search mode. 4. “Majority Humboldt” will appear on your Bluetooth device list. 5. Select “Majority Humboldt” and enter “0000” for the password if necessary. Once connected the Bluetooth logo on the screen will stop flashing. Your device is now paired with the unit.
  • Seite 27 UNDOK app may ask you to insert a PIN code to access the Humboldt. The default PIN is 1234. To change the default PIN for security, please refer to System Settings section: Network - NetRemote PIN Setup.
  • Seite 28 Instructions Guide Using headphones Do not listen to music at high volume when using headphones. Doing so can cause permanent hearing impairment. Turn the tuner volume level to the lowest before using headphones. > Only use headphones with a 3.5 mm jack plug. >...
  • Seite 29 Instructions Guide Setting the Alarm 1. Press TIMER button on the remote control, the display shows “Alarm (1 or 2): Off [hh:mm]”. 2. Press 12 w/s 3 buttons to select the Alarm number (1 or 2) and then press the SELECT button to start the setting of the following parameters.
  • Seite 30 Specifications and Warranty Specification Brand Majority Model Humboldt System Section Power Supply AC100-240V ~ 50/60Hz Power Consumption Working Environment - 0 ~ 35 °C Temperature Net Weight ~2.7kgs Unit Dimension (W) × (D) × 350 x 191 x 120mm Radio Frequency FM 87.50 –...
  • Seite 31 Thank you for purchase of Majority Humboldt. Please follow the guidance of the manual to set up your device and enjoy its fantastic features. If you require further assistance with your new device, please contact our support team on the Majority website: https://www.majority.co.uk/support...
  • Seite 32 Safety Information SAFETY PRECAUTIONS - Read all the instructions carefully before using the unit and keep them for future reference. - Check that the voltage marked on the rating label matches your mains voltage. - The unit must be placed on a flat stable surface and should not be subjected to vibrations. - Do not place the unit on sloped or unstable surfaces as the unit may fall off or tip over.
  • Seite 33 Safety Information Mains Cable Make sure the unit is not resting on top of the mains cable, as the weight of the unit may damage the mains cable and create a safety hazard. If the mains cable is damaged it must be replaced by the manufacturer, its service agent, or similarly qualified persons in order to avoid a hazard.
  • Seite 34 Under the environment with radio-frequency disturbance, the product may malfunction and could self- recover when the interference disappear. Keep these instructions. Instructions are all available for download at www.majority.co.uk IMPORTANT: Please read all instructions carefully before use and keep for future reference...
  • Seite 35 Hu m bol dt Internet Radio DAB+ CD Player Music System Bedienungsanleitung...
  • Seite 36 Schlafeinstellung ................................29 Alarm einstellen..................................30 Alarm abbrechen ................................30 Aktivieren Sie den WLAN-Port ............................31 Spezifikationen und Garantie ....................32 Garantie ....................................32 Spezifikationen ...................................32 Sicherheitsinformationen ......................33 Registrieren Sie Ihr Produkt online unter JAHER www.majority.co.uk und erhalten Sie eine GARANTIE KOSTENLOSE, auf 3 Jahre erweiterte Garantie.
  • Seite 37 
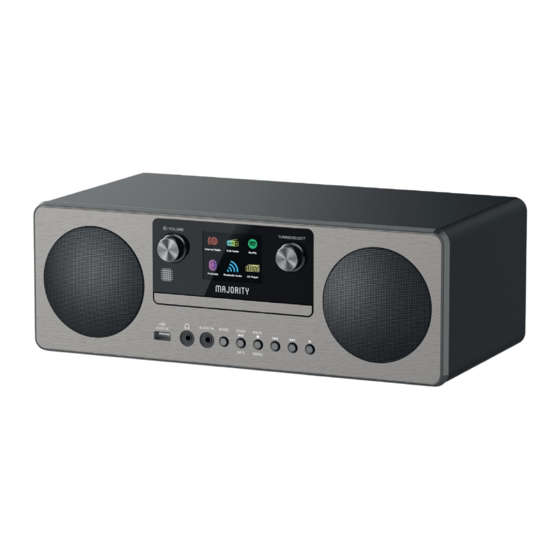
Bedienelemente und Funktionen Vorderansicht 1. Fernbedienungssensor 8. AUDIO IN-Buchse 2. EIN/LAUTSTÄRKE-Regler 9. MODE-Taste 3. CD-Tür 10. SCAN/PLAY/INFO-Taste 4. Display 11. ZURÜCK/STOPP/MENÜ-Taste 5. TUNING/SELECT-Regler 12. VORHERIGE Taste 6. USB-Anschluss 13. Nächster Knopf 7. Kopfhörerbuchse 14. EJECT-Taste...
  • Seite 38 Bedienelemente und Funktionen Rückansicht 15. Netzanschlusskabel 16. DAB/UKW-Antenne...
  • Seite 39 Bedienelemente und Funktionen Fernbedienung 1. EIN-Taste 2. Schlafknopf 3. UHR-Taste 4. INTRO-Taste 5. RANDOM-Taste 6. MODE-Taste 7. PLAY / UP-Taste 8. VORHERIGE Taste 9. Auswahlknopf 10. EQ-Taste 11. VOL +/− Tasten 12. Zifferntasten 13. MONO/ST. Taste 14. EJECT-Taste 15. TIMER-Taste 16.
  • Seite 40 Was befindet sich in der Schachtel? Lieferumfang A. Haupteinheit B. Bedienungsanleitung C. Remote...
  • Seite 41 Anleitung Batteriewechsel für die Fernbedienung 1. Drücken Sie die Batterieabdeckung herunter und schieben Sie die Batterieabdeckung in Pfeilrichtung nach außen. 2. Legen Sie 2x AAA 1.5 V Alkalibatterien ein (nicht im Lieferumfang enthalten). Achten Sie darauf, dass die (+) und ( – ) Enden der Batterie mit den im Batteriefach gekennzeichneten (+) und ( –...
  • Seite 42 Anleitung Netzwerkverbindung Dieses Produkt unterstützt nur eine drahtlose Netzwerkverbindung für den Netzwerkzugriff und keine kabelgebundene LAN-Verbindung. Wireless Network ● Prüfen Sie zunächst, ob die Kontrollleuchten (LINK/ACT) Ihres Routers leuchten. ● Fahren Sie mit den im Folgenden unter „Erste Schritte“ beschriebenen Vorgängen fort. Es wird empfohlen, den Setup-Assistenten im Abschnitt Systemeinstellungen zu durchlaufen.
  • Seite 43 Anleitung Lautstärke einstellen Drehen Sie den Regler ON/VOLUME am Gerät oder drücken Sie die Tasten VOL +/– auf der Fernbedienung, um die Lautstärke einzustellen. Wenn Sie den Ton ausschalten möchten, drücken Sie die MUTE-Taste auf der Fernbedienung. Drücken Sie die MUTE-Taste erneut, drehen Sie den ON/VOLUME-Regler am Gerät oder drücken Sie die VOL +/–-Tasten auf der Fernbedienung, um zum normalen Hören zurückzukehren.
  • Seite 44 Anleitung ● Ihr Radio sucht nun nach Ihrem drahtlosen Netzwerk, dies kann einige Sekunden dauern, dann erscheint eine Liste aller drahtlosen Netzwerke auf dem Bildschirm. Wählen Sie das Ihnen bekannte WLAN-Netzwerk und ob Sie WPS (Push Button/Pin) oder Skip WPS verwenden möchten, um das Passwort über die angezeigte Tastatur einzugeben.
  • Seite 45 Anleitung Systemeinstellungen Drücken Sie die MENU-Taste am Gerät oder auf der Fernbedienung, um das Menü anzuzeigen. Drehen Sie den TUNING/SELECT-Regler am Gerät oder die Aufwärts-/Abwärtstasten auf der Fernbedienung, um Systemeinstellungen auszuwählen, und drücken Sie dann den TUNING/SELECT-Regler am Gerät oder die SELECT-Taste auf der Fernbedienung zur Bestätigung. Equalizer Dieses System unterstützt eine Vielzahl von Equalizern und Soundeffekten.
  • Seite 46 Anleitung Einstellungen anzeigen Zeigen Sie die Einstellung am Gerät an. Manuelle Einstellungen Wählen Sie ein drahtloses Netzwerk mit DHCP aktivieren/ deaktivieren. NetRemote PIN-Einrichtung Definieren einer PIN-Nummer, die eingegeben werden muss, bevor eine Remote-Verbindung mit dem Gerät über ein Netzwerk hergestellt werden kann. Netzwerkprofil Zeigen Sie das verbundene Netzwerk an.
  • Seite 47 Anleitung Auto-Update DAB/UKW/Netzwerk/Keine Aktualisierung Format einstellen 12/24-Stunden-Format. Zeitzone einstellen Wählen Sie eine Zeitzone. (Nur verfügbar, wenn die automatische Aktualisierung vom Netzwerk aktiviert ist.) Sommerzeit Sommerzeit auswählen. (Nur verfügbar, wenn die automatische Aktualisierung vom Netzwerk aktiviert ist.) Standby-Uhr Analoguhr / Digitaluhr LJ...
  • Seite 48 Anleitung ● Drücken Sie im Systemeinstellungsmodus die Aufwärts-/Abwärtstasten, um Werksreset auszuwählen, unddrücken Sie zur Bestätigung die SELECT-Taste. ● Drücken Sie die Vorwärts-/Zurück-Tasten, um [Ja] auszuwählen, und drücken Sie die SELECT-Taste, um zu bestätigen, oder wählen Sie [Nein], um abzubrechen. LJ Nach dem Zurücksetzen des Systems werden alle voreingestellten Sender, Internet-, DAB-und FM-voreingestellten Sender gelöscht.
  • Seite 49 Anleitung Rücklicht ● Drücken Sie im Systemeinstellungsmodus die Auf-/Ab-Tasten, um Hintergrundbeleuchtung auszuwählen, und drücken Sie dann zur Bestätigung die SELECT-Taste. ● Drücken Sie für die anderen Einstellungen unter Hintergrundbeleuchtung die Auf-/Ab-Tasten, um die folgenden Optionen auszuwählen, und drücken Sie dann zur Bestätigung die SELECT-Taste. Operation Mode Hoch Mittel Niedrig Standby Modus...
  • Seite 50 Anleitung Stationsliste Wenn Sie zum ersten Mal Internetradio hören, wird das Radio in [Station List] angezeigt. Drücken Sie die AUFWÄRTS-/ABWÄRTS-Tasten, um aus den folgenden Optionen auszuwählen, und drücken Sie dann zur Bestätigung die AUSWAHL-Taste. "Länder" Sie können gezielt nach Sendern aus Ihrem Land suchen. In diesem Bereich werden lokale Radiosender an Ihrem Standort angezeigt.
  • Seite 51 Anleitung Alternativ per Fernbedienung, Drücken Sie die Tasten Preset ./,, um durch die voreingestellten Sender zu schalten. Oder drücken Sie die Zifferntasten (0-9) auf der Fernbedienung, um direkt zu den voreingestellten Sendern 1-10 zu wechseln. Wenn kein Sender gespeichert ist, wird Preset Empty angezeigt. LJ...
  • Seite 52 Anleitung Stationsliste Drücken Sie im Podcast-Modus die MENU-Taste, um auf das Menü zuzugreifen. Drücken Sie die Auf-/ Ab-Tasten, um [Podcast-Liste] auszuwählen, und drücken Sie zur Bestätigung die SELECT-Taste. Beim Neustart des Radios werden automatisch die zuletzt gehörten Sender ausgewählt. Um zur [Podcast-Liste] zurückzukehren, drücken Sie die ZURÜCK-Taste.
  • Seite 53 Anleitung DAB-Betrieb Drücken Sie die MODE-Taste am Gerät oder auf der Fernbedienung, um auf das Modusmenü zuzugreifen. Drehen Sie den TUNING/SELECT-Regler am Gerät oder drücken Sie die Tasten NEXT / PREVIOUS auf der Fernbedienung, um den DAB-Radiomodus auszuwählen, und drücken Sie dann den TUNING/SELECT-Regler am Gerät oder die SELECT-Taste auf der Fernbedienung zur Bestätigung.
  • Seite 54 Anleitung ● Drücken Sie die Aufwärts-/Abwärtstasten, um den Kanal auszuwählen, und drücken Sie zur Bestätigung die SELECT-Taste. ● Um gefundene Sender anzuhören, kehren Sie zum Bildschirm „Aktuelle Wiedergabe“ zurück und drücken Sie die Aufwärts-/Abwärtstasten, um den gewünschten Sender aus der Senderliste auszuwählen, und drücken Sie zur Bestätigung die SELECT-Taste.
  • Seite 55 Anleitung DRC (Dynamische Bereichskompression) Wenn Sie Musik mit hohem Dynamikbereich in einer lauten Umgebung hören, möchten Sie möglicherweise den Audio-Dynamikbereich komprimieren. ● Drücken Sie im DAB-Modus die MENU-Taste und drücken Sie die Auf-/Ab-Tasten, um DRC auszuwählen, und drücken Sie zur Bestätigung die SELECT-Taste. ●...
  • Seite 56 Anleitung Manuelle Abstimmung Um manuell nach UKW-Sendern zu suchen, drehen Sie den TUNING/SELECT-Regler am Gerät oder drücken Sie wiederholt die Tasten NEXT / PREVIOUS auf der Fernbedienung, bis die gewünschte Frequenz erreicht ist. LJ Beim UKW-Radio kann es erforderlich sein, jeden Sender fein abzustimmen, indem Sie den TUNING/SELECT-Regler am Gerät drehen oder wiederholt die NEXT/Previous-Tasten auf der Fernbedienung drücken.
  • Seite 57 Anleitung Audioeinstellung ● Drücken Sie die MENU-Taste, um auf das Hauptmenü zuzugreifen. ● Drücken Sie die UP / DOWN-Tasten, um die Audioeinstellung auszuwählen, und drücken Sie zur Bestätigung die SELECT-Taste. ● Drücken Sie die Tasten NEXT / PREVIOUS, um [Yes] auszuwählen, um nur in Mono zu hören, oder [NO], damit das Gerät automatisch Stereo oder Mono wählt.
  • Seite 58 Anleitung Drücken Sie die MODE-Taste am Gerät oder auf der Fernbedienung, um auf das Modusmenü zuzugreifen. Drehen Sie den TUNING/SELECT-Regler am Gerät oder drücken Sie die Tasten NEXT / PREVIOUS auf der Fernbedienung, um den CD-Modus auszuwählen, und drücken Sie dann den TUNING/SELECT-Regler am Gerät oder die SELECT-Taste auf der Fernbedienung zur Bestätigung.
  • Seite 59 Anleitung Audio-CD ● Drücken Sie während der CD-Wiedergabe einmal die REPEAT-Taste auf der Fernbedienung. Das Gerät spielt den aktuellen Titel wiederholt ab. ● Drücken Sie die REPEAT-Taste zweimal. Das Gerät spielt alle Titel auf der CD wiederholt ab. ● Drücken Sie die REPEAT-Taste erneut, um die REPEAT-Funktion auszuschalten. MP3 CD ●...
  • Seite 60 Anleitung USB-Betrieb Um ungeschützte Audiodateien, die auf einem angeschlossenen USB-Massenspeichergerät gespeichert sind, über das Gerät abzuspielen, drücken Sie die MODE-Taste am Gerät oder auf der Fernbedienung, um auf das Modusmenü zuzugreifen. Drehen Sie den TUNING/SELECT-Regler am Gerät oder drücken Sie die Tasten NEXT / PREVIOUS auf der Fernbedienung, um den USB-Modus auszuwählen, und drücken Sie dann den TUNING/SELECT-Regler am Gerät oder die SELECT-Taste auf der Fernbedienung zur Bestätigung.
  • Seite 61 „Majority Humboldt“ erscheint in Ihrer Bluetooth-Geräteliste. ● Wählen Sie „Mehrheit Humboldt“ und geben Sie ggf. „0000“ als Passwort ein. Sobald die Verbindung hergestellt ist, hört das Bluetooth-Logo auf dem Bildschirm auf zu blinken. Ihr Gerät ist jetzt mit dem Gerät gekoppelt.
  • Seite 62 Anleitung Aux-Eingang Sie können Ton von einem externen Gerät über das Gerät wiedergeben. ● Schließen Sie das externe Gerät über ein geeignetes AUX-Kabel (nicht im Lieferumfang enthalten) an den analogen Audioeingang des Geräts an. ● Drücken Sie die MODE-Taste am Gerät oder auf der Fernbedienung, um auf das Modusmenü zuzugreifen.
  • Seite 63 Anleitung Kopfhörer verwenden Hören Sie keine Musik mit hoher Lautstärke, wenn Sie Kopfhörer verwenden. Dies kann zu dauerhaften Hörstörungen führen. Stellen Sie die Lautstärke des Tuners auf den niedrigsten Wert ein, bevor Sie Kopfhörer verwenden. ● Verwenden Sie nur Kopfhörer mit einem 3.5mmKlinkenstecker. ●...
  • Seite 64 Anleitung Alarm einstellen ● Drücken Sie die TIMER-Taste auf der Fernbedienung, das Display zeigt „Alarm (1 oder 2): Aus [hh:mm]“. ● Drücken Sie die UP / DOWN-Tasten, um die Alarmnummer (1 oder 2) auszuwählen, und drücken Sie dann die SELECT-Taste, um mit der Einstellung der folgenden Parameter zu beginnen. Drücken Sie die UP / DOWN-Tasten, um auszuwählen, und drücken Sie dann die SELECT-Taste zur Bestätigung.
  • Seite 65 Anleitung Aktivieren Sie den WLAN-Port ● Verbinden Sie das Gerät mit Strom ● Wechseln Sie in den drahtlosen Modus (z. B. Internet) So deaktivieren Sie den Wireless Network Port: ● Gehen Sie zu Hauptmenü – Systemeinstellungen – Netzwerk – Netzwerk verbunden halten. Wählen Sie Nein und drücken Sie dann die SELECT-Taste, um die Netzwerkverbindung getrennt zu halten Bluetooth Version...
  • Seite 66 Spezifikationen und Garantie Garantie Registrieren Sie Ihr Majority-Produkt (https://www.majority.co.uk/de/register/) innerhalb von 30 Tagen nach dem Kauf, um Ihre Verlängerung zu aktivieren 3 Jahre Garantie. Erhalten Sie Zugang zu allen Vorteilen und lebenslangem technischem Support (siehe unsere Erweiterte Garantie (https://www.majority.co.uk/de/returns-warranty/) Details für weitere Informationen).
  • Seite 67 Sicherheitsinformationen  BEI BEDARF Bitte lesen Sie alle Anweisungen vor Gebrauch sorgfältig durch. WARNUNG Risiko eines elektrischen Schlages. Nicht öffnen. 1. Lesen Sie diese Anweisungen: 2. Beachten Sie alle Warnungen. 3. Befolgen Sie alle Anweisungen in der Bedienungsanleitung. 4. Reinigen Sie das Gerät nicht in der Nähe von oder mit Wasser. 5.
  • Seite 68 Sie sollten jetzt Ihre Elektro-Altgeräte recyceln und damit der Umwelt helfen. Dieses Symbol bedeutet, dass ein elektrisches Produkt nicht mit dem normalen Hausmüll entsorgt werden darf. Bitte stellen Sie sicher, dass es nach Fertigstellung einer geeigneten Einrichtung zurEntsorgung zugeführt wird. KONTAKT SUPPORT (HTTPS://WWW.MAJORITY.CO.UK/DE/SUPPORT/)
  • Seite 69 Hu m bol dt Internet Radio DAB+ CD Player Music System Manuel d’utilisation...
  • Seite 70 Annulation de l'alarme..............................30 Activer le port réseau sans fil ............................31 Caractéristiques et garantie ....................32 Garantie ....................................32 Caractéristiques ..................................32 Info sécurité ..........................33 Enregistrez votre produit en ligne pour GARANTIE bénéficier d'une garantie prolongée de 3 ans GRATUITE à l'adresse : www.majority.co.uk...
  • Seite 71 Commandes et fonctions Vue de face 1. Capteur de télécommande 8. Prise AUDIO IN 2. Molette MARCHE/VOLUME 9. Bouton MODE 3. Porte CD 10. Bouton SCAN/LECTURE/INFO 4. Ecran 11. Bouton RETOUR/ARRÊT/MENU 5. Cadran TUNING/SELECT 12. Bouton PRECEDENT 6. Connexion USB 13.
  • Seite 72 Commandes et fonctions Vue arrière 15. Câble de connexion secteur 16. Antenne DAB/FM...
  • Seite 73 Commandes et fonctions Télécommande 1. Bouton MARCHE 2. Bouton de veille 3. Bouton HORLOGE 4. Bouton INTRO 5. Bouton ALÉATOIRE 6. Bouton MODE 7. Bouton PLAY/UP 8. Bouton PRECEDENT 9. Bouton SÉLECTIONNER 10. Bouton EQ 11. Boutons VOL +/- 12. Boutons numérotés 13.
  • Seite 74 Que contient la boîte ? Contenu de la boîte A. Unité principale B. Manuel d’utilisation C. Commande...
  • Seite 75 Guide d'instructions Remplacement de la pile de la télécommande 1. Appuyez sur le couvercle de la batterie et poussez le couvercle de la batterie vers l'extérieur dans le sens de la fl èche. 2. Insérez 2 piles alcalines AAA 1.5 V (non incluses). Assurez- vous de faire correspondre les extrémités (+) et (-) de la pile avec les extrémités (+) et (-) indiquées dans le compartiment de la pile.
  • Seite 76 Guide d'instructions Connexion réseau Ce produit prend uniquement en charge la connexion réseau sans fil pour l'accès au réseau et ne prend pas en charge la connexion LAN filaire. Réseau sans fil ● Vérifiez d'abord si les voyants de contrôle (LINK/ACT) de votre routeur s'allument. ●...
  • Seite 77 Guide d'instructions Réglage du volume Tournez la molette ON/VOLUME de l'appareil ou appuyez sur les touches VOL +/– de la télécommande pour régler le volume. Si vous souhaitez couper le son, appuyez sur le bouton MUTE de la télécommande. Appuyez à nouveau sur la touche MUTE, tournez la molette ON/VOLUME de l'appareil ou appuyez sur les touches VOL +/–...
  • Seite 78 Guide d'instructions Connexion à l'aide du bouton WPS de votre routeur La connexion à l'aide du bouton WPS (Wi-FiProtected Setup) de votre routeur est un moyen simple et rapide de connecter votre radio sans avoir à saisir de mot de passe. Sélectionnez l'une des méthodes de connexion suivantes : Bouton WPS Si votre routeur dispose d'un bouton WPS, vous remarquerez [WPS] devant le nom de votre réseau.
  • Seite 79 Guide d'instructions Les paramètres du système Appuyez sur le bouton MENU de l'appareil ou de la télécommande pour afficher le menu. Tournez le cadran TUNING/SELECT sur l'appareil ou les boutons haut/bas de la télécommande pour sélectionner les paramètres du système, puis appuyez sur le cadran TUNING/SELECT sur l'appareil ou le bouton SELECT sur la télécommande pour confirmer.
  • Seite 80 Guide d'instructions Paramètres manuels Sélectionnez le réseau sans fil avec DHCP activé/désactivé. NetRemote Configuration Pour définir un code PIN à saisir avant de pouvoir se connecter à du code PIN distance à l'appareil via un réseau. Profil de réseau Afficher le réseau connecté. Effacer les paramètres Pour supprimer la mémoire réseau connectée dans le profil réseau.
  • Seite 81 Guide d'instructions L'heure d'été Sélectionnez l'heure d'été. (Uniquement disponible lorsque la mise à jour automatique à partir du réseau est activée.) Horloge de veille Horloge analogique/ Horloge numérique LJ Le paramètre de mise à jour automatique de l'heure par défaut est "Mettre à jour à partir du réseau".
  • Seite 82 Guide d'instructions Mise à jour logicielle ● En mode Paramètres système, appuyez sur les boutons haut/bas pour sélectionner Mise à jour du logiciel, puis appuyez sur le bouton SELECT pour confirmer. ● Appuyez sur les boutons haut / bas pour sélectionner "Réglage de vérification automatique" ou "Vérifier maintenant", puis appuyez sur le bouton SELECT pour confirmer.
  • Seite 83 Guide d'instructions Radio Internet Pour écouter la radio Internet, votre radio doit être connectée à Internet. Essayez de positionner votre radio le plus près possible de votre routeur pour obtenir les meilleures vitesses de connexion. Lorsque le mode radio Internet est sélectionné, la radio se connecte au portail de radio Internet Frontier Silicon pour télécharger une liste de stations.
  • Seite 84 Guide d'instructions Appuyez sur la touche BACK de l'appareil ou de la télécommande pour revenir en arrière d'un niveau de menu. Stations préréglées Les stations radio Internet préréglées sont stockées dans la radio et ne sont pas accessibles à partir d'autres radios.
  • Seite 85 Guide d'instructions Podcasts Pour écouter des podcasts, votre radio doit être connectée à Internet. Essayez de positionner votre radio le plus près possible de votre routeur pour obtenir les meilleures vitesses de connexion. Appuyez sur le bouton MODE de l'appareil ou de la télécommande pour accéder au menu Mode. Tournez le bouton TUNING/SELECT sur l'appareil ou appuyez sur les boutons NEXT / PREVIOUS de la télécommande pour sélectionner le mode Podcasts, puis appuyez sur le bouton TUNING/SELECT sur l'appareil ou sur le bouton SELECT de la télécommande pour confirmer.
  • Seite 86 Guide d'instructions Spotify Connect Utilisez votre téléphone, tablette ou ordinateur comme télécommande pour Spotify. Allez sur spotify.com/connect pour savoir comment. Licences Le logiciel Spotify est soumis à des licences tierces disponibles ici : https://www.spotify.com/connect/third-party-licenses Opération DAB Appuyez sur le bouton MODE de l'appareil ou de la télécommande pour accéder au menu Mode. Tournez la molette TUNING/SELECT de l'appareil ou appuyez sur les boutons NEXT / PREVIOUS de la télécommande pour sélectionner le mode radio DAB, puis appuyez sur la molette TUNING/SELECT de l'appareil ou sur la touche SELECT de la télécommande pour confirmer.
  • Seite 87 Guide d'instructions ● L'écran affichera «Scanning…» et une barre de progression. ● Toutes les stations trouvées seront enregistrées automatiquement. Pour explorer et écouter les stations trouvées, appuyez sur les boutons haut/bas pour sélectionner puis appuyez sur le bouton SELECT pour confirmer. Réglage manuel En plus de la fonction de syntonisation automatique, vous pouvez régler manuellement le récepteur.
  • Seite 88 Guide d'instructions Débit binaire / Codec / Canaux L'écran affichera le débit binaire audio numérique reçu avec des informations supplémentaires sur le codec audio et la configuration du canal. Date Cela affiche la date actuelle fournie automatiquement par le diffuseur. Prune invalide Vous pouvez supprimer toutes les stations indisponibles de la liste.
  • Seite 89 Guide d'instructions Fonctionnement FM Pour passer l'appareil en mode FM, appuyez sur le bouton MODE de la télécommande pour accéder au menu Mode. Appuyez sur le bouton Précédent/Suivant pour sélectionner et appuyez sur le bouton SELECT pour passer au mode « Radio FM ». Vous pouvez également appuyer sur le bouton FM de la télécommande pour passer en mode FM.
  • Seite 90 Guide d'instructions Nom de la station / Fréquence Lorsqu'une station RDS est reçue, le nom de cette station sera affiché, ou sinon la fréquence sera affichée. Date Cela affiche la date actuelle fournie automatiquement par le diffuseur. Paramètres de numérisation ●...
  • Seite 91 Guide d'instructions Fonctionnement CD et MP3 Types de disques compatibles Types de disque Contenu enregistré CD-R (CD enregistrable – Audio/MP3) AUDIO/MP3 CD-RW (CD réinscriptible – Audio/MP3) AUDIO/MP3 AUDIO-CD (Compact Disc Digital Audio) AUDIO LJ Certains fichiers enregistrés peuvent ne pas pouvoir être lus en raison du type et du format du disque ou de l'état de l'enregistrement.
  • Seite 92 Guide d'instructions L'appareil lira le disque et la lecture de la première piste du CD commencera automatiquement. Appuyez sur 12 pour mettre la lecture en pause, l'indicateur de temps écoulé clignotera. Pour reprendre la lecture, appuyez à nouveau sur 12. Appuyez sur 3 pour arrêter la lecture du disque.
  • Seite 93 Guide d'instructions Lecture programmée Vous pouvez programmer jusqu'à 20 pistes à lire dans l'ordre de votre choix. ● Assurez-vous qu'un disque est inséré et qu'il n'est pas en cours de lecture (arrêté). ● Appuyez sur le bouton PRESET pour accéder au mode programme. L'écran affichera "P01T01". ●...
  • Seite 94 "Majority Humboldt" apparaîtra sur votre liste d'appareils Bluetooth. ● Sélectionnez "Majority Humboldt" et entrez "0000" pour le mot de passe si nécessaire. Une fois connecté, le logo Bluetooth sur l'écran arrête de clignoter. Votre appareil est maintenant couplé avec l'appareil.
  • Seite 95 Guide d'instructions Lecture de musique via Bluetooth Vous devrez peut-être régler le volume de votre radio et de votre appareil Bluetooth. Appuyez sur le bouton SCAN/PLAY de l'appareil ou sur le bouton UP de la télécommande pour lire/mettre en pause la musique ou appuyez sur les boutons NEXT / PREVIOUS de l'appareil ou de la télécommande pour passer à...
  • Seite 96 Guide d'instructions NetRemote L'appareil offre une fonctionnalité de NetRemote par smartphone ou tablette dans le système iOS ou Android. En téléchargeant l'application attribuée nommée UNDOK, vous pouvez afficher tous les modes de radio Internet, podcasts, Spotify, DAB, FM et Bluetooth. Recherchez UNDOK sur Google Play ou Apple Store pour l'application UNDOK et installez-la sur votre smartphone ou votre tablette.
  • Seite 97 Guide d'instructions Réglage du sommeil Cette fonction vous permet de programmer l'appareil pour qu'il passe en mode veille de lui-même après une période de temps définie. ● Pour activer la fonction sommeil, appuyez plusieurs fois sur le bouton SLEEP de la télécommande. L'heure changera dans l'ordre ci-dessous à...
  • Seite 98 Guide d'instructions Réglage de l'alarme ● Appuyez sur le bouton TIMER de la télécommande, l'écran affiche "Alarm (1 or 2): Off [hh:mm]". ● Appuyez sur les boutons UP / DOWN pour sélectionner le numéro d'alarme (1 ou 2) puis appuyez sur le bouton SELECT pour démarrer le réglage des paramètres suivants.
  • Seite 99 Guide d'instructions Activer le port réseau sans fil ● Connectez l'appareil à l'alimentation ● Passer en mode sans fil (par exemple Internet) Comment désactiver le port réseau sans fil : ● Allez dans Menu principal – Paramètres système – Réseau – Maintenir le réseau connecté. Sélectionnez Non, puis appuyez sur le bouton SELECT pour garder le réseau déconnecté...
  • Seite 100 Caractéristiques et garantie Garantie Enregistrez votre produit Majority (https://www.majority.co.uk/fr/register/) dans les 30 jours suivant l'achat pour activer votre extension Garantie de 3 ans. Accédez à tous les avantages et à une assistance technique à vie (voir notre Garantie prolongée (https://www.majority.co.uk/fr/returns- warranty/) détails pour plusd'informations).
  • Seite 101 Info sécurité  IMPORTANT Veuillez lire attentivement toutes les instructions avant utilisation. ATTENTION Risque de choc electrique. Ne pas ouvrir. 1. Lisez ces instructions : 2. Respectez tous les avertissements. 3. Suivez toutes les instructions du manuel d'utilisation. 4. Ne pas nettoyer l'appareil à proximité ou avec de l'eau. 5.
  • Seite 102 Vous devez maintenant recycler vos déchets électriques et ainsi protéger l'environnement. Ce symbole signifie qu'un produit électrique ne doit pas être jeté avec les déchets ménagers normaux. Veuillez vous assurer qu'il est transporté dans une installation appropriée pour l'élimination une fois terminé. CONTACTER LE SUPPORT (HTTPS://WWW.MAJORITY.CO.UK/FR/SUPPORT/)
  • Seite 103 Hu m bol dt Internet Radio DAB+ CD Player Music System Manuale d’istruzioni...
  • Seite 104 Annullamento dell'allarme .............................30 Attiva la porta di rete wireless ............................31 Specificazioni e garanzia ......................32 Garanzia....................................32 Specificazioni ..................................32 Informazioni sulla sicurezza ....................33 Registra il tuo prodotto per usufruire di ANNI un’estensione GRATUITA della garanzia a 3 DI GARANZIA anni sul sito: www.majority.co.uk...
  • Seite 105 Controlli e funzioni Vista frontale 1. Sensore del telecomando 8. Jack INGRESSO AUDIO 2. Accensione/Volume 9. Pulsante MODE 3. Porta CD 10. Pulsante SCANSIONE/PLAY/INFO 4. Dsiplay 11. Pulsante INDIETRO/STOP/MENU 5. SINTONIZZAZIONE/SELEZIONA Manopola 12. Pulsante PRECEDENTE 6. Connessione USB 13. Pulsante AVANTI 7.
  • Seite 106 Controlli e funzioni Retrovisore 15. Cavo di collegamento alla rete 16. Antenna DAB/FM...
  • Seite 107 Controlli e funzioni Controllo remoto 1. Pulsante ON 2. Pulsante SLEEP 3. Pulsante OROLOGIO 4. Pulsante INTRO 5. Pulsante CASUALE 6. Pulsante MODE 7. Pulsante PLAY / SU 8. Pulsante PRECEDENTE 9. Pulsante SELEZIONA 10. Pulsante EQ 11. Pulsanti VOL +/- 12.
  • Seite 108 Cosa c’è nella scatola? Contenuto della confezione A. Unità principale B. Manuale di istruzioni C. Remote...
  • Seite 109 Guida alle istruzioni Sostituzione della batteria per il telecomando 1. Premere il coperchio della batteria e spingere il coperchio della batteria verso l'esterno nella direzione della freccia. 2. Inserire 2 batterie alcaline AAA da 1.5 V (non incluse). Assicurarsi di far corrispondere le estremità (+) e ( – ) della batteria con le estremità...
  • Seite 110 Guida alle istruzioni Connessione di rete Questo prodotto supporta solo la connessione di rete wireless per l'accesso alla rete e non supporta la connessione LAN cablata. rete wireless ● Verifica innanzitutto se le spie di controllo (LINK/ACT) del tuo router si accendono. ●...
  • Seite 111 Guida alle istruzioni Regolazione del volume Ruotare la manopola ON/VOLUME sull'unità o premere i pulsanti VOL +/– sul telecomando per regolare il volume. Se si desidera disattivare l'audio, premere il tasto MUTE sul telecomando. Premere di nuovo il pulsante MUTE, ruotare la manopola ON/VOLUME sull'unità o premere i pulsanti VOL +/– sul telecomando per riprendere il normale ascolto.
  • Seite 112 Guida alle istruzioni Connessione utilizzando il pulsante WPS sul router La connessione utilizzando il pulsante WPS (Wi-FiProtected Setup) sul router è un modo semplice e veloce per connettere la radio senza dover digitare una password. Selezionare uno dei seguenti metodi di connessione: Pulsante WPS Se il tuo router ha un pulsante WPS, noterai [WPS] davanti al nome della tua rete.
  • Seite 113 Guida alle istruzioni Impostazioni di sistema Premere il pulsante MENU sull'unità o sul telecomando per visualizzare il menu. Ruotare la manopola TUNING/SELECT sull'unità o i pulsanti su/giù sul telecomando per selezionare Impostazioni di sistema, quindi premere la manopola TUNING/SELECT sull'unità o il pulsante SELECT sul telecomando per confermare.
  • Seite 114 Guida alle istruzioni Visualizza le impostazioni Visualizza l'impostazione sull'unità. Impostazioni manuali Selezionare la rete wireless con abilitazione/disabilitazione DHCP. NetRemote Impostazione Per definire un numero PIN da inserire prima di potersi collegare all'unità in remoto suuna rete. Profilo di rete Visualizza la rete connessa. Cancella impostazioni di Per eliminare la memoria di rete connessa in Profilo di rete.
  • Seite 115 Guida alle istruzioni L'ora legale Seleziona l'ora legale. (Disponibile solo quando l'aggiornamento automatico dalla rete è attivo.) Orologio di standby Orologio analogico/orologio digitale LJ L'impostazione predefinita dell'aggiornamento automatico dell'ora è "Aggiorna dalla rete". Se si desidera impostare manualmente l'ora, si consiglia di disattivare la funzione di aggiornamento automatico.
  • Seite 116 Guida alle istruzioni Aggiornamento software ● Durante la modalità Impostazioni di sistema, premere i pulsanti su/giù per selezionare Aggiornamento software, quindi premere il pulsante SELEZIONA per confermare. ● Premere i pulsanti su/giù per selezionare "Impostazione verifica automatica" o "Verifica ora", quindi premere il pulsante SELEZIONA per confermare.
  • Seite 117 Guida alle istruzioni Internet Radio Per ascoltare la radio Internet, la radio deve essere connessa a Internet. Cerca di posizionare la radio il più vicino possibile al router per ottenere le migliori velocità di connessione. Quando è selezionata la modalità Internet Radio, la radio si connette al portale della radio Internet Frontier Silicon per scaricare un elenco di stazioni.
  • Seite 118 Guida alle istruzioni Premere il pulsante BACK sull'unità o il telecomando può tornare indietro di un livello di menu. Stazioni preimpostate Le stazioni radio Internet preimpostate vengono memorizzate nella radio e non sono accessibili da altre radio. ● Per memorizzare una preselezione radio Internet, devi prima ascoltare la stazione che desideri salvare.
  • Seite 119 Guida alle istruzioni Podcast Per ascoltare i podcast la tua radio deve essere connessa a Internet. Cerca di posizionare la radio il più vicino possibile al router per ottenere le migliori velocità di connessione. Premere il pulsante MODE sull'unità o sul telecomando per accedere al menu Modalità. Ruotare la manopola TUNING/SELECT sull'unità...
  • Seite 120 Guida alle istruzioni Spotify Connect Usa il tuo telefono, tablet o computer come telecomando per Spotify. Vai su spotify.com/connect per sapere come. Licenze Il software Spotify è soggetto a licenze di terze parti disponibili qui: https://www.spotify.com/connect/third-party-licenses Operazione DAB Premere il pulsante MODE sull'unità o sul telecomando per accedere al menu Modalità. Ruotare la manopola TUNING/SELECT sull'unità...
  • Seite 121 Guida alle istruzioni Scansione automatica Premere il pulsante SCAN sul telecomando per attivare la scansione automatica. In alternativa, − Premere il pulsante MENU, quindi premere i pulsanti su/giù per selezionare Scansione. Premere il pulsante SELEZIONA per confermare per attivare la scansione automatica. ●...
  • Seite 122 Guida alle istruzioni Errore del segnale/ Potenza del segnale L'errore viene visualizzato come un numero. Se il numero è 0, significa che il segnale ricevuto è privo di errori e la potenza del segnale è forte. Se il tasso di errore è elevato, si consiglia di riposizionare l'antenna radio o di riposizionare l'unità.
  • Seite 123 Guida alle istruzioni Funzionamento FM Per passare l'unità alla modalità FM, premere il pulsante MODE sul telecomando per accedere al menu Modalità. Premere il pulsante Precedente / Successivo per selezionare e premere il pulsante SELEZIONA per passare alla modalità "Radio FM". In alternativa, premere il pulsante FM sul telecomando per passare alla modalità...
  • Seite 124 Guida alle istruzioni Data Visualizza la data corrente fornita automaticamente dall'emittente. Impostazioni di scansione ● Premere il pulsante MENU per accedere al menu FM. ● Premere i pulsanti Su/Giù per selezionare Impostazioni scansione, quindi premere il pulsante SELEZIONA per confermare. ●...
  • Seite 125 Guida alle istruzioni Operazione CD e MP3 Tipi di dischi compatibili Tipi di dischi Contenuto registrato CD-R (CD registrabile – Audio/MP3) AUDIO/MP3 CD-RW (CD-riscrivibile – Audio/MP3) AUDIO/MP3 AUDIO-CD (Compact Disc Digital Audio) AUDIO LJ Alcuni file registrati potrebbero non essere riproducibili a causa del tipo e del formato del disco o delle condizioni della registrazione.
  • Seite 126 Guida alle istruzioni L'unità leggerà il disco e la prima traccia del CD inizierà automaticamente a essere riprodotta. Premere 12 per mettere in pausa la riproduzione, l'indicatore del tempo trascorso lampeggerà. Per riprendere la riproduzione, premere di nuovo 12. Premere 3 per interrompere la riproduzione del disco. Per saltare la ricerca o cercare e riprodurre ●...
  • Seite 127 Guida alle istruzioni Riproduzione programmata È possibile programmare fino a 20 brani da riprodurre nell'ordine desiderato. ● Assicurarsi che sia inserito un disco e che non sia in riproduzione (fermato). ● Premere il pulsante PRESET per entrare nella modalità programma. Il display visualizzerà “P01T01”. ●...
  • Seite 128 ● "Maggioranza Humboldt" apparirà nell'elenco dei dispositivi Bluetooth. ● Seleziona "Maggioranza Humboldt" e inserisci "0000" per la password, se necessario. Una volta connesso, il logo Bluetooth sullo schermo smetterà di lampeggiare. Il tuo dispositivo è ora accoppiato con l'unità. ●...
  • Seite 129 Guida alle istruzioni Riproduzione di musica tramite Bluetooth Potrebbe essere necessario regolare il volume della radio e del dispositivo Bluetooth. Premere il pulsante SCAN/PLAY sull'unità o il pulsante UP sul telecomando per riprodurre/mettere in pausa la musica o premere i pulsanti NEXT / PREVIOUS sull'unità o sul telecomando per passare alla traccia precedente/successiva.
  • Seite 130 Guida alle istruzioni NetRemote Il dispositivo offre una funzionalità di NetRemote tramite smartphone o tablet in sistema iOS o Android. Scaricando l'app assegnata denominata UNDOK, è possibile visualizzare tutte le modalità di Internet Radio, Podcast, Spotify, DAB, FM e Bluetooth. Cerca UNDOK da Google Play o Apple Store per l'app UNDOK e installala sul tuo smartphone o tablet.
  • Seite 131 Guida alle istruzioni Impostazione del sonno Questa funzione consente di programmare l'unità in modo che passi automaticamente alla modalità standby dopo un determinato periodo di tempo. ● Per attivare la funzione Sleep, premere ripetutamente il pulsante SLEEP sul telecomando. Il tempo cambierà...
  • Seite 132 Guida alle istruzioni Impostazione dell'allarme ● Premere il tasto TIMER sul telecomando, il display mostra “Allarme (1 o 2): Off [hh:mm]”. ● Premere i pulsanti UP / DOWN per selezionare il numero di allarme (1 o 2) e quindi premere il pulsante SELECT per avviare l'impostazione dei seguenti parametri.
  • Seite 133 Guida alle istruzioni Attiva la porta di rete wireless ● Collegare l'unità con l'alimentazione ● Passa alla modalità wireless (ad es. Internet) Come disattivare la porta di rete wireless: ● Vai a Menu principale – Impostazioni di sistema – Rete – Mantieni la rete connessa. Selezionare No, quindi premere il pulsante SELEZIONA per mantenere la rete disconnessa Bluetooth versione Versione...
  • Seite 134 Specificazioni e garanzia Garanzia Registra il tuo prodotto Majority (https://www.majority.co.uk/it/register/) entro 30 giorni dall'acquisto per attivare il tuo esteso 3 anni di garanzia. Ottieni l'accesso a tutti i vantaggi e al supporto tecnico a vita (vedi il nostro Extended Warranty (https://www.majority.co.uk/it/returns-warranty/) dettagli per maggiori informazioni).
  • Seite 135 Informazioni sulla sicurezza  IMPORTANTE Si prega di leggere attentamente tutte le istruzioni prima dell'uso. AVVERTIMENTO Rischio di scosse elettriche. Non aprire. 1. Leggi queste istruzioni: 2. Rispettare tutti gli avvertimenti. 3. Seguire tutte le istruzioni nel manuale dell'utente. 4. Non pulire l'apparecchio vicino o con acqua. 5.
  • Seite 136 Ora dovresti riciclare i tuoi rifiuti elettrici e così facendo aiutare l'ambiente. Questo simbolo indica che un prodotto elettrico non deve essere smaltito con i normali rifiuti domestici. Si prega di assicurarsi che sia portato in una struttura adatta per lo smaltimento una volta terminato. CONTATTA IL SUPPORTO (HTTPS://WWW.MAJORITY.CO.UK/IT/SUPPORT/)
  • Seite 137 Hu m bol dt Internet Radio DAB+ CD Player Music System Manual de instrucciones...
  • Seite 138 Cancelar la alarma ................................30 Activar puerto de red inalámbrica ..........................31 Especificaciones y garantía ....................32 Garantía ....................................32 ESPECIFICACIONES DE PRODUCTO ..........................32 Información de seguridad .....................33 Registre su producto en línea para obtener AÑOS una garantía extendida de 3 años GRATIS en: GARANTÍA www.majority.co.uk...
  • Seite 139 Controles y funciones Vista frontal 1. Sensor de control remoto 8. Conector de ENTRADA DE AUDIO 2. Dial de ENCENDIDO/VOLUMEN 9. Botón de modo 3. Puerta de CD 10. Botón ESCANEAR/REPRODUCIR/INFORMACIÓN 4. Pantalla 11. Botón ATRÁS/DETENER/MENÚ 5. Dial de SINTONIZACIÓN/SELECCIÓN 12.
  • Seite 140 Controles y funciones Vista trasera 15. Cable de conexión a la red 16. Antena DAB/FM...
  • Seite 141 Controles y funciones Control Remoto 1. Botón ON 2. Botón de dormir 3. Botón CLOCK 4. Botón INTRO 5. Botón ALEATORIO 6. Botón de modo 7. Botón JUGAR / ARRIBA 8. Botón ANTERIOR 9. Botón SELECT 10. Botón EQ 11. Botones VOL +/− 12.
  • Seite 142 Qué contiene la caja? Contenido de la caja A. Unidad principal B. Manual de instrucciones C. Control...
  • Seite 143 Guía de instrucciones Reemplazo de batería para el control remoto 1. Presione hacia abajo la tapa de la batería y empújela hacia afuera en la dirección de la fl echa. 2. Inserte 2 pilas alcalinas AAA de 1.5 V (no incluidas). Asegúrese de hacer coincidir los extremos (+) y (-) de la batería con los extremos (+) y (-) indicados en el compartimiento de la batería.
  • Seite 144 Guía de instrucciones Conexión de red Este producto solo es compatible con la conexión de red inalámbrica para el acceso a la red y no es compatible con la conexión LAN por cable. Red inalámbrica ● En primer lugar, compruebe si las luces de control (LINK/ACT) de su enrutador se encienden. ●...
  • Seite 145 Guía de instrucciones Ajustar el volumen Gire el dial ON/VOLUME en la unidad o presione los botones VOL +/– en el control remoto para ajustar el volumen. Si desea apagar el sonido, presione el botón MUTE en el control remoto. Presione el botón MUTE nuevamente, gire el dial ON/VOLUME en la unidad o presione los botones VOL +/–...
  • Seite 146 Guía de instrucciones Conexión usando el botón WPS en su enrutador Conectarse usando el botón WPS (Configuración Wi-FiProtegida) en su enrutador es una manera rápida y fácil de conectar su radio sin tener que escribir una contraseña. Seleccione uno de los siguientes métodos de conexión: Botón WPS Si su enrutador tiene un botón WPS, verá...
  • Seite 147 Guía de instrucciones Ajustes del sistema Presione el botón MENU en la unidad o el control remoto para mostrar el menú. Gire el dial TUNING/ SELECT en la unidad o los botones arriba/abajo en el control remoto para seleccionar Configuración del sistema, luego presione el dial TUNING/SELECT en la unidad o el botón SELECT en el control remoto para confirmar.
  • Seite 148 Guía de instrucciones Ajustes manuales Seleccione la red inalámbrica con la activación/desactivación de DHCP. NetRemoto Configuración de Para definir un número PIN que se introducirá antes de poder conectarse a la unidad de forma remota a través de una red. Perfil de red Ver la red conectada.
  • Seite 149 Guía de instrucciones Horario de verano Seleccione el horario de verano. (Solo disponible cuando la actualización automática desde la red está activada). Reloj en espera Reloj analógico/Reloj digital LJ La configuración predeterminada de actualización de hora automática es "Actualizar desde la red".
  • Seite 150 Guía de instrucciones Actualización de software ● Durante el modo de configuración del sistema, presione los botones arriba/abajo para seleccionar Actualización de software y luego presione el botón SELECCIONAR para confirmar. ● Presione los botones arriba/abajo para seleccionar “Configuración de verificación automática” o “Verificar ahora”, y luego presione el botón SELECCIONAR para confirmar.
  • Seite 151 Guía de instrucciones Radio por Internet Para escuchar radio por Internet, su radio debe estar conectada a Internet. Intente colocar su radio lo más cerca posible de su enrutador para obtener las mejores velocidades de conexión. Cuando se selecciona el modo de radio por Internet, la radio se conecta con el portal de radio por Internet de Frontier Silicon para descargar una lista de estaciones.
  • Seite 152 Guía de instrucciones Presione el botón BACK en la unidad o el control remoto puede retroceder un nivel de menú. Estaciones preestablecidas Las estaciones de radio por Internet predeterminadas se almacenan en la radio y no se puede acceder a ellas desde otras radios. ●...
  • Seite 153 Guía de instrucciones Pódcasts Para escuchar Podcasts su radio debe estar conectada a Internet. Intente colocar su radio lo más cerca posible de su enrutador para obtener las mejores velocidades de conexión. Presione el botón MODO en la unidad o en el control remoto para acceder al menú Modo. Gire el dial TUNING/SELECT en la unidad o presione los botones NEXT / PREVIOUS en el control remoto para seleccionar el modo Podcasts, luego presione el dial TUNING/SELECT en la unidad o el botón SELECT en el control remoto para confirmar.
  • Seite 154 Guía de instrucciones Spotify Connect Use su teléfono, tableta o computadora como control remoto para Spotify. Ve a spotify.com/connect para aprender cómo hacerlo. Licencias El software de Spotify está sujeto a licencias de terceros que se encuentran aquí: https://www.spotify.com/connect/third-party-licenses Operación DAB Presione el botón MODO en la unidad o en el control remoto para acceder al menú...
  • Seite 155 Guía de instrucciones Ajuste manual Además de la función de sintonización automática, puede sintonizar manualmente el receptor. Esto puede ayudarlo al alinear su antena o al agregar estaciones que se perdieron durante la sintonización automática. ● Pulse MENÚ para mostrar el menú. ●...
  • Seite 156 Guía de instrucciones Fecha Esto muestra la fecha actual proporcionada automáticamente por la emisora. Poda no válida Puede eliminar todas las estaciones no disponibles de la lista. ● Durante el modo DAB, presione el botón MENU y presione los botones arriba/abajo para seleccionar Prune invalid, presione el botón SELECT para confirmar.
  • Seite 157 Guía de instrucciones Operación FM Para cambiar la unidad al modo FM, presione el botón MODO en el control remoto para acceder al menú Modo. Presione el botón Anterior / Siguiente para seleccionar y presione el botón SELECCIONAR para cambiar al modo "Radio FM". Alternativamente, presione el botón FM en el control remoto para cambiar al modo FM.
  • Seite 158 Guía de instrucciones Fecha Esto muestra la fecha actual proporcionada automáticamente por la emisora. Configuración de escaneo ● Presione el botón MENÚ para acceder al menú FM. ● Presione los botones Arriba/Abajo para seleccionar Configuración de escaneo y luego presione el botón SELECCIONAR para confirmar.
  • Seite 159 Guía de instrucciones Operación de CD y MP3 Tipos de discos compatibles Tipos de disco Contenido grabado CD-R (CD grabable – Audio/MP3) AUDIO/MP3 CD-RW (CD regrabable – Audio/MP3) AUDIO/MP3 AUDIO-CD (Discos compactos de audio digital) AUDIO LJ Es posible que algunos archivos grabados no se puedan reproducir debido al tipo y formato del disco o al estado de la grabación.
  • Seite 160 Guía de instrucciones La unidad leerá el disco y la primera pista del CD comenzará a reproducirse automáticamente. Presione 12 para pausar la reproducción, el indicador de tiempo transcurrido parpadeará. Para reanudar la reproducción, presione 12 nuevamente. Presione 3 para detener la reproducción del disco. Para omitir la búsqueda o Buscar y reproducir ●...
  • Seite 161 Guía de instrucciones Reproducir programa Puede programar hasta 20 pistas para que se reproduzcan en el orden que desee. ● Asegúrese de que haya un disco insertado y que no se esté reproduciendo (detenido). ● Presione el botón PRESET para ingresar al modo de programación. La pantalla mostrará “P01T01”. ●...
  • Seite 162 “Majority Humboldt” aparecerá en su lista de dispositivos Bluetooth. ● Seleccione "Mayoría Humboldt" e ingrese "0000" para la contraseña si es necesario. Una vez conectado, el logotipo de Bluetooth en la pantalla dejará de parpadear. Su dispositivo ahora está emparejado con launidad.
  • Seite 163 Guía de instrucciones Reproducción de música a través de Bluetooth Es posible que deba ajustar el volumen de su radio y dispositivo Bluetooth. Presione el botón SCAN/ PLAY en la unidad o el botón UP en el control remoto para reproducir/pausar la música o presione los botones NEXT/ANTEVIOUS en la unidad o el control remoto para saltar a la pista anterior/siguiente.
  • Seite 164 Guía de instrucciones NetRemoto El dispositivo ofrece una función de NetRemote por teléfono inteligente o tableta en el sistema iOS o Android. Al descargar la aplicación asignada llamada UNDOK, puede ver todos los modos de Internet Radio, Podcasts, Spotify, DAB, FM y Bluetooth. Busque UNDOK en Google Play o Apple Store para la aplicación UNDOK e instálela en su teléfono inteligente o tableta.
  • Seite 165 Guía de instrucciones Configuración de sueño Esta función le permite programar la unidad para que cambie al modo de espera por sí misma después de un período de tiempo establecido. ● Para activar la función dormir, presione repetidamente el botón SLEEP en el control remoto. El tiempo cambiará...
  • Seite 166 Guía de instrucciones Configurar la alarma ● Presione el botón TIMER en el control remoto, la pantalla muestra "Alarma (1 o 2): Apagado [hh: mm]". ● Presione los botones ARRIBA / ABAJO para seleccionar el número de alarma (1 o 2) y luego presione el botón SELECCIONAR para iniciar la configuración de los siguientes parámetros.
  • Seite 167 Guía de instrucciones Activar puerto de red inalámbrica ● Conecte la unidad con energía ● Cambiar al modo inalámbrico (por ejemplo, Internet) Cómo desactivar el puerto de red inalámbrica: ● Vaya a Menú principal – Configuración del sistema – Red – Mantener la red conectada. Seleccione No y luego presione el botón SELECCIONAR para mantener la red desconectada Bluetooth versión Versión...
  • Seite 168 Registre su producto mayoritario (https://www.majority.co.uk/es/register/) dentro de los 30 días posteriores a la compra para activar su 3 años de garantía. Obtenga acceso a todos los beneficios y soporte técnico de por vida (consulte nuestro Garantía Extendida (https://www.majority.co.uk/es/ returns-warranty/) detalles para más información).
  • Seite 169 Información de seguridad  IMPORTANTE Lea todas las instrucciones detenidamente antes de usar. ADVERTENCIA Riesgo de shock eléctrico. No abrir. 1. Lea estas instrucciones: 2. Preste atención a todas las advertencias. 3. Siga todas las instrucciones del manual de usuario. 4.
  • Seite 170 Ahora debería reciclar sus artículos eléctricos de desecho y, al hacerlo, ayudar al medio ambiente. Este símbolo signifi ca que un producto eléctrico no debe desecharse con la basura doméstica normal. Asegúrese de llevarlo a una instalación adecuada para su eliminación cuando haya terminado. CONTACTAR CON SOPORTE TÉCNICO (HTTPS://WWW.MAJORITY.CO.UK/ES/SUPPORT/)
  • Seite 172 EU RP: AR Experts, P.O. Box 5047, 3620 AA Breukelen, The Netherlands US: lzilla Ltd, C/0 A.N. Deringer, Inc., 19520 Wilmington Ave, Rancho Dominguez, CA, 90220 Majority is owned and operated by iZilla Ltd. Registered in England with Company No: 08520738...