KMINA PRO Benutzerhandbuch
Rollator
Vorschau ausblenden
Andere Handbücher für PRO:
- Bedienungsanleitung ,
- Benutzerhandbuch (12 Seiten) ,
- Gebrauchsanweisung (2 Seiten)
KMINA P R O RO L L ATO R - U SE R M AN U AL
ANDADOR KMINA PRO - MANUAL DE USUARIO
DEAMBULATORE KMINA PRO - MANUALE UTENTE
KMINA PRO ROLLATOR - BENUTZERHANDBUCH
DÉAMBULATEUR KMINA PRO - MANUEL D'UTILISATION
EN
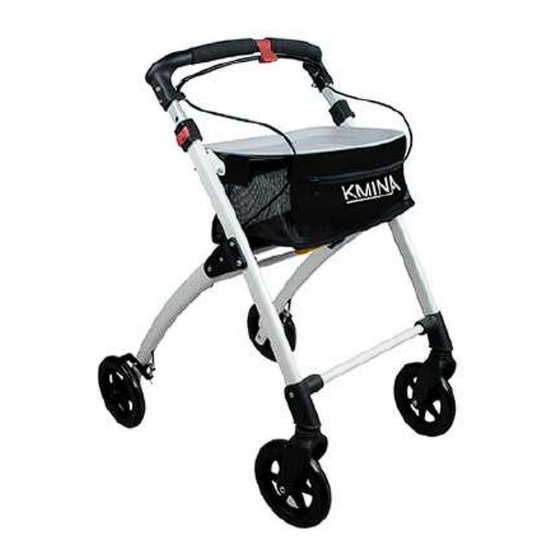
The KMINA PRO Rollator is lightweight, smart and easy to use. Designed to be a durable walker it is manufactured
from painted aluminium tubing with four solid tyre wheels. It incorporates a storage bag, locking brakes and a tray.
It also has height adjustable handles and can be folded for storage or transportation. This rollator can be used by
those with poor balance and / or weak legs, and by people who have lost mobility in one hand.
SÍ
Br ake cable
Tray
Basket
Folding button
Front wheel
FOLD I N G S Y STE M
1. When unfolding, open the rollator frame fully, push down on the tray frame and handle to lock in position. The
rollator is completely opened with a clear click. To ensure it is fully open, support the handle with one hand and
press down on the tray with the other hand.
2. When folding, depress frame release yellow button. Then push rear legs towards front legs to fold the frame.
The tray simply sits on the frame above the bag. Ensure that the tray is firmly in place before use and do not exceed
the maximum load.
H E I G HT AD JUS TMEN T
The handles have five settings at 35 mm intervals.To determine the correct height of the handle:
1.Stand straight behind the rollator with your shoulder relaxed and arms slightly bent at 15º.
2.Set the handle height to be level with your wrists using the securing red clip.
B R A K E SY S TEM
When the rollator is in motion brakes work normally by pushing the brake cable towards the handlebars.
1.Lock: Grasp both handles and press on the red brake lock to lock the rollator. It is correctly locked with a
clear click.
2.Unlock: Press on the red brake lock to unlock. It is correctly unlocked with a clear click.
The pressure needed to brake can be adjusted by turning the brake adjustment located at the top of the brake shoe
on the inside of the frame.
1.Turning the knob anti-clockwise increases the pressure needed to brake by moving the brake shoe nearer the
wheel and compressing the spring.
2.Turning the knob clockwise decreases the pressure need to brake.
CODE
K MI NA P RO R OLLATOR - BLAC K
K MI NA P RO R OLLATOR - BLUE
Brake lock
Handgrip
Brake w ire
Alum inium fram e
Br ake
Rear wheel
1
K1 000 9
K 10 010
Inhaltsverzeichnis

Verwandte Anleitungen für KMINA PRO


Inhaltszusammenfassung für KMINA PRO
- Seite 1 KMINA P R O RO L L ATO R - U SE R M AN U AL The KMINA PRO Rollator is lightweight, smart and easy to use. Designed to be a durable walker it is manufactured from painted aluminium tubing with four solid tyre wheels. It incorporates a storage bag, locking brakes and a tray.
-
Seite 2: Technical Specifications
AN DA DOR K M I N A P R O - AZU L K 1001 0 ( 5 regulations) El Andador KMINA PRO ha sido diseñado para ser ligero, elegante y fácil de usar por casa. Está fabricado con 26” 21,2”... - Seite 3 DIMENSIÓN PLEGADO ( 5 regulaciones) Il Deambulatore KMINA PRO è stato disegnato per essere leggero, elegante e facile da usare a casa. E' costituito da tubi in alluminio e quattro ruote piene. Inoltre, incorpora un cestello, un vassoio, un manubrio monoasse...
-
Seite 4: Specifiche Tecniche
LARGHEZZA DIMENSIONE DI PIEGATURA ( 5 regulamento) Der KMINA PRO Rollator ist leicht und einfach zu bedienen. Entworfen als langlebige Gehhilfe, ist er aus lackiertem Aluminiumrohr mit vier festen Reifenrädern gefertigt. Er verfügt über eine Aufbewahrungstasche, 66 cm 54 cm... -
Seite 5: Technische Spezifikationen
( 5 regelungen) Le KMINA PRO Déambulateur a été conçu pour être léger, élégant et facile à utiliser à la maison. Il est composé de tubes en aluminium et de quatre roues pleines. Il intègre également un panier, un plateau, un guidon à un essieu... -
Seite 6: Caractéristiques Techniques
■ Tout incid e n t gr a ve l i é au p r o du i t do i t ê t r e si g n a l é a u fa b r ica nt et à l 'a uto r i té com pé te nte d e l 'É t at admin@kmina.com | www.kmina.com membre da n s l e q u e l l' u ti l i s at e u r e t l e p a t i e n t so n t é...