Inhaltsverzeichnis
Werbung
Verfügbare Sprachen
Verfügbare Sprachen
Quicklinks
Installations- und Bedienungsanleitung
Installation and operating manual
Notice d'installation et d'emploi
Manual de instalación y uso
Istruzioni per l'installazione e l'uso
Installatie- en bedieningshandleiding
DE
Wired Glasdisplay - plus
EN
Wired Glass Display - plus
FR
Écran en verre câblé « Wired Glasdisplay - plus »
ES
Wired Pantalla de cristal - plus
IT
Wired Display in vetro - plus
NL
Wired Glasdisplay - plus
HmIP-WGD-PL
S. 2
p. 23
p. 37
p. 53
pag. 68
pag. 83
Werbung
Inhaltsverzeichnis

Inhaltszusammenfassung für eQ-3 homematic IP HmIP-WGD-PL
- Seite 1 Installations- und Bedienungsanleitung Installation and operating manual Notice d‘installation et d‘emploi Manual de instalación y uso Istruzioni per l‘installazione e l‘uso Installatie- en bedieningshandleiding Wired Glasdisplay - plus S. 2 Wired Glass Display - plus p. 23 p. 37 Écran en verre câblé « Wired Glasdisplay - plus » Wired Pantalla de cristal - plus p.
-
Seite 2: Lieferumfang
Schrauben 3,2 x 25 mm Bedienungsanleitungen Beiblatt mit Sicherheitshinweisen Dokumentation © 2022 eQ-3 AG, Deutschland Alle Rechte vorbehalten. Ohne schriftliche Zustimmung des Herausgebers darf diese Anleitung auch nicht auszugsweise in irgendeiner Form reproduziert werden oder unter Verwendung elektronischer, mechanischer oder chemischer Verfahren vervielfältigt oder verarbeitet werden. - Seite 6 click...
- Seite 7 Homematic IP...
-
Seite 9: Inhaltsverzeichnis
Inhaltsverzeichnis Hinweise zur Anleitung ................10 Gefahrenhinweise ..................10 Funktion und Geräteübersicht ..............12 Allgemeine Systeminformationen ............13 Inbetriebnahme ..................13 Installationshinweise ................13 Installation ....................15 Anlernen ....................16 5.3.1 Anlernen an die Zentrale CCU3 ..........17 5.3.2 Anlernen an die Homematic IP Cloud per Wired Access Point ................18 Updates über SD-Karte einspielen .......... -
Seite 10: Hinweise Zur Anleitung
Hinweise zur Anleitung Hinweise zur Anleitung Lesen Sie diese Anleitung sorgfältig, bevor Sie Ihre Homematic IP Geräte in Betrieb nehmen. Bewahren Sie die Anleitung zum späteren Nachschla- gen auf! Wenn Sie das Gerät anderen Personen zur Nutzung überlassen, überge- ben Sie auch diese Anleitung. Benutzte Symbole: Achtung! Hier wird auf eine Gefahr hingewiesen. - Seite 11 Gefahrenhinweise Das Gerät ist kein Spielzeug! Erlauben Sie Kindern nicht damit zu spielen. Lassen Sie das Verpackungsmaterial nicht achtlos liegen. Plastikfolien/ -tüten, Styroporteile etc. können für Kinder zu einem gefährlichen Spielzeug werden. Bei Sach- oder Personenschäden, die durch unsachgemäße Hand- habung oder Nichtbeachten der Gefahrenhinweise verursacht wer- den, übernehmen wir keine Haftung.
-
Seite 12: Funktion Und Geräteübersicht
Funktion und Geräteübersicht Den Laserstrahl nicht auf Personen richten. Nicht in den direkten LASER oder reflektierten Strahl blicken. Manipulationen (Änderungen) Klassifiziert nach DIN EN 60825-1:2015-07 an der Lasereinrichtung sind unzulässig. Diese Bedienungsanlei- tung ist aufzubewahren und bei Weitergabe der Lasereinrichtung mitzugeben. -
Seite 13: Allgemeine Systeminformationen
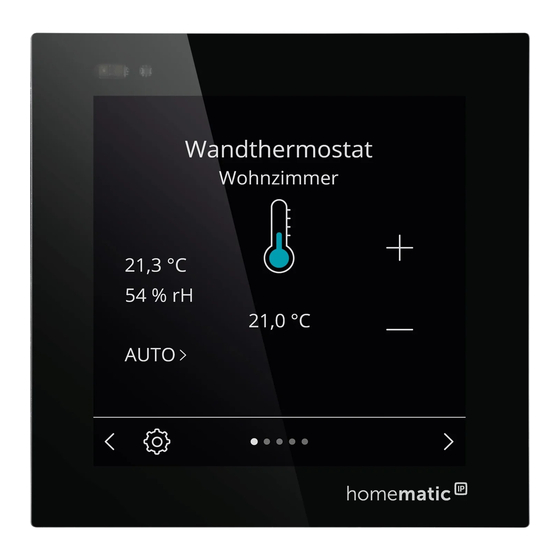
Allgemeine Systeminformationen Geräteübersicht (s. Abbildung 1): (A) Montageplatte (B) Touch-Display (C) Näherungs- und Helligkeitssensor (D) Systemtaste (Anlerntaste und LED) (E) SD-Kartenslot Allgemeine Systeminformationen Dieses Gerät ist Teil des Homematic IP Smart-Home-Systems und kommu- niziert über das Homematic IP Protokoll. Sie haben die Möglichkeit, alle Ge- räte des Systems komfortabel und individuell über die Bedienoberfläche der Zentrale CCU3 oder flexibel per Smartphone über die Homematic IP App in Verbindung mit der Homematic IP Cloud zu konfigurieren. - Seite 14 Inbetriebnahme Beachten Sie die auf dem Gerät angegebene Abisolierlänge der anzu- schließenden Leiter. Beachten Sie bei der Installation die Gefahrenhinweise gemäß „2 Ge- fahrenhinweise“ auf Seite 10. Hinweis! Installation nur durch Personen mit einschlägigen elekt- rotechnischen Kenntnissen und Erfahrungen!* Durch eine unsachgemäße Installation gefährden Sie •...
-
Seite 15: Installation
Inbetriebnahme Zugelassene Leitungsquerschnitte zum Anschluss an das Gerät sind: Starre Leitung: 0,12-0,50 mm Aus Gründen der elektrischen Sicherheit dürfen zum Anschluss des Homematic IP Wired Bus ausschließlich folgende Leitungen einge- setzt werden: • Fernmeldeleitung J-Y(ST)Y mit 2 x 2 x 0,8 (= 0,5 mm²) oder 4 x 2 x 0,8 (= 0,5 mm²), geschirmt, TP •... -
Seite 16: Anlernen
Inbetriebnahme Setzen Sie die Montageplatte (A) in die Unterputzdose und befes- • tigen Sie diese anschließend mittels der mitgelieferten Schrauben an der Unterputzdose (s. Abbildung 5). • Setzen Sie das Display (B) in die Montageplatte ein, indem Sie die Verbindungsstifte in die dafür vorgesehene Halterung der Mon- tageplatte vollständig einrasten (s. -
Seite 17: Anlernen An Die Zentrale Ccu3
Inbetriebnahme • mit Homematic IP Funk-Komponenten über den Homematic IP Access Point (HmIP-HAP) zu kombinieren. 5.3.1 Anlernen an die Zentrale CCU3 Um das Homematic IP Wired Gerät softwarebasiert und komfortabel steuern und konfigurieren sowie in Zentralenprogrammen nutzen zu können, müssen Sie es an die WebUI anlernen. Um das Gerät an die Zen- trale CCU3 anzulernen, gehen Sie wie folgt vor: •... -
Seite 18: Anlernen An Die Homematic Ip Cloud Per Wired Access Point
Inbetriebnahme • Nach dem Herstellen der Spannungsversorgung ist das Gerät für 3 Minuten aktiv. Sie können den Anlernmodus manuell für weitere 3 Minuten starten, indem Sie die Systemtaste (D) kurz mit einem spitzen Gegenstand (z. B. mit einem Stift) drücken (s. Abbildung 8). •... -
Seite 19: Updates Über Sd-Karte Einspielen
Inbetriebnahme Sie können den Anlernmodus manuell für weitere 3 Minuten starten, indem Sie die Systemtaste (D) kurz mit einem spitzen Gegenstand (z. B. mit einem Stift) drücken (s. Abbildung 9). • Das Gerät erscheint automatisch in der Homematic IP App. •... -
Seite 20: Bedienung
Bedienung Bedienung Nach erfolgreicher Inbetriebnahme des Glasdisplays kann es ganz be- quem über die WebUI Benutzeroberfläche oder per Homematic IP App eingerichtet werden. Dank des zuverlässigen Näherungssensors wird das Display automatisch beleuchtet, sobald sich eine Person nähert. Das Display kann ganz intu- itiv per Touch-Gestik bedient werden. -
Seite 21: Wiederherstellung Der Werkseinstellungen
Wiederherstellung der Werkseinstellungen Wiederherstellung der Werkseinstellungen Die Werkseinstellungen des Geräts können wiederhergestellt wer- den. Dabei gehen alle Einstellungen verloren. Um die Werkseinstellungen des Geräts wiederherzustellen, gehen Sie wie folgt vor: • Drücken Sie für 4 s mit einem spitzen Gegenstand (z. B. mit ei- nem Stift) auf die Systemtaste (D), bis die LED (D) schnell orange zu blinken beginnt (s. -
Seite 22: Technische Daten
Technische Daten Technische Daten Geräte-Kurzbezeichnung: HmIPW-WGD-PL Versorgungsspannung: 24 V , +/-5 %, SELV Stromaufnahme: 110 mA max. Leistungsaufnahme im Ruhebetrieb: 0,6 W Leitungsart u. -querschnitt: Starre Leitung 0,12-0,50 mm² Installation: nur in Schalterdosen (Gerätedosen) gemäß DIN 49073-1 Schutzart: IP20 Schutzklasse: Umgebungstemperatur: -5 bis +40 °C Abmessungen (B x H x T):... -
Seite 23: Package Contents
Operating manuals Supplement with safety instructions ocumentation © 2022 eQ-3 AG, Germany All rights reserved. Translation from the original version in German. This manual may not be reproduced in any format, either in whole or in part, nor may it be duplicated or edited by electronic, mechanical or chemical means, without the written consent of the publisher. - Seite 24 Table of contents Information about this manual .............25 Hazard information .................25 Function and device overview ..............27 General system information ..............28 Start-up ..................... 28 Installation instructions ..............28 Installation ................... 30 Pairing ....................30 5.3.1 Connecting to Homematic IP Central Control Unit CCU3 ..................31 5.3.2 Connecting to the Homematic IP cloud via Wired...
-
Seite 25: Information About This Manual
Information about this manual Information about this manual Please read this manual carefully before operating your Homematic IP components. Keep the manual so you can refer to it at a later date if you need to. If you hand over the device to other persons for use, please hand over this manual as well. - Seite 26 Hazard information We accept no liability for damage to property or personal injury caused by improper use or the failure to observe the hazard warn- ings. In such cases, all warranty claims are void. We accept no liabil- ity for any consequential damage. When connecting to the device terminals, observe the cables and cable cross-sections permitted for this purpose.
-
Seite 27: Function And Device Overview
Function and device overview Using the device for any purpose other than that described in this operating manual does not fall within the scope of intended use and will invalidate any warranty or liability. The device may only be operated within a domestic environment, in business and trade areas and in small enterprises. -
Seite 28: General System Information
General system information General system information This device is part of the Homematic IP smart home system and works with the Homematic IP protocol. All devices in the Homematic IP system can be configured easily and individually with the CCU3 user interface or flexibly with the smartphone app in connection with the Homematic IP cloud. - Seite 29 Start-up Incorrect installation also means that you are running the risk of serious damage to property, e.g. from fire. You risk personal liability for personal injury and property damage. Consult an electrician! *Specialist knowledge required for installation: The following specialist knowledge is particularly important during ins- tallation: •...
-
Seite 30: Installation
Start-up The shield (continuity wire) must be connected to “–” (=GND) at the bus connection of the Wired access point (HmIPW-DRAP). The shield must not be placed on the glass display. Installation The bus is powered by the Homematic IP Wired Access Point (HmI- PW-DRAP). -
Seite 31: Connecting To Homematic Ip Central Control Unit Ccu3
Start-up To integrate the device into your system and enable it to communicate with other devices, you must first add it. The following set-up and control options are available: Connecting to the Homematic IP Central Control Unit CCU3 For local, software-based configuration and control via PC, you have the option to connect the device to a Central Control Unit CCU3 and to use it in a wide range of programs (see „5.3.1 Anlernen an die Zentrale CCU3“... - Seite 32 Start-up window. The pairing mode of the Central Control Unit will be activated for 60 seconds. An information box shows how much pairing time remains. • After connecting the power supply, the device is active for 3 min- utes. You can manually start the pairing mode for another 3 minutes by pressing the system button (D) briefly using a pointed object (e.g.
-
Seite 33: Connecting To The Homematic Ip Cloud Via Wired Access Point
Start-up 5.3.2 Connecting to the Homematic IP cloud via Wired access point If you want to control your Homematic IP Wired devices flexibly via the smartphone app, they can be connected to the Homematic IP cloud. To do this, proceed as follows: •... -
Seite 34: Import Updates Via Sd Card
Operation Import updates via SD card For detailed information on firmware updates with reference to using the SD card in the SD card slot (E), please refer to the user manual. Operation Once your glass display has been connected successfully, it can be easily set up via the WebUI user interface or the Homematic IP app. -
Seite 35: Restore Factory Settings
Restore factory settings Restore factory settings The device’s factory settings can be restored. If you do this, you will lose all your settings. To restore the factory settings of the device, please proceed as follows: • Press and hold down the system button (D) using a pointed ob- ject (e.g. -
Seite 36: Technical Specifications
Technical specifications Technical specifications Device short description: HmIPW-WGD-PL Supply voltage: 24 V , +/-5 %, SELV Current consumption: 110 mA max. Power consumption in Standby: 0.6 W Cable type and cross section: Rigid cable 0.12-0.50 mm² Installation: only in normal commercial switch boxes (device boxes) in accordance with DIN 49073-1 Protection rating:... -
Seite 37: Contenu De La Livraison
Modes d’emploi Fiche de consignes de sécurité Documentation © 2022 eQ-3 AG, Allemagne Tous droits réservés. Le présent manuel ne peut être reproduit, en totalité ou sous forme d’extraits, de manière quelconque sans l’accord écrit de l’éditeur, ni copié ou modifié par des procédés électroniques, mécaniques ou chimiques. - Seite 38 Table des matières Remarques sur la notice ................ 39 Mises en garde ..................39 Fonction et aperçu de l’appareil ............41 Informations générales sur le système ..........42 Mise en service ..................42 Instructions d’installation ..............42 Installation ...................44 Apprentissage ..................45 5.3.1 Enregistrement dans la centrale CCU3 ......
-
Seite 39: Remarques Sur La Notice
Remarques sur la notice Remarques sur la notice Lisez attentivement la présente notice avant de mettre les éléments Ho- mematic IP en service. Conservez la notice pour pouvoir vous y référer ultérieurement ! Si vous laissez d’autres personnes utiliser l’appareil, n’oubliez pas de leur remettre également cette notice d’utilisation. - Seite 40 Mises en garde Cet appareil n’est pas un jouet ! Tenez-le hors de portée des enfants. Ne laissez pas traîner le matériel d’emballage. Les sachets/films en plastique, éléments en polystyrène, etc. peuvent constituer des jouets dangereux pour les enfants. Notre responsabilité ne saurait être engagée en cas de dommages matériels ou de dommages corporels dus au maniement inappro- prié...
-
Seite 41: Fonction Et Aperçu De L'appareil
Fonction et aperçu de l’appareil Ne pas orienter le faisceau laser sur les personnes. Ne pas regar- LASER der directement dans le faisceau ou son reflet. Toute manipula- Klassifiziert nach DIN EN 60825-1:2015-07 tion (modification) du dispositif laser est interdite. Cette notice d’emploi doit être conservée et remise au nouveau utilisateur en cas de cession du dispositif laser. -
Seite 42: Informations Générales Sur Le Système
Informations générales sur le système Grâce à la plaque de montage et les matériels de montage fournis, l’écran en verre peut être installé facilement sur un boîtier encastrable et relié au système câblé. Aperçu de l’appareil (voir la Figure 1) : (A) Plaque de montage (B) Écran tactile (C) Détecteur de proximité... - Seite 43 Mise en service L’installation est autorisée uniquement dans les boîtiers de commu- tateurs usuels (boîtiers d’encastrement) selon DIN 49073-1. Respectez la longueur de dénudage indiquée sur l’appareil pour les conducteurs à raccorder. Lors de l’installation, respectez les mises en garde indiquées à la sec- tion „2 Gefahrenhinweise“...
-
Seite 44: Installation
Mise en service • montage du matériel d’installation électrique ; • type du réseau d’alimentation (systèmes TN/IT/TT) et conditions de raccordement directement associées (mise au neutre clas- sique, mise à la terre, autres mesures nécessaires, etc.). Sections de câble autorisées pour le raccordement à l’appareil : Câble rigide : 0,12-0,50 mm Pour des raisons de sécurité... -
Seite 45: Apprentissage
Mise en service matic IP Wired Bus (voir la Figure 3). • Raccordez le bus câblé Homematic IP Wired Bus aux bornes de raccordement prévues à cet effet (voir la Figure 4). Pour brancher ou débrancher les conducteurs individuels, appuyez sur le dispo- sitif de déverrouillage à... -
Seite 46: Enregistrement Dans La Centrale Ccu3
Mise en service (voir „5.3.2 Anlernen an die Homematic IP Cloud per Wired Access Point“ auf Seite 48). Dans ce cas, les appareils câblés « Wired » • peuvent être commandés au moyen de l’appli pour smartphone via le point d’accès câblé Homematic IP Wired Access Point (HmIPW-DRAP) ou •... - Seite 47 Mise en service • Après la mise sous tension, l’appareil est actif pendant 3 minutes. Vous pouvez relancer manuellement le mode d’apprentissage pour 3 minutes supplémentaires en appuyant brièvement sur la touche système (D) à l’aide d’un objet pointu (par ex. un crayon) (voir la Fi- gure 8).
-
Seite 48: Enregistrement Dans Homematic Ip Cloud Via Le Point D'accès Câblé
Mise en service 5.3.2 Enregistrement dans Homematic IP Cloud via le point d’accès câblé Si vous souhaitez commander confortablement vos appareils câblés Homematic IP Wired au moyen de l’appli pour smartphone, il vous suf- fit d’enregistrer les appareils Homematic IP Wired dans Homematic IP Cloud. -
Seite 49: Charger Les Mises À Jour Via La Carte Sd
Utilisation Si vous utilisez déjà des appareils Homematic IP dans le système Smart Home ou souhaitez combiner vos appareils câblés avec des éléments radio de Homematic IP, vous pouvez aussi enregistrer tout simplement vos appareils câblés Homematic IP Wired à un point d’accès Homematic IP Access point existant. -
Seite 50: Codes D'erreur Et Séquences De Clignotement
Codes d’erreur et séquences de clignotement Codes d’erreur et séquences de clignotement Code de cligno- Signification Solution tement Clignotement Transmission de Attendez que la transmission bref orange données soit terminée. 1x activation Opération Vous pouvez poursuivre avec la longue commande. activée en vert 1 activation... -
Seite 51: Entretien Et Nettoyage
Entretien et nettoyage L’appareil effectue un redémarrage. Après le redémarrage, vous pouvez intégrer à nouveau l’appareil dans votre système Homematic IP. Entretien et nettoyage L’appareil ne requiert aucun entretien. Confiez les réparations à un spécialiste. Nettoyez l’appareil avec un chiffon doux, propre, sec et non pelucheux. N’utilisez pas de nettoyant contenant un solvant, le boîtier en plastique et les écritures peuvent être attaqués. - Seite 52 Caractéristiques techniques Consignes pour l’élimination L’appareil ne doit pas être jeté avec les ordures ménagères ! Les ap- pareils électroniques sont à éliminer conformément à la directive relative aux appareils électriques et électroniques usagés via les points de collecte locaux d’appareils usagés. Informations de conformité...
-
Seite 53: Volumen De Suministro
Tornillos 3,2 x 25 mm Manuales de instrucciones Hoja adjunta a las indicaciones de seguridad Documentación © 2022 eQ-3 AG, Alemania Todos los derechos reservados. Queda prohibida la reproducción total o parcial de estas instrucciones en todas las formas posibles o utilizando procedimientos electrónicos, mecánicos o químicos, así... - Seite 54 Índice Advertencias sobre estas instrucciones ..........55 Advertencias de peligro ................55 Funciones y esquema del dispositivo ..........57 Información general del sistema ............58 Puesta en servicio ................... 58 Instrucciones de instalación ............58 Instalación ...................60 Conexión .....................60 5.3.1 Conexión a la central CCU3 ..........61 5.3.2 Conexión a Homematic IP Cloud a través de Wired Access Point ................
-
Seite 55: Advertencias Sobre Estas Instrucciones
Advertencias sobre estas instrucciones Advertencias sobre estas instrucciones Lea atentamente estas instrucciones antes de poner en servicio sus dis- positivos Homematic IP. ¡Conserve estas instrucciones para consultas posteriores! Si cede este dispositivo para que lo utilicen otras personas, entregue también estas instrucciones junto con el dispositivo. Símbolos empleados ¡Atención! Esta palabra señala un peligro. - Seite 56 Advertencias de peligro Se declina toda responsabilidad por las lesiones o los daños mate- riales causados por un uso indebido o incumplimiento de las adver- tencias de peligro. ¡En esos casos se anula el derecho a garantía! ¡No se asume ninguna responsabilidad por daños indirectos! Para conectar los bornes del dispositivo utilice los cables y seccio- nes de cable permitidos.
-
Seite 57: Funciones Y Esquema Del Dispositivo
Funciones y esquema del dispositivo Todo uso distinto del indicado en estas instrucciones se considera incorrecto y conlleva la anulación de la garantía y la responsabilidad. El dispositivo está diseñado para el uso exclusivamente en viviendas, entornos comerciales e industriales o en pequeñas empresas. Funciones y esquema del dispositivo Este dispositivo forma parte de Homematic IP Smart-Home-Systems y comunica con el protocolo de radio de Homematic IP. -
Seite 58: Información General Del Sistema
Información general del sistema Información general del sistema Este dispositivo forma parte del sistema de hogar inteligente de Home- matic IP y comunica con el protocolo Homematic IP. Tiene la opción de configurar todos los dispositivos del sistema de manera cómoda e indivi- dual a través de la interfaz de mando de CCU3 central o de manera flexible con el móvil mediante la app Homematic IP combinada con Homematic IP Cloud. - Seite 59 Puesta en servicio • su propia vida • la vida de los usuarios de la instalación eléctrica Una instalación incorrecta puede ocasionar costosos daños materiales, por ejemplo, por un incendio. En Usted recae la responsabilidad personal en caso de lesiones físicas y daños materiales. ¡Solicite los servicios de un electricista! *Conocimientos técnicos necesarios para la instalación: para realizar la instalación se requieren los siguientes conocimientos té-...
-
Seite 60: Instalación
Puesta en servicio La pantalla (cable blindado) se debe colocar a “–“ (= masa) en la co- nexión de bus de los Wired Access Points (HmIPW-DRAP). La panta- lla del cable no se debe colocar en la pantalla de cristal. Instalación El Bus se alimenta a través del Homematic IP Wired Access Point (HmIPW-DRAP). -
Seite 61: Conexión A La Central Ccu3
Puesta en servicio En el manual del sistema de Homematic IP Wired encontrará infor- mación detallada sobre las opciones de configuración y control. Para integrar el dispositivo en su sistema y que pueda comunicarse con otros dispositivos, es necesario conectarlo primero. Tiene las siguientes opciones de configuración y control: Conexión a la central CCU3 Para una configuración local basada en el software y el control por PC,... - Seite 62 Puesta en servicio • Para activar el modo de conexión haga clic en la siguiente ven- tana en „Conectar dispositivo HmIP“. La central pasará al modo de conexión durante 60 segundos. El campo de información irá indicando el tiempo restante. •...
-
Seite 63: Conexión A Homematic Ip Cloud A Través De Wired Access Point
Puesta en servicio Si está en servicio sin acceso activo a internet, seleccione la opción „Conectar dispositivo Homematic IP sin acceso a internet“. Para la conexión, introduzca en los campos correspondientes el SGTIN y la clave del dispositivo. Encontrará el SGTIN y la clave en la pegatina adjunta. -
Seite 64: Cargar Actualizaciones Desde Tarjeta Sd
Manejo positivo ya está preparado para funcionar. • Si se enciende el LED rojo, inténtelo de nuevo. • Seleccione la solución deseada para su dispositivo. • Introduzca un nombre para el dispositivo en la app y asígnele una sala. Si ya utiliza dispositivos Homematic IP en su sistema de hogar inteli- gente, o desea combinar sus dispositivos Wired con los componen- tes de radio de Homematic IP, puede conectar también fácilmente los dispositivos Homematic IP Wired a un Homematic IP Access Point... -
Seite 65: Códigos De Errores Y Secuencias Intermitentes
Códigos de errores y secuencias intermitentes Códigos de errores y secuencias intermitentes Secuencia intermi- Significado Solución tente Luz naranja Transmisión de datos Espere hasta que finali- intermitente corta ce la transmisión. 1 luz Proceso Puede continuar con el manejo. verde larga confirmado 1 luz roja larga Proceso... -
Seite 66: Mantenimiento Y Limpieza
Mantenimiento y limpieza • Suelte de nuevo el botón del sistema para finalizar el restableci- miento de la configuración de fábrica. El dispositivo ejecuta un reinicio. Tras el reinicio ya puede integrar de nuevo el dispositivo en su sistema Homematic IP. Mantenimiento y limpieza El dispositivo no requiere mantenimiento. - Seite 67 Datos técnicos Indicaciones sobre la eliminación ¡No desechar el dispositivo en la basura doméstica! La eliminación de los equipos electrónicos debe efectuarse siguiendo la directiva de equipos eléctricos y electrónicos usados, en los puntos de reco- gida locales para ese tipo de aparatos. Información relativa a la conformidad El distintivo CE es un símbolo de mercado libre dirigido exclusiva- mente a las autoridades y que no implica ninguna garantía de deter-...
- Seite 68 Istruzioni per l'uso Foglio allegato con le avvertenze di sicurezza Documentazione © 2022 eQ-3 AG, Germania Tutti i diritti riservati. Senza l’approvazione scritta del produttore è vietata la riproduzione di questo manuale o di sue parti in qualsiasi forma o la sua duplicazione o modifica con l’utilizzo di processi elettronici, meccanici o chimici.
- Seite 69 Indice Indicazioni su queste istruzioni ............70 Indicazioni di pericolo ................70 Funzioni e vista d’insieme dell’apparecchio ........72 Informazioni generali sul sistema ............73 Messa in funzione ..................73 Avvertenze per l’installazione ............73 Installazione ..................75 Accoppiamento ................. 76 5.3.1 Accoppiamento con la centralina CCU3 ......77 5.3.2 Accoppiamento con il Cloud Homematic IP tramite il Wired Access Point ..............
-
Seite 70: Indicazioni Su Queste Istruzioni
Indicazioni su queste istruzioni Indicazioni su queste istruzioni Leggere attentamente queste istruzioni prima di mettere in funzione i dispositivi Homematic IP. Conservare questo manuale per poterlo con- sultare anche in futuro! Se si affida l’utilizzo dell’apparecchio ad altre persone consegnare anche queste istruzioni per l’uso. - Seite 71 Indicazioni di pericolo L’azienda declina qualsiasi responsabilità per danni a cose o persone causati da un utilizzo improprio o dalla mancata osservanza delle indicazioni di pericolo. In casi simili decade il diritto alla garanzia! Si declina qualsiasi responsabilità per danni indiretti! Quando si esegue l’allaccio ai morsetti dell’apparecchio tenere pre- senti i cavi ammessi e la loro sezione.
-
Seite 72: Funzioni E Vista D'insieme Dell'apparecchio
Funzioni e vista d’insieme dell’apparecchio Qualsiasi impiego diverso da quello descritto nelle presenti istruzio- ni per l’uso non è conforme alle disposizioni e comporta l’esclusione di responsabilità e la perdita dei diritti di garanzia. Questo dispositivo è destinato esclusivamente all’uso in ambienti residenziali, commerciali e dell’industria leggera. -
Seite 73: Informazioni Generali Sul Sistema
Informazioni generali sul sistema Informazioni generali sul sistema Questo apparecchio fa parte del sistema Homematic IP Smart-Home e comunica tramite il protocollo Homematic IP. Gli utenti possono configu- rare tutti gli apparecchi del sistema comodamente e singolarmente tramite l’interfaccia utente della centralina CCU3 oppure in modo flessibile tra- mite l’applicazione Homematic IP App collegata al sistema Homematic IP Cloud. - Seite 74 Messa in funzione Avviso! L’installazione deve essere eseguita soltanto da persone in possesso di conoscenze ed esperienze elettrotecniche pertinenti!* Un’installazione eseguita in modo non appropriato mette a rischio • la propria vita; • la vita delle persone che utilizzano l’impianto elettrico. Con un’installazione eseguita in modo non appropriato si rischiano gravi danni materiali, ad es.
-
Seite 75: Installazione
Messa in funzione Per motivi di sicurezza in ambito elettrico, per collegare il sistema Homematic IP Wired Bus utilizzare esclusivamente i cavi di seguito indicati: • cavo per telefono J-Y(ST)Y da 2 x 2 x 0,8 (= 0,5 mm²) oppure 4 x 2 x 0,8 (= 0,5 mm²), schermato, TP •... -
Seite 76: Accoppiamento
Messa in funzione Inserire il display (B) nella piastra di montaggio spingendo le spine • di collegamento fino in fondo nell’apposito supporto della piastra (v. figura 6). • Riaccendere il sistema Homematic IP Wired Bus (v. figura 7) per attivare la modalità Inizializzazione dell’apparecchio (v. „5.3 An- lernen“... -
Seite 77: Accoppiamento Con La Centralina Ccu3
Messa in funzione 5.3.1 Accoppiamento con la centralina CCU3 Per comandare e configurare comodamente il dispositivo Homematic IP Wired mediante software e per utilizzarlo all’interno dei programmi della centralina è necessario eseguire l’accoppiamento con l’interfaccia WebUI. Per accoppiare il dispositivo alla centralina CCU3 procedere nel modo seguente: •... -
Seite 78: Accoppiamento Con Il Cloud Homematic Ip Tramite Il Wired Access Point
Messa in funzione • Attendere che la procedura di accoppiamento sia conclusa. • Una procedura di accoppiamento andata a buon fine viene con- fermata dall’accensione del LED (D) verde. L’apparecchio è pron- to per l’uso. • Se si accende la luce del LED rossa, riprovare la procedura. •... - Seite 79 Messa in funzione La modalità di accoppiamento può essere avviata manualmente per altri 3 minuti premendo brevemente il tasto di sistema (D) con un oggetto appuntito (ad es. con una penna) (v. figura 9). • L’apparecchio compare automaticamente nell’app Homematic •...
-
Seite 80: Importa Aggiornamenti Dalla Scheda Sd
Importa aggiornamenti dalla scheda SD Informazioni dettagliate sugli aggiornamenti del firmware eseguiti utilizzando la scheda SD nell’apposito slot (E) sono fornite nel Ma- nuale dell’utente. Completata la messa in funzione del display in vetro, per configurarlo si può comodamente utilizzare l’interfaccia utente WebUI o l’app Home- matic IP. -
Seite 81: Ripristino Delle Impostazioni Di Fabbrica
Ripristino delle impostazioni di fabbrica Luce rossa lampeg- Dispositivo difet- Prestare attenzione alle giante a lungo 6 volte toso indicazioni nell’app o rivolgersi a un rivenditore specializzato. Luce arancione 1 vol- Visualizzazione di Quando la visualizzazio- ta e luce verde 1 volta prova ne di prova scompare dal (dopo l’alimentazione... -
Seite 82: Dati Tecnici
Dati tecnici Dati tecnici Sigla dell’apparecchio: HmIPW-WGD-PL Tensione di alimentazione: 24 V , +/-5 %, SELV Corrente assorbita: 110 mA max. Potenza assorbita nel funzionamento a riposo: 0,6 W Tipo di cavo e sezione cavo: Cavo rigido 0,12-0,50 mm² Installazione: solo in scatole per interruttori (scatole di supporto apparecchio) secondo DIN 49073-1... - Seite 83 Schroeven 3,2 x 25 mm Handleidingen Bijgesloten blad met veiligheidsinstructies Documentatie © 2022 eQ-3 AG, Duitsland Alle rechten voorbehouden. Zonder schriftelijke toestemming van de uitgever mogen deze handleiding of fragmenten ervan op geen enkele manier worden gereproduceerd of met behulp van elektronische, mechanische of chemische middelen worden verveel- voudigd of verwerkt.
- Seite 84 Inhoudsopgave Instructies bij deze handleiding ............85 Gevarenaanduidingen ................85 Werking en overzicht van het apparaat ..........87 Algemene systeeminformatie .............. 88 Inbedrijfstelling ..................88 Installatie-instructies .................88 Installatie ....................90 Inleren ....................91 5.3.1 Inleren in de centrale CCU3 ..........92 5.3.2 Onderwijs aan de Homematic IP cloud via Wired Access Point ................
-
Seite 85: Instructies Bij Deze Handleiding
Instructies bij deze handleiding Instructies bij deze handleiding Lees deze handleiding zorgvuldig door voordat u uw Homematic IP ap- paraten in gebruik neemt. Bewaar de handleiding, om ze ook later nog te kunnen raadplegen! Als u het apparaat door andere personen laat gebruiken, geef dan ook deze handleiding mee. - Seite 86 Gevarenaanduidingen Voor zaak- of personenschade die door een onjuist gebruik of niet-naleving van de gevarenaanduidingen veroorzaakt is, stellen wij ons niet aansprakelijk. In dergelijke gevallen vervalt ieder garantie- recht! Voor gevolgschade stellen wij ons niet aansprakelijk! Neem bij het aansluiten op de apparaatklemmen in acht welke lei- dingen en leidingdoorsnedes hiervoor zijn toegestaan.
-
Seite 87: Werking En Overzicht Van Het Apparaat
Werking en overzicht van het apparaat Bij gebruik in een veiligheidstoepassing moet het apparaat / systeem in combinatie met een UPS (ononderbroken voeding) worden inge- zet om een mogelijke stroomuitval te overbruggen. Elk ander gebruik dan wat in deze handleiding beschreven wordt, is oneigenlijk en leidt tot de uitsluiting van garantie en aansprakelijk- heid. -
Seite 88: Algemene Systeeminformatie
Algemene systeeminformatie Overzicht van het apparaat (zie afbeelding 1): (A) Montageplaat (B) Touch-display (C) Naderingssensor en Helderheidssensor (D) Systeemtoets (inleertoets en led) (E) SD-kaartslot Algemene systeeminformatie Dit apparaat is een onderdeel van het Homematic IP Smart Home sys- teem en communiceert via het Homematic IP protocol. U hebt de moge- lijkheid alle apparaten van het systeem comfortabel en individueel via de bedieningsinterface van de centrale CCU3 of flexibel per smartphone via de Homematic IP app in combinatie met de Homematic IP cloud te con-... - Seite 89 Inbedrijfstelling Neem de op het apparaat aangegeven striplengte voor de aan te slui- ten kabels in acht. Neem bij de installatie de gevarenaanduidingen overeenkomstig „2 Gefahrenhinweise“ auf Seite 85 in acht. Opmerking! Installatie alleen door personen met desbetreffende elektrotechnische kennis en ervaring!* Door een onjuiste installatie brengt u uw eigen •...
-
Seite 90: Installatie
Inbedrijfstelling Toegestane kabeldoorsneden voor de aansluiting op het apparaat zijn: starre kabel: 0,12-0,50 mm Vanwege de elektrische veiligheid mogen voor het aansluiten van de Homematic IP Wired Bus uitsluitend de volgende kabels worden ge- bruikt: • signaalkabel J-Y(ST)Y met 2 x 2 x 0,8 (= 0,5 mm²) of 4 x 2 x 0,8 (= 0,5 mm²), afgeschermd, TP •... -
Seite 91: Inleren
Inbedrijfstelling Plaats de montageplaat (A) in de inbouwdoos en bevestig deze • vervolgens met de bijgeleverde schroeven aan de inbouwdoos (zie afbeelding 5). • Zet het display (B) in de montageplaat door de verbindingspen- nen volledig vast te klikken in de daarvoor bedoelde houder van de montageplaat (zie afbeelding 6). -
Seite 92: Inleren In De Centrale Ccu3
Inbedrijfstelling 5.3.1 Inleren in de centrale CCU3 Om het Homematic IP Wired apparaat softwarematig en comfortabel te kunnen bedienen en configureren, en om het in centrale programma’s te kunnen gebruiken, moet het in de WebUI ingeleerd worden. Ga als volgt te werk om het apparaat in de centrale CCU3 in te leren: •... -
Seite 93: Onderwijs Aan De Homematic Ip Cloud Via Wired Access Point
Inbedrijfstelling groen. Het apparaat is nu gebruiksklaar. • Indien de led rood brandt, dient u het opnieuw te proberen. • Na korte tijd verschijnt het nieuw ingeleerde apparaat in de inbox van uw interface. Nieuw ingeleerde apparaten en de bijbehorende kanalen zijn pas be- schikbaar voor bedienings- en configuratietaken nadat ze in de inbox zijn geconfigureerd. -
Seite 94: Update Installeren Via Sd-Kaart
Bediening apparaat zelf. • Wacht tot het inleerproces voltooid is. Ter bevestiging van een succesvol inleerproces brandt de led (D) • groen. Het apparaat is nu gebruiksklaar. • Indien de led rood brandt, dient u het opnieuw te proberen. • Kies de gewenste oplossing voor uw apparaat. -
Seite 95: Foutcodes En Knipperreeksen
Foutcodes en knipperreeksen het beeldscherm. Elke pagina kan afzonderlijk worden verdeeld in één, twee of vier tegels voor de bediening van de gewenste functies. Op die manier zijn talrijke functies op het gebied van licht en verduistering beschikbaar. Foutcodes en knipperreeksen Knippercode Betekenis Oplossing... -
Seite 96: Onderhoud En Reiniging
Onderhoud en reiniging • Druk opnieuw gedurende 4 sec. op de systeemtoets totdat de led groen oplicht (zie afbeelding 11). • Laat de systeemtoets weer los om het herstel van de fabrieksin- stellingen te voltooien. Het apparaat voert een herstart uit. Na de hernieuwde start kunt u het apparaat weer in uw Homematic IP systeem integreren. - Seite 97 Technische gegevens Verwijdering Het apparaat hoort niet in de vuilnisbak! Elektronische apparaten moeten overeenkomstig de richtlijn voor afgedankte elektrische en elektronische apparaten worden ingeleverd bij de inzamelpunten voor afgedankte apparaten. Informatie met betrekking tot de conformiteit De CE-markering is een label voor het vrije verkeer van goederen binnen de Europese Unie en is uitsluitend bedoeld voor de desbe- treffende autoriteiten.
- Seite 98 Kostenloser Download der Homematic IP App! Free download of the Homematic IP app! Bevollmächtigter des Herstellers: Manufacturer’s authorised representative: eQ-3 AG Maiburger Straße 29 26789 Leer / GERMANY www.eQ-3.de...