Inhaltsverzeichnis
Werbung
Verfügbare Sprachen
Verfügbare Sprachen
Quicklinks
Werbung
Inhaltsverzeichnis

Verwandte Anleitungen für Toguard C200


Inhaltszusammenfassung für Toguard C200
- Seite 1 Ultra HD Dash Cam A8 | User Manual | N0.:5132212151458...
-
Seite 2: Inhaltsverzeichnis
———— ENGLISH ———— 1. Quick Start Guide ..............6 2. Important Notice ................7 3. Interface and Button Function ..........8 3.1 Recording Interface ............8 3.2 Product Features ............9 3.3 Button Function .............10 3.4 Specification ..............11 4. Getting Started ................12 4.1 Check the Memory Card .......... - Seite 3 3.3 Funktion der Taste ............30 3.4 Spezifikation ..............31 4.Starten Sie den Betrieb des Geräts ........32 4.1 Überprüfen Sie die Speicherkarte ....... 32 4.2 Installieren Sie eine Dashcam ........33 4.3 Ein- und Ausschalten der Dashcam ......33 4.4 Anfangseinstellungen ........... 34 4.5 Aufgenommenes Video ansehen ........
- Seite 4 4.3 Allumer/éteindre la Dash Cam ........55 4.4 Paramètres initiaux ............56 4.5 Voir les vidéos enregistrées .........58 5.Mode de fonctionnement ............59 5.1 Vidéo Recording Mode ..........59 5.2 Mode photos ..............64 5.3 Mode de lecture ............64 6. Politique de garantie ...............65 6.1 Période de garantie ............
- Seite 5 6. Politica di garanzia ..............86 6.1 Periodo di garanzia ............86 6.2 Assistenza post-vendita ..........87 6.3 Cosa non copre questa garanzia .........87 7.Problemi e risposte ..............88 ———— Español ———— 1. Guía de inicio rápido ...............91 2.Advertencia Importante ............92 3.Función de interfaz y botón .............93 3.1 Interfaz de grabación ............93 3.2 Características del producto ........
-
Seite 6: Quick Start Guide
———— ENGLISH ———— 1. Quick Start Guide Installing the camera 1.Check if the memory card is in the camera. 2.Attach the suction cup bracket with GPS to the camera. 3. Plug the charging cable into the USB port of the camera, and then plug the adapter into the cigarette lighter socket of your car. -
Seite 7: Important Notice
6. Press M to return to the standby mode. Press the OK button and the camera starts working. 2. Important Notice • This dash cam is intended for use in motor vehicle only. Do NOT install the camera where it might block the driver’s view of road or the deployment of the airbag. -
Seite 8: Interface And Button Function
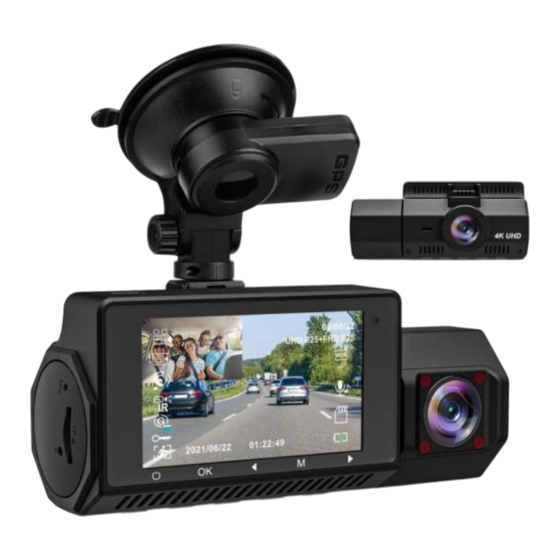
3. Interface and Button Function 3.1 Recording Interface 1.Mode 2.Loop Recording 3.GPS 4.IR LED 5.G-sensor 6.Lock video 7.Motion Detection 8.Time&Date 9.Power 10.SD card 11.Microphone 12.WDR 13.Video Resolution 14.Recording Time 15.Recording Status Note: The dash cam uses super capacitor instead of lithium battery as power source, which is safer and lighter. -
Seite 9: Product Features
3.2 Product Features 1.Front Camera 2.Screen 3.IR LED Lights 4.Inside Camera 5. USB Port 6.Mount Socket 7.Power 8.OK 9.Left 10.Menu/Mode 11.Right 12.Microphone 13.SD Card Slot 14.Reset Hole... -
Seite 10: Button Function
3.3 Button Function Short press to turn off the screen or turn on the screen, long press to turn on and turn off. Power In Setting Menu, short press to select option and adjust values. ◀ During video recording, short press to switch ... -
Seite 11: Specification
3.4 Specification Model Screen Display 2.45 inch LCD Screen Lens 170° Wide Angle Lens Video Resolution Front: 3840*2160P/2560*1440P/ 1920*1080P / Rear:1920*1080P Video Format Video Coding H.264 Video Mode Normal / Loop Recording Picture Format Loop Recording 1 Min/3 Min/5 Min Power ON Recording Supported G-Sensor Lock... -
Seite 12: Getting Started
4. Getting Started 4.1 Check the Memory Card Please insert the SD card in the correct direction. The SD card will pop out after pressing it with a fingernail or sharp object. (SD card is already inserted in the SD card slot) To remove the memory card Ensure that the dash cam is powered off,then push the memory card until a click is heard and then release the card... -
Seite 13: Powering The Dash Cam On /Off
1.Use the Suction cup mount with GPS to Install the dash cam on the windshield, recommended place near the rear view mirror facing front, adjust the lens angle for best coverage. 2.Plug the included power adapter into the car cigarette lighter socket, the indicator will light up meaning power is 3.Connect the power cable to the USB port on the dash cam. -
Seite 14: Initial Settings
4.4 Initial Settings Before using the dash cam we recommend Formatting the Inserted Micro SD Card, setting the correct Language, Time and Date. After setting the initial settings, press M to return to standby mode. Press the OK button to start camera operation. -
Seite 15: View The Recorded Videos
3). Press the right button to select "OK", press OK to confirm the formatting and return to the system menu. Note: 1.Menus cannot be accessed while the camera is recording.Please stop the recording before attempting to access the menu.(The blinking red dot on the screen means the camera is recording video). -
Seite 16: Operating Mode
and those ending in "B" are those recorded by the internal camera. Note: To playback video files on your PC it is recommended to connect the Micro SD card directly to your PC using either a USB Micro SD card reader(not included)or if your PC has a SD card slot, a Micro SD/SD Card converter(not included).Once the Micro SD card is connected it should appear as a removable storage device.It is recommended... - Seite 17 5.1.1 Locked Recording Lock Recording saves the current video file and prevents it from being overwritten. When the car encounters a collision, the G-sensor detects the vibration and the camera automatically locks the video. To manually activate locking video, follow the instructions below.
- Seite 18 sensitivity settings.The default is 0. G sensor: G-sensor will detect significant or sudden shock and movement then the camera will automatically lock current recording file.The detection sensitivity can be adjusted to OFF / Low / Middle / High. If set to "High", the camera will automatically lock the video even if the car goes over a speed bump.
- Seite 19 to pause the recording, and then press the M button twice to enter the system settings menu. After the setting is completed, press the M key to exit the menu setting. Date/Time: Set the time and date. Press the left and right keys to adjust the numbers, then press the [OK] button to confirm/change, and press the [M] button again to exit the time setting.
-
Seite 20: Photo Mode
https://apps.apple.com/us/app/hit-gps-player/id1527858255 GPS Switch: Turn the GPS function on or off. Timezone Setting: Set the correct time zone. Format: Completely delete all files in the storage card. Default Setting: Return menu setting Defaults. Version: The firmware version of the dash cam. 5.2 Photo Mode Press the OK Button to stop the dash cam from recording.(no red dot flashing on the screen)then long press... -
Seite 21: Warranty Policy
Delete: Delete the recorded files. Protect: Use this option to Lock and Unlock files, locked files will not be overwritten by loop recording. Slide show: Select a time gap to activate this function. Recorded file will be displayed in slide show. 4) Long press M button to quit playback and return to standby mode. -
Seite 22: What This Warranty Does Not Cover
provide you with a 100% perfect solution. From US: supportus@abask.hk From EU/UK: supporteu@abask.hk 6.3 What this warranty does not cover 1) If the device was not purchased from an authorized retailer. 2) Device malfunction due to the normal wear and tear, misuse, lack of maintenance, accidents, modification, alteration or repairs by an unauthorized person or entity. - Seite 23 2.The dash cam will stop automatically when recording. Solution: 1) Check whether the memory is full. 2) Check whether the loop recording function of the dash cam is working. 3) Check whether the Micro SD card is high-speed above 4) Playback the recorded video on dash cam to check whether there might be to many locked videos, which cause the SD card space run out and stop looping recording.
- Seite 24 not work, warming your windscreen then try it again. 2) Please soak suction mount to warm water for a moment. 3) If it is still not working, we are glad to send a new suction mount to you, please contact us to get a replacement. 6.Without external power supply, the camera will not power on, or the camera will power off immediately after the external power supply is disconnected.
-
Seite 25: Deutsch
———— Deutsch ———— 1. Schnellstartanleitung Installieren der Kamera 1. prüfen Sie, ob die Speicherkarte in der Kamera ist. 2. befestigen Sie die Saugnapfhalterung mit GPS an der Kamera. 3. Setzen Sie das Ladekabel in die USB -port der Kamera ein und legen Sie den Adapter in das Auto leichter. Starten Sie das Auto, die Kamera wird automatisch geöffnet. -
Seite 26: Wichtiger Hinweis
drücken Sie die OK-Taste, um die Einstellungen zu übernehmen. Drücken Sie die rechte oder linke Taste, um die Sprache auszuwählen, drücken Sie die OK-Taste zur Bestätigung und kehren Sie zum Systemmenü zurück. 3)Formatieren Sie die Speicherkarte. Wählen Sie mit der rechten Taste die Option "Formatieren"... - Seite 27 • Mit dieser Kamera werden Video bei hoher Auflösung aufgezeichnet. Verwenden Sie unbedingt eine U3 oder über Hochgeschwindigkeits-Micro-SD-Karte. Maximale Unterstützung 256G -Karten. • Um auf die Menüeinstellungen zuzugreifen, drücken Sie bitte die OK -Taste, um zuerst die Videoaufzeichnung zu stoppen. •...
-
Seite 28: Produktbeschreibung
3.Produktbeschreibung 3.1 Bildschirm Einführung 1.Modus 2.Loop-Aufnahme 3. GPS 4. IR-LED 5.G-Sensor 6. Video sperren 7. Bewegungserkennung 8.Zeit&Datum 9. Strom 10. SD-Karte 11. Mikrofon 12. WDR 13. Videoauflösung 14. Aufnahmezeit 15. Aufnahmestatus Notiz: Es ist normal, dass das Batteriesymbol die ganze Zeit blinkt. -
Seite 29: Produktfunktionen
3.2 Produktfunktionen 1. Frontlinse 2. Bildschirm 3.IR-LED-Leuchten 4.Innenkamera USB-Anschluss 6.Schlitz montieren 7. Macht-Taste 8.OK-Taste 9.Links-Taste 10.Menü/Modus 11.Rechts-Taste 12.Mikrofon Loch Zurücksetzen 14.Speicherkarten- steckplatz... -
Seite 30: Funktion Der Taste
3.3 Funktion der Taste Kurzes Drücken schaltet den Bildschirm aus oder ein, langes Drücken schaltet den Bildschirm ein und Strom aus. • Drücken Sie im Einstellungsmenü kurz, um eine Option auszuwählen und die Werte anzupassen. • Drücken Sie während der Videoaufnahme kurz ◀... -
Seite 31: Spezifikation
3.4 Spezifikation Modell Bildschirm 2,45-Zoll-LCD-Bildschirm Objektiv 170° Weitwinkelobjektiv Vorderseite: 3840*2160P/2560*1440P/ Video-Auflösung 1920*1080P/ Rückseite: 1920*1080P Video-Format Video-Codierung H.264 Video-Modus Normal / Schleifenaufzeichnung Schleifenaufzeichnung 1 Min/3 Min/5 Min Aufnahme einschalten Unterstützt G-Sensor-Sperre Unterstützt Englisch / Chinesisch / Deutsch / Sprache Französisch /Spanisch Audio-Aufnahme EIN/AUS Speicher... -
Seite 32: Starten Sie Den Betrieb Des Geräts
4.Starten Sie den Betrieb des Geräts 4.1 Überprüfen Sie die Speicherkarte Bitte legen Sie die SD-Karte in der richtigen Richtung ein. Die SD-Karte springt heraus, wenn Sie sie mit einem Fingernagel oder einem spitzen Gegenstand eindrücken. (Die SD-Karte ist bereits in den SD-Kartensteckplatz eingesetzt) So entfernen Sie die Speicherkarte Vergewissern Sie sich, dass die Dashcam ausgeschaltet ist,... -
Seite 33: Installieren Sie Eine Dashcam
4.2 Installieren Sie eine Dashcam 1. Mit der Saugnapfhalterung mit GPS, montieren Sie die Dashcam an der Windschutzscheibe, es wird empfohlen, es in der Nähe des Rückspiegels zu platzieren und den Objektivwinkel für die beste Abdeckung einzustellen. 2. stecken Sie den mitgelieferten Netzadapter in die Zigarettenanzünderbuchse des Autos, die Kontrollleuchte leuchtet auf, was bedeutet, dass der Strom eingeschaltet ist. -
Seite 34: Anfangseinstellungen
schaltet sich automatisch ein/aus, wenn die Zündung des Fahrzeugs ein/ausgeschaltet wird. Manuell ein/aus Manuelles Einschalten/Ausschalten 1) Manuelles Einschalten Halten Sie die Einschalttaste gedrückt, bis der Startbildschirm erscheint. 2)Manuelles Ausschalten Vergewissern Sie sich, dass die Aufzeichnung gestoppt wurde (kein roter Punkt blinkt auf dem Bildschirm). Drücken Sie die Einschalttaste der Dashcam für 10 Sekunden, um die Kamera auszuschalten. -
Seite 35: Einstellen Von Datum Und Uhrzeit
auszuwählen, und drücken Sie OK, um die Spracheinstellung aufzurufen. 3). drücken Sie die rechte oder linke Taste, um Ihre Sprache auszuwählen, drücken Sie die OK-Taste zur Bestätigung und kehren Sie zum Systemmenü zurück. 4.4.2 Einstellen von Datum und Uhrzeit Mit der Einstellung von Datum und Uhrzeit können Sie Ihre Aufnahmen mit einem Zeitstempel versehen, der als Referenz dient. -
Seite 36: Aufgenommenes Video Ansehen
3). Drücken Sie die rechte Taste, um "OK" zu wählen, drücken Sie OK, um die Formatierung zu bestätigen und zum Systemmenü zurückzukehren. Notiz: 1. Während die Kamera aufzeichnet, kann nicht auf das Menü zugegriffen werden. Bitte beenden Sie die Aufnahme, bevor Sie versuchen, auf das Menü... -
Seite 37: Betriebsmodus
auf dem Computer, um das aufgenommene Video anzusehen. Normale Videos werden im Ordner "Movie" gespeichert. Wichtige geschützte Videos werden automatisch im Ordner "EMR" gespeichert. Videos, die mit "A" enden, wurden mit der Frontkamera aufgenommen, Videos, die mit "B" enden, wurden mit der internen Kamera aufgenommen. -
Seite 38: Auflösung
Ein blinkender roter Punkt in der oberen linken Ecke zeigt an, dass die Aufnahme läuft.Drücken Sie die OK-Taste, um die Aufnahme zu stoppen, oder starten Sie die Aufnahme erneut. 5.1.1 Video Sperren Die Sperrenaufzeichnung speichert die aktuelle Videodatei und verhindert, dass sie überschrieben wird. Wenn das Auto auf eine Kollision trifft, erkennt der G-Sensor die Vibration und die Kamera sperrt das Video automatisch. - Seite 39 Länge der Aufnahmevideodatei auf 1/3/5 Minuten einstellen, um automatisch die früheste Datei zu überschreiben, wenn der Speicher der SD-Karte voll ist. Wir empfehlen Ihnen, die Loop-Aufnahmefunktion einzuschalten, um zu verhindern, dass der Speicherplatz auf der Speicherkarte voll wird, und die Aufnahme zu stoppen. (3-Minuten-Einstellung standardmäßig).
- Seite 40 Datumsanzeige: Datums- und Zeitstempel in Videodateien aktivieren/deaktivieren. Parkmonitor: (Optional) Wenn das optionale Kabel angeschlossen ist und der Parkmonitor aktiviert ist, bleibt die Kamera im Standby-Modus, nachdem der Motor abgestellt wurde.Wenn die Kamera eine Erschütterung erkennt, schaltet sie sich automatisch ein und nimmt ein kurzes Video auf, danach kehrt sie automatisch in den Standby-Modus zurück.
- Seite 41 Akustisches Signal: Wird verwendet, um den Piepton ein- oder auszuschalten, wenn eine Taste gedrückt wird. Boot-Sound: Dient zum Ein- oder Ausschalten des Tons beim Ein- oder Ausschalten des Geräts. Sprache: Legen Sie die Sprache für die Dashcam fest (Englisch, Deutsch, Französisch, Spanisch, Italienisch, usw.) Frequenz: 50 Hz / 60Hz, Wenn die Kamera das Radio stört, versuchen Sie, die Frequenz zu ändern.
-
Seite 42: Fotomodus
Timezone Setting: Stellen Sie die richtige Zeitzone ein. Format: Löscht alle Dateien auf der Speicherkarte vollständig. Standard Einstell: Menüeinstellung auf Standardwerte zurücksetzen. Version: Die Firmware-Version der Dashcam. 5.2 Fotomodus Drücken Sie die OK -Taste, um den Dash -Cam von der Aufnahme zu stoppen. -
Seite 43: Gewährleistungspolitik
sperren und zu entsperren, gesperrte Dateien werden durch die Loop-Aufnahme nicht überschrieben. Diashow: Wählen Sie ein Zeitintervall aus, um diese Funktion zu aktivieren. Die aufgezeichneten Dateien werden in einer Diashow angezeigt. 4) Drücken Sie lange die M-Taste, um die Wiedergabe zu beenden und in den Standby-Modus zurückzukehren. -
Seite 44: Was Diese Garantie Nicht Abdeckt
jederzeit an unser Kundendienstzentrum. Wir werden Ihnen innerhalb von 24 Stunden antworten und Ihnen eine 100% perfekte Lösung anbieten. Aus den USA: supportus@abask.hk Aus der EU/UK: supporteu@abask.hk 6.3 Was diese Garantie nicht abdeckt 1) Wenn das Gerät nicht bei einem autorisierten Händler gekauft wurde. -
Seite 45: Fragen Und Antworten
Fragen und Antworten 1. Sie können nicht auf das Menü zugreifen? Lösung: Wenn der Camcorder ein Video aufzeichnet, funktioniert die Menütaste nicht. Ein blinkender roter Punkt auf dem Bildschirm zeigt an, dass die Kamera ein Video aufzeichnet. Drücken Sie OK, um die Aufnahme anzuhalten, und drücken Sie dann M, um das Menü... - Seite 46 4. Es gibt Schlieren im Video. Oder das Funksignal ist beeinträchtigt. Lösung: Es sollten falsche optische Frequenzen vorliegen. Stellen Sie entsprechend der lokalen Frequenz 50 Hz oder 60 Hz entsprechend ein. 5. Der Saugnapf haftet nicht gut an der Windschutzscheibe? Lösung: 1) Bitte reinigen Sie die Windschutzscheibe mit Glasreinigungstüchern.
- Seite 47 Lösung: 1) Bitte überprüfen Sie, ob das Ladekabel richtig angeschlossen ist. 2) Bitte führen Sie die Büroklammer 3 Sekunden lang in das „R“-Loch an der Seite der Kamera ein und lassen Sie sie dann los. Die Kamera wird automatisch neu gestartet. 3) Bitte formatieren Sie die Speicherkarte im Menü.
-
Seite 48: Français
———— Français ———— 1.Guide de démarrage rapide 1.1 Installation de la caméra 1.Vérifiez si la carte mémoire est dans l'appareil photo. 2. Fixez le support à ventouse avec GPS à l'appareil photo. 3. Connecter le câble de charge au port USB de la caméra, puis connectez l'adaptateur au allume-cigare de la voiture. -
Seite 49: Avis Important
"OK", appuyez sur OK pour confirmer le formatage et revenir au menu système. 6. Pour revenir en mode veille, appuyez sur M. Appuyez sur le bouton OK et l'appareil photo commence à fonctionner. 2.Avis important • Cette caméra de tableau de bord est destinée à être utilisée dans un véhicule à... -
Seite 50: Interface Et Fonction De Bouton
vous-même. • Pour l'inspection interne et la réparation, contactez le centre de service. 3.Interface et fonction de bouton 3.1 Interface d'enregistrement 1.Mode 2.Enregistrement continu 3.GPS 4.IR LED 5.G Senor 6. Verrouiller la vidéo 7. Détection de mouvement 8. Date/Heure 9. Alimentation 10. Carte SD 11. Microphone 12. -
Seite 51: Caractéristiques Du Produit
symbole de la batterie à l'écran continue de clignoter. 3.2 Caractéristiques du produit 1. Caméra frontale 2.Écran 3. Lumières LED IR 4. Caméra intérieure 5. port USB 6. Prise de montage 7.Puissance 8. D'accord 9.Gauche 10.Menu/Mode 11.Droite 12.Microphone 13. Fente pour carte mémoire 14. -
Seite 52: Fonction Du Bouton
3.3 Fonction du bouton Appuyez brièvement pour éteindre l'écran ou allumer l'écran, appuyez longuement pour allumer et éteindre. Alimentation Dans le menu de configuration, appuyez brièvement pour sélectionner l'option et ajuster les valeurs. Pendant l'enregistrement vidéo, appuyez brièvement ◀ ... -
Seite 53: Spécification
3.4 spécification Modèle Affichage à l'écran Écran LCD de 2,45 pouces Objectif Objectif à grand angle de 170 ° Résolution vidéo Frontal : 3840*2160P/2560*1440P/ Arrière:1920*1080P 1920*1080P Format Vidéo Codage Vidéo H.264 Mode Vidéo Enregistrement normal / en Boucle Format d’image Enregistrement en boucle 1 Min/3 Min/5 Min Enregistrement... -
Seite 54: Commencer À Utiliser L'appareil
4.Commencer à utiliser l'appareil 4.1 Vérifier la carte mémoire Veuillez insérer la carte SD dans le bon sens. La carte SD sortira après avoir appuyé dessus avec un ongle ou un objet pointu. (La carte SD est déjà insérée dans la fente pour carte SD) Pour retirer la carte mémoire Assurez-vous que la caméra de tableau de bord est éteinte,... -
Seite 55: Installation De La Caméra De Tableau De Bord
4.2 Installation de la caméra de tableau de bord 1.Utilisez le support à ventouse avec GPS pour installer la caméra de tableau de bord sur le pare-brise, endroit recommandé près du rétroviseur face à l'avant, ajustez l'angle de l'objectif pour une meilleure couverture. 2.Branchez l'adaptateur secteur inclus dans la prise allume-cigare de la voiture, l'indicateur s'allumera, ce qui signifie que l'alimentation est allumée. -
Seite 56: Paramètres Initiaux
(1) arrêt manuel Maintenez le bouton d'alimentation enfoncé jusqu'à ce que l'écran de démarrage apparaisse. (2)Arrêt manuel Assurez-vous que l'enregistrement a été arrêté (pas de point rouge clignotant sur l'écran). Appuyez sur le bouton d'alimentation de la caméra de tableau de bord pendant 10 secondes pour éteindre la caméra. -
Seite 57: Réglez La Date Et L'heure
4.4.2 Réglez la date et l'heure Le réglage de l'heure et de la date vous permet d'estampiller votre métrage avec l'heure comme référence. 1). Appuyez sur la touche OK pour arrêter l'enregistrement et appuyez deux fois sur la touche M pour entrer dans le menu système. -
Seite 58: Voir Les Vidéos Enregistrées
fichiers de la carte. Une fois ces fichiers supprimés, vous ne pourrez plus les récupérer. 3. Après avoir défini les paramètres initiaux, appuyez sur M pour revenir en mode veille. Appuyez sur le bouton OK et la caméra commence à fonctionner. 4.5 Voir les vidéos enregistrées 4.5.1 Lecture de la vidéo sur la caméra de tableau de bord... -
Seite 59: Mode De Fonctionnement
de connecter la carte Micro SD directement à votre PC en utilisant soit un lecteur de carte Micro SD USB (non inclus) ou si votre PC dispose d'un emplacement pour carte SD, un convertisseur de carte Micro SD/SD ( non inclus). Une fois la carte Micro SD connectée, elle devrait apparaître comme un périphérique de stockage amovible. -
Seite 60: Menu D'enregistrement Vidéo
5.1.1 Enregistrement verrouillé Verrouiller l'enregistrement enregistre le fichier vidéo actuel et l'empêche d'être écrasé. Lorsque la voiture rencontre une collision, le G Senor détecte la vibration et la caméra verrouille automatiquement la vidéo. Pour activer manuellement le verrouillage vidéo, suivez les instructions ci-dessous. - Seite 61 recommandons d'activer la fonction d'enregistrement en boucle pour éviter que l'espace de la carte mémoire ne soit plein et arrêter l'enregistrement. (réglage 3 minutes par défaut). WDR: Plage dynamique étendue : activez cette option pour optimiser la qualité vidéo avec une plage de lumière et des détails d'image plus larges.
- Seite 62 Marque Date: Active/desactive les marques de date et d'heure dans les fichiers vidéo. Moniteur de stationnement : (facultatif) Avec le kit de câblage en option connecté, le moniteur de stationnement est activé, la caméra restera en veille après l'arrêt du moteur. Lorsque l'appareil photo détecte un tremblement, il s'allume automatiquement et prend une courte vidéo, puis revient automatiquement en veille.
- Seite 63 Son de démarrage: Utilisé pour desactiver ou active le son lorsque l'appareil est éteint ou allumé. Langues: Définissez la langue de la caméra de tableau de bord. (anglais, allemand, français, espagnol, italien, etc.) Fréquence: 50 Hz/60 Hz, si la caméra interfère avec la radio, essayez de changer la fréquence.
-
Seite 64: Mode Photos
carte de stockage. Regl.Defaut : retour aux paramètres de menu par défaut. Version : La version du micrologiciel de la caméra de tableau de bord. 5.2 Mode photos Appuyez sur le bouton OK pour arrêter l'enregistrement de la caméra embarquée (aucun point rouge ne clignote à l'écran), puis appuyez longuement sur le bouton mode [M] pour passer en mode photo. -
Seite 65: Politique De Garantie
Noter: Le nom du fichier se trouve dans le coin supérieur droit de l'écran. La vidéo se terminant par A est la vidéo enregistrée par la caméra frontale. La vidéo se terminant par B est la vidéo enregistrée par la caméra intérieure. 6. -
Seite 66: Ce Que Cette Garantie Ne Couvre Pas
aide, veuillez contacter notre centre de service après-vente à tout moment. Nous vous répondrons dans les 24 heures et vous fournirons une solution parfaite à 100%. Depuis les États-Unis : supportus@abask.hk Depuis l'UE/le Royaume-Uni : supporteu@abask.hk 6.3 Ce que cette garantie ne couvre pas 1) Si l'appareil n'a pas été... -
Seite 67: Problèmes Communs Et Réponses
avec un impact léger qui n'est pas suffisant pour activer le capteur de détection d'impact peuvent ne pas être enregistrés. 7.Problèmes communs et réponses 1.Vous n'arrivez pas à accéder au menu ? Lorsque la caméra enregistre une vidéo, le bouton de menu ne fonctionne pas. - Seite 68 2)Changez une carte U3 ou supérieure à haut débit. 4.Il y a des interférences de rayures dans la vidéo. Ou la radio est perturbée. Solution: Il devrait y avoir une mauvaise fréquence lumineuse. Selon la fréquence principale locale, effectuez les réglages appropriés 50HZ ou 60HZ.
- Seite 69 enregistrer la dernière vidéo après une coupure de courant. 7. L'appareil photo s'allume et s'éteint à plusieurs reprises. Solution: 1) Veuillez vérifier si le câble de charge est bien connecté. 2) Veuillez insérer un trombone dans le trou "R" sur le côté de la caméra pendant 3 secondes, puis relâchez.
-
Seite 70: Italiano
———— Italiano ———— 1.Guida rapida all'uso Installazione della dash cam 1.Controllare che la scheda di memoria sia inserita nella fotocamera. 2.Fissare la staffa a ventosa con GPS alla fotocamera. 3. Con collegare il cavo di ricarica sulla porta USB della fotocamera, quindi collegare l'adattatore all'accendisigari dell'auto. -
Seite 71: Avviso Importante
formattazione e tornare al menu di sistema. 6. Premere M per tornare alla modalità standby. Premere il pulsante OK e la fotocamera inizia a funzionare. 2.Avviso importante • Questo prodotto è destinato esclusivamente all'uso su veicoli a motore.NON installare la fotocamera dove potrebbe bloccare la visuale della strada da parte del conducente o l'attivazione dell'airbag. -
Seite 72: Interfaccia E Funzione Del Pulsante
3.Interfaccia e funzione del pulsante 3.1 Icone di registrazione 1. Modalità 2.Loop di registrazione 3.GPS 4.IR LED 5.G sensor 6. Blocca video 7.Monitor di Parcheggio 8.Ora & Data 9. Alimentazione 10.Scheda SD 11.Microfono 12. WDR 13. Spia di Risoluzione Video 14. -
Seite 73: Caratteristiche Del Prodotto
3.2 Caratteristiche del prodotto 1. Fotocamera anteriore 2.Schermo 3. Luci LED IR Fotocamera interna 5. Porta USB 6. Montare la presa 7. Potenza 8.OK 9.Pulsante sinistro 10.Menu/Modalità 11.Bottone giusto 12.Microfono Slot per scheda SD 14.Foro di ripristino... -
Seite 74: Funzione Di Pulsante
3.3 Funzione di Pulsante Premere brevemente per spegnere o accendere lo schermo, premere a lungo per accendere e spegnere. Alimentazione • Nel menu Impostazioni, premere brevemente per selezionare l'opzione e regolare i valori. ◀ • Durante la registrazione video, premere brevemente per cambiare la modalità... -
Seite 75: Specifiche
3.4 Specifiche Modello Visualizzazione dello Schermo LCD da 2,45 pollici Schermo Obiettivo Obiettivo Grandangolare 170° Anteriore: 3840*2160P/2560*1440P/ Risoluzione Video 1920*1080P Posteriore: 1920*1080P Formato Video Codifica Video H.264 Modalità Video Registrazione Normale/in Ciclo Formato Immagine Registrazione in ciclo 1 Min/3 Min/5 Min Registrazione Supportato all'Accensione... -
Seite 76: Inizia A Utilizzare La Fotocamera
4.Inizia a utilizzare la fotocamera 4.1 Controllo della scheda di memoria Inserire la scheda SD nella direzione corretta. La scheda SD verrà estratta dopo averla premuta con un'unghia o un oggetto appuntito. (La scheda SD è già inserita nello slot della scheda SD) Per rimuovere la scheda di memoria Assicurarsi che la dash cam sia spenta, quindi spingere la... -
Seite 77: Accensione E Spegnimento Della Dash Cam
1. Utilizzare il supporto a ventosa per installare la fotocamera a cruscotto sul parabrezza, posizione consigliata vicino allo specchietto retrovisore rivolto in avanti, regolare l'angolo dell'obiettivo per la migliore copertura. 2. Collegare l'adattatore di alimentazione incluso nella presa dell'accendisigari dell'auto, la spia si accenderà indicando che l'alimentazione è... -
Seite 78: Impostazioni Iniziali
dash cam si riavvia. 4.4 Impostazioni iniziali Prima di utilizzare la dash cam si consiglia di formattare la scheda Micro SD inserita, impostare la lingua, l'ora e la data corrette. Dopo aver impostato le impostazioni iniziali, premere M per tornare alla modalità standby. Premere il pulsante OK e la fotocamera inizia a funzionare. -
Seite 79: Visualizzazione Dei Video Registrati
prepara la scheda per l'uso con la dash cam. 1). Premere il tasto OK per interrompere la registrazione e premere due volte il tasto M per accedere al menu di sistema. 2). Premere il tasto destro per selezionare l'opzione di formattazione, premere OK per accedere all'impostazione. -
Seite 80: Modalità Operativa
4.5.2 Riproduzione di un video su un PC 1) Collegare la dash cam al computer utilizzando il cavo USB (in dotazione). 2) Selezionare "Memoria di massa" sulla dash cam. 3) Aprire la cartella "Novatek" sul disco di memoria del computer per visualizzare il video registrato. I video normali vengono memorizzati nella cartella "Movie". -
Seite 81: Modalità Di Registrazione Video
desiderata.Guardare l'icona nell'angolo in alto a sinistra dello schermo per ogni modalità. In queste tre modalità, è possibile accedere alla modalità di impostazione premendo il pulsante M. Premere il pulsante destro o sinistro per selezionare l'opzione di impostazione, premere il pulsante OK per confermare, premere il pulsante M per tornare al menu. - Seite 82 Dimensioni Immagine Regola la risoluzione video di registrazione dell'obiettivo anteriore. UHD P30: 4K 30FPS, utilizzare solo la Len fronte. UHD P25+FHD P25: fronte 4K 25FPS + interno 1080P 25FPS. QHD P30+FHD P30: fronte 2K 30FPS + interno 1080P 30FPS. FHD P30+FHD P30: fronte 1080P 30FPS + interno 1080P 30FPS.
- Seite 83 IR LED: attiva o disattiva le 4 luci LED IR accanto alla telecamera interna. Se impostata su "Auto", la luce LED IR si accende automaticamente quando la luce si attenua. Rear Camera Mirror: questa funzione può cambiare l'immagine speculare / l'immagine originale dell'obiettivo posteriore.
- Seite 84 destro per regolare i numeri, quindi premere il tasto [OK] per confermare/modificare e premere nuovamente il tasto [M] per uscire dall'impostazione dell'ora. Backlight: La temporizzazione consente di spegnere automaticamente lo schermo, in modo che il prodotto possa funzionare con un consumo energetico estremamente ridotto.
-
Seite 85: Modalità Foto
Interruttore GPS: Attiva o disattiva la funzione GPS. Impostazione del fuso orario: Imposta il fuso orario corretto. Formattazione: Elimina completamente tutti i file della scheda di memoria. Impostazione predefinita: Ripristina le impostazioni predefinite del menu. Versione: La versione del firmware della dash cam. 5.2 Modalità... -
Seite 86: Politica Di Garanzia
3) Premere il tasto M per accedere al menu dei file. È possibile eliminare o proteggere i file video. Elimina: Elimina i file registrati. Proteggi: Utilizzare questa opzione per bloccare e sbloccare i file; i file bloccati non saranno sovrascritti dalla registrazione in loop. -
Seite 87: Assistenza Post-Vendita
anni. Se ne avete bisogno, contattate il nostro centro di assistenza post-vendita. 6.2 Assistenza post-vendita Se il dispositivo non funziona normalmente o se avete bisogno di assistenza tecnica o di aiuto, contattate il nostro centro di assistenza post-vendita in qualsiasi momento. Vi risponderemo entro 24 ore e vi forniremo una soluzione perfetta al 100%. -
Seite 88: Problemi E Risposte
7.Problemi e risposte 1.Non è possibile accedere al menu? Quando la fotocamera sta registrando un video, il pulsante del menu non funziona. Un punto rosso lampeggiante sullo schermo significa che la fotocamera sta registrando un video. Premere OK per mettere in pausa la registrazione, quindi premere M per accedere al menu. - Seite 89 frequenza principale locale, effettuare le impostazioni appropriate a 50HZ o 60HZ. 5.Il supporto a ventosa non può essere fissato bene al parabrezza? Soluzione: 1)Pulire il parabrezza dove si attacca con una salvietta per la pulizia del vetro. Rimosso il film protettivo, se non funziona, riscaldare il parabrezza e riprovare.
- Seite 90 4) Verificare che la fotocamera sia tornata normale. 8.Come funziona il registratore dopo che si è bloccato? Soluzione: Se la macchina si blocca per qualche motivo durante l'uso, Inserire una graffetta nel foro "R" sul lato della fotocamera per 3 secondi, quindi rilasciare. La fotocamera si riavvierà automaticamente.
-
Seite 91: Español
———— Español ———— 1. Guía de inicio rápido Instalación de la cámara 1.Compruebe si la tarjeta de memoria está en la cámara. 2. Fije el soporte de ventosa con GPS a la cámara. 3. Conecta el cable de carga al puerto USB de la cámara y, a continuación, conecta el adaptador al encendedor del coche. -
Seite 92: Advertencia Importante
regresar al menú del sistema. 6. Pulse M para volver al modo de espera. Presione el botón OK y la cámara comenzará a funcionar. 2.Advertencia Importante •Esta dash cam está diseñada para usarse únicamente en vehículos motorizados. NO instale la cámara donde pueda bloquear la vista del conductor de la carretera o el despliegue de la bolsa de aire. -
Seite 93: Función De Interfaz Y Botón
3.Función de interfaz y botón 3.1 Interfaz de grabación 1. Modo 2. Grabación continua 3.GPS 4.IR LED 5.G-sensor 6. Proteger vídeo 7. Detección de movimiento 8.Tiempo y fecha 9.Potencia 10.Tarjeta SD 11.Micrófono 12.WDR 13.Resolución de video 14.Tiempo de grabación 15.Estado de grabación Nota: La cámara del tablero utiliza un supercondensador en lugar de una batería de litio como fuente de energía, que es más... -
Seite 94: Características Del Producto
3.2 Características del producto 1. Cámara frontal 2.Pantalla 3. Luces LED IR 4. Cámara interior 5. Puerto USB 6. Zócalo de montaje 7. Poder 8.OK 9.Izquierda 10.Menú/Modo 11. Derecha 12. Micrófono 13. Ranura para tarjeta de memoria 14. Restablecer agujero... -
Seite 95: Función De Botón
3.3 Función de Botón Pulse brevemente para apagar la pantalla o encender la pantalla, mantenga pulsado para encender y apagar. Potencia En el menú de configuración, pulse brevemente para seleccionar la opción y ajustar los valores. Durante la grabación de vídeo, pulse brevemente para ... -
Seite 96: Especificación
3.4 Especificación Modelo Visualización de la Pantalla LCD de 2,45 pulgadas pantalla Lente Lente gran angular de 170 ° Resolución de Vídeo Frontal: 3840*2160P/2560*1440P/ 1920*1080P/ Parte trasera:1920*1080P Formato de Video Codificación de Video H.264 Modo de Video Grabación Normal/en Bucle Grabación en Bucle 1 Minuto/3 Minutos/5 Minutos Encendido de... -
Seite 97: Empezar A Usar El Dispositivo
4.Empezar a usar el dispositivo 4.1 Comprobar la tarjeta de memoria Inserte la tarjeta SD en la dirección correcta. La tarjeta SD saldrá después de presionarla con una uña o con un objeto afilado. (La tarjeta SD ya está insertada en la ranura para tarjetas SD) Para quitar la tarjeta de memoria Asegúrese de que la cámara del tablero esté... -
Seite 98: Encendido/Apagado De La Cámara De Tablero
1. Utiliza el soporte de ventosa con GPS para instalar la cámara de salpicadero en el parabrisas, lugar recomendado cerca del espejo retrovisor mirando hacia el frente, ajusta el ángulo de la lente para una mejor cobertura. 2. Enchufe el adaptador de corriente incluido en el enchufe del encendedor de cigarrillos del automóvil, el indicador se iluminará, lo que significa que la alimentación está... -
Seite 99: Ajustes Iniciales
aplanado en el orificio "R" en el costado de la grabadora del automóvil durante 5 segundos, luego suéltelo. La grabadora de coche se reiniciará. 4.4 Ajustes iniciales Antes de usar la dash cam, recomendamos formatear la tarjeta Micro SD insertada y configurar el idioma, la hora y la fecha correctos. -
Seite 100: Formatear La Tarjeta De Memoria
4.4.3 Formatear la tarjeta de memoria Al formatear la tarjeta Micro SD se eliminará toda la información de la tarjeta Micro SD insertada y se preparará la tarjeta para su uso con la dash cam. 1). Presione la tecla OK para detener la grabación y presione la tecla M para ingresar al menú... -
Seite 101: Modo De Funcionamiento
derecha. Presiona OK para reproducir el video. 4.5.2 Reproducción de video en una PC 1) Conecte la cámara del tablero a la computadora usando el cable USB (incluido). 2) Seleccione "Almacenamiento masivo" en la cámara del tablero. 3) Abra la carpeta "Novatek" en el disco de almacenamiento en la computadora para ver el video que grabó. -
Seite 102: Modo De Grabación De Vídeo
diferentes modos y acceder al modo que desee. Mire el ícono en la esquina superior izquierda de la pantalla para cada modo. En estos tres modos, puede ingresar al modo de configuración presionando el botón M. Presione el botón derecho o izquierdo para seleccionar la opción de configuración, presione el botón OK para confirmar, presione el botón M . - Seite 103 Resolución Ajuste la resolución de video de grabación de la lente frontal. UHD P30: 4K 30FPS, solo use Len frontal. UHD P25+FHD P25: Frontal 4K 25FPS + Interior 1080P 25FPS. QHD P30+FHD P30: Frontal 2K 30FPS + Interior 1080P 30FPS. FHD P30+FHD P30: Frontal 1080P 30FPS + Interior 1080P 30FPS.
- Seite 104 IR LED: Encienda o apague las 4 luces LED IR junto a la cámara interior. Si se establece en "Auto", la luz LED IR se encenderá automáticamente cuando la luz se atenúe. Rear Camera Mirror: Opción: encendido/apagado. Esta función puede cambiar la imagen de espejo/imagen original de la lente trasera.
- Seite 105 Fecha/Hora:Configure la hora y la fecha. Presione las teclas izquierda y derecha para ajustar los números, luego presione el botón [OK] para confirmar/cambiar, y presione el botón [M] nuevamente para salir de la configuración de la hora. Protector de Pantalla: El tiempo puede apagar automáticamente la pantalla de visualización, de modo que el producto pueda funcionar con un consumo de energía extremadamente bajo.
-
Seite 106: Modo De Foto
Interruptor de GPS: apagado o encendido la función GPS. Configuración de zona horaria: Establezca la zona horaria correcta. Formato: Elimine completamente todos los archivos en la tarjeta de almacenamiento. Configuración por defeto: Vuelve a la configuración predeterminada del menú. Versión: La versión de firmware de la dash cam 5.2 Modo de foto Presione el botón OK para detener la grabación de la cámara del tablero (sin un punto rojo parpadeando en la... -
Seite 107: Política De Garantía
2) Use el botón IZQUIERDO y DERECHO para desplazarse por los archivos/fotos grabados y presione OK para reproducir o pausar la reproducción del archivo seleccionado. 3) Presione la tecla M para ingresar al menú de archivo. Puede eliminar o proteger archivos de video. Eliminar: elimina los archivos grabados. -
Seite 108: Servicio Postventa
Todos los accesorios: 18 meses Tarjeta Micro-SD: 6 meses . Si se une a Las garantías extendidas están disponibles nuestro programa de garantía extendida, obtendrá una . Si lo necesita, póngase en contacto garantía de 2 años con nuestro centro de servicio postventa. 6.2 Servicio postventa Si su dispositivo no puede funcionar con normalidad, o necesita soporte técnico o ayuda, por favor, póngase en... -
Seite 109: Problemas Y Respuestas
producto o lesiones personales que se produzcan debido a accidentes o desastres naturales. 5) La Dash Cam graba y guarda el vídeo de los accidentes del vehículo. Sin embargo, no garantiza la grabación de todos los accidentes. Es posible que no se graben los accidentes con un impacto leve que no sea suficiente para activar el sensor de detección de impactos. - Seite 110 problema con la velocidad de la tarjeta de memoria. Solución: 1) Formatee su tarjeta Micro SD en la cámara. 2) Cambiar una tarjeta de alta velocidad U3 o superior. 4.Hay rayas de interferencia en el video o la radio está perturbada.
- Seite 111 cámara de tablero A8 es un supercondensador más seguro y liviano en lugar de una batería de litio, solo se usa para guardar el último video después de una falla de energía. 7. La cámara sigue encendiéndose y apagándose repetidamente. Solución: 1) Verifique si el cable de carga está...