Herunterladen Inhalt Inhalt Diese Seite drucken

Werbung

Verfügbare Sprachen
  • DE

Verfügbare Sprachen

  • DEUTSCH, seite 24
ZOSI C611 Smart IP Camera
Quick Start Guide
*Please read this guide carefully before use and keep it properly.
V6.K.01.Z

Werbung

Inhaltsverzeichnis
loading

Inhaltszusammenfassung für ZOSI C611

  • Seite 1 ZOSI C611 Smart IP Camera Quick Start Guide *Please read this guide carefully before use and keep it properly. V6.K.01.Z...
  • Seite 2 Contents...
  • Seite 3: Package Content

    Package Content Please check and ensure that the product is in good condition and the accessories are complete. Camera *1 5V 1A Power Adapter *1 Mounting Template *1 Quick Start Guide Mounting Screw Bag *1 Reset Needle *1 Quick Start Guide *1...
  • Seite 4: Power On The Camera

    Camera Structure Diagram CDS Sensor 10pcs IR-LEDs (Night Vision Up to 30ft) Micro SD Card Slot 3.6mm HD Lens (90° Angle View) Indicator Light Magnetic Base Reset Button Microphone Loudspeaker Power supply Power On the Camera Connect the camera to the power outlet via USB cable, and the blue light will be on after the camera is powered on.
  • Seite 5: Log In And Registration

    Log in and Registration 1. Scan the QR code below to download free Zosi Smart App on your phone. (Both Android and Apple systems can scan to download, and also can search and download in App Store or Google Store.) 2.
  • Seite 6 NOTE: If the device fails to be added, please check the following points: 1.Check whether the device is powered on. 2.Check whether the WiFi password is entered correctly. 3.Confirm the network connected to the mobile phone and the device can access the Internet normally. 4.Confirm whether the network has firewall restrictions, which may cause the device fails to connect to our company’s server normally, and causing the device to be offline.
  • Seite 7: Installation Notes

    Installation Notes 1. Please confirm that the device has been added to the App before installation. 2. The camera can be installed flat, ceiling or wall mounted, it is recommended to place it in a place with a wide viewing angle. Ceiling/Wall-mounted Notes 1.Drill holes in the wall according the mounting hole template and insert the plastic wall plugs.
  • Seite 8 Diagram of Wall-mounted/Ceiling Installation AVSS Download and install Zosi AVSS Client, and following this guide to complete installation. Official download link: https://www.zosi- tech.com/app/, double-click “AVSS” icon, choose language and click log in. Note: It is recommended to log in with the account of Zosi Smart App to avoid multiple accounts using.
  • Seite 9 FAQs 1.Q: Why can’t I add the device by local search? Please make sure the device and mobile phone are in the same LAN. If you can’t make both of them in the same LAN, please enter the device UID manually to add the device. 2.Q: Why is the device disconnected? Please check whether the device is connected to the network.
  • Seite 10: Lista De Empaque

    Lista de empaque Asegúrese de que la cámara esté en buenas condiciones y los accesorios estén completos después de abrir la caja. Cámara *1 Fuente de alimentación 5V 1A *1 Plantilla de perforación *1 Quick Start Guide Bolsa de tornillos *1 Aguja de reinicio *1 Manual de instrucciones *1...
  • Seite 11 Estructura de la cámara Sensor CDS 10pcs LED IR (Visión nocturna alcanza de hasta 30ft) Ranura para tarjeta Micro SD 3,6mm Lente (Ángulo de visión de 90°) Base magnética indicadora Botón de Micrófono reinicio Altavoz Fuente de alimentación Conectar la cámara a la corriente Conecte la cámara a la toma de corriente.
  • Seite 12 ZOSI Android/IOS Agregar el dispositivo 1. Abra la aplicación "Zosi Smart", inicie sesión e ingrese a la interfaz del dispositivo, haga clic en el botón "+" en la parte inferior para agregar un dispositivo, y luego seleccione C611. 2. Escanee el código QR o ingrese manualmente el UID del dispositivo, haga clic en "Confirmar"...
  • Seite 13 Nota: este dispositivo solo admite 2,4G WiFi. 5. Después de escuchar el mensaje de voz "Wireless Configuration Succeed" → "Wireless Connecting, please wait" → "Wireless Connection Succeed", haga clic en "Siguiente", luego "Confirmar" y por fin haga clic en "Hecho", el dispositivo se ha agregado correctamente a la aplicación.
  • Seite 14 Nota de instalación 1. Confirme que la cámara se haya agregado a la aplicación antes de la instalación. 2. Se puede colocar la cámara en una superficie plana, o montar en pared/techo. Se recomienda colocarla en un lugar con visión amplio.
  • Seite 15 Nota: se recomienda iniciar sesión con la cuenta y la contraseña de la aplicación “Zosi Smart” para evitar múltiples cuentas. También puede iniciar de sesión localmente (no se requiere cuenta ni contraseña).
  • Seite 16: Preguntas Frecuentes

    Preguntas frecuentes 1. ¿Por qué no se puede agregar el dispositivo utilizando la búsqueda local? Asegúrese de que el móvil y el dispositivo estén en una misma red LAN. Si los dos no pueden estar en la misma red LAN, ingrese manualmente el UID del dispositivo para completar la adición.
  • Seite 17: Liste D'emballage

    Liste d’emballage Après le déballage, veuillez vérifier si la caméra est en bon état et que les accessoires sont complets. Caméra *1 Adaptateur secteur 5V/1A *1 gabarit collant*1 Quick Start Guide Set de vis de montage *1 Épingle *1 Notice *1...
  • Seite 18: Mise Sous Tension

    Présentation du produit Senseur CDS 10pcs LEDs IR (Vision Nocturne de 30 pieds) Emplacement de carte Micro SD Objectif 3,6mm (Angle de vue 90°) Voyant Base magnétique Bouton de réinitialisation Microphone Haut-parleur Power Mise sous tension Connectez la caméra à la prise de courant à l'aide d'un câble USB. La caméra est sous tension une fois son voyant allumé.
  • Seite 19 ZOSI Android/IOS Ajouter la caméra à l’application 1. Ouvrez Zosi Smart App, puis connectez-vous et cliquez sur « + » pour ajouter un appareil, veuillez sélectionner Caméra C611. 2. Scannez le code QR de la caméra ou saisissez l'UID manuellement, puis cliquez sur «Confirmer».
  • Seite 20 Note : si l’ajout a échoué, veuillez vérifier les points suivants 1. Vérifiez si la caméra est sous tension. 2. Vérifiez si le mot de passe du WiFi est correct. 3. Confirmez que le réseau est connecté au téléphone mobile et que la caméra peut accéder à...
  • Seite 21 Notes d'installation 1. Veuillez confirmer que la caméra a été ajoutée à l'application avant l'installation. 2. La caméra peut être installée à plat, au plafond ou au mur, il est recommandé de la placer dans un endroit avec un grand angle de vision.
  • Seite 22: Schéma D'installation

    Double-cliquez sur l'icône «AVSS», choisissez la langue et cliquez sur «Log in». Note : il est recommandé de se connecter avec le compte de Zosi Smart App pour éviter plusieurs comptes utilisant. Scannez le code QR ci-dessous pour regarder la vidéo...
  • Seite 23 FAQs 1. Pourquoi je n’arrive pas à ajouter la caméra par recherche locale ? Veuillez vous assurer que la caméra et le téléphone mobile sont connectés sur le même réseau local. Sinon, veuillez saisir l'UID de la caméra manuellement pour ajouter la caméra à l’application. 2.
  • Seite 24 Packliste Bitte überprüfen Sie sich, ob das Produkt in gutem Zustand ist und das Zubehör vollständig ist. Kamera *1 5V/1A Netzteil *1 Lochaufkleber *1 Quick Start Guide Schraubenpackung *1 Reset Nadel *1 Kurzanleitung *1...
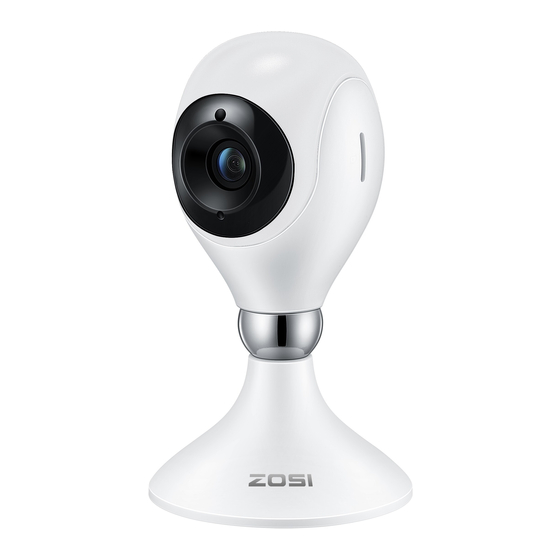
  • Seite 25: Kameraübersicht

    Kameraübersicht Lichtsensor IR LEDs* 10 (Nachtsicht bis 30ft) MicroSD Kartenslot 3.6mm Linse (90 Grad Betrachtungswinkel) Kontrollleuchte Magnetfuß Reset Knopf Mikrofon Lautsprecher Stromanschluss Schalten Sie die Kamera ein Verbinden Sie den USB-Port auf der Rückseite der Kamera mit einem USB Kabel mit dem Stromanschluss. Wenn die Kamera aufleuchtet, bedeutet dies, dass die Stromversorgung eingeschaltet ist.
  • Seite 26: Einloggen Und Registrieren

    ZOSI Android/IOS Geräte hinzufügen 1. Öffnen Sie die Zosi Smart App, melden Sie sich an und klicken Sie auf „+“, um das Gerät hinzuzufügen, wählen Sie C611. 2. Scannen Sie den Geräte-QR-Code oder geben Sie die Geräte-UID manuell ein und klicken Sie dann auf „Bestätigen“.
  • Seite 27 5. Klicken Sie auf „Weiter“, nachdem Sie die Sprachaufforderun- gen „Wireless configuration succeed“>> „Wireless Connecting, please wait“>>„Wireless Connection Succeed“ gehört haben. Klicken Sie im Popup-Fenster auf ,,Bestätigen", klicken Sie auf ,,Fertig" auf der Schnittstelle ,,Erfolgreich hinzufügen". Das Gerät wurde erfolgreich zur APP-Geräteseite hinzugefügt. HINWEIS: Wenn das Gerät nicht hinzugefügt werden kann, überprüfen Sie bitte die folgenden Punkte: 1.
  • Seite 28 Installationshinweise 1. Bitte bestätigen Sie, dass das Gerät vor der Installation zur App hinzugefügt wurde. 2. Die Kamera kann flach, an der Decke oder an der Wand montiert werden. Es wird empfohlen, es an einem Ort mit einem breiten Betrachtungswinkel aufzustellen. Hinweise zur Decken-/Wandmontage 1.Bohren Sie Löcher gemäß...
  • Seite 29: Installationsdiagramm Der Kamera

    Installationsdiagramm der Kamera AVSS Laden Sie Zosi AVSS Client herunter, installieren Sie es und befolgen Sie diese Anleitung, um die Installation abzuschließen. Offizieller Download-Link: https://www.zositech.com/app/, doppelklicken Sie auf das „AVSS“-Symbol, wählen Sie die Sprache und klicken Sie auf Anmelden. Hinweis: Es wird empfohlen, sich mit dem Konto der Zosi Smart App anzumelden, um mehreren Konto zu vermeiden.
  • Seite 30: Häufig Gestellte Fragen

    Häufig gestellte Fragen 1. F:Warum kann ich das Gerät nicht über die lokale Suche hinzufügen? Bitte stellen Sie sicher, dass sich Gerät und Mobiltelefon im selben LAN befinden. Wenn Sie nicht beide im selben LAN einrichten können, geben Sie die Geräte-UID manuell ein, um das Gerät hinzuzufügen.
  • Seite 31: Contenuto Del Pacco

    Contenuto del pacco Si prega di controllare e assicurarsi che il prodotto sia in buone condizioni e che gli accessori siano completi. Telecamera *1 Adattatore di Alimentazione Dima di Montaggio *1 5V/1A *1 Quick Start Guide Confezione di Viti *1 Ago di Reset *1 Guida Rapida all’Uso *1...
  • Seite 32 Schema della struttura della telecamera Sensore CDS 10 LED IR (Visione notturna da 30 piedi) Slot per scheda micro SD Obiettivo da 3,6 mm (Angolo di visione di 90 °) Indicatore Base magnetica Tasto reset Microfono Altoparlante Alimentazione Accendere la telecamera Collegare la telecamera alla presa di corrente tramite cavo USB.
  • Seite 33 ZOSI Android/IOS Aggiungere dispositivi 1. Aprire l’app Zosi Smart, accedere e fare clic su “+” per aggiungere il dispositivo, selezionare C611. 2. Scansionare il codice QR del dispositivo o inserire manualmente l’UID del dispositivo, poi fare clic su “Conferma”.
  • Seite 34 5. Fare clic su “Avanti” dopo aver sentito i messaggi vocali “Wireless configuration succeed”, “Wireless Connecting, please wait”, “Wireless Connection Succeed”, fare clic su “Conferma” nella finestra a comparsa e fare clic su “Fine” nell’interfaccia “Aggiunto riuscito”. NOTA: Se il dispositivo non viene aggiunto con successo, controllare i seguenti punti: 1.
  • Seite 35 Note d’installazione 1. Confermare che il dispositivo è stato aggiunto all’app prima dell’installazione. 2. La telecamera può essere installata in piano, a soffitto o a parete, si consiglia di posizionarla in un luogo con un ampio angolo di visione. Note per montaggio a soffitto/parete 1.
  • Seite 36 Link ufficiale per il download: https://www.zositech.com/app/, fare doppio clic sull’icona “AVSS”, scegliere la lingua e fare clic su “Accedi”. Nota: si consiglia di accedere con l’account di Zosi Smart App per evitare più account utilizzanti. Accesso locale (nessun account e password richiesti) Scansionare il codice QR qui sotto per guardare i video delle operazioni di AVSS.
  • Seite 37: Domande Frequenti

    Domande frequenti 1.D:Perché non riesco ad aggiungere il dispositivo tramite la ricerca locale? R: Assicurarsi che il dispositivo e il cellulare siano nella stessa LAN. Se non riuscire a metterli entrambi nella stessa LAN, inserire manualmente l’UID del dispositivo per aggiungere il dispositivo. 2.D: Perché...
  • Seite 38 Paklijst Controleer of het product in goede staat is en of de accessoires compleet zijn. Camera *1 5V/1A voeding *1 Gat sticker*1 Quick Start Guide Montage schroef tas *1 Reset naald *1 Snelstartgids *1...
  • Seite 39: Camera-Overzicht

    Camera-overzicht Licht sensor IR-leds* 10 (Nachtzicht tot 30ft) MicroSD-kaartsleuf 3,6 mm lens (90 graden kijkhoek) Indicatielampje Magnetische voet Reset knop Microfoon Spreker Stroomaansluiting Zet de camera aan Sluit de USB-poort aan de achterkant van de camera met een USB-kabel aan op de stroomaansluiting. Wanneer de camera oplicht, betekent dit dat de stroom is ingeschakeld.
  • Seite 40 ZOSI Android/IOS Apparaten toevoegen 1. Open de Zosi Smart App, log in en klik op “+” om het apparaat toe te voegen, selecteer C611. 2. Scan de QR-code van het apparaat of voer de UID van het apparaat handmatig in en klik vervolgens op "Bevestigen".
  • Seite 41 OPMERKING: Als het apparaat niet kan worden toegevoegd, controleer dan het volgende: 1. Zorg ervoor dat het apparaat is ingeschakeld. 2. Controleer of het wifi-wachtwoord correct is ingevoerd. 3. Bevestig het netwerk dat is verbonden met de mobiele telefoon en het apparaat heeft normaal toegang tot internet. 4.
  • Seite 42: Installatie-Instructies

    Installatie instructies 1. Bevestig dat het apparaat vóór de installatie aan de app is toegevoegd. 2. De camera kan plat, aan het plafond of aan de muur worden gemonteerd. Het wordt aanbevolen om het op een locatie met een brede kijkhoek te plaatsen. Opmerkingen over plafond- / wandmontage 1.
  • Seite 43 Officiële downloadlink: https://www.zositech.com/app/, dubbelklik op het “AVSS”-picto- gram, selecteer de taal en klik op Aanmelden. Let op: Het wordt aanbevolen om in te loggen met het Zosi Smart App-account om meerdere accounts te vermijden. Lokale login (geen account en wachtwoord vereist) Scan de onderstaande QR-code om de AVSS-bedieningsvideo te bekijken.
  • Seite 44: Veelgestelde Vragen

    Veel Gestelde Vragen 1. V : Waarom kan ik het apparaat niet toevoegen met lokaal zoeken? Zorg ervoor dat het apparaat en de mobiele telefoon zich in hetzelfde LAN bevinden. Als u ze niet allebei op hetzelfde LAN kunt instellen, voert u handmatig de apparaat-UID in om het apparaat toe te voegen.
  • Seite 45 All rights reserved. No part of this publication may be reproduced by any means without written permission from ZOSI. The information in this publication is believed to be accurate in all respects. ZOSI cannot assume responsibility for any consequences resulting from the use thereof.

Inhaltsverzeichnis