Faber PRO TOTAL INOX Gebrauchsanweisung
Inhaltsverzeichnis
Inhaltsverzeichnis

Verwandte Anleitungen für Faber PRO TOTAL INOX

Inhaltszusammenfassung für Faber PRO TOTAL INOX
- Seite 1 PRO TOTAL INOX /PRO DELUXE MANUALE D’USO...
- Seite 2 In questo caso lascia scorrere un pò d’acqua prima di rimuoverla. » La tanica della tua macchina Faber deve essere adeguatamente piena d’acqua, se non lo fai rischi di danneggiare la pompa di erogazione. È importante che il tubo di carico sia immerso nell’acqua.
-
Seite 3: Dichiarazione Di Conformità
BENVENUTO te imputabili al produttore: in particolare non sono coperti dalla Garanzia gli interventi sui difetti dovuti NEL MONDO FABER! ad un uso non idoneo, alla mancata osservanza delle istruzioni per il funzionamento dell’apparecchio, a ri- Il presente libretto ti sarà utile per consentire un parazioni effettuate con ricambi non originali, a ope- corretto funzionamento e un’accurata manutenzione... - Seite 4 PRENDITI CURA La tua Faber presenta perdita di acqua dalla parte superiore del pressacialda? DELLA TUA FABER! » Con le erogazioni il diffusore posto nella parte alta del pressacialda può allentarsi o usurare le sue Segui le nostre indicazioni o guarnizioni: recati presso un Centro di Assistenza.
-
Seite 5: Norme Generali
NORME GENERALI DI SICUREZZA Prima di installare la tua macchina, presta un PERICOLO attimo di attenzione: i simboli seguenti permetteranno di riconoscere ATTENZIONE/PRECAUZIONE le situazioni di pericolo, quelle in cui prendere delle precauzioni per non arrecare danno alla macchina, ti forniranno indicazioni necessarie CONSIGLI UTILI per gestirla al meglio. -
Seite 6: Caratteristiche Tecniche
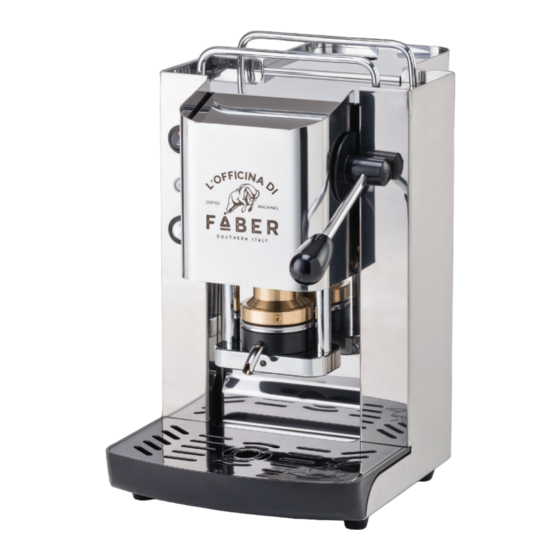
PRO TOTAL INOX /PRO DELUXE CARATTERISTICHE TECNICHE - Telaio in acciaio inox Aisi 410/Verniciato Mat - Vano poggiatazze - Piastra di supporto cromo - Leva cromata - Vaschetta in ABS - Griglia in ABS nera o metallo - Pompa 15 bar... - Seite 7 ISTRUZIONI D’USO 1. Sollevare il coperchio dal vano serbatoio (7) ed estrarre lo stesso 2. Riempire d’acqua non frizzante posizionare il serbatoio all’interno del proprio alloggio facendo attenzione ad inserire il tubicino all’interno fino a circa 1 cm dal fondo 3.
- Seite 8 OPTIONAL VAPOR LANCIA VAPORE CARATTERISTICHE TECNICHE - Telaio in acciaio inox Aisi 410/Verniciato Mat - Vano poggiatazze - Piastra di supporto cromo - Leva cromata - Vaschetta in ABS - Griglia in ABS nera o metallo - Pompa 15 bar - Scambiatore in alluminio - Siluro e pressacialda regolabile in ottone - Resistenza: 500 w...
- Seite 9 LANCIA VAPORE ISTRUZIONI D’USO LANCIA VAPORE 1. Accendere la macchina (tasto A) attendere che la spia luminosa (spia luminosa C - Fig 2) sia spenta, questo segnala che la temperatura per l’erogazione del vapore è stata raggiunta. 2. Inserire il contenitore con il liquido da riscaldare e premere il tasto di erogazione del vapore (tasto B - Fig 2) fino al raggiungimento della temperatura desiderata, quindi premere nuovamente il tasto...
- Seite 10 PRO TOTAL INOX/PRO DELUXE ZODIAC CARATTERISTICHE TECNICHE - Telaio in acciaio inox Aisi 410/Verniciato Mat - Vano poggiatazze - Piastra di supporto cromo - Leva cromata - Vaschetta in ABS - Griglia in ABS nera o metallo - Pompa 15 bar - Dosatore a timer (caffè...
-
Seite 11: Accensione Apparecchio
ACCENSIONE APPARECCHIO Accensione: premere il tasto T1 o T3 oppure contemporaneamente T1 e T3. Spegnimento: Premere contemporaneamente T1 e T3 per 2 secondi. RISCALDAMENTO ACQUA Alla prima accensione è necessario attendere che l’acqua venga riscaldata prima di poter procedere con l’erogazione del caffè. -
Seite 12: Configurazione Sistema
VALORI DURATA EROGAZIONE CAFFÈ Default di fabbrica Programmabile dall’utente T1 - Erogazione caffè corto 24 secondi Minimo 10 sec./Massimo 75 sec. T3 - Erogazione caffè lungo 33 secondi Minimo 10 sec./Massimo 75 sec. La nuova durata viene memorizzata solo se superiore a 10 secondi CONFIGURAZIONE SISTEMA Configurazione preriscaldamentoacqua (attivazione Spina+ T3 - config. - Seite 13 I nostri accessori Gli esclusivi accessori per macchine da caffè in cialde Faber e la nostra selezione di cialde rendono ancora più comoda e piacevole la tua pausa. Tutto a portata di mano su faberitaliasrl.it Portaccessori Filtro addolcitore In plastica, utile a...
-
Seite 14: Garanzia Del Produttore
GARANZIA DEL PRODUTTORE 1) L’apparecchio è garantito dalla OFI srl per un periodo 2) La garanzia copre gli interventi di sostituzione di 24 mesi dalla data in cui il primo utente ne ha fatto o riparazione dovuti a vizi costruttivi o a difetto di acquisto. - Seite 15 GARANZIA DEL PRODUTTORE a circostanze che, comunque, non possono farsi utilizzo ( quali, a titolo esemplicativo, parti asportabili, risalire a difetti di fabbricazione dell’apparecchio. guarnizioni, plastiche, ecc.). Impregiudicati i diritti che l’Utente vanta nei 4) La OFI srl declina ogni responsabilità per eventuali confronti dei Venditori, suo diretto contraente, ai danni che possono, direttamente o indirettamente, sensi della Direttiva 1944/44/CE e del suo decreto...
- Seite 16 In this case, let some water flow before removing it. » Your Faber coffee machine’s tank must be adequately filled with water: if it is not, you risk damaging the delivery pump. It is important that the inlet tube is immersed in water.
-
Seite 17: Declaration Of Conformity
WELCOME correct power supply voltage as well as all other damage that is not objectively attributable to TO THE WORLD OF FABER! the manufacturer: in particular, interventions on This booklet will be useful for you to ensure you defects due to unsuitable use, failure to observe... -
Seite 18: Take Care
TAKE CARE Your Faber is leaking from the top of the pod press? OF YOUR FABER! › The diffuser placed in the upper part of the pod Follow our directions or press can loosen or wear out its gaskets from go to a Service Centre dispensing: go to a Service Centre. -
Seite 19: General Safety
GENERAL SAFETY INSTRUCTIONS Before installing your machine, take a moment DANGER to familiarise yourself with the following: the following symbols will allow you to recognise WARNING/CAUTION dangerous situations, situations where you should take precautions so as not to damage the machine and provide you with the necessary USEFUL TIPS information to manage it in the best possible way. -
Seite 20: Technical Specifications
PRO TOTAL INOX /PRO DELUXE TECHNICAL SPECIFICATIONS - Frame in AISI 410 stainless steel/Matte varnish - Cup tray - Chrome support plate - Chrome lever - ABS tray - Black ABS or metal grille - 15-bar pump - Aluminium exchanger... - Seite 21 OPERATING INSTRUCTIONS 1. Lift the lid off the water tank (7) and remove the tank 2. Fill with still water and place the tank back in its casing, ensuring that the tube is inserted to a depth of approx. 1 cm from the bottom 3.
- Seite 22 OPTIONAL VAPOR STEAM WAND TECHNICAL SPECIFICATIONS - Frame in AISI 410 stainless steel/Matte varnish - Cup tray - Chrome support plate - Chrome lever - ABS tray - Black ABS or metal grille - 15-bar pump - Aluminium exchanger - Brass cartridge and adjustable pod press - Resistance: 500 w - Fixed thermoregulator 95°/145°...
- Seite 23 STEAM WAND STEAM WAND OPERATING INSTRUCTIONS 1. Turn on the machine (button A) and wait for the indicator light (indicator light C – Fig. 2) to turn off: this indicates that the machine has reached the necessary temperature to dispense steam. 2.
- Seite 24 PRO TOTAL INOX/PRO DELUXE ZODIAC CARATTERISTICHE TECNICHE - Frame in AISI 410 stainless steel/Matte varnish - Cup tray - Chrome support plate - Chrome lever - ABS tray - Black ABS or metal grille - 15-bar pump - Timed dispenser (long/short coffee)
-
Seite 25: Water Heating
ACCENSIONE APPARECCHIO Switching on appliance: Press the T1 or T3 button or T1 and T3 simultaneously to turn on the device. Press T1 and T3 simultaneously for 2 seconds to turn off the device. WATER HEATING The first time it is switched on, it is necessary to wait for the water to be heated before being able to proceed with coffee brewing. - Seite 26 VALUES DURATION COFFEE BREWING Factory Default Programmable by user T1 - Brewing short coffee 24 seconds Minimum 10 sec./Maximum 75 sec. T3 - Brewing long coffee 33 seconds Minimum 10 sec./Maximum 75 sec. The new duration is saved only if superior to 10 seconds. CONFIGURATION SYSTEM Configuration water preheating (Plug + T3 activation - T1 T3 ICO1 ICO3 config.) Insert the plug into the socket while pressing the key T3...
- Seite 27 Our accessories The exclusive optional for coffee pod machine Faber and our coffee pod selection make your coffee break more than comfortable. Everything at your fingertips on www.faberitaliasrl.it Faber Accessory Water softner holder cleaner In plastic useful for It contains a special...
- Seite 28 Compliments pour avoir acheté votre des mesures afin de ne causer pas de dommages à la machine à café FABER! machine, et vous donneront les indications nécéssaires afin d’exploiter au mieux votre machine.
-
Seite 29: Caractéristiques Téchniques
PRO TOTAL INOX /PRO DELUXE Machine à café à dosette, compacte avec un design à la mode. Lignes sobres, proportions équilibrées, parfaite pour la maison et pour le bureau. CARACTÉRISTIQUES TÉCHNIQUES - Cadre en acier / acier peint mat - Façade en Inox - Échangeur en aluminium avec torpille en laiton... - Seite 30 INSTRUCTIONS POUR L’UTILISATION 1. Soulever le couvercle du réservoir (7) et l’extraire. 2. Remplir avec eau non minérale positionner le réservoir dans son logement en prêtant attention à insérer le petit tube à l’intérieur jusqu’à environ 1cm du fond. 3. Insérer la fiche dans la prise de courant et positionner l’interrupteur (1) sur ON-Lumière allumée.
- Seite 31 INSTRUCTIONS POUR L’UTILISATION DE LA LANCE VAPEUR 1. Positionner l’interrupteur (A) sur ON-Lumière allumée 2. Attendre la coupure du témoin de température (B) 3. Positionner le briquette, insérer la lance vapeur et actionner l’interrupteur de refoulement (C) 4. Quand on est arrivé au niveau de refoulement de la vapeur désiré, désactiver l’interrupteur de refoulement (C).
-
Seite 32: Declaración De Conformidad
Felicitaciones por la compra de su la máquina, proporcionando la información necesaria máquina de café FABER! para tratar mejor su máquina. Este manual le será útil para asegurar un correcto funcionamiento y operación de su... -
Seite 33: Características Técnicas
PRO TOTAL INOX /PRO DELUXE Cafetera de diseño compacto y elegante. Líneas sobrias, proporciones equilibradas, es perfecta tanto para el hogar y como para la oficina. CARACTERÍSTICAS TÉCNICAS - Estrucura de acero/ mat de acero pintado - Frente en Inox - Intercambiador de calor de aluminio con porta- filtro de latón... - Seite 34 INSTRUCCIONES DE USO 1. Levante la tapa del compartimiento del tanque (7) y saque el deposito. 2. Llene el depósito de agua natural (sin gas) coloque el depósito en su alojamiento asegurándose de insertar el tubo interior hasta al menos 1 cm de la parte inferior. 3.
- Seite 35 INSTRUCCIONES DE USO DE LA LANZA DE VAPOR 1. Presionar del interruptor en la posición ON - luz encendida 2. Esperar a que el piloto de temperatura (B) está apagado 3. Coloque la jarra, inserte la boquilla de vapor y hacer funcionar el interruptor de erogación (C) 4.
-
Seite 36: Konformitätserklärung
Herzlichen Glückwünsch für den bestimmte Massnahmen zu treffen, um die Maschine nicht zu beschädigen. Die o.g. Symbole werden Sie Einkauf Ihrer Kaffeemaschine FABER! Ihnen auch die notwendigen Hinweise angeben, um Ihre Maschine am besten zu verwenden. Diese Gebracuchsanweisungen sind nützlich für ein korrektes Funktionieren und eine sorgfältige... -
Seite 37: Erste Installation
PRO TOTAL INOX /PRO DELUXE Kaffeemaschine mit Kapseln, kompakt mit einem modische Design. Sachlicher Stil, ausgeglichene Proportionen, einwandfrei für beide Haus und Büro. Technische Eigenschaften - Rahmen aus Edelstahl / lackiertem Stahl - Vorne in Inox - Aluminiumaustauscher mit Messingrohr - Messingkapselpresse - Fester Temperaturregler 95°/98°... - Seite 38 GEBRAUCHSANWEISUNGEN 1. Den Behälterdeckel (7) aufheben und ihn herausziehen. 2. Mit stillem Wasser ausfüllen. Den Behälter in sein Gehäuse stellen. Vorsicht: stecken Sie bitte das kleine Rohr in den Inneren bis ca. 1cm aus dem Boden ein. 3. Den Stecker in eine Steckdose einstecken Den Schalter (1) auf ON-Licht ein-legen.
- Seite 39 GEBRAUCHSANWEISUNGEN FÜR DIE VERWENDUNG DER DAMPFDÜSE 1. Den Schalter A auf ON-Licht ein- legen 2. Warten, bis wann die Temperaturanzeigelampe B zu ist 3. Das Kännchen stellen, die Dampfdüse einstecken und den Versorgungsschalter C betätigen 4.Wenn das gewünschte Dampfversorgungsniveau erreicht wird, den Versorgungsschalter C zu machen.
- Seite 48 OFI srl Viale Melvin Jones 8, 81100 Caserta info@lofficinadifaber.com www.faberitaliasrl.it...