Herunterladen Inhalt Inhalt Diese Seite drucken
PNI CT25PW Benutzerhandbuch
Vorschau ausblenden Andere Handbücher für CT25PW:

Werbung

Verfügbare Sprachen
  • DE

Verfügbare Sprachen

  • DEUTSCH, seite 23
PNI CT25PW
Smart thermostat / Intelligenter Thermostat
Termostato inteligente / Thermostat intelligent
Intelligens termosztát / Termostato intelligente
Slimme thermostaat / Inteligentny termostat
Termostat inteligent incastrabil

Werbung

Inhaltsverzeichnis
loading

Inhaltszusammenfassung für PNI CT25PW

  • Seite 1 PNI CT25PW Smart thermostat / Intelligenter Thermostat Termostato inteligente / Thermostat intelligent Intelligens termosztát / Termostato intelligente Slimme thermostaat / Inteligentny termostat Termostat inteligent incastrabil...
  • Seite 2 User manual ........3 Benutzerhandbuch ......22 Manual de usuario ......43 Manuel utilisateur ......64 HU Használati utasítás ......85 Manuale utente ....... 106 Handleiding ........127 Instrukcja obsługi ......148 RO Manual de utilizare ......169...
  • Seite 3 Introduction PNI CT25PW is a programmable built-in thermostat for underfloor heating with water, which turns the heating system on and off depending on the set temperature. You can set different temperatures for different time periods and days. The thermostat can work and display the temperature in 3...
  • Seite 4: Special Warnings

    Special warnings As the product must be connected to a 230V mains supply and to a heating equipment, the installation must be performed only by qualified personnel, in order to avoid irreparable damage to the product or to the heating equipment to which it is connected, defects which are not subject to warranty.
  • Seite 5: Technical Specifications

    Technical specifications • Power supply: 230V • Maximum load: 16A • Temperature range that can be set: 5°C ~ 35°C • Displayed temperature range: 0 ~ +50°C • Sensor: NTC 10K • Temperature measurement accuracy: ± 0.1°C • Temperature setting step: ± 0.5°C •...
  • Seite 6: Product Description

    Product description Day of the week WiFi signal level Hour Over-heating Open window protection detection No external sensor alarm Child protection active Current period (keys locked) On/Off Settings Down...
  • Seite 7 Connecting the thermostat to the WiFi network and adding it to the Tuya Smart application Note: Make sure you have your mobile phone connected to the 2.4GHz WiFi network and the GPS location enabled. For a quick setup, make sure the phone and thermostat are as close to each other as possible (1-3 m).
  • Seite 8 1. Connect your phone to the WiFi network. 2. Download the app Tuya Smart. Android 3. Open the application, create an account and log in. 4. Add the thermostat to the application by pressing the + icon in the upper right corner of the screen or by pressing the Add device button (this button shows only when you do not have any devices added to the application).
  • Seite 9 8. In the next interface, select the option EZ Mode from the upper right corner. 9. Long press the key from the thermostat to enter the pairing mode. Then, press the key ˄. The icon will blink on the screen. 10.
  • Seite 11: Setting The Thermostat

    Setting the thermostat Set the time and the day of the week Long press the key for about 5 seconds. The minutes icon will flash on the screen. Press the keys ˄ and ˅ to reach the desired value. Short press the key to confirm.
  • Seite 12 Scheduled mode 1. After setting the time and day of the week, will enter programming mode periods each week. It starts with setting the first day of the week and the first period. 2. The start time* and temperature* will flash on the screen in turn.
  • Seite 13 Default settings Period Hour Temp. Hour Temp. 12345 07:00 22°C 08:30 19°C (M-F) 6 (S) 08:00 22°C 08:30 22°C 7 (S) 08:00 22°C 08:30 22°C Period Hour Temp. Hour Temp. 12345 17:00 22°C 17:00 19°C (M-F) 6 (S) 17:00 22°C 22:00 19°C 7 (S)
  • Seite 14: Manual Mode

    Manual mode Shortly press the key to set the Manual operation mode. Only the time, day of the week and temperature will be displayed on the screen. Press the keys ˄ and ˅ to set the desired temperature. The heating system will turn on and off to keep this temperature for 24 hours.
  • Seite 15 Functions Keylock function If Child Protection has been activated in the advanced settings menu (see page 16), the thermostat keys will lock as soon as the screen backlight turns off. Long press the key ˄ and ˅ for about 5 seconds to temporarily unlock the keys.
  • Seite 16 Advanced settings Switch off the thermostat by briefly pressing the key and ˄ simultaneously for about 6 seconds. Press the keys Use the keys ˄ and ˅ to change the settings and the key to move to the next setting. Menu Description Range...
  • Seite 17 Antifreeze 5°C~15°C 5°C temperature External sensor -8°C~8°C 0°C calibration Display floor Read only temperature Floor temperature 20°C~80°C 32°C overheating limit Hysteresis 0.2°C~6°C 0.3°C Child protection 0: Keys unlocked 1: Keys locked Open window 1: On detection (OWD) 0: Off * - Menus 07 and 08 appear only if option 2 (Air and floor sensor) has been selected in menu 04.
  • Seite 18 The time interval in 2~30 min. 15 min. which the sudden drop in temperature is detected Degrees lost in the 2°C 2°C time interval set at 3°C menu 13 4°C The time after which 10~60 min 30 min. the device returns to its original mode of operation Reset...
  • Seite 19: Connection Diagrams

    Connection diagrams...
  • Seite 20: Installation Instructions

    Installation instructions Note: Install the thermostat at eye level. Before installing the thermostat, carefully read the instructions in this manual. The thermostat was designed to be recessed and requires a dose (minimum depth 35mm) with side mounting screws.
  • Seite 21 Simplified EU declaration of conformity SC ONLINESHOP SRL declares that the PNI CT25PW flush-mounted smart thermostat is in accordance with the RED Directive 2014/53/EU. The full text of the EU Declaration of Conformity is available at the following internet address : https://www.mypni.eu/products/8018/download/...
  • Seite 22 Intelligenter Thermostat PNI CT25PW Benutzerhandbuch...
  • Seite 23: Einführung

    Einführung PNI CT25PW ist ein programmierbarer eingebauter Thermostat für die Fußbodenheizung mit Wasser, der das Heizsystem je nach eingestellter Temperatur ein- und ausschaltet. Sie können unterschiedliche Temperaturen für unterschiedliche Zeiträume und Tage einstellen. Der Thermostat kann auf drei Arten arbeiten und die...
  • Seite 24: Besondere Warnungen

    Besondere Warnungen Da das Produkt an eine 230-V-Netzversorgung und an ein Heizgerät angeschlossen werden muss, darf die Installation nur von qualifiziertem Personal durchgeführt werden, um irreparable Schäden am Produkt oder an dem Heizgerät, an das es angeschlossen ist, zu vermeiden Keine Garantie. Für die erste Konfiguration des Thermostats empfehlen wir Ihnen, einen Spezialisten anzurufen.
  • Seite 25: Technische Spezifikationen

    Technische Spezifikationen • Stromversorgung: 230V • Maximale Belastung: 16A • Temperaturbereich einstellbar: 5°C ~ 35°C. • Angezeigter Temperaturbereich: 0 ~ + 50°C. • Sensor: NTC 10K • Genauigkeit der Temperaturmessung: ± 0,1°C. • Temperatureinstellschritt: ± 0,5°C. • Wasserbeständigkeit: IP30 • Gehäuse: ABS mit Brandschutznorm UL94-5...
  • Seite 26: Produktbeschreibung

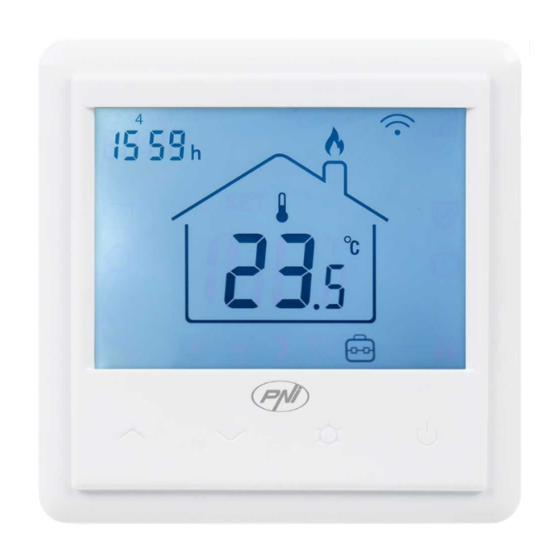
    Produktbeschreibung Wochentag WiFi-Signalpegel Stunde Überhitzungsschutz Fenstererkennung öffnen Kein externer Sensor Derzeitige Kinderschutz aktiv Periode (Schlüssel gesperrt) Oben On/Off die Einstellungen Nieder...
  • Seite 27 Anschließen des Thermostats an das WiFi- Netzwerk und Hinzufügen zur Tuya Smart- Anwendung Hinweis: Stellen Sie sicher, dass Ihr Mobiltelefon mit dem 2,4-GHz-WLAN-Netzwerk verbunden und der GPS-Standort aktiviert ist. Stellen Sie für eine schnelle Einrichtung sicher, dass Telefon und Thermostat so nahe wie möglich beieinander liegen (1-3 m).
  • Seite 28 1. Verbinden Sie Ihr Telefon mit dem WiFi-Netzwerk. 2. Laden Sie die App herunter Tuya Smart. Android 3. Öffnen Sie die Anwendung, erstellen Sie ein Konto und melden Sie sich an. 4. Fügen Sie den Thermostat zur Anwendung hinzu, indem Sie auf das Symbol + in der oberen rechten Ecke des Bildschirms klicken oder auf die Schaltfläche Add device klicken (diese Schaltfläche wird nur angezeigt, wenn der...
  • Seite 29 Thermostat (Wi-Fi). 7. Wählen Sie das WiFi-Netzwerk aus, zu dem Sie eine Verbindung herstellen möchten, und fügen Sie das Kennwort hinzu. Klicken Next. 8. Wählen Sie in der nächsten Oberfläche die Option EZ Mode in der oberen rechten Ecke. 9. Drücken Sie lange die Taste vom Thermostat, um in den Pairing-Modus zu gelangen.
  • Seite 31: Einstellen Des Arbeitsmodus

    Thermostat einstellen Stellen Sie die Uhrzeit und den Wochentag ein Drücken Sie lange die Taste für ca. 5 Sekunden. Das Minuten-Symbol blinkt auf dem Bildschirm. Drücken Sie die Tasten ˄ und ˅ um den gewünschten Wert zu erreichen. Drücken Sie kurz die Taste bestätigen.
  • Seite 32 Geplanter Modus 1. Nachdem Sie die Uhrzeit und den Wochentag eingestellt haben, rufen Sie den Programmiermodus der 4 Perioden für jeden Wochentag auf. 2. Es beginnt mit der Einstellung des ersten Wochentags und der ersten Periode. 3. Die Startzeit * und die Temperatur * blinken nacheinander auf dem Bildschirm.
  • Seite 33 Standardeinstellungen Zeitraum Stunde Temp. Stunde Temp. 12345 07:00 22°C 08:30 19°C (Mo-Fr) 6 (S) 08:00 22°C 08:30 22°C 7 (S) 08:00 22°C 08:30 22°C Zeitraum Stunde Temp. Stunde Temp. 12345 17:00 22°C 17:00 19°C (Mo-Fr) 6 (S) 17:00 22°C 22:00 19°C 7 (S) 17:00...
  • Seite 34: Manueller Modus

    Manueller Modus Drücken Sie kurz die Taste um den manuellen Betriebsmodus einzustellen. Auf dem Bildschirm werden nur Uhrzeit, Wochentag und Temperatur angezeigt. Drücken Sie die Tasten ˄ und ˅ um die gewünschte Temperatur einzustellen. Das Heizsystem wird ein- und ausgeschaltet, um diese Temperatur 24 Stunden lang zu halten.
  • Seite 35 Funktionen Tastensperrfunktion Wenn im erweiterten Einstellungsmenü (siehe Seite 36) der Kinderschutz aktiviert wurde, werden die Thermostat- Tasten gesperrt, sobald die Hintergrundbeleuchtung des Bildschirms ausgeschaltet wird. Drücken Sie lange die Taste ˄ und ˅ für ca. 5 Sekunden, um die Schlüssel zu entsperren. Fenstererkennungsfunktion öffnen (OWD) Wenn die Funktion über das Menü...
  • Seite 36: Erweiterte Einstellungen

    Betriebsmodus zurück. Das Symbol verschwindet vom Bildschirm. Durch Drücken einer beliebigen Taste verlassen Sie den OWD-Modus. Erweiterte Einstellungen Schalten Sie den Thermostat durch kurzes Drücken der Taste aus und ˄ gleichzeitig für ca. 6 Drücken Sie die Tasten Sekunden. Verwenden Sie die Tasten ˄ und ˅ to Ändern Sie die Einstellungen und den Schlüssel um zur nächsten Einstellung zu gelangen.
  • Seite 37 Einstellen der 5°C ~35°C 35°C maximalen Temperaturgrenze Einstellen der 5°C ~35°C 5°C minimalen Temperaturgrenze Sensorauswahl 0: Luft 1: Fußboden 2: Luft &Fußboden Frostschutz- 5°C~15°C 5°C temperaturen Externe -8°C~8°C 0°C Sensorkalibrierung Bodentemperatur Schreib- anzeigen geschützt...
  • Seite 38 Überhitzungsgrenze 20°C~80°C 32°C für Bodentemperatur Hysteresis 0.2°C~6°C 0.3°C Kinderschutz 0: Off 1: On Fenstererkennung 1: On öffnen (OWD) 0: Off Das Zeitintervall, in 2~30 min. 15 min. dem der plötzliche Temperaturabfall erkannt wird Gradverlust in dem in 2°C 2°C Menü 13 eingestellten 3°C Zeitintervall 4°C...
  • Seite 39 Die Zeit, nach der 10~60 min 30 min. das Gerät in seinen ursprünglichen Betriebsmodus zurückkehrt Reset 0: Nien 1: Ja. Drücken für 5 s. Warten Sie, bis das Gerät neu gestartet wurde. Softwareversion * - Die Menüs 07 und 08 werden nur angezeigt, wenn in Menü...
  • Seite 40 Anschlusspläne...
  • Seite 41 Installationsanleitung Hinweis: Installieren Sie den Thermostat auf Augenhöhe. Lesen Sie vor der Installation des Thermostats die Anweisungen in diesem Handbuch sorgfältig durch. Der Thermostat wurde für die Aussparung entwickelt und erfordert eine Dosis (Mindesttiefe 35 mm) mit seitlichen Befestigungsschrauben.
  • Seite 42 Vereinfachte EU-Konformitätserklärung SC ONLINESHOP SRL erklärt, dass der Unterputz- Smart-Thermostat PNI CT25PW der ROTEN Richtlinie 2014/53/EU entspricht. Der vollständige Text EU-Konformitätserklärung unter folgender Internetadresse verfügbar: https://www.mypni.eu/products/8018/download/ certifications...
  • Seite 43 Termostato inteligente PNI CT25PW Manual de usuario...
  • Seite 44 Introducción PNI CT25PW es un termostato integrado programable para suelo radiante con agua, que enciende y apaga el sistema de calefacción en función de la temperatura programada. Puede establecer diferentes temperaturas para diferentes períodos de tiempo y días. El termostato puede funcionar y mostrar la temperatura de 3 formas: - según el sensor de suelo...
  • Seite 45: Advertencias Especiales

    Advertencias especiales Dado que el producto debe estar conectado a una red eléctrica de 230V y a un equipo de calefacción, la instalación debe ser realizada únicamente por personal calificado, con el fin de evitar daños irreparables en el producto o en el equipo de calefacción al que está conectado, defectos que son no sujeto a garantía.
  • Seite 46: Especificaciones Técnicas

    Especificaciones técnicas • Fuente de alimentación: 230 V • Carga máxima: 16A • Rango de temperatura que se puede configurar: 5°C ~ 35°C • Rango de temperatura mostrado: 0 ~ + 50°C • Sensor: NTC 10K • Precisión de la medición de temperatura: ± 0,1°C •...
  • Seite 47: Descripción Del Producto

    Descripción del Producto Día de la semana Nivel de señal WiFi Hora Protección contra Detección de sobrecalentamiento ventana abierta Sin sensor externo Protección infantil Período actual activa (llaves bloqueadas) Hasta On/Off Configuraciones Abajo...
  • Seite 48 Conectar el termostato a la red WiFi y agregarlo a la aplicación Tuya Smart Nota: asegúrese de tener su teléfono móvil conectado a la red WiFi de 2.4GHz y la ubicación GPS habilitada. Para una configuración rápida, asegúrese de que el teléfono y el termostato estén lo más cerca posible el uno del otro (1-3 m).
  • Seite 49 1. Conecte su teléfono a la red WiFi. 2. Descarga la aplicación Tuya Smart. Android 3. Abra la aplicación, cree una cuenta e inicie sesión. 4. Agregue el termostato a la aplicación presionando el ícono + en la esquina superior derecha de la pantalla o presionando el botón Add device (este botón se muestra solo cuando no tiene ningún dispositivo agregado a la aplicación).
  • Seite 50 agregue la contraseña. Click Next. 8. En la siguiente interfaz, seleccione la opción EZ Mode en la esquina superior derecha. 9. Mantenga presionada la tecla del termostato para ingresar al modo de emparejamiento. Luego, presione la tecla ˄. El icono parpadeará...
  • Seite 52: Ajuste Del Termostato

    Ajuste del termostato Establecer la hora y el día de la semana Mantenga presionada la tecla durante unos 5 segundos. El icono de minutos parpadeará en la pantalla. Pulse las teclas ˄ y ˅ para alcanzar el valor deseado. Presione brevemente la tecla para confirmar.
  • Seite 53: Modo Programado

    Modo programado 1. Después de configurar la hora y el día de la semana, ingresará al modo de programación de los 4 períodos para cada día de la semana. 2. Comienza configurando el primer día de la semana y el primer período.
  • Seite 54 Configuración por defecto Período Hora Temp. Hora Temp. 12345 07:00 22°C 08:30 19°C (L-V) 6 (S) 08:00 22°C 08:30 22°C 7 (D) 08:00 22°C 08:30 22°C Período Hora Temp. Hora Temp. 12345 17:00 22°C 17:00 19°C (L-V) 6 (S) 17:00 22°C 22:00 19°C...
  • Seite 55: Modo Manual

    Modo manual Presione brevemente la tecla para configurar el modo de funcionamiento manual. En la pantalla solo se mostrarán la hora, el día de la semana y la temperatura. Presione las teclas ˄ y ˅ para configurar la temperatura deseada. El sistema de calefacción se encenderá y apagará para mantener esta temperatura durante 24 horas.
  • Seite 56 Funciones Función de bloqueo de teclas Si se ha activado Protección infantil en el menú de configuración avanzada (consulte la página 57), las teclas del termostato se bloquearán tan pronto como se apague la luz de fondo de la pantalla. Mantenga presionada la tecla ˄ y ˅ durante unos 5 segundos para desbloquear las llaves.
  • Seite 57 Ajustes avanzados Apague el termostato presionando brevemente la tecla y ˄ durante unos 6 Presione simultáneamente las teclas segundos. Usa las teclas ˄ y ˅ para cambiar la configuración y la tecla para pasar a la siguiente configuración. Menu Descripción Intervalo Default Calibración del sensor...
  • Seite 58 Selección de sensor 0: Aire 1: Suelo 2: Aire &Suelo Temperatura 5°C~15°C 5°C anticongelante Calibración de sensor -8°C~8°C 0°C externo Muestra la Solo lectura temperatura del suelo Límite de 20°C~80°C 32°C sobrecalentamiento de la temperatura del suelo Hysteresis 0.2°C~6°C 0.3°C Protección infantil 0: Off 1: On...
  • Seite 59 Detección de ventana 1: On abierta (OWD) 0: Off El intervalo de tiempo 2~30 min. 15 min. en el que se detecta la caída repentina de temperatura. Grados perdidos en el 2°C 2°C intervalo de tiempo 3°C establecido en el 4°C menú...
  • Seite 60 Reset 0: No 1: Si. Prensa durante 5 s. Espere a que el dispositivo se reinicie. Versión del software...
  • Seite 61: Diagramas De Conexión

    Diagramas de conexión...
  • Seite 62 Instrucciones de instalación Nota: Instale el termostato a la altura de los ojos. Antes de instalar el termostato, lea atentamente las instrucciones de este manual. El termostato fue diseñado para empotrarse y requiere una dosis (profundidad mínima de 35 mm) con tornillos de montaje laterales.
  • Seite 63 Declaración de conformidad de la UE simplificada SC ONLINESHOP SRL declara que el termostato inteligente empotrado PNI CT25PW cumple con la Directiva RED 2014/53/EU. El texto completo de la Declaración de conformidad de la UE está disponible en la siguiente dirección de Internet: https://www.mypni.eu/products/8018/download/...
  • Seite 64 Thermostat intelligent PNI CT25PW Manuel d’utilisation...
  • Seite 65 Introduction PNI CT25PW est un thermostat intégré programmable pour chauffage par le sol avec eau, qui allume et éteint le système de chauffage en fonction de la température réglée. Vous pouvez régler différentes températures pour différentes périodes et jours. Le thermostat peut fonctionner et afficher la température de 3 façons:...
  • Seite 66: Caractéristiques Principales

    Mises en garde spéciales Le produit devant être raccordé à une alimentation secteur 230V et à un équipement de chauffage, l’installation doit être réalisée uniquement par du personnel qualifié, afin d’éviter des dommages irréparables au produit ou à l’équipement de chauffage auquel il est connecté, des défauts qui sont non soumis à...
  • Seite 67: Spécifications Techniques

    Spécifications techniques • Alimentation: 230V • Charge maximale: 16A • Plage de température réglable: 5°C ~ 35°C • Plage de température affichée: 0 ~ + 50°C • Capteur: NTC 10K • Précision de la mesure de la température: ± 0,1°C •...
  • Seite 68: Description Du Produit

    Description du produit Jour de la semaine Niveau du signal WiFi Heure Protection contre Détection de la surchauffe fenêtre ouverte Pas de capteur externe Protection de Période actuelle l'enfance active (clés verrouillées) Haut On/Off Réglages...
  • Seite 69 Connecter le thermostat au réseau WiFi et l’ajouter à l’application Tuya Smart Remarque: assurez-vous que votre téléphone mobile est connecté au réseau WiFi 2,4 GHz et que la localisation GPS est activée. Pour une configuration rapide, assurez-vous que le téléphone et le thermostat sont aussi proches que possible (1 à 3 m).
  • Seite 70 1. Connectez votre téléphone au réseau WiFi. 2. Téléchargez l’application Tuya Smart. Android 3. Ouvrez l’application, créez un compte et connectez-vous. 4. Ajoutez le thermostat à l’application en appuyant sur l’icône + dans le coin supérieur droit de l’écran ou en appuyant sur le bouton Add device (ce bouton s’affiche uniquement lorsque vous n’avez aucun appareil ajouté...
  • Seite 71 connecter et ajoutez le mot de passe. Cliquez sur Next. 8. Dans l’interface suivante, sélectionnez l’option EZ Mode dans le coin supérieur droit. 9. Appuyez longuement sur la touche du thermostat pour accéder au mode de couplage. Ensuite, appuyez sur la touche ˄.
  • Seite 73: Réglage Du Thermostat

    Réglage du thermostat Réglez l’heure et le jour de la semaine Appuyez longuement sur la touche pendant environ 5 secondes. L’icône des minutes clignotera sur l’écran. Appuyez sur les touches ˄ et ˅ pour atteindre la valeur souhaitée. Appuyez brièvement sur la touche pour confirmer.
  • Seite 74: Mode Programmé

    Réglage du mode de travail Appuyez brièvement sur la touche pour basculer entre le mode Eco (vacances), programmé ou manuel. Mode programmé 1. Après avoir réglé l’heure et le jour de la semaine, vous entrerez dans le mode de programmation des 4 périodes pour chaque jour de la semaine.
  • Seite 75 chaque jour de la semaine (1 - 7). * Remarque: l’heure peut être modifiée d’un quart à un quart d’heure et la température d’un demi-degré à un demi-degré. Par exemple, vous pouvez régler l’heure sur 07:15 ou 07:30 ou 07:45 et la température sur 22,0°C ou 22,5°C ou 23,0°C .
  • Seite 76: Mode Manuel

    Période Heure Temp. Heure Temp. 12345 17:00 22°C 17:00 19°C (L-V) 6 (S) 17:00 22°C 22:00 19°C 7 (D) 17:00 22°C 22:00 19°C Mode manuel Appuyez brièvement sur la touche to régler le mode de fonctionnement manuel. Seuls l’heure, le jour de la semaine et la température seront affichés à...
  • Seite 77 Mode éco (vacances) Appuyez brièvement sur la touche pour régler le mode de fonctionnement Eco. Une icône de valise apparaîtra à l’écran. Appuyez sur les touches ˄ et ˅ pour régler la température souhaitée. Les fonctions Fonction de verrouillage des touches Si la protection enfant a été...
  • Seite 78: Advanced Settings

    Fonction de détection de fenêtre ouverte Si la fonction a été activée à partir du menu des réglages avancés (voir page 78), le thermostat éteindra le chauffage si la température ambiante baisse brusquement (réglage par défaut de 2°C en 15 minutes). Cette baisse soudaine de température se produit lorsqu’une fenêtre ou une porte est ouverte alors que le système de chauffage fonctionne.
  • Seite 79 Menu Description Intervalle Default Calibrage du capteur -8°C~8°C 0°C interne Réglage de la limite 5°C ~35°C 35°C de température maximale Réglage de la limite de 5°C ~35°C 5°C température minimale Sélection du capteur 0: Air 1 Plancher 2: Air et plancher Température antigel 5°C~15°C...
  • Seite 80 Afficher la Lecture température du sol seulement Limite de surchauffe 20°C~80°C 32°C de la température du sol Hysteresis 0.2°C~6°C 0.3°C Protection de 0: Off l’enfance 1: On Détection de fenêtre 1: On ouverte (OWD) 0: Off L’intervalle de 2~30 min. 15 min.
  • Seite 81 Degrés perdus dans 2°C 2°C l’intervalle de temps 3°C défini au menu 13 4°C Le temps après 10~60 min 30 min. lequel l’appareil revient à son mode de fonctionnement d’origine Reset 0: No 1: Oui. Appuyer pendant 5 s. Attendez l’appareil redémarre.
  • Seite 82: Schémas De Connexion

    Schémas de connexion...
  • Seite 83 Instructions d’installation Noter: Installez le thermostat au niveau des yeux. Avant d’installer le thermostat, lisez attentivement les instructions de ce manuel. Le thermostat a été conçu pour être encastré et nécessite une dose (profondeur minimum 35 mm) avec des vis de montage latérales.
  • Seite 84 Déclaration de conformité UE simplifiée SC ONLINESHOP SRL déclare que le thermostat intelligent encastré PNI CT25PW est conforme à la directive RED 2014/53/EU. Le texte complet de la déclaration de conformité UE est disponible à l’adresse Internet suivante: https://www.mypni.eu/products/8018/download/ certifications...
  • Seite 85 Intelligens termosztát PNI CT25PW Használati utasítás...
  • Seite 86 Bevezetés A PNI CT25PW egy programozható beépített termosztát vízzel történő padlófűtéshez, amely a fűtési rendszert a beállított hőmérséklettől függően ki- és bekapcsolja. Különböző hőmérsékleteket állíthat különböző időszakokra és napokra. A termosztát 3 módon képes működni és megjeleníteni a hőmérsékletet: - a padlóérzékelő szerint - a beépített légérzékelő...
  • Seite 87 Különleges figyelmeztetések Mivel a terméket 230 V-os hálózatra és fűtőberendezésre kell csatlakoztatni, a felszerelést csak képzett személyzet végezheti annak elkerülése érdekében, hogy a termék vagy a fűtőberendezés, amelyhez csatlakozik, helyrehozhatatlan károkat, hibákat észleljen nem vonatkozik garancia. A termosztát első konfigurálásához javasoljuk, hogy hívjon szakembert.
  • Seite 88: Műszaki Adatok

    Műszaki adatok • Tápellátás: 230V • Maximális terhelés: 16A • Beállítható hőmérsékleti tartomány: 5°C ~ 35°C • Megjelenített hőmérsékleti tartomány: 0 ~ + 50°C • Érzékelő: NTC 10K • A hőmérséklet mérési pontossága: ± 0,1°C • Hőmérséklet-beállítási lépés: ± 0,5°C •...
  • Seite 89: Termékleírás

    Termékleírás A hét napja WiFi jelszint Óra Túlmelegedés Nyitott ablak elleni védelem észlelése Nincs külső érzékelő A gyermekvédelem Jelenlegi időszak aktív (kulcsok zárva) On/Off Beállítások...
  • Seite 90 A termosztát csatlakoztatása a WiFi hálózathoz és hozzáadása a Tuya Smart alkalmazáshoz Megjegyzés: Győződjön meg arról, hogy mobiltelefonja csatlakozik a 2,4 GHz-es WiFi hálózathoz, és engedélyezve van a GPS helymeghatározás. A gyors beállítás érdekében győződjön meg arról, hogy a telefon és a termosztát a lehető legközelebb van egymáshoz (1-3 m).
  • Seite 91 1. Csatlakoztassa telefonját a WiFi hálózathoz. 2. Töltse le az alkalmazást Tuya Smart. Android 3. Nyissa meg az alkalmazást, hozzon létre egy fiókot és jelentkezzen be. 4. Adja hozzá a termosztátot az alkalmazáshoz a képernyő jobb felső sarkában található + ikon megnyomásával vagy az Add device gomb megnyomásával (ez a gomb csak akkor jelenik meg, ha még nincs hozzáadva eszköz az alkalmazáshoz).
  • Seite 92 7. Válassza ki a csatlakozni kívánt WiFi hálózatot, és adja meg a jelszót. Kattintson a gombra Next. 8. A következő felületen válassza a jobb felső sarokban az EZ Mode lehetőséget. 9. Hosszan nyomja meg a gombot a termosztátból a párosítás módba való belépéshez. Ezután nyomja meg a gombot ˄.
  • Seite 94 A termosztát beállítása Állítsa be az időt és a hét napját Hosszan nyomja meg a gombot körülbelül 5 másodpercig. A perc ikon villogni kezd a képernyőn. Nyomja meg a gombokat ˄ és ˅ hogy elérje a kívánt értéket. Röviden nyomja meg a gombot a megerősítéshez.
  • Seite 95 Ütemezett mód 1. A hét időpontjának és napjának beállítása után belép a 4 periódus programozási módjába a hét perceken napjára. A hét első napjának és az első időszaknak a beállításával kezdődik. 2. A kezdési idő* és a hőmérséklet* felváltva villog a képernyőn.
  • Seite 96 Alapbeállítások Időszak Óra Hőfok Óra Hőfok 12345 07:00 22°C 08:30 19°C (H-P) 6 (V) 08:00 22°C 08:30 22°C 7 (S) 08:00 22°C 08:30 22°C Időszak Óra Hőfok Óra Hőfok 12345 17:00 22°C 17:00 19°C (H-P) 6 (V) 17:00 22°C 22:00 19°C 7 (S) 17:00...
  • Seite 97 Manuális mód Röviden nyomja meg a gombot a kézi üzemmód beállításához. Csak az idő, a hét napja és a hőmérséklet jelenik meg a képernyőn. Nyomja meg a gombokat ˄ és ˅ a kívánt hőmérséklet beállításához. A fűtési rendszer be- és kikapcsol, hogy ezt a hőmérsékletet 24 órán keresztül tartsa.
  • Seite 98 Funkciók Billentyűzár funkció Speciális beállítások menüben aktiválta Gyermekvédelmet (lásd: 99. oldal), a termosztát gombjai azonnal lezáródnak, apercek a képernyő háttérvilágítása kialszik. Hosszan nyomja meg a gombot ˄ és ˅ fvagy körülbelül 5 másodpercig a billentyűk feloldásához. Nyitott ablak észlelési funkció (OWD) Ha a funkciót a speciális beállítások menüben aktiválták (lásd: 99.
  • Seite 99 További beállítások Kapcsolja ki a termosztátot a gomb rövid megnyomásával és ˄ egyidejűleg körülbelül 6 Nyomja meg a gombokat másodpercig. Használja a gombokat ˄ és ˅ a beállítások megváltoztatásához, és a gomb a következő beállításhoz lépéshez. Menu Leírás Intervallum Default Belső...
  • Seite 100 Az érzékelő 0: Levegő kiválasztása 1: Padlón 2: Levegő &padlón Fagyálló hőmérséklet 5°C~15°C 5°C Külső érzékelő -8°C~8°C 0°C kalibrálása Kijelzi a padló Csak hőmérsékletét olvasható A padló 20°C~80°C 32°C hőmérsékletének túlmelegedési határa Hysteresis 0.2°C~6°C 0.3°C Gyermekvédelem 0: Off 1: On Nyitott ablak 1: On észlelése (OWD)
  • Seite 101 Az az időintervallum, 2~30 percek 15 amelyben a hirtelen percek hőmérséklet- csökkenést észlelik A 13. menüben 2°C 2°C beállított 3°C időintervallumban 4°C elvesztett fokok Az az idő, amely után 10~60 a készülék visszatér percek percek eredeti működési módjához...
  • Seite 102 Reset 0: Nem 1: Igen. Nyomja meg mert 5 s. Várja meg, amíg az eszköz újraindul. Szoftver verzió * - A 07-es és 08-as menük csak akkor jelennek meg, ha a 2-es opciót (Levegő- és padlóérzékelő) választották a 04-es menüben.
  • Seite 103 Csatlakozási diagramok...
  • Seite 104: Telepítési Útmutató

    Telepítési útmutató Jegyzet: Helyezze a termosztátot szemmagasságba. A termosztát felszerelése előtt figyelmesen olvassa el a kézikönyv utasításait. A termosztátot süllyesztésre tervezték, és adagot igényel (percekmum mélység 35 mm) oldalsó rögzítőcsavarokkal.
  • Seite 105 Egyszerűsített EU-megfelelőségi nyilatkozat Az SC ONLINESHOP SRL kijelenti, hogy a PNI CT25PW süllyesztett intelligens termosztát megfelel a 2014/53/EU RED irányelvnek. Az EU-megfelelőségi nyilatkozat teljes szövege a következő internetes címen érhető el: https://www.mypni.eu/products/8018/download/ certifications...
  • Seite 106 Termostato intelligente PNI CT25PW Manuale d’uso...
  • Seite 107 Introduzione PNI CT25PW è un termostato da incasso programmabile per i sistemi di riscaldamento con aqua, che avvia ed arresta il sistema di riscaldamento a seconda della temperatura impostata. Può impostare temperature diverse per diversi periodi orari e diversi giorni della settimana.
  • Seite 108: Avvertenze Speciali

    Avvertenze speciali Poiché il prodotto deve essere collegato ad una rete di alimentazione 230V e ad un impianto di riscaldamento, l’installazione deve essere eseguita solo da personale qualificato, al fine di evitare danni irreparabili al prodotto o all’apparecchio di riscaldamento a cui è collegato. Per la configurazione iniziale del termostato, si consiglia di operare con personale qualificato ed esperto sul campo.
  • Seite 109: Specifiche Tecniche

    Specifiche tecniche • Alimentazione: 230V • Carico massimo: 16A • Intervallo di temperatura impostabile: 5°C ~ 35°C • Intervallo di temperatura visualizzata: 0 ~ 50°C • Sensore: NTC 10K • Precisione di misurazione della temperatura: ±0.1°C • Passo impostazione temperatura: ±0.5°C •...
  • Seite 110: Descrizione Del Prodotto

    Descrizione del prodotto Giorno della settimana Livello segnale WiFi Protezione Rilevamento sovrariscaldamento finestra aperta Mancanza sensore esterno Protezione bambini Periodo corrente (tast bloccati) Avvio/Arresto Impostazioni...
  • Seite 111 Connessione termostato alla rete WiFi e aggiunta nella app mobile Tuya Smart Nota: assicurarsi che il suo telefono cellulare sia connesso alla rete WiFi a 2,4 GHz e che la posizione GPS sia abilitata. Per una configurazione rapida, assicurarsi che il telefono e il termostato siano il più...
  • Seite 112 1. Connettere il telefono alla rete WiFi. 2. Scaricare la app mobile Tuya Smart. Android 3. Aprire la app, creare conto ed accedere. 4. Aggiungere il termostato nella app premendo l’icona + dall’angolo in alto a destra dello schermo o premendo Add device (questo pulsante viene visualizzato solo quando non sono presenti altri dispositivi all’applicazione).
  • Seite 113 8. Nell’interfaccia seguente, selezionare l’opzione EZ Mode nell’angolo in alto a destra. 9. Premere a lungo il tasto sul termostato per accedere la modalità di abbinamento. Quindi, premere il tasto ˄. L’icona lampeggerà sullo schermo. 10. Quindi spunta l’opzione Confirm the indicator is blinking rapidly.
  • Seite 115 Impostare il termostato Impostazione ora e giorno della settimana Tenere premuto il tasto per 5 secondi. Sullo schermo lampeggerà l’indicatore dei minuti. Premere i tasti ˄ e ˅ per raggiungere il valore desiderato. Premere brevemente il tasto per confermare. L’indicatore dell’ora lampeggerà. Premere i tasti ˄...
  • Seite 116 Modalità programmata 1. Dopo aver impostato l’ora e il giorno della settimana, accederà la modalità di programmazione dei quattro periodi per ogni gorno della settimana. 2. Inizia con l’impostazione del primo giorno della settimana e del primo periodo. 3. L’ora di inizio* e la temperatura* lampeggeranno sullo schermo.
  • Seite 117 Impostazioni predefinite Periodo Temp. Temp. 12345 07:00 22°C 08:30 19°C (L-V) 6 (S) 08:00 22°C 08:30 22°C 7 (D) 08:00 22°C 08:30 22°C Periodo Temp. Temp. 12345 17:00 22°C 17:00 19°C (L-V) 6 (S) 17:00 22°C 22:00 19°C 7 (D) 17:00 22°C 22:00...
  • Seite 118: Modalità Manuale

    Modalità manuale Premere brevemente il tasto per impostare la modalità di funzionamento Manuale. Sullo schermo sarà visualizzata solo l’ora, il giorno della settimana e la temperatura. Premere i tasti ˄ e ˅ per impostare la temperatura desiderata. Il sistema di riscaldamento si avvierà e si spegnerà per mantenere questa temperatura per 24 ore.
  • Seite 119 Funzioni Blocco tasti Se la funzione Protezione bambini è stata attivata nel menu delle ipostazioni anvanzate (vedi pagina 120), i tasti del termostato si bloccheranno non appena la retroilluminazione dello schermo si spegne. Premere il tasto ˄ e ˅ per 5 secondi per sbloccare temporaneamente i tasti.
  • Seite 120: Impostazioni Avanzate

    iniziale dopo 30 minuti. icona scompare dallo schermo. Premendo un tasto qualsiasi uscirà dalla modalità OWD. Impostazioni avanzate Spegnere il termostato premendo brevemente il tasto e ˄ per circa 6 Premere contemporaneamente i tasti secondi. Usare i tasti ˄ e ˅ per cambiare le impostazioni ed il tasto per passare all’impostazione successiva.
  • Seite 121 Impostazione del 5°C ~35°C 5°C limite minimo di temperatura Selezione sensore 0: Aria 1: Pavimento 2: Aria e Pavimento Temperatura 5°C~15°C 5°C antigelo Taratura sensore -8°C~8°C 0°C esterno Visualizza la Solo temperatura del visualiz- pavimento zazione Limite 20°C~80°C 32°C surriscaldamento temp.
  • Seite 122 Histerezis 0.2°C~6°C 0.3°C Protezione bambini 0: Tasti sbloccati 1: Tasti bloccati Rilevamento finestra 1: attivo aperta (OWD) 0: inattivo L’intervallo di tempo 2~30 min. 15 min. in cui viene rilevato il calo improvviso della temperatura Gradi persi 2°C 2°C nell’intervallo di 3°C tempo impostato al 4°C...
  • Seite 123 Il tempo dopo il 10~60 min 30 min. quale il dispositivo torna alla modalità di funzionamento originale Reset 0: No 1: Si. Premere il tasto 5 secondi. Attendere il riavvio del termostato. Versione software * - I menu 07 e 08 compaiono solo se nel menu 04 è stata selezionata l’opzione 2 (Sensore aria e pavimento).
  • Seite 124 Diagrama connessioni...
  • Seite 125: Istruzioni Di Installazione

    Istruzioni di installazione Note: Installa il termostato al livello degli occhi. Prima di installare il termostato, leggere attentamente le istruzioni di questo manuale. Il termostato è stato progettato per essere ad incasso e necessita di una dose interrata (profondità minima 35mm) con viti di fissaggio laterali.
  • Seite 126 Dichiarazione di conformità UE semplificata SC ONLINESHOP SRL dichiara che il termostato intelligente da incasso PNI CT25PW è conforme alla Direttiva RED 2014/53/UE. Il testo completo della Dichiarazione di conformità UE è disponibile sul seguente sito Web: https://www.mypni.eu/products/8018/download/ certifications...
  • Seite 127 Slimme thermostaat PNI CT25PW Handleiding...
  • Seite 128 Invoering PNI CT25PW is een programmeerbare ingebouwde thermostaat voor vloerverwarming met water, die het verwarmingssysteem in- en uitschakelt afhankelijk van de ingestelde temperatuur. U kunt verschillende temperaturen instellen voor verschillende tijdsperioden en dagen. De thermostaat kan werken en de temperatuur op 3...
  • Seite 129: Belangrijkste Kenmerken

    Speciale waarschuwingen Aangezien het product moet worden aangesloten op een 230V-netvoeding en op verwarmingsapparatuur, mag de installatie alleen worden uitgevoerd door gekwalificeerd personeel, om onherstelbare schade aan het product of aan de verwarmingsapparatuur waarop het is aangesloten, te voorkomen. valt niet onder de garantie. Voor de eerste configuratie van de thermostaat raden we u aan een specialist te bellen.
  • Seite 130: Technische Specificaties

    Technische specificaties • Stroomvoorziening: 230V • Maximale belasting: 16A • In te stellen temperatuurbereik: 5°C ~ 35°C • Weergegeven temperatuurbereik: 0 ~ + 50°C • Voeler: NTC 10K • Nauwkeurigheid temperatuurmeting: ± 0,1°C • Instelstap temperatuur: ± 0,5°C • Waterbestendigheid: IP30 •...
  • Seite 131: Productomschrijving

    Productomschrijving Dag van de week WiFi-signaalniveau Bescherming Open raam tegen oververhitting detectie Geen externe sensor Kinderbescherming Huidige periode actief (sleutels vergrendeld) On/Off Instellingen Omlaag...
  • Seite 132 De thermostaat verbinden met het wifi-netwerk en deze toevoegen aan de Tuya Smart-applicatie Opmerking: zorg ervoor dat uw mobiele telefoon is verbonden met het 2,4 GHz WiFi-netwerk en dat de GPS-locatie is ingeschakeld. Voor een snelle installatie zorgt u ervoor dat de telefoon en de thermostaat zo dicht mogelijk bij elkaar staan (1-3 m).
  • Seite 133 1. Verbind je telefoon met het wifi-netwerk . 2. Download de app Tuya Smart. Android 3. Open de applicatie, maak een account aan en log in. 4. Voeg de thermostaat toe aan de applicatie door op het + -pictogram in de rechterbovenhoek van het scherm te drukken of door op de knop Add device te drukken (deze knop wordt alleen weergegeven als er geen apparaten aan de applicatie zijn toegevoegd) .
  • Seite 134 maken en voeg het wachtwoord toe. Klik Next. 8. Selecteer de optie in de volgende interface EZ Mode vanuit de rechterbovenhoek. 9. Druk lang op de toets van de thermostaat om de koppelingsmodus te openen. Druk vervolgens op de toets ˄.
  • Seite 136: De Thermostaat Instellen

    De thermostaat instellen Stel de tijd en de dag van de week in Druk lang op de toets ongeveer 5 seconden ingedrukt. Het minutenpictogram knippert op het scherm. Druk op de toetsen ˄ en ˅ om de gewenste waarde te bereiken. Druk kort op de toets bevestigen.
  • Seite 137 Geplande modus 1. Na het instellen van de tijd en de dag van de week, komt u in de programmeermodus van de 4 periodes voor elke dag van de week. 2. Het begint met het instellen van de eerste dag van de week en de eerste periode.
  • Seite 138 Standaard instellingen Periode Temp. Temp. 12345 07:00 22°C 08:30 19°C (M-F) 6 (S) 08:00 22°C 08:30 22°C 7 (S) 08:00 22°C 08:30 22°C Periode Temp. Temp. 12345 17:00 22°C 17:00 19°C (M-F) 6 (S) 17:00 22°C 22:00 19°C 7 (S) 17:00 22°C 22:00...
  • Seite 139: Handmatige Modus

    Handmatige modus Druk kort op de toets om de handmatige bedieningsmodus in te stellen. Alleen de tijd, dag van de week en temperatuur worden op het scherm weergegeven. Druk op de toetsen ˄ en ˅ om de gewenste temperatuur in te stellen. Het verwarmingssysteem wordt in- en uitgeschakeld om deze temperatuur 24 uur vast te houden.
  • Seite 140 Functies Keylock-functie Als kinderbeveiliging is geactiveerd in het menu geavanceerde instellingen (zie pagina 141), worden de thermostaattoetsen vergrendeld zodra de achtergrondverlichting van het scherm uitgaat. Druk lang op de toets ˄ en ˅ ongeveer 5 seconden ingedrukt om de toetsen te ontgrendelen. Open raam detectie functie (OWD) Als de functie is geactiveerd vanuit het geavanceerde instellingenmenu (zie pagina 141), zal de thermostaat...
  • Seite 141: Geavanceerde Instellingen

    bedrijfsmodus. Het icoon verdwijnt van het scherm. Door op een willekeurige toets te drukken, verlaat u de OWD-modus. Geavanceerde instellingen Schakel de thermostaat uit door kort op de toets te drukken aennd ˄ gelijktijdig ongeveer 6 Druk op de toetsen seconden ingedrukt.
  • Seite 142 Instellen van 5°C ~35°C 35°C de maximale temperatuurgrens Instellen van 5°C ~35°C 5°C de minimum temperatuurgrens Sensor selectie 0: Lucht 1:Verdieping 2: Lucht& Verdieping Antivries temperatuur 5°C~15°C 5°C Kalibratie externe -8°C~8°C 0°C sensor Vloertemperatuur Alleen lezen weergeven Oververhittingslimiet 20°C~80°C 32°C vloertemperatuur...
  • Seite 143 Hysteresis 0.2°C~6°C 0.3°C Kinderbescherming 0: Off 1: On Open raam detectie 1: On (OWD) 0: Off Het tijdsinterval 2~30 min. 15 min. waarin de plotselinge temperatuurdaling wordt gedetecteerd Verloren graden in 2°C 2°C het tijdsinterval dat is 3°C ingesteld in menu 13 4°C De tijd waarna 10~60 min...
  • Seite 144 Reset 0: No 1: Ja. Druk gedurende 5s. Wacht tot het apparaat opnieuw is opgestart. Software versie * - Menu’s 07 en 08 verschijnen alleen als optie 2 (Lucht- en vloersensor) is geselecteerd in menu 04.
  • Seite 145 Aansluitschema’s...
  • Seite 146: Installatie-Instructies

    Installatie instructies Notitie: Installeer de thermostaat op ooghoogte. Lees de instructies in deze handleiding zorgvuldig door voordat u de thermostaat installeert. De thermostaat is ontworpen om verzonken te worden en vereist een dosis (minimale diepte 35 mm) met zijmontageschroeven.
  • Seite 147 Vereenvoudigde EU-conformiteitsverklaring SC ONLINESHOP SRL verklaart dat de slimme inbouwthermostaat PNI CT25PW in overeenstemming is met de RED-richtlijn 2014/53/EU. De volledige tekst van de EU-conformiteitsverklaring is beschikbaar op het volgende internetadres: https://www.mypni.eu/products/8018/download/ certifications...
  • Seite 148 Inteligentny termostat PNI CT25PW Instrukcja obsługi...
  • Seite 149 Wprowadzenie PNI CT25PW to programowalny, wbudowany termostat do ogrzewania podłogowego wodą, który włącza i wyłącza instalację grzewczą w zależności od zadanej temperatury. Możesz ustawić różne temperatury dla różnych okresów czasu i dni. Termostat może pracować i wyświetlać temperaturę na 3 sposoby: - zgodnie z czujnikiem podłogowym...
  • Seite 150 Specjalne ostrzeżenia Ponieważ produkt musi być podłączony do sieci zasilającej 230 V oraz do urządzenia grzewczego, instalacja musi być wykonywana wyłącznie przez wykwalifikowany personel, aby uniknąć nieodwracalnego uszkodzenia produktu lub sprzętu grzewczego, do którego jest podłączony, wad, które są nie podlega gwarancji. W przypadku pierwszej konfiguracji termostatu zalecamy skontaktowanie się...
  • Seite 151: Specyfikacja Techniczna

    Specyfikacja techniczna • Zasilanie: 230V • Maksymalne obciążenie: 16A • Zakres temperatur, który można ustawić: 5°C ~ 35°C • Wyświetlany zakres temperatur: 0 ~ + 50°C • Czujnik: NTC 10 K. • Dokładność pomiaru temperatury: ± 0,1°C • Krok ustawienia temperatury: ± 0,5°C •...
  • Seite 152: Opis Produktu

    Opis produktu Dzień tygodnia Poziom sygnału WiFi Godzina Ochrona Wykrywanie przed przegrzaniem otwartego okna Brak czujnika zewnętrznego Ochrona dziecka Obecny okres aktywna (klucze zablokowane) W górę On/Off Ustawienia Na dół...
  • Seite 153 Podłączenie termostatu do sieci WiFi i dodanie go do aplikacji Tuya Smart Uwaga: upewnij się, że masz telefon komórkowy podłączony do sieci WiFi 2,4 GHz i włączoną lokalizację GPS. W celu szybkiej konfiguracji upewnij się, że telefon i termostat znajdują się jak najbliżej siebie (1-3 m).
  • Seite 154 1. Podłącz telefon do sieci Wi-Fi. 2. Pobierz aplikację Tuya Smart. Android 3. Otwórz aplikację, utwórz konto i zaloguj się. 4. Dodaj termostat do aplikacji naciskając ikonę + w prawym górnym rogu ekranu lub naciskając przycisk Add device (ten przycisk pojawia się tylko wtedy, gdy nie masz dodanych żadnych urządzeń...
  • Seite 155 8. W następnym interfejsie wybierz opcję EZ Mode z prawego górnego rogu. 9. Długo naciśnij klawisz z termostatu, aby przejść do trybu parowania. Następnie naciśnij klawisz ˄. Ikona zacznie migać na ekranie. 10. Następnie zaznacz opcję Confirm the indicator is blinking rapidly.
  • Seite 157: Ustawianie Termostatu

    Ustawianie termostatu Ustaw godzinę i dzień tygodnia Długo naciśnij klawisz przez około 5 sekund. Ikona minut zacznie migać na ekranie. Naciśnij klawisze ˄ i ˅ aby osiągnąć żądaną wartość. Krótko naciśnij klawisz potwierdzać. Na ekranie zacznie migać wskaźnik godzin. Naciśnij klawisze ˄...
  • Seite 158 Tryb zaplanowany 1. Po ustawieniu godziny i dnia tygodnia przejdziesz do trybu programowania 4 okresów dla każdego dnia tygodnia. 2. Rozpoczyna się ustawieniem pierwszego dnia tygodnia i pierwszego okresu. 3. Czas rozpoczęcia* i temperatura* będą migać kolejno na ekranie. Za każdym naciśnięciem klawisza wybrana wartość...
  • Seite 159 Ustawienia domyślne Kropka Godzina Temp. Godzina Temp. 12345 07:00 22°C 08:30 19°C (Pn-Pt) 6 (Sob) 08:00 22°C 08:30 22°C 7 (Niedz) 08:00 22°C 08:30 22°C Kropka Godzina Temp. Godzina Temp. 12345 17:00 22°C 17:00 19°C (Pn-Pt) 6 (Sob) 17:00 22°C 22:00 19°C 7 (Niedz)
  • Seite 160: Tryb Ręczny

    Tryb ręczny Krótko naciśnij klawisz aby ustawić tryb pracy ręcznej. Na ekranie zostanie wyświetlona tylko godzina, dzień tygodnia i temperatura. Naciśnij klawisze ˄ i ˅ ustawić żądaną temperaturę. System ogrzewania włącza się i wyłącza, aby utrzymać tę temperaturę przez 24 godziny. Tryb Eco (wakacje) Krótko naciśnij klawisz aby ustawić...
  • Seite 161 Funkcje Funkcja Keylock Jeśli w menu ustawień zaawansowanych została aktywowana ochrona przed dziećmi (patrz strona 162), przyciski termostatu zostaną zablokowane, gdy tylko wyłączy się podświetlenie ekranu. Długo naciśnij klawisz ˄ i ˅ przez około 5 sekund, aby odblokować klucze. Funkcja wykrywania otwartego okna (OWD) Jeśli funkcja została aktywowana z menu ustawień...
  • Seite 162: Zaawansowane Ustawienia

    Naciśnięcie dowolnego klawisza spowoduje wyjście z trybu OWD . Zaawansowane ustawienia Wyłączyć termostat przez krótkie naciśnięcie klawisza i ˄ jednocześnie przez około 6 sekund. Naciśnij klawisze Użyj kluczy ˄ i ˅ aby zmienić ustawienia i klawisz przejść do następnego ustawienia. Menu Opis Interwał...
  • Seite 163 Ustawianie 5°C ~35°C 5°C minimalnego ograniczenia temperatury Wybór czujnika 0: Powietrze 1: Podłoga 2: Powietrze &Podłoga Temperatura przeciw- 5°C~15°C 5°C zamrożeniowa Kalibracja czujnika -8°C~8°C 0°C zewnętrznego Wyświetl temperaturę Tylko czytać podłogi Limit przegrzania 20°C~80°C 32°C temperatury podłogi Hysteresis 0.2°C~6°C 0.3°C...
  • Seite 164 Ochrona dziecka 0: Off 1: On Wykrywanie 1: On otwartego okna 0: Off (OWD) Przedział czasu, w 2~30 min. 15 min. którym wykrywany jest nagły spadek temperatury Stopnie utracone w 2°C 2°C przedziale czasowym 3°C ustawionym w menu 4°C Czas, po którym 10~60 min 30 min.
  • Seite 165 Reset 0: Nie 1: Tak. Naciśnij przez 5 sekund. Poczekaj, aż urządzenie uruchomi się ponownie. Wersja oprogramowania * - Menu 07 i 08 pojawiają się tylko wtedy, gdy wybrano opcję 2 (czujnik powietrza i podłogi) w menu 04.
  • Seite 166: Schematy Połączeń

    Schematy połączeń...
  • Seite 167: Instrukcje Instalacji

    Instrukcje Instalacji Uwaga: Zainstaluj termostat na wysokości oczu. Przed zainstalowaniem termostatu należy uważnie przeczytać instrukcje zawarte w niniejszej instrukcji. Termostat został zaprojektowany do wbudowania i wymaga dozowania (minimalna głębokość 35 mm) z bocznymi śrubami montażowymi.
  • Seite 168 Uproszczona deklaracja zgodności UE SC ONLINESHOP SRL oświadcza, że inteligentny termostat podtynkowy PNI CT25PW jest zgodny z dyrektywą RED 2014/53/UE. Pełny tekst deklaracji zgodności UE jest dostępny pod następującym adresem internetowym: https://www.mypni.eu/products/8018/download/ certifications...
  • Seite 169 Termostat inteligent PNI CT25PW Manual de utilizare...
  • Seite 170 Introducere PNI CT25PW este un termostat incastrat programabil pentru incalzire in pardoseala cu agent termic, care porneste si opreste sistemul de incalzire in functie de nivelul de temperatura setat. Puteti seta temperaturi diferite pentru perioade orare si zile diferite. Termostatul poate functiona si afisa temperatura in 3...
  • Seite 171 Atentionari speciale Deoarece produsul trebuie conectat la o retea de alimentare cu energie electrica 230V si la un echipament de incalzire, instalarea trebuie efectuata doar de personal calificat, pentru a evita defectarea iremediabila a produsului sau a echipamentului de incalzire la care se conecteaza, defecte care nu fac obiectul garantiei.
  • Seite 172: Specificatii Tehnice

    Specificatii tehnice • Alimentare: 230V • Sarcina maxima: 16A • Interval de temperatura ce poate fi setata: 5°C ~ 35°C • Interval de temperatura afisata: 0 ~ 50°C • Senzor: NTC 10K • Precizie masurare temperatura: ±0.1°C • Pas setare temperatura: ±0.5°C •...
  • Seite 173: Descriere Produs

    Descriere produs Ziua saptamanii Nivel semnal WiFi Protectie Detectie fereastra supra-incalzire deschisa Eroare lipsa sensor extern Protectie copii activa Perioada curenta (taste blocate) Pornire/Oprire Setari...
  • Seite 174 Conectare termostat la reteaua WiFi si adaugare in aplicatia Tuya Smart Nota: Asigurati-va ca aveti telefonul mobil conectat la reteaua WiFi 2.4GHz si locatia GPS activata. Pentru o configurare rapida, asigurati-va ca telefonul si termostatul se afla cat mai aproape unul de celalalt (1-3 m). ATENTIE: Asigurati-va ca aveti disponibila o retea wireless pe frecventa 2.4 Ghz si ca ati conectat telefonul la aceasta.
  • Seite 175 1. Conectati telefonul la reteaua WiFi. 2. Descarcati aplicatia Tuya Smart. Android 3. Deschideti aplicatia, creati-va cont si autentificati-va. 4. Adaugati termostatul in aplicatie apasand pictograma + din coltul dreapta sus al ecranului sau apasand butonul Add device (acest buton apare doar atunci cand nu aveti nici un dispozitiv adaugat in aplicatie).
  • Seite 176 8. In interfata urmatoare, selectati din coltul dreapta sus optiunea EZ Mode. 9. Apasati lung tasta de pe termostat pentru a intra in modul de imperechere. Apoi, apasati tasta ˄. Pictograma va clipi pe ecran. 10. Apoi bifati in aplicatie Confirm the indicator is blinking rapidly.
  • Seite 178 Programare termostat Setare ora si zi din saptamana Tineti apasata tasta timp de 5 secunde. Pe ecran va clipi indicatorul minutelor. Apasati tastele ˄ si ˅ pentru a ajunge la valoarea dorita. Apasati scurt tasta pentru a confirma. Indicatorul orei va clipi. Apasati tastele ˄ si ˅ pentru a ajunge la valoarea dorita.
  • Seite 179 Modul programat 1. Dupa ce ati setat ora si ziua saptamanii, veti intra in modul de programare a celor 4 perioade pentru fiecare zi a saptamanii. 2. Se incepe cu setarea primei zile a saptamanii si a primei perioade. 3. Pe ecran vor clipi pe rand ora de start* si temperatura*. La fiecare apasare a tastei va fi confirmata valoarea aleasa si se va trece la setarea urmatoare.
  • Seite 180 Setari implicite Perioada Temp. Temp. 12345 07:00 22°C 08:30 19°C (L-V) 6 (S) 08:00 22°C 08:30 22°C 7 (D) 08:00 22°C 08:30 22°C Perioada Temp. Temp. 12345 17:00 22°C 17:00 19°C (L-V) 6 (S) 17:00 22°C 22:00 19°C 7 (D) 17:00 22°C 22:00...
  • Seite 181 Modul Manual Apasati scurt tasta pentru a seta modul de functionare Manual. Pe ecran va fi afisata doar ora, ziua saptamanii si temperatura. Apasati tastele ˄ si ˅ pentru a seta temperatura dorita. Sistemul de incalzire va porni si se va opri pentru a mentine aceasta temperatura pe durata a 24 de ore.
  • Seite 182 Functii Blocare taste Daca functia Protectie copii a fost activata din meniul de setari avansate (vezi pagina 183), tastele termostatului se vor bloca imediat ce lumina de fundal a ecranului se va stinge. Apasati tasta ˄ si ˅ timp de 5 secunde pentru a debloca temporar tastele.
  • Seite 183 Setari avansate Opriti termostatul apasand scurt tasta si ˄ timp de aproximativ 6 Apasati simultan tastele secunde. Folositi tastele ˄ si ˅ pentru a schimba setarile si tasta pentru a trece la urmatoarea setare. Meniu Descriere Interval Implicit Calibrare -8°C~8°C 0°C senzor intern Setare limita maxima...
  • Seite 184 Selectare senzor 0: Aer 1: Pardoseala 2: Aer si Pardoseala Temperatura 5°C~15°C 5°C anti-inghet Calibrare -8°C~8°C 0°C senzor extern Afisare temperatura Doar afisare pardoseala Limita supraincalzire 20°C~80°C 32°C temperatura pardoseala Histerezis 0.2°C~6°C 0.3°C...
  • Seite 185 Protectie copii 0: Taste deblocate 1: taste blocate Detectie fereastra 1: activa deschisa (OWD) 0: inactiva Intervalul de timp in 2~30 min. 15 min. care se detecteaza scaderea brusca a temperaturii Grade pierdute in 2°C 2°C intervalul de timp 3°C setat la punctul 13 4°C Intervalul de timp...
  • Seite 186 Resetare 0: Nu 1: Da. Apasati tasta timp de 5 secunde. Asteptati repornirea termost. Versiune software * - Meniurile 07 si 08 apar doar daca la meniul 04 a fost selectata optiunea 2 (Senzor aer si pardoseala).
  • Seite 187 Diagrama conexiuni...
  • Seite 188 Instructiuni de instalare Note: Instalati termostatul la nivelul ochilor. Inainte de instalarea termostatului, cititi cu atentie instructiunile din acest manual. Termostatul a fost conceput pentru a fi montat incastrat si necesita o doza ingropata (profunzime minima 35mm) cu suruburi de prindere laterale.
  • Seite 189 Declaratie UE de conformitate simplificata SC ONLINESHOP SRL declara ca Termostat inteligent incastrabil CT25PW este conformitate cu Directiva RED 2014/53/UE. Textul integral al declaratiei UE de conformitate este disponibil la urmatoarea adresa de internet: https://www.mypni.eu/products/8018/download/ certifications...

Inhaltsverzeichnis