Inhaltsverzeichnis
Werbung
Verfügbare Sprachen
Verfügbare Sprachen
Quicklinks
Thermostatic head/Thermostatkopf/ Cabezal
termostático/ Tête thermostatique/ Termosztatikus
fej/ Testa termostatica/ Thermostatische kop/ Głowica
termostatyczna/Cap termostatic inteligent
EN
User manual .........................................................
DE
Benutzerhandbuch ..............................................
ES
Manual de usuario ...............................................
FR
Manuel utilisateur ...............................................
HU
Használati utasítás ..............................................
IT
Manuale utente ..................................................
NL
Handleiding ........................................................
PL
Instrukcja obsługi ...............................................
RO
Manual de utilizare .............................................
PNI CT25T
2
14
27
40
53
66
79
92
105
Werbung
Inhaltsverzeichnis

Verwandte Anleitungen für PNI CT25T


Inhaltszusammenfassung für PNI CT25T
-
Seite 1: Inhaltsverzeichnis
PNI CT25T Thermostatic head/Thermostatkopf/ Cabezal termostático/ Tête thermostatique/ Termosztatikus fej/ Testa termostatica/ Thermostatische kop/ Głowica termostatyczna/Cap termostatic inteligent User manual ............Benutzerhandbuch ..........Manual de usuario ..........Manuel utilisateur ..........Használati utasítás ..........Manuale utente ..........Handleiding ............Instrukcja obsługi .......... -
Seite 2: Product Presentation
Product presentation PNI CT25T is a thermostat that measures the air temperature and regulates according to this the water flow inside the radiator. This thermostat does not control the heating boiler. Install a thermostatic head on each radiator and set the desired temperature for each room. How... -
Seite 3: Main Features
Main features • Backlit screen • Universal thread M30 x 1.5 • 5 keys for device setting • PID circuit control • Schedule per day (7 days), 4 periods per day • The screen displays the room temperature, the set temperature, the day of the week and the time •... -
Seite 4: Battery Installation
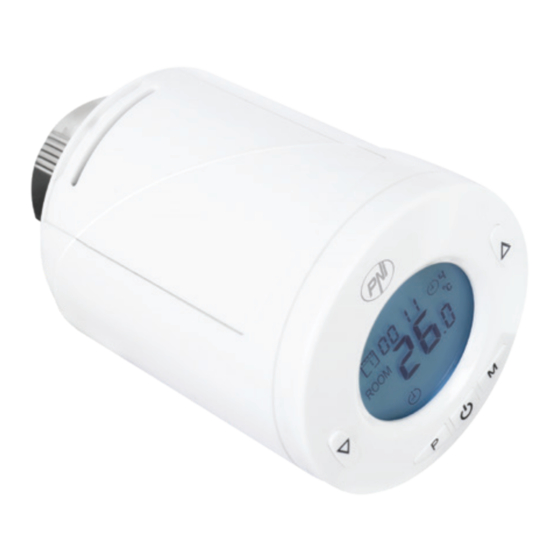
Control Dimensions Ø 55 x 69 mm Description of screen icons Low battery indicator Open window Signal indicator Time and day of (when paired with a hub) Current period the week Manual mode Child protection Scheduled mode Eco (holiday) mode Battery installation •... - Seite 5 Install thermostatic head on the radiator’s valve by screwing on the M30 adapter or using one of the included adapters. Note: PNI CT25T can only be mounted on thermostatic valves. It does not work with classic radiator valves.
- Seite 6 Included adapters Device initialization 1. After installing the batteries, IN IL will appear on the screen, which indicates the initialization of the device. 2. When Ad AP appears on the screen, press ▲ to switch from 0 to 1 (the thermostatic head will automatically adapt to the closed-open state of the valve).
-
Seite 7: Key Lock Function
time will be displayed on the screen. The minute indicator will flash. Press the key ▲ or ▼ until you reach the desired value (00 - 60). Short press the key P to confirm. • Then the hour indicator will flash. Press the key ▲ or ▼... - Seite 8 Schedule by day 1. Long press the key P. 2. After setting the time and day of the week, you will enter the programming mode of the 4 periods for each day of the week. 3. It starts with setting the first day of the week (day 1) and the first period (period 1) 4.
- Seite 9 Default settings Period Hour Temp. Hour Temp. 12345 07:00 22°C 08:30 19°C (M-F) 6 (S) 08:00 22°C 08:30 22°C 7 (S) 08:00 22°C 08:30 22°C Period Hour Temp. Hour Temp. 12345 17:00 22°C 17:00 19°C (M-F) 6 (S) 17:00 22°C 22:00 19°C 7 (S)
-
Seite 10: Setting Parameters
open window icon appears on the screen. The device will return to its original operating mode after 30 minutes. The icon disappears from the screen. By pressing any key, you will exit the “open window” mode. Setting parameters Switch off the thermostat by briefly pressing the . - Seite 11 Setting the 5°C 5°C minimum ~35°C temperature limit Antifreeze 5°C~15°C 5°C temperature Screen display 0: room temp. 1: set temp. Child 0: Keys protection unlocked 1: Keys locked Open window 1: On detection 0: Off The time 2~30 min. 15 min. interval in which the sudden drop in...
- Seite 12 The time after 10~60 30 min. which the device returns to its original mode of operation Reset 0: No 1: Yes. Press for 5 seconds. Wait for the restart therm. Software version Software version Battery voltage Unit: 10mV PID P-band 2°C~10°C 7°C selection PID I-Time...
- Seite 13 Pairing with the PNI CT25WIFI hub The PNI CT25WIFI hub is not included in the package, it must be purchased separately. To remotely control the thermostatic head through the Tuya Smart application, it must be paired with the PNI CT25WIFI internet hub.
-
Seite 14: Benutzerhandbuch
Intelligenter thermostatischer Kopf PNI CT25T Handbuch... -
Seite 15: Produktbeschreibung
Produktbeschreibung CT25T Thermostat, Lufttemperatur misst und abhängig davon die Durchflussmenge im Heizkörper anpasst. Dieses Thermostat kontrolliert nicht die Heizung. Bauen Sie einen thermostatischen Kopf auf jeden Heizkörper ein und stellen Sie für jedes Zimmer die gewünschte Temperatur ein. Wie schnell die Temperatur in einem Zimmer steigt, hängt von den... -
Seite 16: Funktionen
Funktionen • Beleuchteter Bildschirm • Gewinde universal M30 x 1.5 • 5 Tasten für Geräteinstellung • Kontrolle durch PID Kreis • Programmierung nach Tagen (7 Tage), 4 Zeiträumen pro Tag • Der Bildschirm zeigt die Zimmertemperatur, die eingestellte Temperatur, den Wochentag und die Uhrzeit an. -
Seite 17: Batterien Einlegen
Maximale Ausweitung 5.0mm Kolben Wasserwiderstand IP20 Klasse Kontrolle Dimensionen Ø 55 x 69 mm Beschreibung Bilder Anzeige leere Batterie Fenster o en Anzeige Signal (wenn es mit einem Hub gepaart ist) Uhrzeit und Wochentag Laufender Zeitraum Kinderschutz Modus manuell Modus programmiert Modus Ferien Batterien einlegen... - Seite 18 • Entfernen Sie den Deckel des thermostatischen Kopfes • Legen Sie die 2 alkalische Batterien ein, indem Sie die Polarität beachten • Legen Sie den Deckel zurück. Einbau thermostatischer Kopf am Hahn Installieren thermostatischen Kopf auf dem Hahn des Heizkörpers und schrauben Sie den Adapter M30 ein oder verwenden...
-
Seite 19: Gerät Starten
Hinweis: PNI CT25T kann nur an thermostatischen Hähnen eingebaut werden. Es funktioniert nicht mit klassischen Hähnen. Mitgelieferte Adapter Gerät starten Nach Einlegen der Batterien, wird auf dem Bildschirm IN IL angezeigt, das zeigt, dass das Gerät gestartet wurde. Wenn auf dem Bildschirm AD AP erscheint, drücken Sie ▲... - Seite 20 Einstellungen Einstellung Uhr und Wochentag • Drücken Sie die Taste P für 5 Sekunden. Auf dem Bildschirm wird nur die Uhrzeit angezeigt. Der Minutenzeiger blinkt. Drücken Sie die Taste ▲ oder ▼ bis Sie zum gewünschten Wert kommen (00 - 60). Drücken Sie kurz die Taste P um zu bestätigen.
-
Seite 21: Einstellung Modus
Einstellung Modus Drücken Sie die Taste M, um zwischen den 3 Modi zu wechseln: manuell, programmiert oder Eco (Ferien). Programmierung nach Tagen 1. Drücken Sie lang die Taste P. 2. Nachdem Sie die Uhr und den Wochentag eingestellt haben, kommen Sie in Modus Programmierung der 4 Zeiträumen für jeden Wochentag. - Seite 22 *Hinweis: Die Uhrzeit kann alle Viertelstunden geändert werden und die Temperatur mit einem halben Grad. Z.B. Sie können die Uhrzeit um 07:15 oder um 7:30 oder 7:45 einstellen und die Temperatur bei 22.0°C oder 22.5°C oder 23.0°C. Implizite Einstellungen Zeitraum Temp.
-
Seite 23: Parameter Einstellen
Detektion offenes Fenster Wenn die Funktion aus dem Menü “Parameter einstellen” aktiviert wurde (siehe Seite 24), schaltet der thermostatische Kopf die Heizung aus, wenn die Temperatur plötzlich sinkt (implizite Einstellung 2°C in 15 Minuten). Die Temperatur sinkt plötzlich, weil ein Fenster oder eine Tür offen sind, während die Heizung eingeschaltet ist. - Seite 24 Menü Beschreibung Intervall Impli- Kalibrierung -8°C~8°C 0°C Temperatur interner Sensor Einstellung 5°C ~35°C 35°C Höchstgrenze Temperatur Einstellung 5°C ~35°C 5°C Mindestgrenze Temperatur Temperatur 5°C~15°C 5°C Frostschutz Anzeige 0: Temp. Bildschirm 1: eingest. Temp. Kinderschutz entsperrte Tasten 1: gesperrte Tasten Detektion 1: aktiv offenes 0: inaktiv...
- Seite 25 Zeitraum wenn 2~30 Min. eine plötzliche Min. Temperatur- senkung detektiert wird Verlorene Grade 2°C 2°C im Zeitraum 3°C eingestellt bei 13 4°C Zeitraum in dem 10~60 Min das Gerät zum Min. ersten Betrieb zurückkommt Neue 0: Nein Einstellung 1: Ja. Drücken für 5 Sek.
-
Seite 26: Paaren Mit Hub Pni Ct25Wifi
PID Selectie 30~90 min I-time Paaren mit Hub PNI CT25WIFI Der Hub PNI CT25WIFI wird nicht mitgeliefert, es muss separat gekauft werden. Um den thermostatischen Kopf durch die App Tuya Smart fernzubedienen, muss er mit dem Hub für Internet PNI CT25WIFI gepaart werden. -
Seite 27: Manual De Usuario
PNI CT25T Cabezal termostático inteligente Manual de usuario... - Seite 28 Presentacion de producto PNI CT25T es un termostato que mide la temperatura del aire y regula de acuerdo con esto el flujo de agua dentro del radiador. Este termostato no controla la caldera de calefacción. Instale un cabezal termostático en cada radiador y establezca la temperatura deseada para cada habitación.
-
Seite 29: Principales Características
Principales características • Pantalla retroiluminada • Rosca universal M30 x 1,5 • 5 teclas para configurar el dispositivo • Control de circuito PID • Horario por día (7 días), 4 periodos por día • La pantalla muestra la temperatura ambiente, la temperatura configurada, el día de la semana y la hora. - Seite 30 Clase waterproof IP20 Control Dimensiones Ø 55 x 69 mm Descripción de los iconos de pantalla Indicador de batería baja Ventana abierta Indicador de señal Hora y día de la (cuando se combina con un hub) Período actual semana Modo manual Protección infantil Modo programado Modo Eco (vacaciones)
- Seite 31 Instalación de cabezal termostático en la válvula termostática Instale cabezal termostático en la válvula del radiador atornillando el adaptador M30 o usando uno de los adaptadores incluidos. Nota: PNI CT25T solo se puede montar en válvulas termostáticas. No funciona con válvulas de radiador clásicas.
- Seite 32 Adaptadores incluidos Inicialización del dispositivo 1. Después de instalar las baterías, aparecerá IN IL en la pantalla, lo que indica la inicialización del dispositivo. 2. Cuando aparezca Ad AP en la pantalla, presione ▲ para cambiar de 0 a 1 (el cabezal termostático se adaptará...
- Seite 33 Configuraciónes Configuración de la hora y el día de la semana • Mantenga pulsado P durante unos 5 segundos. Solo se mostrará la hora en la pantalla. El indicador de minutos parpadeará. Presione la tecla ▲ o ▼ hasta alcanzar el valor deseado (00 - 60). Presione brevemente la tecla P para confirmar.
- Seite 34 Configuración de modo Presione la tecla M para cambiar a uno de los 3 modos: Manual, Programado o Eco (Vacaciones). Programación por día 1. Mantenga presionada la tecla P. 2. Después de configurar la hora y el día de la semana, ingresará...
- Seite 35 Configuración por defecto Período Hora Temp. Hora Temp. 12345 07:00 22°C 08:30 19°C (L-V ) 6 (S) 08:00 22°C 08:30 22°C 7 (D) 08:00 22°C 08:30 22°C Período Hora Temp. Hora Temp. 12345 17:00 22°C 17:00 19°C (L-V) 6 (S) 17:00 22°C 22:00...
-
Seite 36: Configuración De Parámetros
abre una ventana o puerta mientras la caldera de calefacción está funcionando. El icono de ventana abierta aparece en la pantalla. El dispositivo volverá a su modo de funcionamiento original después de 30 minutos. El icono desaparece de la pantalla. Al presionar cualquier tecla, saldrá... - Seite 37 Configuración 5°C~35°C 5°C del límite de temperatura mínima Temperatura 5°C~15°C 5°C anticongelante Visualización de 0: temp. la pantalla ambiente 1: temp. esta- blecida Protección 0: Llaves infantil desblo- -queadas 1: Llaves bloque- adas Detección de 1: On ventana abierta 0: Off El intervalo 2~30 min.
- Seite 38 Grados 2°C 2°C perdidos en 3°C el intervalo 4°C de tiempo establecido en el punto 13 El tiempo 10~60 30 min. después del cual el dispositivo vuelve a su modo de funcionamiento original. Reset 0: No 1: Si. Prensa durante 5 segundos.
- Seite 39 30 min I-Time de PID Emparejamiento CT25WIFI El hub PNI CT25WIFI no está incluido en el paquete, debe comprarse por separado. Para controlar de forma remota el cabezal termostático a través de la aplicación Tuya Smart, debe emparejarse con el hub PNI CT25WIFI.
-
Seite 40: Manuel Utilisateur
PNI CT25T Tête thermostatique intelligente Manuel de l’Utilisateur... -
Seite 41: Présentation Du Produit
Présentation du produit PNI CT25T est un thermostat qui mesure la température de l’air et régule en conséquence le débit d’eau à l’intérieur du radiateur. Ce thermostat ne contrôle pas la chaudière de chauffage. Installez une tête thermostatique sur chaque radiateur et réglez la température désirée pour... -
Seite 42: Caractéristiques Principales
Caractéristiques principales • Écran rétroéclairé • Filetage universel M30 x 1,5 • 5 touches pour le réglage de l’appareil • Contrôle du circuit PID • Horaire par jour (7 jours), 4 périodes par jour • L’écran affiche la température ambiante, la température de consigne, le jour de la semaine et l’heure •... -
Seite 43: Installation De La Batterie
Waterproof IP20 Contrôler Dimensions Ø 55 x 69 mm Description des icônes d’écran Indicateur de batterie faible Fenêtre ouverte Indicateur de signal Heure et jour de la (lorsqu'il est associé à un hub) Période actuelle semaine Mode manuel Protection de l'enfance Mode programmé... - Seite 44 M30 ou en utilisant l’un des adaptateurs inclus. Remarque: Le PNI CT25T ne peut être monté que sur des vannes thermostatiques. Il ne fonctionne pas avec les vannes de radiateur classiques.
- Seite 45 Adaptateurs inclus Initialisation de l’appareil 1. Après avoir installé les piles, IN IL apparaîtra sur l’écran, ce qui indique l’initialisation de l’appareil. 2. Lorsque Ad AP apparaît à l’écran, appuyez sur ▲ pour passer de 0 à 1 (la tête thermostatique s’adaptera automatiquement à...
- Seite 46 Réglages Réglage de l’heure et du jour de la semaine • Appuyez longuement sur P pendant environ 5 secondes. Seule l’heure sera affichée à l’écran. L’indicateur des minutes clignotera. Appuyez sur la touche ▲ ou ▼ jusqu’à atteindre la valeur souhaitée (00 - 60).
- Seite 47 Réglage du mode Appuyez sur la touche M pour passer à l’un des 3 modes: manuel, programmé ou éco (vacances) . Programme par jour 1. Appuyez longuement sur la touche P. 2. Après avoir réglé l’heure et le jour de la semaine, vous entrerez dans le mode de programmation des 4 périodes pour chaque jour de la semaine.
- Seite 48 Paramètres par défaut Période Heure Temp. Heure Temp. 12345 07:00 22°C 08:30 19°C (L-V) 6 (S) 08:00 22°C 08:30 22°C 7 (D) 08:00 22°C 08:30 22°C Période Heure Temp. Heure Temp. 12345 17:00 22°C 17:00 19°C (L-V) 6 (S) 17:00 22°C 22:00 19°C...
- Seite 49 pendant que la chaudière de chauffage fonctionne. L’icône de la fenêtre ouverte apparaît à l’écran. L’appareil reviendra à son mode de fonctionnement d’origine après 30 minutes. L’icône disparaît de l’écran. En appuyant sur n’importe quelle touche, vous sortez du mode «fenêtre ouverte». Paramètres de réglage Éteignez le thermostat en appuyant brièvement sur la touche...
- Seite 50 Réglage de 5°C 5°C la limite de ~35°C température minimale Température 5°C~15°C 5°C antigel Écran 0: temp. d’affichage chambre 1: temp. réglé Protection de 0: Clés l’enfance déverrou- illées 1: Clés verrou- illées Détection de 1: On fenêtre ouverte 0: Off L’intervalle de 2~30 min.
- Seite 51 Degrés perdus 2°C 2°C dans l’intervalle 3°C de temps défini 4°C au point 13 Le temps après 10~60 30 min. lequel l’appareil revient à son mode de fnctionnement d’origine Reset 0: No 1: Oui. Appuyer pendant 5 secondes. Attendez le redé- marrage Version de logiciel...
- Seite 52 P PID Sélection de la 30~90 30 min I-Time PID Couplage avec le hub PNI CT25WIFI Le hub PNI CT25WIFI n’est pas inclus dans le package, il doit être acheté séparément. Pour contrôler à distance la tête thermostatique l’application Tuya Smart,...
-
Seite 53: Használati Utasítás
PNI CT25T Intelligens termosztatikus fej Használati utasítás... - Seite 54 Termékbemutató A PNI CT25T egy termosztát, amely méri a levegő hőmérsékletét és ennek megfelelően szabályozza a radiátor belsejében lévő víz áramlását. Ez a termosztát nem szabályozza a fűtőkazánt. Helyezzen egy termosztátfejet minden radiátorra, és állítsa be a kívánt hőmérsékletet az egyes helyiségekhez.
- Seite 55 Főbb jellemzői • Háttérvilágítású képernyő • Univerzális menet M30 x 1,5 • 5 gomb az eszköz beállításához • PID áramkör vezérlés • Menetrend naponta (7 nap), napi 4 periódus • A képernyőn megjelenik a szobahőmérséklet, a beállított hőmérséklet, a hét napja és az idő •...
- Seite 56 Ellenőrzés Méretek Ø 55 x 69 mm A képernyő ikonjainak leírása Az akkumulátor lemerülésének jelzője Nyitott ablak Jeljelző A hét ideje és napja (elosztóval párosítva) Jelenlegi időszak Manuális mód Gyermekvédelem Ütemezett mód Eco (üdülési) mód Az akkumulátor telepítése • Távolítsa el a fedelet a termosztatikus fej hátuljáról.
- Seite 57 Termosztatikus fej felszerelése a termosztatikus szelepre Szerelje be a termosztátfejet a radiátor szelepére az M30 adapter csavarozásával vagy a mellékelt adapterek egyikével. Megjegyzés: A PNI CT25T csak termosztatikus szelepekre szerelhető fel. Klasszikus radiátorszelepekkel nem működik.
- Seite 58 Tartozék adapterek Eszköz inicializálása 1. Az elemek behelyezése után az IN IL jelenik meg a képernyőn, ami jelzi a készülék inicializálását. 2. Amikor az Ad AP megjelenik a képernyőn, nyomja meg a ▲ gombot a 0-ról 1-re váltáshoz (a termosztatikus fej automatikusan alkalmazkodik szelep nyitott-nyitott állapotához).
- Seite 59 perc jelző villog. Nyomja meg a ▲ vagy ▼ gombot, amíg el nem éri a kívánt értéket (00 - 60). Röviden nyomja meg a P gombot a megerősítéshez. • Ezután az óra jelző villog. Nyomja meg a ▲ vagy ▼ gombot, amíg el nem éri a kívánt értéket (00 - 24).
- Seite 60 Menetrend napról napra 1. Hosszan nyomja meg a P gombot. 2. A hét időpontjának és napjának beállítása után belép a 4 periódus programozási módjába a hét minden napjára. 3. A hét első napjának (1. nap) beállításával kezdődik és az első időszak (1. időszak) 4.
- Seite 61 Alapbeállítások Időszak Óra Hőfok Óra Hőfok 12345 07:00 22°C 08:30 19°C (H-P) 6 (S) 08:00 22°C 08:30 22°C 7 (V) 08:00 22°C 08:30 22°C Időszak Óra Hőfok Óra Hőfok 12345 17:00 22°C 17:00 19°C (H-P) 6 (S) 17:00 22°C 22:00 19°C 7 (V) 17:00...
- Seite 62 fűtőkazán működése közben. A nyitott ablak ikonra megjelenik a képernyőn. A készülék 30 perc múlva visszatér eredeti üzemmódjába. Az ikonra eltűnik a képernyőről. Bármelyik gomb megnyomásával kilép a „nyitott ablak” módból. Paraméterek beállítása Kapcsolja ki a termosztátot a gomb rövid megnyomásával .
- Seite 63 A minimális 5°C~35°C 5°C hőmérsékleti határ beállítása Fagyálló 5°C~15°C 5°C hőmérséklet Képernyő megjelenítése szobahő- mérséklet beállított hőmér- séklet Gyermek- 0: Kulcsok védelem feloldva 1: Kulcsok zárva Nyitott ablak 1: On észlelése 0: Off Az az 2~30 min. 15 min. időintervallum, amelyben a hirtelen hőmérséklet-...
- Seite 64 A 13. pontban 2°C 2°C megadott időin- 3°C tervallumban 4°C elvesztett fokok Az az idő, amely 10~60 30 min. után a készülék visszatér eredeti működési módjához Reset 0: Nem 1: Igen. Nyomja másod- percig. Várja meg. az újrain- dítást Szoftver verzió Szoftver verzió...
- Seite 65 Párosítás a PNI CT25WIFI elosztóval A PNI CT25WIFI hubot nem tartalmazza a csomag, külön kell megvásárolni. A termosztatikus fej távvezérléséhez a Tuya Smart alkalmazáson keresztül párosítva kell lennie a PNI CT25WIFI internetes elosztóval. A két eszköz párosítására vonatkozó utasítások a hub felhasználói kézikönyvében találhatók.
-
Seite 66: Manuale Utente
Testa termostatica intelligente PNI CT25T Manuale d’uso... - Seite 67 Presentazione del prodotto PNI CT25T è un termostato che misura la temperatura dell’aria e regola di conseguenza il flusso d’acqua dentro il radiatore. Questo termostato non controlla la caldaia. Installare una testa termostatica su ogni radiatore e impostare la temperatura desiderata per ogni stanza.
-
Seite 68: Funzioni Principali
Funzioni principali • Schermo retroilluminato • Filettatura universale M30 x 1,5 • 5 tasti per l’impostazione del dispositivo • Controllo del circuito PID • Programma giornaliero (7 giorni), 4 periodi al giorno • Lo schermo visualizza la temperatura ambiente, la temperatura impostata, il giorno della settimana e l’ora •... -
Seite 69: Descrizione Delle Icone
Classe wtaerproof IP20 Controllo Dimensioni Ø 55 x 69 mm Descrizione delle icone Indicatore di batteria scarica Finestra aperta Indicatore del segnale Ora e giorno della (quando abbinato a un hub) Periodo attuale settimana Protezione bambini Modalità manuale Modalità programmata Modalità... - Seite 70 Installazione della testa termostatica sulla valvola Installare testa termostatica sulla valvola radiatore avvitando l’adattatore utilizzando degli adattatori inclusi. Nota: PNI CT25T può essere montato solo su valvole termostatiche. Non funziona con le classiche valvole per radiatori.
- Seite 71 Adattatori inclusi Inizializzazione del dispositivo 1. Dopo aver installato le batterie, sullo schermo apparirà IN IL, indicante l’inizializzazione del dispositivo 2. Quando sullo schermo compare Ad AP, premere il tasto ▲ per passare da 0 a 1 (la testa termostatica si adatterà automaticamente alla corsa chiuso-aperto della valvola).
-
Seite 72: Blocco Tasti
schermo verrà visualizzata solo l’ora. L’indicatore dei minuti lampeggerà. Premere il tasto ▲ o ▼ fino a raggiungere il valore desiderato (00 - 60). Premere brevemente il tasto P per confermare. • Quindi l’indicatore delle ore lampeggerà. Premere il tasto ▲ o ▼ fino a raggiungere il valore desiderato (00 - 24). - Seite 73 Programmazione giornaliera 1. Premere a lungo il tasto P. 2. Dopo aver impostato l’ora e il giorno della settimana, accederà alla modalità programmazione dei 4 periodi per ogni giorno della settimana. 3. Inizia con l’impostazione del primo giorno della settimana (giorno 1) e il primo periodo (periodo 1) 4.
- Seite 74 Impostazioni predefinite Periodo Temp. Temp. 12345 07:00 22°C 08:30 19°C (L-V) 6 (S) 08:00 22°C 08:30 22°C 7 (D) 08:00 22°C 08:30 22°C Periodo Temp. Temp. 12345 17:00 22°C 17:00 19°C (L-V) 6 (S) 17:00 22°C 22:00 19°C 7 (D) 17:00 22°C 22:00...
-
Seite 75: Impostazione Dei Parametri
funzione. Sullo schermo viene visualizzata l’icona della finestra aperta Il dispositivo tornerà alla modalità operativa originale dopo 30 minuti. icona scompare dallo schermo. Premendo un tasto qualsiasi uscirai dalla modalità “finestra aperta”. Impostazione dei parametri Spegnere il termostato premendo brevemente il tasto . - Seite 76 Imposta il limite 5°C 35°C 5°C minimo di temperatura Temperatura 5°C~15°C 5°C antigelo Visualizzazione 0: temp. sullo schermo camera 1: temp. impostata Protezione 0: Tasti bambini sbloccati 1: Tasti bloccati Rilevamento 1: On finestra aperta 0: Off L’intervallo 2~30 min. 15 min. di tempo in cui viene rilevato il calo...
- Seite 77 Il tempo 10~60 30 min. trascorso il quale il dispositivo torna alla modalità di funzionamento originale Reset 0: No 1: Si. Premere 5 sec. Attendere il riavvio. Versione software Versione software Tensione Unità: batteria 10mV PID selezione 2°C~10°C 7°C P-band PID selezione 30~90 30 min...
- Seite 78 Abbinamento con il hub PNI CT25WIFI L’hub PNI CT25WIFI non è compreso nella confezione, si acquista separatamente. Per controllare a distanza la testa termostatica tramite l’applicazione Tuya Smart, è necessario accoppiarla con l’hub internet PNI CT25WIFI. Le istruzioni per l’associazione dei due dispositivi sono disponibili nel manuale utente dell’hub.
-
Seite 79: Handleiding
PNI CT25T Slimme thermostaatkop Handleiding... - Seite 80 Productpresentatie CT25T thermostaat luchttemperatuur meet en op basis hiervan de waterstroom in de radiator regelt. Deze thermostaat regelt de verwarmingsketel niet. Installeer een thermostaatkop op elke radiator en stel de gewenste temperatuur voor elke kamer in. Hoe snel de temperatuur in een ruimte stijgt, hangt af van de instellingen in de ketel en de grootte van de radiator.
-
Seite 81: Belangrijkste Kenmerken
Belangrijkste kenmerken • Scherm met achtergrondverlichting • Universele schroefdraad M30 x 1,5 • 5 toetsen voor apparaatinstelling • PID-circuitregeling • Schema per dag (7 dagen), 4 periodes per dag • Op het scherm worden de kamertemperatuur, de ingestelde temperatuur, de dag van de week en de tijd weergegeven •... -
Seite 82: Batterij Installatie
Waterdichte klasse IP20 Controle Dimensies Ø 55 x 69 mm Beschrijving van schermpictogrammen Lage batterij-indicator Open raam Signaalindicator Tijd en dag van de (indien gekoppeld met een hub) Huidige periode week Handmatige Kinderbescherming modus Geplande modus Eco (vakantie) modus Batterij installatie •... - Seite 83 Installatie van thermostaatkop op de thermostaatkraan Installeer de thermostaatkop op de radiatorkraan door de M30-adapter vast te schroeven of een van de meegeleverde adapters te gebruiken. Opmerking: CT25T alleen thermostaatkranen worden gemonteerd. Het werkt niet met klassieke radiatorkranen.
- Seite 84 Meegeleverde adapters Initialisatie van het apparaat 1. Na het plaatsen van de batterijen verschijnt IN IL op het scherm, wat aangeeft dat het apparaat is geïnitialiseerd. 2. Wanneer Ad AP op het scherm verschijnt, drukt u op ▲ om van 0 naar 1 te schakelen (de thermostaatkop past zich automatisch aan de gesloten-open toestand van de klep aan).
- Seite 85 Alleen de tijd wordt op het scherm weergegeven. De minutenindicator knippert. Druk op de toets ▲ of ▼ totdat u de gewenste waarde bereikt (00 - 60). Druk kort op de toets P om te bevestigen. • Daarna gaat de uurindicator knipperen. Druk op de toets ▲...
- Seite 86 Plan per dag 1. Druk lang op de toets P. 2. Na het instellen van de tijd en de dag van de week, komt u in de programmeermodus van de 4 periodes voor elke dag van de week. 3. Het begint met het instellen van de eerste dag van de week (dag 1) en de eerste periode (periode 1)
- Seite 87 Standaard instellingen Periode Temp. Temp. 12345 07:00 22°C 08:30 19°C (M-F) 6 (S) 08:00 22°C 08:30 22°C 7 (S) 08:00 22°C 08:30 22°C Periode Temp. Temp. 12345 17:00 22°C 17:00 19°C (M-F) 6 (S) 17:00 22°C 22:00 19°C 7 (S) 17:00 22°C 22:00...
-
Seite 88: Parameters Instellen
een raam of deur wordt geopend terwijl de verwarmingsketel in werking is. Het geopende vensterpictogram verschijnt op het scherm. Het apparaat keert na 30 minuten terug naar de oorspronkelijke bedrijfsmodus. Het icoon verdwijnt van het scherm. Door op een willekeurige toets te drukken, verlaat u de modus “open venster”. - Seite 89 Setting the 5°C~35°C 5°C minimum temperature limit Antivries 5°C~15°C 5°C temperatuur Scherm 0: kamer- temp. 1: stel temp. Kinder- 0: Sleutels bescherming ont- grendeld 1: Sleutels ver- grendeld Open raam 1: On detectie 0: Off 2~30 min. 15 min. tijdsinterval waarin de plotselinge temp.
- Seite 90 Verloren 2°C 2°C graden in het 3°C tijdsinterval 4°C ingesteld bij punt 13 De tijd waarna 10~60 30 min. het apparaat terugkeert naar de oorspronkelijke werkingsmodus Reset 0: Nee 1: Ja. druk gedurende 5 sec. Wacht op de herstart Software versie Software versie Batterij voltage Eenheid:...
- Seite 91 30~90 30 min selection Koppelen met de PNI CT25WIFI-hub De PNI CT25WIFI-hub is niet inbegrepen in het pakket, deze moet apart worden aangeschaft. Om de thermostaatkop op afstand te bedienen via de Tuya Smart-applicatie, moet deze worden gekoppeld met de PNI CT25WIFI-internethub.
-
Seite 92: Instrukcja Obsługi
PNI CT25T Inteligentna głowica termostatyczna Instrukcja obsługi... -
Seite 93: Prezentacja Produktu
Prezentacja produktu PNI CT25T to termostat, który mierzy temperaturę powietrza i na tej podstawie reguluje przepływ wody wewnątrz grzejnika. Ten termostat nie steruje kotłem grzewczym. Zainstaluj głowicę termostatyczną na każdym grzejniku i ustaw żądaną temperaturę dla każdego pomieszczenia. Szybkość wzrostu temperatury w pomieszczeniu zależy od ustawień... -
Seite 94: Specyfikacja Techniczna
Główne cechy • Podświetlany ekran • Gwint uniwersalny M30 x 1,5 • 5 klawiszy do ustawiania urządzenia • Sterowanie obwodem PID • Harmonogram dziennie (7 dni), 4 okresy dziennie • Na ekranie wyświetlana jest temperatura pokojowa, ustawiona temperatura, dzień tygodnia i godzina •... -
Seite 95: Instalacja Baterii
Waterproof IP20 Kontrola Wymiary Ø 55 x 69 mm Opis ikon ekranu Wskaźnik niskiego poziomu baterii Otwórz okno Wskaźnik sygnału Godzina i dzień (w połączeniu z koncentratorem) Obecny okres tygodnia Ochrona dziecka Tryb ręczny Tryb zaplanowany Tryb Eco (wakacje) Instalacja baterii •... - Seite 96 Montaż głowicy termostatycznej na zaworze termostatycznym Zamontuj głowicę termostatyczną na zaworze grzejnika, przykręcając adapter M30 lub używając jednego z dołączonych adapterów. Uwaga: PNI CT25T można montować tylko na zaworach termostatycznych. Nie działa z klasycznymi zaworami grzejnikowymi.
- Seite 97 Dołączone adaptery Inicjalizacja urządzenia 1. Po zainstalowaniu baterii na ekranie pojawi się IN IL, co oznacza inicjalizację urządzenia. 2. Gdy na ekranie pojawi się Ad AP, naciśnij ▲, aby przełączyć z 0 na 1 (głowica termostatyczna automatycznie dostosuje się do stanu zamkniętego-otwartego zaworu). Głowica termostatyczna zamknie się...
- Seite 98 zostanie wyświetlona tylko godzina. Wskaźnik minut zacznie migać. Naciśnij klawisz ▲ lub ▼, aż osiągniesz żądaną wartość (00 - 60). Krótko nacisnąć klawisz P, aby potwierdzić. • Następnie wskaźnik godziny zacznie migać. Naciśnij klawisz ▲ lub ▼, aż osiągniesz żądaną wartość...
- Seite 99 Planuj według dnia 1. Długo naciśnij klawisz P. 2. Po ustawieniu godziny i dnia tygodnia wejdziesz w tryb programowania 4 okresów dla każdego dnia tygodnia. 3. Rozpoczyna się ustawieniem pierwszego dnia tygodnia (dzień 1) i pierwszy okres (okres 1) 4. Czas rozpoczęcia* i temperatura* będą migać na ekranie.
- Seite 100 Ustawienia domyślne Kropka Godzina Temp. Godzina Temp. 12345 07:00 22°C 08:30 19°C (Pn-Pt) 6 (Sob.) 08:00 22°C 08:30 22°C 7 (Niedz ) 08:00 22°C 08:30 22°C Kropka Godzina Temp. Godzina Temp. 12345 17:00 22°C 17:00 19°C (Pn-Pt) 6 (Sob.) 17:00 22°C 22:00 19°C...
-
Seite 101: Ustawianie Parametrów
lub drzwi podczas pracy kotła grzewczego. Ikona otwartego okna pojawia się na ekranie. Urządzenie powróci do pierwotnego trybu pracy po 30 minutach. Ikona zniknie z ekranu. Naciśnięcie dowolnego klawisza powoduje wyjście z trybu „otwartego okna”. Ustawianie parametrów Wyłączyć termostat przez krótkie naciśnięcie klawisza . - Seite 102 Ustawianie 5°C~35°C 5°C minimalnego ograniczenia temperatury Temperatura 5°C~15°C 5°C przeci- wzamrożeniowa Wyświetlacz 0: temp. pokojowa 1: Ustaw temp. Ochrona 0: Klucze dziecka odblo- kowane 1: Klucze zablo- kowane Wykrywanie 1: On otwartego okna 0: Off Przedział czasu, 2~30 min. 15 min. w którym wykrywany jest nagły spadek...
- Seite 103 Stopnie 2°C 2°C utracone w 3°C przedziale 4°C czasowym określonym w punkcie 13 Czas, po 10~60 30 min. którym urządzenie powraca do pierwotnego trybu pracy Reset 0: Nie 1: Tak. Naciśnij i przy- trzymaj przez 5 sek. Poczekaj ponowne urucho- mienie.
- Seite 104 . Simplified EU declaration of conformity SC ONLINESHOP SRL declares that Intelligent Thermostatic Head PNI CT25T is in accordance with RED Directive 2014/53/EU. The full text of the EU Declaration of Conformity is available at the following internet address : https://www.mypni.eu/products/7999/download/...
-
Seite 105: Manual De Utilizare
Cap termostatic inteligent PNI CT25T Manual de utilizare... - Seite 106 Prezentare produs PNI CT25T este un termostat care masoara temperatura aerului si regleaza in functie de aceasta debitul de apa din calorifer. Acest termostat nu controleaza centrala termica. Instalati cate un cap termostatic pe fiecare calorifer si setati pentru fiecare camera temperatura dorita.
-
Seite 107: Specificatii Tehnice
Functii • Ecran iluminat • Filet universal M30 x 1.5 • 5 taste pentru setare dispozitiv • Control prin circuit PID • Programare pe zile (7 zile), 4 perioade pe zi • Ecranul afiseaza temperatura din camera, temperatura setata, ziua saptamanii si ora •... -
Seite 108: Instalare Baterii
Clasa de rezistenta IP20 la apa Control Dimensiuni Ø 55 x 69 mm Descriere pictograme ecran Indicator baterie descarcata Fereastra deschisa Indicator semnal (cand este imperecheat cu un hub) Ora si ziua saptamanii Perioada curenta Mod manual Protectie pentru copii Mod programat Mod vacanta Instalare baterii... - Seite 109 Instalare cap termostatic pe robinet Instalati capul termostatic pe robinetul caloriferului insuruband adaptorul M30 sau folosind unul dintre adaptoarele incluse. Nota: PNI CT25T se poate monta doar pe robineti termostatati. Nu functioneaza cu robineti clasici de calorifer. 1 0 9...
- Seite 110 Adaptoare incluse Initializare dispozitiv 1. Dupa instalarea bateriilor, pe ecran va aparea IN IL, care indica initializarea dispozitivului 2. Cand pe ecran apare Ad AP apasati tasta ▲ pentru a schimba din 0 in 1 (capul termostatic se va adapta automat la cursa inchis-deschis a robinetului).
- Seite 111 Apasati tasta ▲ sau ▼ pana ajungeti la valoarea dorita (00 - 60). Apasati scurt tasta P pentru a confirma. • Apoi, va clipi indicatorul pentru ora. Apasati tasta ▲ sau ▼ pana ajungeti la valoarea dorita (00 - 24). Apasati scurt tasta P pentru a confirma. •...
- Seite 112 Programare pe zile 1. Apasati lung tasta P. 2. Dupa ce ati setat ora si ziua saptamanii, veti intra in modul de programare a celor 4 perioade pentru fiecare zi a saptamanii. 3. Se incepe cu setarea primei zile a saptamanii (ziua 1) si a primei perioade (perioada 1) 4.
- Seite 113 Setari implicite Perioada Temp. Temp. 12345 07:00 22°C 08:30 19°C (L-V) 6 (S) 08:00 22°C 08:30 22°C 7 (D) 08:00 22°C 08:30 22°C Perioada Temp. Temp. 12345 17:00 22°C 17:00 19°C (L-V) 6 (S) 17:00 22°C 22:00 19°C 7 (D) 17:00 22°C 22:00...
- Seite 114 centrala functioneaza. Pe ecran apare pictograma de fereastra deschisa Dispozitivul se va intoarce la modul initial de functionare dupa 30 minute. Pictograma dispare de pe ecran. Apasand orice tasta, veti iesi din modul “fereastra deschisa“. Setare parametri Opriti termostatul apasand scurt tasta .
- Seite 115 Setare limita 5°C~35°C 5°C minima temperatura Temperatura 5°C~15°C 5°C antiinghet Afisare ecran 0: temp. camera 1: temp. setata Protectie copii 0: Taste deblocate 1: taste blocate Detectie 1: activa fereastra 0: inactiva deschisa Intervalul de 2~30 min. 15 min. timp in care se detecteaza scaderea brusca a temperaturii...
- Seite 116 Intervalul de 10~60 30 min. timp dupa care dispozitivul se intoarce la modul initial de functionare Resetare 0: Nu 1: Da. Apasati tasta timp de 5 secunde. Asteptati repornirea termost. Versiune software Versiune software Tensiune Unitate: baterie 10mV PID Selectie 2°C~10°C 7°C P-band PID Selectie...
- Seite 117 Imperecherea cu hub-ul PNI CT25WIFI Hub-ul PNI CT25WIFI nu este inclus in pachet, se achizitioneaza separat. Pentru a controla de la distanta capul termostatic prin aplicatia Tuya Smart, acesta trebuie imperecheat cu hub-ul pentru internet PNI CT25WIFI. Instructiuni despre imperecherea celor doua dispozitive gasiti in manualul de utilizare al hub-ului.