Inhaltsverzeichnis
Werbung
Verfügbare Sprachen
Verfügbare Sprachen
Quicklinks
Werbung
Inhaltsverzeichnis

Verwandte Anleitungen für KELLER CellaTemp PK-Serie

Inhaltszusammenfassung für KELLER CellaTemp PK-Serie
- Seite 1 CellaTemp PK / PKF / PKL xx 1105008 02/2020...
-
Seite 3: Allgemeines
Diese Anleitung gibt Ihnen die minimalen Informationen um das Pyrometer der Serie PK sach- gerecht zu installieren. Detaillierte Informationen entnehmen Sie bitte der Bedienungsanleitung CellaTemp PK. Sie können diese unter folgendem Link herunterladen: https://www.keller.de/de/its/mediathek/anleitungen.htm Symbolerklärung Wichtige Hinweise in dieser Bedienungsanleitung sind durch Symbole gekennzeichnet. -
Seite 4: Elektrischer Anschluss
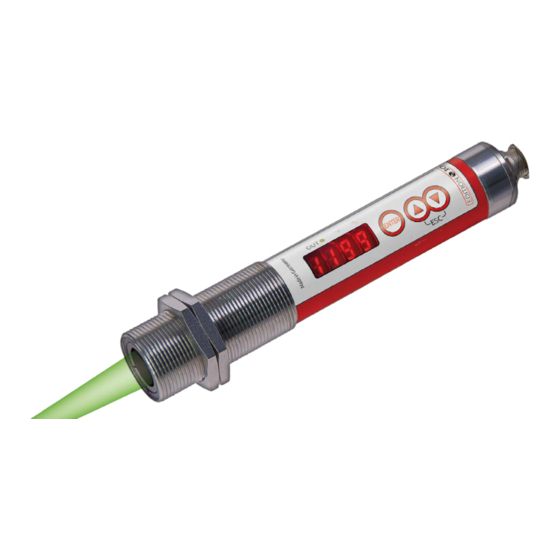
Kurzanleitung CellaTemp PK / PKF / PKL xx • Das Pyrometer sollte wenn möglich im 90 ° Winkel zum Messobjekt installiert werden. Der Winkel sollte nicht kleiner als 45 ° aus der senkrechten sein. • Der Messfleck muss komplett von Messobjekt ausgefüllt sein. Elektrischer Anschluss Das Pyrometer wird mit Niederspannung 24 DC (18 …... - Seite 5 Kurzanleitung CellaTemp PK / PKF / PKL xx Installation 1. Wählen Sie für das Pyrometer einen geeigneten Montageort. Folgenden Kriterien sind zu beachten: • Die Linse und das Sichtfeld des Pyrometers müssen frei von Schmutz, Rauch und Wasser- dampf sein. Ansonsten ist die Axialluftdüse PS 01/A zu installieren, um es vor Verschmut- zung zu schützen.
-
Seite 6: Transport, Verpackung Und Entsorgung
Die zur Konfiguration des IO-Link-Gerätes notwendigen IODDs sowie detaillierte Informationen über Prozessdatenaufbau, Diagnosefunktionen und Parameter adressen sind im Download-Be- reich unter www.keller.de/its/pyrometer erhältlich. Für den IO-Link-Betrieb ist ein 3-adriges Kabel Port Class A (Typ A) zu verwenden. Transport, Verpackung und Entsorgung Transport-Inspektion Die Lieferung ist bei Erhalt unverzüglich auf Vollständigkeit und Transportschäden zu prüfen. -
Seite 7: Explanation Of Symbols
This guide gives you the minimum information to properly install the pyrometers of the PK se- ries. For detailed information please refer to the user guide CellaTemp PK. You can download it under the following link: https://www.keller.de/en/its/mediacenter/manuals.htm Explanation of symbols Important safety-related references in this manual are marked with a symbol. -
Seite 8: Electrical Connection
Quick Start Guide CellaTemp PK / PKF / PKL xx • The pyrometer should be installed at 90 ° to the measurement object, if possible. The angle should not be less than 45 ° from the vertical. • The spot must be completely filled by the measured object. Electrical connection The pyrometer is supplied with low voltage 24V DC (18 ... - Seite 9 The IODDs required for configuring the IO-Link device as well as detailed information on pro- cess data set-up, diagnostic functions and parameter addresses are available in the download area at www.keller.de/its/pyrometer. A 3-wire cable port Class A (Type A) must be used for IO-Link operation.
- Seite 10 These devices can be returned for disposal to the manufacturer or they must be disposed properly by the user. For the improper disposal of the device by the user, the company KELLER is not responsible. is a registered trademark of the IO-Link corporate community.
-
Seite 11: Explication Des Symboles
PK. Pour obtenir des informations plus détaillées, veuillez téléchar- ger le manuel complet du CellaTemp PK à cette adresse : https://www.keller.de/en/its/mediacenter/manuals.htm Explication des symboles Les références aux consignes de sécurité sont symbolisées par ce dessin. Le non-respect de ces règles peut entrainer des accidents et dommages physiques et matériels. -
Seite 12: Alimentation Électrique
Guide rapide CellaTemp PK / PKF / PKL xx • Le thermomètre sera installé si possible perpendiculairement à l’objet mesuré, à défaut d’un angle supérieur à 45 °. • L’objet doit remplir entièrement le spot de meure. Alimentation électrique L’instrument est alimenté en 24V DC (18 ... 32V DC). REMARQUE ! Le pyromètre doit être installé... - Seite 13 Les IODD pour l’accès à l’interface IO-Link ainsi que les informations sur l’acquisition des don- nées sont détaillés dans la rubrique téléchargement de www.keller.de/its/pyrometer. Un câble 3 fils de Classe A (Type A) doit être utilisé pour une utilisation de l’IO-Link.
- Seite 14 En accord avec la législation européenne, la mise au rebut de tout appareil électrique et électro- nique usagé doit suivre une procédure clairement définie. KELLER ne pourra être tenu responsable pour le non-respect des règles de mise au rebus par l’utilisateur/propriétaire d’un instrument KELLER.
- Seite 15 PK. Véase también el Manual de instrucciones para CellaTemp PK para obtener información detallada. Puede descargarlo aquí: https://www.keller.de/en/its/mediacenter/manuals.htm Explicación de los símbolos Indicaciones importantes de este Manual de instrucciones de uso están marcadas con un sím- bolo.
-
Seite 16: Conexión Eléctrica
Guía rápida CellaTemp PK / PKF / PKL xx • inferiores. Por lo tanto, asegúrese siempre de que la lente esté limpia y que nada obstruya el campo de visión del pirómetro. Cualquier interferencia causada por objetos puede conducir a errores de medición. •... - Seite 17 Guía rápida CellaTemp PK / PKF / PKL xx Instalación 1. Seleccione un lugar de montaje adecuado para el pirómetro. Deben observarse los siguien- tes criterios: • La lente y el campo de visión del pirómetro deberán estar libres de suciedad, humo y vapor de agua.
- Seite 18 Los residuos de equipos eléctricos y electrónicos a menudo contienen materiales valiosos. Estos dispositivos pueden ser devueltos al fabricante para su eliminación o deben ser eliminados adecuadamente por el usuario. KELLER no se responsabiliza de la eliminación inadecuada del dispositivo por parte del usuario.
-
Seite 19: Generalità
Questo manuale fornisce le informazioni minime necessarie per installare correttamente il piro- metro della serie PK. Per informazioni dettagliate consultare le istruzioni per l‘uso di CellaTemp PK. Inoltre può essere scaricarli dal seguente link: https://www.keller.de/en/its/mediacenter/manuals.htm Spiegazione dei simboli In queste istruzioni per l‘uso le istruzioni importanti sono contrassegnate da simboli. -
Seite 20: Collegamento Elettrico
Breve manuale CellaTemp PK / PKF / PKL xx • Se possibile, il pirometro deve essere installato ad un angolo di 90 ° rispetto all‘oggetto da misurare. L‘angolo non deve essere inferiore a 45 ° rispetto alla verticale. • Il punto di misura deve essere completamente riempito dall‘oggetto da misurare. Collegamento elettrico Il pirometro è... - Seite 21 Breve manuale CellaTemp PK / PKF / PKL xx Installazione 1. Scegliere un luogo di montaggio adatto per il pirometro. Rispettare i seguenti criteri: • La lente e il campo visivo del pirometro devono essere privi di sporco, fumo e vapore. In caso contrario è...
- Seite 22 In molti casi, le vecchie apparecchiature elettriche ed elettroniche conten- gono ancora materiali preziosi. Questi dispositivi possono essere restituiti al produttore per lo smaltimento o devono essere smaltiti correttamente dall‘utente. KELLER non è responsabile dello smaltimento improprio dell‘apparecchio da parte dell‘utente.
-
Seite 23: Общие Положения
Данная инструкция содержит минимальное количество информации, необходимой для правильной установки прибора серии РK. Для получения подробной информации см. «Ин- струкцию по эксплуатации CellaTemp PK». Вы можете скачать её по следующей ссылке: https://www.keller.de/en/its/mediacenter/manuals.htm Значение символов Важные указания в данной инструкции по эксплуатации обозначены следующими символами: Внимание! -
Seite 24: Электрическое Подключение
Инструкция CellaTemp PK / PKF / PKL xx пирометра не должно быть препятствий. Любые внешние воздействия могут привести к ошибкам измерения. • Угол наводки должен составлять по возможности 90 °C . Угол по горизонтали должен быть не менее 45 °. •... -
Seite 25: Установка
Инструкция CellaTemp PK / PKF / PKL xx Установка 1. Выберете пригодное для монтажа пирометра место. При этом необходимо соблюдать следующие критерии: • Линза и поле визирования пирометра должны быть защищены от воздействия грязи, дыма и пара. Во избежание загрязнения оптики необходимо установить воздушное сопло... - Seite 26 конфигурировать параметры в процессе эксплуатации. Необходимые IODD, а также под- робную информацию о структуре технологических, диагностических данных и адресацию параметров Вы найдёте в «Download» под ссылкой www.keller.de/en/its. Для IO-Link необходим трёхжильный кабель Port Class A(Тип A). Транспортировка, упаковка и утилизация...
- Seite 27 快速指南 CellaTemp PK / PKF / PKL xx 高温计 CellaTemp PK / PKF / PKL xx 快速指南 概述 本指南为您提供了正确安装PK系列高温计的简要信息。如需详细信息,请参考用户 指南CellaTemp PK。您可通过如下链接下载。 https://www.keller.de/en/its/mediacenter/manuals.htm 符号说明 本手册中的重要安全相关参考均标有符号。 注意 该符号指出指导方针。不仔细查看,可能导致设备受到损坏,发生故障 或甚至无法运行。 警示:该符号指出需要注意的提示和信息,以确保有效和无故障运行。 ► 动作:该符号提示操作员采取措施。 > 响应,结果。该符号指出行动结果。 激光笔的激光安全说明 二类激光产品 • 切勿直视激光光路(发射功率<1.0 mW,波长为630-670 nm) • 激光激活时,切勿让仪器处于无人看管状态。...
- Seite 28 快速指南 CellaTemp PK / PKF / PKL xx 电气连接 高温计配有24V DC低电压(18 ... 32V DC)。 注意 只有技术娴熟的合格电工才能安装高温计。请勿在电源开启的情况下连 接仪器。请始终遵守国际安全规定。 ► 切换到空档并确认没有电压供应 ► 根据以下原理图连接仪器: 24 V DC Test 0/4 - 20 mA shielded Pin 1 BN (棕色) L +(电源24V DC) Pin 5 GY (灰色) 开路集电极开关输出;Imax = 150 mA OUT2 Pin 2 WH (白色)
- Seite 29 发射率系数设置如下: ► 按 [▲ 或 ▼] ► 按 [▲ 或 ▼] 直到显示所需的发射率 ► 按 [Enter] 或等待3秒钟 > 显示当前温度值并存储新的发射率系数。 确保高温计的功能正确。所有参数可直接在高温计上设置(参见手册,第5章)。 5. 建议在维护计划中检查高温计。 PK 1x系列高温计仅测量终端稳定状态下的精确结果。稳定期约为启动电源10 分钟后。 IO-链接 该设备具有IO-Link通信接口,该接口需要支持IO-Link的模块(IO-Link主站)进 行操作。IO-Link接口允许直接访问过程和诊断数据,并可在操作期间对设备进行 参数化。 配置IO-Link设备所需的IODD以及有关过程数据设置、诊断功能和参数地址的详细 信息,可在 www.keller.de/en/its/pyrometers 的下载区找到。 IO-Link操作必须使用一个A类(A型)3线电缆端口。 装运、包装和处理 运输后检查 收到后立即打开并检查整批货物,确保货物完好无损。如果集装箱/包装存在明显 的损坏迹象,请拒收货物。如果不可行,在接受货物时应确保货运承运人的交付记 录注明损坏程度,以便提出索赔。如果发现隐蔽损失或损坏,请立即将其报告给托 运人或货运承运人。如果提出索赔的期限已经过期,则不能再提出索赔要求赔偿损 失或损失。...
- Seite 30 快速指南 CellaTemp PK / PKF / PKL xx 包装 所使用的包装由精心挑选的环保材料制成,因此可以回收。请确保以生态无害的方 式对它们进行处理。 旧设备的处理 通常情况下,旧的电气和电子设备仍然包含有价值的材料。 旧的设备可以退回给制造商处理或由用户妥善处理。 用户对设备的不当处置引起的任何问题,KELLER HCW公司概不负 责。...
- Seite 31 이 안내서는 PK 시리즈 적외선온도계를 바르게 설치하는 데 필요한 최소한의 정 보를 제공합니다. 자세한 내용은 CellaTemp PK 사용 설명서를 참고하십시오. 하기 링크에서 내려 받을 수 있습니다. https://www.keller.de/en/its/mediacenter/manuals.htm 기호 설명 이 설명서에서 안전과 관련된 중요한 언급에는 다음과 같은 기호가 붙어 있습니...
- Seite 32 빠른 가이드 CellaTemp PK / PKF / PKL xx 장착하기 • 적외선온도계는 연기, 열, 증기에 불필요하게 노출되지 않는 장소에 설치해야 합 니다. 렌즈가 오염되면 측정값이 낮아집니다. 따라서 항상 렌즈의 청결을 유지하 십시요. 적외선온도계의 측정시야에는 장애물이 없어야 합니다. 물체에 의해 간 섭을...
- Seite 33 세스 및 진단 데이터에 직접 액세스할 수 있으며 작동 중에 조건에 맞추어 장치 를 구성할 수 있습니다. 프로세스 데이터의 구성, 진단 기능, 파라미터 주소에 관한 자세한 내용과 IO 링크 장치를 구성하는 데 필요한 IO 장치 설명(IODD)은 www.keller.de/en/its/pyrometers 의 내려받기 섹션에서 확인할 수 있습니다.
- Seite 34 안 쓰는 장비의 폐기 처리 안 쓰는 전기 및 전자 장비에도 종종 귀중한 재료가 들어 있습니 다. 이런 장비는 폐기를 위해 제조사에게 보낼 수 있으며, 그렇지 않으면 사용자가 적절하게 폐기해야 합니다. 사용자가 장비를 부적절하게 폐기한 경우, KELLER HCW는 그에 대해 책임을 지 지 않습니다.
- Seite 36 KELLER HCW GmbH Infrared Temperature Solutions (ITS) Carl-Keller-Str. 2-10 49479 Ibbenbüren, Germany www.keller.de/its...