Werbung
Quicklinks
Manuale utente - User Manual - Manuel de l'utilisateur
Bedienungsanleitung - Manual de usuario - Manual do utilizador
Εγχειρίδιο χρήστη
K40912 - K40932
Videocitofono 7in supplementare vivavoce
7in hands-free video door entryphone
Portier-vidéo mains-libres 7in
Freisprechhaustelefon 7in
Videoportero manos libres 7in
Videoporteiro com monitor 7" alta-voz
7in hands-free video door entryphone
Werbung

Verwandte Anleitungen für Vimar Elvox K40912


Inhaltszusammenfassung für Vimar Elvox K40912
- Seite 1 Manuale utente - User Manual - Manuel de l'utilisateur Bedienungsanleitung - Manual de usuario - Manual do utilizador Εγχειρίδιο χρήστη K40912 - K40932 Videocitofono 7in supplementare vivavoce 7in hands-free video door entryphone Portier-vidéo mains-libres 7in Freisprechhaustelefon 7in Videoportero manos libres 7in Videoporteiro com monitor 7"...
-
Seite 2: Caratteristiche E Funzioni
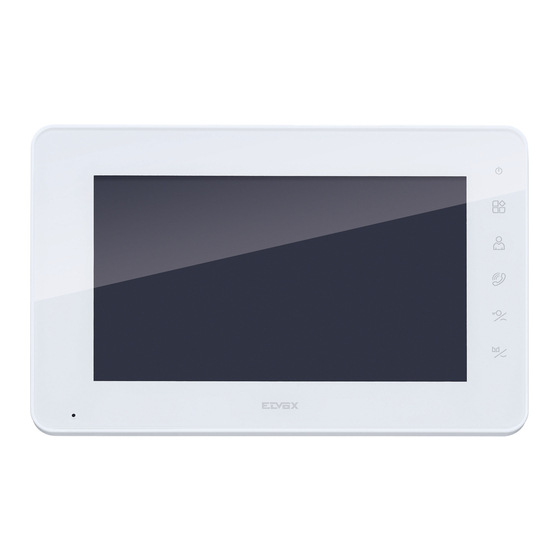
K40912 - K40932 Caratteristiche e funzioni Characteristics & functions Videocitofono Video entryphone • Monitor 7“ • 7" Monitor • 5 tasti capacitivi a sfioramento retroilluminati • 5 backlit capacitive soft buttons • Intercomunicante tra posti interni (della stessa famiglia). • Intercom function between indoor units (of the same family) •... -
Seite 3: Características Y Funciones
K40912 - K40932 Características e funções Características y funciones Videoporteiro Videoportero • Monitor 7" • Monitor 7” • 5 botones capacitivos retroiluminados • 5 teclas capacitivas sensíveis ao tato e retroiluminadas • Intercomunicante entre postos internos (da mesma família). • Intercomunicación entre aparatos internos (de la misma •... - Seite 4 K40912 - K40932 Videocitofono Video entryphone Portier-vidéo Videohaustelefon Videoportero Videoporteiro θυροτηλεόραση 1 Schermo 1 Screen 1 Écran 2 Microfono 2 Microphone 2 Microphone 3 LED di segnalazione: Power ON 3 Indicator LEDs: Power ON (red light) 3 Leds de signalisation : Power ON (luce rossa) 4 Menu button: to access settings (led rouge)
- Seite 5 K40912 - K40932 1 Bildschirm 1 Pantalla 1 Ecrã 2 Mikrofon 2 Micrófono 2 Microfone 3 Anzeige-LEDs: Versorgung EIN (rot) 3 LED de señalización: Alimentación 3 LED de sinalização: Power ON (luz 4 Taste Menü: Öffnen der ON (luz roja) vermelha) Einstellungen 4 Botón Menú: para acceder a los...
- Seite 6 K40912 - K40932 Video entryphone installation Installazione Videocitofono Installation du portier-vidéo Installation des Videohaus- Instalación del videoportero Instalação do videoporteiro telefons Εγκατάσταση θυροτηλεόρα- σης - Si consiglia di provvedere ad una prima - Il est conseillé de procéder à une pre- - It is advisable to first configure the de- Two family Single family...
- Seite 7 K40912 - K40932 - Se recomienda realizar la primera con- - Aconselha-se a proceder a uma primei- - Vor dem Anschluss an den Systembus figuración del dispositivo antes de la ra configuração do dispositivo antes da sollte das Gerät erstmals konfiguriert conexión al bus de sistema. ligação ao bus de sistema.
- Seite 8 K40912 - K40932 Alimentatore multispina Multi-plug power supply Alimentation multifiches (per le versioni che lo prevedono) (for applicable versions) (selon les versions) Tensione di alimentazione AC: 100 V - AC supply voltage: 100 V - 240 V, 0.6 Tension d'alimentation CA : 100 V - 240 V, 0,6 A, 50 Hz / 60 Hz A, 50 Hz / 60 Hz 240 V, 0,6 A, 50 Hz / 60 Hz...
- Seite 9 K40912 - K40932 Alimentatore per barra DIN Power supply for DIN rail Alimentation pour rail DIN Technical characteristics Caractéristiques techniques Caratteristiche tecniche - Power supply: 100 - 240 Vac 50/60Hz - Alimentation : 100 - 240 Vca 50/60 Hz - Alimentazione: 100 - 240 Vac 50/60Hz - Maximum power consumption 0.8 A - Consommation maximale 0,8 A - Consumo massimo 0,8 A...
- Seite 10 K40912 - K40932 Alimentatore per barra DIN: Installazioni previste Power supply for DIN rail: Possible installations Alimentation pour rail DIN : Installations prévues Netzteil für DIN-Schiene: Vorgesehene Installationen Alimentador para carril DIN Montajes previstos Alimentador para barra DIN: Instalações previstas Τροφοδοτικό...
- Seite 11 Installazione era (optional) CCTV (en option) Ai terminali CCTV e GND del posto The Vimar 46CAM.136B.8 camera Possibilité de brancher la caméra Vi- esterno è possibile collegare teleca- can be connected to the CCTV and mar 46CAM.136B.8 aux cosses CCTV mera Vimar 46CAM.136B.8.
- Seite 12 K40912 - K40932 Schema di collegamento impian- Single-family system connection Schéma de connexion installa- to monofamiliare diagram tion un usager Schaltbild der Einfamilienanlage Esquema de conexión de una Esquema de ligação do sistema instalación unifamiliar monofamiliar Διάγραμμα σύνδεσης εγκατά- στασης μίας οικογένειας BUS1+ BUS1- COM NO/NC LOCK GND CCTV GND BUS1 BUS2...
- Seite 13 K40912 - K40932 Note: Remarques : Notes: 1. La lunghezza minima del cavo tra due 1. Le câble entre deux portiers-vidéo doit 1. The minimum cable length between videocitofoni deve essere 5m. mesurer au moins 5 m. two video entryphones is 5 m. 2.
- Seite 14 K40912 - K40932 Two-family system connection Schema di collegamento impian- Schéma de connexion instal- to bifamiliare con due targhe e diagram with two panels and up lation deux usagers avec deux fino a tre monitor per Famiglia to three monitors per user plaques et jusqu'à...
- Seite 15 K40912 - K40932 BUS1 BUS2 BUS1 BUS2 Black Black Black Black BUS1 BUS2 BUS1 BUS2 Black Black Black Black...
-
Seite 16: Funktionsweise
K40912 - K40932 Funzionamento Operation Fonctionnement Il videocitofono può essere utilizzato The video entryphone is operated using Le portier-vidéo peut être utilisé à travers attraverso i tasti a sfioramento (soft but- the soft buttons. les touches à effleurement (soft buttons). tons). Note that the buttons can assume differ- Les touches peuvent remplir plusieurs Si noti che i tasti possono assumere di- ent functions depending on the current fonctions selon le mode d'utilisation du... - Seite 17 K40912 - K40932 Configurazione Configuration Configuration Se in condizioni di stand-by si sfiora il In stand-by condition, on pressing soft En effleurant la touche (4) en mode tasto (4) il Videocitofono entra in button (4) the video entryphone will veille, le portier-vidéo passe au mode modalità configurazione: sul monitor enter configuration mode: the menu configuration : le moniteur affiche le apparirà il menù come indicato nella shown in the figure below will appear on menu, comme l'indique la figure ci-des- figura riportata sotto.
- Seite 18 K40912 - K40932 Si noti che sulla parte destra dello scher- Note that on the right-hand side of the Un symbole graphique indiquant la fonc- mo, in corrispondenza di ogni tasto è ripor- screen, in correspondence with each but- tion associée s'affiche sur la partie droite tato un simbolo grafico con l’indicazione ton, there is a graphic symbol indicating de l'écran, face à...
- Seite 19 K40912 - K40932 Λάβετε υπόψη ότι στο δεξί τμήμα της οθόνης, σε κάθε πλήκτρο αντιστοιχεί ένα γραφικό σύμβολο με την ένδειξη της λει- τουργίας που έχει αντιστοιχιστεί: - Στο πλήκτρο (4) αντιστοιχίζεται η λειτουργία ανοίγματος μενού. - Στο πλήκτρο (5) αντιστοιχίζεται η λειτουργία εξόδου από το μενού που χρησιμοποιείται.
- Seite 20 K40912 - K40932 Configurazione > melodie Configuration > ringtones Configuration > mélodies Selezionando l’icona [suoneria] Select the ringtones icon and press Sélectionner l’icône [sonnerie] sfiorando il tasto (4) si accederà al button (4) to access the ringtone effleurer la touche (4) pour accéder sotto-menù di selezione delle melodie selection sub-menu shown in the figure au sous-menu de sélection des mélo- come riportato nella figura sotto:...
- Seite 21 K40912 - K40932 Agendo sui selettori (7) e (8) Using the selection buttons (7) Agir sur les sélecteurs (7) et (8) sarà possibile selezionare tra sei diffe- select one of the six ringtone pour choisir parmi six mélodies dif- renti melodie. Una volta selezionata la options.
- Seite 22 K40912 - K40932 Configurazione > relè e con- Configuration > relay and Configuration > relais et sultazione dispositivi colle- connected devices consultation dispositifs gati connectés Select the configuration icon to ac- Selezionando l’icona [configurazioni] Sélectionner l’icône [configurations] cess the sub-menu: - configuration of the relay activation si entrerà...
- Seite 23 K40912 - K40932 Nella schermata riportata in figura: In the screen shown in the figure: Selon la page représentée sur la figure : Al tasto (4) è associata la funzione Button (4) is associated with the La touche (4) est associée à la di selezionare l’icona relativa a ciascuna icon selection function (each icon repre- fonction de sélection de l’icône corres- dispositivo raffigurato: premendo ripetu- sents a device): press repeatedly to pondant à...
- Seite 24 K40912 - K40932 No ecrã indicado na figura: En la pantalla de la figura: Auf der abgebildeten Bildschirmseite: À tecla (4) está associada a função Al botón (4) está asociada la fun- Der Taste (4) ist die Funktion Wahl de selecionar o ícone relativo a cada dis- ción de selección del icono correspon- des Symbols zu jedem dargestellten Ge- positivo representado: premindo repeti- diente a cada dispositivo representado:...
- Seite 25 K40912 - K40932 Στην οθόνη που φαίνεται στην εικόνα: Στο πλήκτρο (4) αντιστοιχίζεται η λει- τουργία επιλογής του εικονιδίου που αφο- ρά κάθε μηχανισμό που παρουσιάζεται: πατώντας επανειλημμένα το πλήκτρο μπο- ρείτε να επιλέξετε κυκλικά τα εικονίδια. Στο πλήκτρο (5) αντιστοιχίζεται η λει- τουργία ανοίγματος μενού Στο πλήκτρο (6) δεν αντιστοιχίζεται καμία λειτουργία Στο πλήκτρο (7) αντιστοιχίζεται η λει- τουργία επιλογέα (βέλος προς τα πάνω) Στο πλήκτρο (8) αντιστοιχίζεται η λει- τουργία επιλογέα (βέλος προς τα κάτω) Σημασία εικονιδίων: - Εικονίδιο [ρολόι] : πατώντας τα πλή- κτρα (7) και (8) μπορείτε να αυξήσετε και να μειώσετε τον χρόνο ενεργοποίησης του ρελέ...
- Seite 26 K40912 - K40932 Configurazione > Indirizzo ID Configuration > ID address Configuration > Adresse ID Selezionando l’icona [indirizzi] Select the addresses icon to enter Sélectionner l’icône [adresses] entrerà nel sotto-menù: the sub-menu: pour accéder au sous-menu : Konfiguration > ID-Adresse Configuración >...
- Seite 27 K40912 - K40932 Agire sui tasti (7) e (8) per se- Use buttons (7) and (8) to se- Agir sur les touches (7) et (8) lezionare l’indirizzo: lect the address: pour sélectionner l'adresse : - Master (Indicato con M) - Master (Indicated with M) - Maître (indiquée par M) - Estensione 1 (Indicato con 1) - Extension 1 (Indicated with 1)
- Seite 28 K40912 - K40932 Configurazione > reset Configuration > reset Configuration > reset Selezionando l’icona [reset] si en- Select the reset icon to enter the Sélectionner l’icône [reset] pour ac- trerà nel sotto-menù: sub-menu: céder au sous-menu : Konfiguration > Reset Configuración > reset Configuração > reset Durch Auswahl des Symbols [Reset] Al seleccionar el icono [reset] Selecionando o ícone [reset]...
- Seite 29 K40912 - K40932 Agendo sui tasti (7) e (8) Press buttons (7) and (8) Agir sur les touches (7) et (8) può selezionare l'azione di reset [ select the reset action [ ] or cancel [ pour sélectionner l'action de reset [ ou l'annulation [ oppure l'annullamento [ The reset action is executed only when...
- Seite 30 K40912 - K40932 Consultation (et réglages au- Video feed (and audio/video Consultazione (e regolazio- dio vidéo) settings) ni audio video) In stand-by condition, on pressing button (5) Se in condizioni di stand-by si sfiora il En effleurant la touche (5) en mode veille, le portier-vidéo passe au mode the video entryphone will switch to video...
- Seite 31 K40912 - K40932 Abfrage (und Audio-/Videoein- Consulta (y ajustes audio-ví- Consulta (e regulações áu- stellungen) deo) dio/vídeo) Si estando en stand-by se toca el botón Se, em condições de standby, se tocar na Durch den Touch der Taste (5) bei Vide- ohaustelefon im Standby-Zustand wird der el videoportero entra en el modo tecla (5)
- Seite 32 K40912 - K40932 Χρήση (και ρυθμίσεις ήχου/εικό- νας) Εάν στην κατάσταση αναμονής πατήσετε το πλή- κτρο (5) , η θυροτηλεόραση θα μεταβεί στον τρόπο λειτουργίας χρήσης: στην οθόνη θα εμφα- νιστεί η εικόνα που καταγράφηκε από τον μηχανι- σμό που χρησιμοποιείται. Η σειρά χρήσης των καμερών είναι η εξής: CAM1 / CCTV1 / CAM2 / CCTV2. Λάβετε υπόψη ότι οι μηχανισμοί μπορούν να χρησιμοποιηθούν μόνο εάν ενεργοποιήθηκαν στη σχετική σελίδα διαμόρφωσης. Πατώντας επανειλημμένα το πλήκτρο (5) μεταβαίνετε στον επόμενο μηχανισμό (εάν ο εξω- τερικός μηχανισμός είναι μοναδικός, δεν γίνεται...
- Seite 33 K40912 - K40932 Intercomunicante Intercom mode Communication entre postes Se in condizioni di stand-by si sfiora il In stand-by condition, press button (6) En effleurant la touche (6) en mode tasto (6) , si entra in modalità Inter- to enter Intercom mode, as shown veille, le portier-vidéo passe au mode in- comunicante come indicato nella figura in the following figure:...
- Seite 34 K40912 - K40932 START INTERCOM STOP INTERCOM Per uscire dalla comunicazione tra di- To quit intercommunication between Pour quitter la communication entre dispositifs intérieurs, appuyer sur la spositivi interni si prema il tasto (7) indoor devices, press button (7) : il dispositivo ritornerà in modalità the device will return to stand-by mode.
- Seite 35 K40912 - K40932 Chiamata da targa Entrance panel call Appel depuis la plaque de Quando un visitatore preme il pulsante di When a visitor presses the call button on chiamata sulla targa esterna, l’immagine the entrance panel, the video image is Lorsqu'un visiteur appuie sur le bouton del visitatore viene visualizzata sullo...
- Seite 36 Website www. downloadable from the site vimar.com www.vimar.com www.vimar.com vimar.com zum Download verfügbar Installationsvorschriften Regole di installazione Installation rules Règles d’installation Die Installation muss durch Fach- L’installazione deve essere Installation should be carried L’installation doit etre confiee a des...
- Seite 37 El manual de instrucciones É possível descarregar o Το εγχειρίδιο οδηγιών είναι se puede descargar en la manual de instruções no site διαθέσιμο για λήψη από την página web www.vimar. www.vimar.com ιστοσελίδα www.vimar.com Normas de instalación Regras de instalação Κανονισμοι La instalacion debe ser realizada A instalação deve ser efetuada...
- Seite 38 K40912 - K40932...
- Seite 39 K40912 - K40932...
- Seite 40 Viale Vicenza, 14 36063 Marostica VI - Italy www.vimar.com 49401279A0 00 1804...