Herunterladen Inhalt Inhalt Diese Seite drucken
Bestron ASV45ZR Gebrauchsanweisung

Bestron ASV45ZR Gebrauchsanweisung

Standventilator
Vorschau ausblenden Andere Handbücher für ASV45ZR:

Werbung

Verfügbare Sprachen
  • DE

Verfügbare Sprachen

  • DEUTSCH, seite 7
ASV45ZR
Handleiding statiefventilator
Gebrauchsanweisung Standventilator
Mode d'emploi ventilator sur pied
45W, 220-240V ~ 50/60Hz
Instruction manual stand fan
Istruzioni per l'uso del ventilatore a piantana
Manual del usuario del ventilador de pedestal

Werbung

Inhaltsverzeichnis
loading

Inhaltszusammenfassung für Bestron ASV45ZR

  • Seite 1 ASV45ZR Handleiding statiefventilator Instruction manual stand fan Gebrauchsanweisung Standventilator Istruzioni per l’uso del ventilatore a piantana Mode d’emploi ventilator sur pied Manual del usuario del ventilador de pedestal 45W, 220-240V ~ 50/60Hz...
  • Seite 2 Gebruikershandleiding VeIlIGHeIdSVooRScHRIften - Algemeen • Lees de gebruiksaanwijzing goed door en bewaar deze zorgvuldig. • G ebruik dit apparaat alleen zoals beschreven in deze gebruiksaanwijzing. • D it apparaat mag worden gebruikt door kinderen ouder dan 8 jaar en personen met verminderde lichamelijke, zintuiglijke of geestelijke vermogens of gebrek aan ervaring en kennis, maar alleen onder toezicht of als ze instructie hebben gekregen over het veilig gebruik van het apparaat en de mogelijke gevaren ervan begrijpen. • K inderen moeten in de gaten gehouden worden om er zeker van te zijn dat ze niet met het apparaat spelen. • R einiging en onderhoud moeten niet worden gedaan door kinderen, behalve als zij ouder dan 8 jaar zijn en onder toezicht staan. • H oud het toestel en de kabel buiten bereik van kinderen tot 8 jaar oud. •...
  • Seite 3 Gebruikershandleiding WeRkInG - Algemeen Het apparaat is alleen bedoeld voor huishoudelijke doeleinden, niet voor professioneel gebruik. 1. Ventilatorvinnen 2. Ventilatorkorf 3. Motorhuis 4. Afstandsbediening 5. Bedieningskast 6. Uitschuifbaar statief 7. Hoogtevergrendeling 8. Snoer met stekker MontAGe - Statief monteren 1. P laats de twee poten van het statief kruislings over elkaar en draai ze aan het statief vast met behulp van de vier schroeven. 2. Draai de hoogtevergrendeling van het statief af. 3. S chuif het beschermkapje over het statief en plaats het over de poten. 4. Draai de hoogtevergrendeling weer op het statief.
  • Seite 4 Gebruikershandleiding 5. Draai de bevestigingsring van het motorhuis linksom (tegen de klok in) en verwijder de ring het motorhuis. 6. P laats de achterkant van de ventilatorkorf op het motorhuis, met de uitsparingen precies over de nokken van het motorhuis en het handvat aan de bovenkant. MontAGe - Ventilator monteren 1. P laats de bevestigingsring terug op de as en draai deze goed vast (rechtsom). 2. S chuif de ventilatorvinnen op de as met de uitsparingen precies over de twee nokken van de as. 3. P laats de bevestigingsknop terug op de as en draai deze vast (linksom), terwijl u de ventilatorvinnen vasthoudt. 4. O p de korfrand zitten vijf klemmen. Leg de bovenste klem zorgvuldig om de buitenste ring van de korf, zodat u de korfdelen met de schroef en het moertje aan elkaar kunt bevestigen. Draai de schroef met een kruiskopschroevendraaier aan. 5. Sluit de overige klemmen. WeRkInG - Ventileren 1. Steek de stekker in het stopcontact. 2. Druk op de “ON/SPEED” knop. De ventilator begint te ventileren. 3. Druk op dezelfde knop om te kunnen kiezen tussen laag, gemiddeld en hoge snelheid (low, mid, high).
  • Seite 5: Reiniging En Onderhoud

    Gebruikershandleiding timer mode Dit apparaat is voorzien van een tijdschakelaar waarmee u de ventilator automatisch kunt laten uitschakelen aan het einde van een ingestelde tijd. Door meermaals op de TIMER-knop te drukken verhoogt u de uitschakeltijd steeds met een half uur. Voorbeeld Wilt u de ventilator over 3,5 uur automatisch laten uitschakelen, druk dan meermaals op de ‘TIMER’-knop totdat de lampjes 0,5h, 1h en 2h tegelijkertijd oplichten. Breeze-modus De ventilator is voorzien van een Natural Breeze en een Sleep Breeze functie. Druk daarvoor op de “MODE” knop. • B ij Natural Breeze varieert de snelheid van hoog naar laag (groen lampje is aan). • B ij Sleep Breeze varieert de snelheid van normaal naar laag (lampje is uit). • D ruk opnieuw op de “MODE” knop om de Breeze-modus uit te schakelen. Een rood lampje brandt. ReInIGInG en ondeRHoud Na verloop van tijd kan er stof blijven zitten tussen de spaken van de ventilatorkorf en op de ventilatorvinnen. Probeer eerst met een handveger en/ of stofzuiger het stof te verwijderen. Lukt dit niet, dan kunt u de ventilator uit elkaar halen en reinigen.
  • Seite 6: Ce-Conformiteitsverklaring

    9. D e garantie geeft geen enkel recht op vergoeding van eventuele schade, buiten de vervanging respectievelijk reparatie van de defecte onderdelen. De importeur kan nooit aansprakelijk gesteld worden voor eventuele vervolgschade of enigerlei andere consequenties die door of in relatie met de door hem geleverde apparatuur zijn ontstaan. 10. O m aanspraak te maken op garantie kunt u zich wenden tot uw winkelier. Bestron biedt ook de mogelijkheid om het apparaat rechtstreeks ter reparatie aan te bieden aan de Bestron Service Dienst. Stuur echter nooit zomaar iets op. Het pakket kan dan namelijk geweigerd worden en eventuele kosten zijn voor uw rekening. Neem contact op met de Service Dienst en zij zullen u vertellen hoe u het apparaat moet inpakken en verzenden.
  • Seite 7: Sicherheitsbestimmungen - Elektrizität Und Wärme

    Gebrauchsanweisung SIcHeRHeItSBeStIMMunGen - Allgemein • L esen Sie die Bedienungsanleitung gut durch und bewahren Sie diese sorgfältig auf. • V erwenden Sie dieses Gerät nur so wie in dieser Bedienungsanleitung beschrieben. • D ieses Gerät kann von Kinder ab 8 Jahren verwendet werden, und Personen mit Behinderungen körperlichen, sensorischen oder geistigen Fähigkeiten oder einem Mangel an Erfahrung und Wissen, es sei denn, sie wurden von einer für ihre Sicherheit verantwortlichen Person im Gebrauch des Gerätes unterrichtet oder bei dessen Gebrauch beaufsichtigt und die Gefahren beteiligt verstehen. • K inder müssen beaufsichtigt werden, damit sie nicht mit dem Gerät spielen. • R einigung und Wartung dieses Gerät ist nicht geeignet für Kinder, ausser für Kinder elter dann 8 Jahr und mit Aufsicht. • Behaltet Gerät und Kabel nicht in de Nähe von Kinder unter 8 jahr. • L assen Sie Reparaturen von einem qualifizierten Mechaniker ausführen. Versuchen Sie nie, das Gerät selbst zu reparieren SIcHeRHeItSBeStIMMunGen - elektrizität und Wärme • B evor Sie das Gerät verwenden, prüfen Sie, ob die Netzspannung mit der auf dem Typenschild des...
  • Seite 8: Funktion - Allgemein

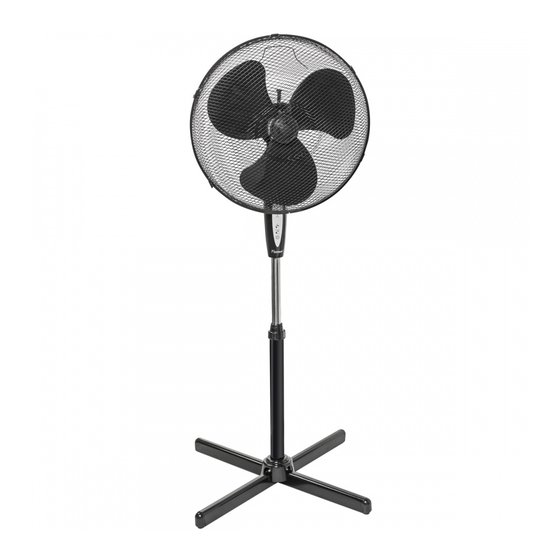
    Gebrauchsanweisung funktIon - Allgemein Das Gerät ist nur für den Hausgebrauch vorgesehen und nicht für die professionelle Verwendung. 1. Ventilatorflügel 2. Ventilatorkorb 3. Motorgehäuse 4. Fernbedienung 5. Bedienfeld 6. Ausziehbares Stativ 7. Höhensperre 8. Kabel mit Stecker MontIeRen - Stativ montieren 1. S tellen Sie die zwei Füße des Stativs kreuzweise übereinander und drehen Sie diese mithilfe der vier Schrauben am Stativ fest. 2. Drehen Sie die Höhensperre des Stativs ab. 3. S chieben Sie die Schutzkappe über das Stativ und bringen Sie es über den Füßen an. 4. D rehen Sie die Höhensperre wieder auf das Stativ.
  • Seite 9: Montieren - Ventilator Montieren

    Gebrauchsanweisung 5. D rehen Sie den Befestigungsknopf auf der Achse des Motorgehäuses rechts herum (im Uhrzeigersinn) und nehmen Sie den Knopf von der Achse. 6. B ringen Sie die Rückseite des Ventilatorkorbs auf das Motorgehäuses an. Die Aussparungen müssen genau sich über den Nocken des Motorgehäuses und der Schaft an der Oberseite befinden. MontIeRen - Ventilator montieren 1. B ringen Sie den Befestigungsring wieder auf der Achse an und ziehen Sie ihn richtig fest an (Im Uhrzeigersinn). 2. S chieben Sie die Ventilatorflügel auf die Achse, die Aussparungen müssen sich genau über den zwei Nocken der Achse befinden.
  • Seite 10: Timer Mode

    Gebrauchsanweisung 1. Drücken Sie auf die Taste “ON/SPEED”. Der Ventilator beginnt mit niedriger Geschwindigkeit zu lüften. 2. D rücken Sie auf dieselbe Taste, um zwischen niedriger, mittlerer und hoher Geschwindigkeit wählen zu können (low, mid, high). 3. Drücken Sie auf die Taste “OFF”. Der Ventilator stoppt. timer mode Dieses Gerät ist jedoch auch mit einem Zeitschalter versehen, mit dem Sie den Ventilator am Ende der eingestellten Zeit ausschalten lassen können. Durch mehrfaches Drücken die TIMER-Taste verlängern Sie die Ausschaltzeit jeweils um eine halbe Stunde. Beispiel Wenn Sie den Ventilator nach 3,5 Stunden automatisch ausschalten lassen wollen, drücken Sie mehrere Male auf die ‘TIMER’-Taste, bis die Lämpchen 0,5h, 1h und 2h gleichzeitig aufleuchten. Breeze Modus Der Lüfter hat eine Natural Breeze und eine Sleep Breeze Funktion, die nur mit der Fernbedienung zu aktivieren ist. Hierzu drücken Sie die Taste “MODE”. • N atural Breeze variiert die Geschwindigkeit von hoch zu niedrig (Ein grünes Licht leuchtet). • S leep Breeze variiert die Geschwindigkeit von normal zur niedrig. (Licht ist aus).
  • Seite 11: Garantiebestimmungen

    Sie sich zunächst telefonisch, per Fax oder Mail an den Werkskundendienst wenden. Bitte schicken Sie keine Geräte unaufgefordert. Insbesondere dürfen Pakete niemals unfrei eingesendet werden. Sprechen Sie daher zuerst mit uns. Wir sagen Ihnen wie Sie Ihr Gerät an uns einsenden sollen. 11. Das Gerät eignet sich nicht für die professionelle Verwendung. kundendIenSt Sollte unerwartet eine Störung auftreten dann können Sie sich mit dem BESTRON-Kundendienst in Verbindung setzen: www.bestron.com/service ce-konfoRMItätSeRkläRunG Dieses Produkt entspricht auf dem Gebiet der Sicherheit den Bestimmungen der folgenden europäischen Richtlinien: • EMC-Richtlinie...
  • Seite 12: Consignes De Sécurité - Généralités

    Mode d’emploi conSIGneS de SécuRIté - Généralités • L isez soigneusement le mode d’emploi et conservez-le précieusement. • U tilisez cet appareil uniquement suivant les instructions décrites dans le mode d’emploi. • C et appareil peut être utilisé par les enfants à partir de 8 ans et les personnes ayant réduit les capacités physiques, sensorielles ou mentales ou manque d’expérience et de connaissances si elles ont été aidées ou instruites concernant l’utilisation de l’appareil en toute sécurité et comprennent les risques qu’il peut entraîne. • C et appareil n’est pas un jouet. En présence d’enfants, il est important de s’assurer qu’ils ne jouent pas avec l’appareil. • N ettoyage et entretien ne doivent pas être effectués par les enfants, sauf s’ils sont âgés de plus de 8 ans et supervisés. •...
  • Seite 13 Mode d’emploi fonctIonneMent - Généralités L’appareil est destiné uniquement à l’utilisation domestique, et non à l’usage professionnel. 1. Pales du ventilateur 2. Corbeille du ventilateur 3. Bloc moteur 4. Télécommande 5. Boîtier de commande 6. Pied télescopique 7. Verrouillage de hauteur 8. C ordon et fiche MontAGe - Montage du pied 1. C roisez à angle droit les deux barres d’appui du pied télescopique et fixez-le sous le montant au moyen des quatre vis. 2. Dévissez entièrement le verrouillage de hauteur.
  • Seite 14 Mode d’emploi 4. R evissez le verrouillage de hauteur sur le montant du pied télescopique. 5. T ournez vers la droite (dans le sens des aiguilles d’une montre) le bouton de fixation de l’arbre du bloc moteur, et détachez le bouton de l’arbre. 6. M ontez l’arrière de la corbeille du ventilateur sur le bloc moteur, en plaçant les encoches exactement par-dessus les cames de l’arbre du bloc moteur, et en dirigeant la poignée vers le haut. MontAGe - Montage du ventilateur 1. R emontez l’anneau de fixation sur l’arbre et fixez-le fermement (vers la droite). 2. M ontez les pales du ventilateur sur l’arbre, les encoches passant exactement par d essus les cames de l’arbre. 3. R emontez le bouton de fixation sur l’arbre et fixez-le fermement (tournez vers la gauche) pendant que vous immobilisez les pales du ventilateur. 4. I l y a cinq agrafes dans la corbeille. Placez soigneusement la agrafe supérieure de la bride autour de l’anneau extérieur de la partie déjà fixée de la corbeille, de telle sorte que vous pouvez fixer ensemble les deux parts de la corbeille avec l’écrou et le boulon. Serrez la vis au moyen d’un tournevis à tête croisée.
  • Seite 15: Nettoyage Et Entretien

    Mode d’emploi 1. A ppuyer sur le bouton “ON/SPEED” (Marche/Vitesse). Le ventilateur commence à tourner à faible vitesse. 2. A ppuyer sur ce même bouton pour choisir entre trois vitesses : lente, moyenne ou rapide (low, mid, high). 3. Appuyer sur le bouton “OFF” (Marche/Vitesse). Le ventilateur s’arrête.
  • Seite 16: Conditions De Garantie

    10. P our pouvoir faire appel à la garantie, vous pouvez vous adresser à votre revendeur. Bestron offre aussi la possibilité de faire réparer l’appareil directement par le service après-vente de Bestron. Toutefois, n’envoyez jamais rien sans avoir reçu d’instructions au préalable. Le colis pourrait en effet être refusé et les frais éventuels seraient à votre charge. Prenez contact avec le service après-vente qui vous expliquera comment vous devez emballer et expédier l’appareil.
  • Seite 17: Safety Instructions - General

    user’s instructions SAfety InStRuctIonS - General • P lease read these instructions carefully and retain them for future reference. • Use this appliance solely in accordance with these instructions. • T his appliance can be used by children older than 8 years and persons with reduced physical, sensory or mental capabilities or lack of experience and knowledge, but only if they have been given supervision or instruction concerning use of the appliance in a safe way and understand the hazards involved. • C hildren should be supervised to ensure that they do not play with the appliance. • C leaning and maintenance must not be done by children, except if they are older than 8 years and supervised. •...
  • Seite 18 user’s instructions opeRAtIon - General The appliance is intended only for domestic use, not for professional use. 1. Fan blades 2. Fan housing 3. Motor housing 4. Remote control 5. Control unit 6. Telescopic stand 7. Height lock 8. Power cord and plug MontAGe - Assembling the stand 1. L ay the two feet of the stand across each other, at right angles, and fit them to the upright using the four screws. 2. Remove the height lock from the upright. 3. S lide the protective cover onto the upright, and fit it over the feet. 4. Fit the height lock to the upright.
  • Seite 19: Operation - Remote Control

    user’s instructions 5. U nscrew the locking ring from the motor-housing (by turning it counterclockwise) and remove the ring from the motor housing. 6. F it the rear of the fan housing onto the motor-housing, making sure that the openings are aligned precisely with the lugs on the motor housing and that the grip is at the top. MontAGe - Assembling the fan 1. S lide the locking ring onto the shaft, and screw it tight (clockwise). 2. S lide the fan blades onto the shaft, making sure that the notches are aligned precisely with the two keys on the shaft.
  • Seite 20: Cleaning And Maintenance

    user’s instructions timer mode The appliance can be turned off manually by pressing the OFF button. However this appliance is fitted with a timer with allows you to shut off the appliance at the end of a pre determed time. By pressing the TIMER button repeatedly you increase the time in increments of 0.5 hours. for example If you want to shut off the appliance after 3,5 hours, press the TIMER button repeatedly, till the indicator lamps 0,5h, 1h and 2h are lit at the same time. Breeze mode The fan is equipped with a Natural Breeze and a Sleep Breeze function that only can be switched on with with the remote control. To do so, press the “MODE” button. • n Natural Breeze mode the speed varies from high to low (green light is on). • t Sleep Breeze the speed varies from normal to low (light is off). • P ress the ‘MODE’ button again to deactivate the setting. A red light illuminates. cleAnInG And MAIntenAnce Over the course of time dust can accumulate between the spokes in the fan housing, and on the fan blades. Always begin by trying to remove the dust with a brush and/or vacuum cleaner. If this does not remove all the dust you can always dismantle the fan and clean it. 1. Remove the plug from the wall socket. 2. L oosen the bolt in the rim around the fan housing using a small crosshead screwdriver. 3. R emove the rim and the front half of the filter housing. 4. H old the fan blades to stop them from turning, and unscrew the spinner by turning clockwise in the direction of the ‘LOOSEN’ arrow. Remove the fan blades from the motor housing.
  • Seite 21: Guarantee Terms

    Losses incurred during transport. b. The removal or changing of the appliance’s serial number. 8. The guarantee does not cover power cords, lamps or glass parts. 9. N o claims can be submitted under this warranty for damage other than the repair or replacement of faulty parts. The importer can never be held responsible for any consequential loss or damage or any other consequences, resulting either directly or indirectly from the appliance supplied by the importer. 10. I n case of claims under guarantee you can contact your dealer where the appliance is purchased. Bestron offers you also the possibility to send the appliance directly to our Service Department. Do not send your appliance without consulting us. The package may be refused and any any costs will be for your account. Please contact the Service Department and they will tell you how to pack and send the appliance. 11. This appliance is not suitable for professional use. SeRVIce If a fault should occur please contact the BESTRON service department: www.bestron.com/service ce declARAtIon of confoRMIty This product conforms to the essential requirements of the following EU safety directives: • EMC Directive...
  • Seite 22 Istruzioni per l’uso pReScRIZIonI dI SIcuReZZA - Generalità • Leggere con attenzione le istruzioni per l’uso e conservarle con cura. • U tilizzare questo apparecchio esclusivamente come descritto nelle presenti istruzioni. • Q uesto apparecchio può essere utilizzato da bambini di età da 8 anni e di sopra e persone con ridotte capacità fisiche, sensoriali o mentali o mancanza di esperienza e conoscenza se esse sono state date supervisione o istruzioni riguardanti l’uso dell’apparecchio in modo sicuro e capire i rischi coinvolti. • I bambini vanno sorvegliati per accertarsi che non si mettano a giocare con l’apparecchio. • P ulizia e manutenzione non dovrebbe essere fatto da bambini, tranne se sono più vecchi di 8 anni e sorvegliati. • Tenere l’apparecchio e il cavo lontano da bambini a 8 anni. • F ar eseguire le riparazioni a un tecnico qualificato. Non cercare mai di riparare da soli l’apparecchio. noRMe dI SIcuReZZA - elettricità e calore • P rima di utilizzare l’apparecchio, controllare che la tensione di rete corrisponda alla tensione di esercizio indicata sulla targhetta identificativa dell’apparecchio.
  • Seite 23 Istruzioni per l’uso funZIonAMento - Avvertenze generali Questo apparecchio è concepito esclusivamente per l’impiego domestico e non per l’uso professionale. 1. Pale del ventilatore 2. Griglia di protezione 3. Vano motore 4. Telecomando 5. Blocco comandi 6. Piantana estraibile 7. Dispositivo di blocco della regolazione dell’altezza 8. C avo e spina MontAGGIo - Montaggio della piantana 1. P osizionare le due zampe della piantana in modo incrociato l’una sopra all’altra e fissarle alla piantana mediante le 4 viti in dotazione. 2. S vitare e rimuovere dalla piantana il dispositivo di blocco della regolazione dell’altezza. 3. I nserire il cappuccio di protezione sulla piantana e posizionarlo correttamente sulle zampe.
  • Seite 24 Istruzioni per l’uso 5. R uotare verso sinistra (in senso antiorario) l’anello di fissaggio presente sull del vano motore e rimuovere l’anello dall del vano motore. 6. I nserire la parte posteriore della griglia di protezione del ventilatore sull del vano motore, avendo cura di posizionare esattamente i fori in corrispondenza dei perni del vano motore e la maniglia in alto. MontAGGIo - Montaggio del ventilatore 1. R iposizionare l’anello di fissaggio sull’asse e assicurarsi di serrarlo in modo corretto (Senso orario). 2. I nserire quindi sull’asse il blocco pale del ventilatore avendo cura di posizionare esattamente i fori in corrispondenza dei due perni dell’asse. 3. R iposizionare la manopola di fissaggio sull’asse e assicurarsi di serrarla in modo corretto (in senso antiorario) tenendo ben fermo il blocco pale del ventilatore.
  • Seite 25: Pulizia E Manutenzione

    Istruzioni per l’uso 1. Premere il tasto “ON / SPEED”. Al primo avvio il ventilatore funziona a bassa velocità. 2. Premere lo stesso tasto per scegliere tra bassa, media ed alta velocità (low, mid, high). 3. Premere il tasto “OFF”. Il ventilatore si ferma. timer mode L’apparecchio può essere disattivato manualmente premendo il pulsante OFF. Tuttavia, questo apparecchio è dotato di un timer con consente di spegnere l’apparecchio al termine di un periodo di pre determed. Premendo il tasto TIMER ripetutamente si aumenta il tempo in incrementi di 0,5 ore. per esempio Se si desidera disattivare l’apparecchio dopo 3,5 ore, premere il tasto TIMER ripetutamente, finché le spie di 0,5 h, 1h e 2h sono accese contemporaneamente. Breeze mode Il ventilatore è dotato di una Natural Breeze e una Sleep Breeze per abilitare la funzione di trascinamento che solo con il telecomando. Per farlo, premere il tasto “MODE”. • A Natural Breeze varia la velocità da alto a basso (luce verde è accesa). • A l sonno varia la velocità del normale a basso Sleep Breeze (la luce è spenta).
  • Seite 26: Condizioni Di Garanzia

    10. Per reclamare la garanzia, potete rivolgervi al vostro negoziante. Bestron offre anche la possibilità di far riparare l’apparecchio direttamente dal Centro assistenza Bestron. Tuttavia, non spedite mai l’apparecchio senza aver fatto le dovute considerazioni. Il pacco può infatti essere respinto e le eventuali spese sono a vostro carico. Contattate il Centro assistenza e vi diranno come imballare e spedire l’apparecchio.
  • Seite 27: Normas De Seguridad - General

    Manual del usuario noRMAS de SeGuRIdAd - General • L ea las instrucciones de uso con detenimiento y guárdelas cuidadosamente. • U tilice este aparato únicamente en la forma que se describe en las instrucciones. • E ste aparato puede ser utilizado por niños de 8 años y arriba y personas con reducción capacidades físicas, sensoriales o mentales o falta de experiencia y conocimiento si han tenido supervisión o instrucciones relativas al uso del aparato de forma segura y entender los riesgos que conllevan. • Es preciso vigilar que los niños no jueguen con el aparato. • L impieza y mantenimiento no deben ser hechos por los niños, excepto si son mayores de 8 años y supervisados. • M antener el aparato y el cable alejado de los niños de 8 años de edad. • H aga reparar el aparato únicamente por un técnico cualificado. No intente nunca reparar el aparato usted mismo. noRMAS de SeGuRIdAd - electricidad y fuentes de calor • A ntes de utilizar el aparato, verifique que el voltaje de la red corresponda al voltaje indicado en la placa.
  • Seite 28: Funcionamiento General

    Manual del usuario funcIonAMIento - General Este aparato está concebido únicamente para uso doméstico, no para uso profesional. 1. Aspas 2. Rejilla 3. Alojamiento del motor 4. Control remoto 5. Caja de mando 6. Pedestal extensible 7. Anillo para fijar la altura 8. Cable con enchufe MontAje - ensamblaje del pedestal 1. H aga una cruz con las dos patas que forman la base del pedestal y fíjelas a éste con los cuatro tornillos adjuntos. 2. R etire el anillo de fijación de la altura del pedestal.
  • Seite 29: Funcionamiento - Mando A Distancia

    Manual del usuario 5. G ire el anillo de fijación del alojamiento del motor hacia la izquierda (en dirección opuesta a las agujas del reloj) y retírelo. 6. C oloque la parte posterior de la rejilla (B) en el orificios exactamente sobre los topes del alojamiento del motor y la empuñadura hacia arriba. MontAje - ensamblaje del ventilador 1. C oloque el anillo de fijación nuevamente en el eje y apriételo bien (derecha). 2. C oloque las aspas en el eje con los orificios exactamente sobre los dos topes. 3. C oloque nuevamente la perilla en el eje y apriétela (girando hacia la izquierda) mientras sostiene las aspas. 4. E l aro tiene cinco abrazaderas. Coloque la abrazadera superior del aro cuidadosamente sobre el anillo exterior de la rejilla, de manera que pueda fijar los partes del rejilla con la tuerca y el tornillo. Apriete el tornillo con un destornillador de estrella. 5. Cierre la otra abrazaderas. funcIonAMIento - Ventilar 1. Conecte el enchufe en una toma de corriente y conectar a la pared.
  • Seite 30: Limpieza Y Mantenimiento

    Manual del usuario 1. P ulse el botón “ON / SPEED”. En un primer momento la puesta en marcha el ventilador funciona a baja velocidad. 2. Pulse el mismo botón para elegir entre bajo, medio y de alta velocidad (low, mid, high). 3. P ulse el botón “OFF”. El ventilador se detiene.. timer mode Aaparato se puede desactivar manualmente pulsando el botón de apagado. Sin embargo, este aparato está dotado de un temporizador con le permite apagar el aparato al final de una época pre determed. Al pulsar el botón TIMER varias veces a aumentar el tiempo en incrementos de 0,5 horas. por ejemplo Si desea apagar el aparato después de 3,5 horas, pulse el botón TIMER varias veces, hasta que las luces indicadoras de 0,5 h, 1h y 2 h se encienden al mismo tiempo. Breeze modo El ventilador está equipado con una Natural Breeze y una Sleep Breeze para activar la función de arrastre que sólo con el control remoto. Para ello, pulse el botón “MODE”. • E n Natural Breeze varía la velocidad de alta a baja (una luz verde está encendida.). • E n el sueño varía la velocidad del normal con Sleep Breeze (la luz está apagada). • P ulse el botón “MODE” de nuevo para desactivar el ajuste. Una luz roja está encendida. lIMpIeZA y MAntenIMIento Con el tiempo se puede acumular polvo entre la rejilla o en las aspas. Pruebe primero a limpiar el polvo con un cepillo o con la aspiradora. Si no lo consigue, puede desarmar el ventilador para limpiarlo.
  • Seite 31: Disposiciones De Garantía

    9. L a garantía no concede derecho a reclamar indemnización alguna por daños, diferente a la sustitución o reparación, respectivamente, de las partes defectuosas. El importador no podrá ser responsabilizado por daños consecuenciales o por cualquier otra clase de efectos causados por el aparato suministrado por él o que guarden relación con el mismo. 10. Para hacer valer la garantía. Puede acudir a la tienda donde compró el producto. Bestron también ofrece la posibilidad de entregar el aparato directamente al servicio técnico Bestron para su reparación. Pero no podrá enviarlo de cualquier manera. El paquete podría ser rechazado y los costes asociados correrían de su cuenta. Póngase en contacto con el servicio técnico, donde le indicarán cómo debe embalar y enviar el aparato.
  • Seite 32 Bestron Customer Service WhatsApp +31 6 46 79 22 53...

Inhaltsverzeichnis