Inhaltsverzeichnis
Werbung
Verfügbare Sprachen
Verfügbare Sprachen
Quicklinks
All manuals and user guides at all-guides.com
Copyright Notice:
Copyright Notice:
Copyright Notice:
Copyright Notice:
Copyright Notice:
No part of this installation guide may be reproduced, transcribed, transmitted, or trans-
lated in any language, in any form or by any means, except duplication of documen-
tation by the purchaser for backup purpose, without written consent of ASRock Inc.
Products and corporate names appearing in this guide may or may not be registered
trademarks or copyrights of their respective companies, and are used only for identifica-
tion or explanation and to the owners' benefit, without intent to infringe.
Disclaimer:
Disclaimer:
Disclaimer:
Disclaimer:
Disclaimer:
Specifications and information contained in this guide are furnished for informational
use only and subject to change without notice, and should not be constructed as a
commitment by ASRock. ASRock assumes no responsibility for any errors or omissions
that may appear in this guide.
With respect to the contents of this guide, ASRock does not provide warranty of any kind,
either expressed or implied, including but not limited to the implied warranties or
conditions of merchantability or fitness for a particular purpose. In no event shall
ASRock, its directors, officers, employees, or agents be liable for any indirect, special,
incidental, or consequential damages (including damages for loss of profits, loss of
business, loss of data, interruption of business and the like), even if ASRock has been
advised of the possibility of such damages arising from any defect or error in the guide
or product.
This device complies with Part 15 of the FCC Rules. Operation is subject to the
following two conditions:
(1) this device may not cause harmful interference, and
(2) this device must accept any interference received, including interference that
may cause undesired operation.
CALIFORNIA, USA ONLY
The Lithium battery adopted on this motherboard contains Perchlorate, a toxic
substance controlled in Perchlorate Best Management Practices (BMP) regulations
passed by the California Legislature. When you discard the Lithium battery in
California, USA, please follow the related regulations in advance.
"Perchlorate Material-special handling may apply, see
www.dtsc.ca.gov/hazardouswaste/perchlorate"
ASRock Website: http://www.asrock.com
Published April 2007
Copyright©2007 ASRock INC. All rights reserved.
ASRock ConRoe1333-DVI/H Motherboard
1 1 1 1 1
Werbung
Inhaltsverzeichnis

Verwandte Anleitungen für ASROCK ConRoe1333-DVI/H


Inhaltszusammenfassung für ASROCK ConRoe1333-DVI/H
- Seite 1 ASRock. ASRock assumes no responsibility for any errors or omissions that may appear in this guide. With respect to the contents of this guide, ASRock does not provide warranty of any kind, either expressed or implied, including but not limited to the implied warranties or conditions of merchantability or fitness for a particular purpose.
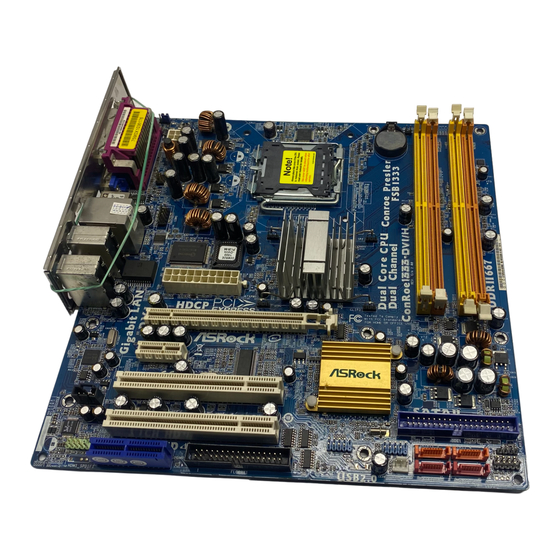
- Seite 2 Chassis Speaker Header (SPEAKER 1) ATX Power Connector (ATXPWR1) System Panel Header (PANEL1) BIOS FWH Chip Fourth SATAII Connector (SATAII_4; Orange) Serial Port Connector (COM1) Secondary SATAII Connector (SATAII_2; Red) Infrared Module Header (IR1) 2 2 2 2 2 ASRock ConRoe1333-DVI/H Motherboard...
- Seite 3 “ok”. Choose “2CH”, “4CH”, “6CH”, or “8CH” and then you are allowed to select “Realtek HDA Primary output” to use Rear Speaker, Central/Bass, and Front Speaker, or select “Realtek HDA Audio 2nd output” to use front panel audio. 3 3 3 3 3 ASRock ConRoe1333-DVI/H Motherboard...
-
Seite 4: Package Contents
1. Introduction 1. Introduction 1. Introduction 1. Introduction Thank you for purchasing ASRock ConRoe1333-DVI/H motherboard, a reliable moth- erboard produced under ASRock’s consistently stringent quality control. It delivers excellent performance with robust design conforming to ASRock’s commitment to quality and endurance. - Seite 5 - Support DDRII667/533 (see CAUTION 6) - Max. capacity: 4GB (see CAUTION 7) Hybrid Booster - CPU Frequency Stepless Control (see CAUTION 8) - ASRock U-COP (see CAUTION 9) - Boot Failure Guard (B.F.G.) Expansion Slot - 1 x PCI Express x16 slot...
- Seite 6 Overclocking may affect your system stability, or even cause damage to the components and devices of your system. It should be done at your own risk and expense. We are not responsible for possible damage caused by overclocking. 6 6 6 6 6 ASRock ConRoe1333-DVI/H Motherboard...
- Seite 7 SATAII mode. You can also connect SATA hard disk to SATAII connector directly. ® ® 13. Power Management for USB 2.0 works fine under Microsoft Windows Vista 64-bit / Vista / XP 64-bit / XP SP1 or SP2 / 2000 SP4. 7 7 7 7 7 ASRock ConRoe1333-DVI/H Motherboard...
- Seite 8 “DVMT Mode Select” option under BIOS. * If you plan to use external graphics card on this motherboard, please refer to Premium Discrete requirement at http://www.asrock.com * If the onboard VGA supports DVI, it must also support HDCP function to qualify for Windows ®...
- Seite 9 CPU surface is unclean or if there is any bent pin on the socket. Do not force to insert the CPU into the socket if above situation is found. Otherwise, the CPU will be seriously damaged. 9 9 9 9 9 ASRock ConRoe1333-DVI/H Motherboard...
- Seite 10 Use your left hand index finger and thumb to support the load plate edge, engage PnP cap with right hand thumb and peel the cap from the socket while pressing on center of PnP cap to assist in removal. ASRock ConRoe1333-DVI/H Motherboard...
- Seite 11 Step 5. Connect fan header with the CPU fan connector on the motherboard. Step 6. Secure excess cable with tie-wrap to ensure cable does not interfere with fan operation or contact other components. ASRock ConRoe1333-DVI/H Motherboard...
- Seite 12 2.3 Installation of Memory Modules (DIMM) 2.3 Installation of Memory Modules (DIMM) ConRoe1333-DVI/H motherboard provides four 240-pin DDRII (Double Data Rate II) DIMM slots, and supports Dual Channel Memory Technology. For dual channel configuration, you always need to install identical (the same brand, speed, size and chip-type) DDRII DIMM pair in the slots of the same color.
- Seite 13 DIMMs or the system components. Step 1. Unlock a DIMM slot by pressing the retaining clips outward. Step 2. Align a DIMM on the slot such that the notch on the DIMM matches the break on the slot. ASRock ConRoe1333-DVI/H Motherboard...
-
Seite 14: Installing An Expansion Card
The HDMR slot is shared with PCI2 slot. PCIE Slots: PCIE1 (PCIE x16 slot) is used for PCI Express cards with x16 lane width graphics cards or ASRock DVI Graphics-HDCP card. PCIE2 (PCIE x1 slot) is used for PCI Express cards with x1 lane width cards, such as Gigabit LAN card, SATA2 card, etc. - Seite 15 Step 2. Connect the DVI-D monitor to the DVI-D output connector of DVI Graphics- HDCP card which is inserted to PCIE1 (PCIE x16 slot) on this motherboard. DVI-D connector of DVI-D output connector DVI-D monitor of DVI Graphics-HDCP card ASRock ConRoe1333-DVI/H Motherboard...
- Seite 16 HDTV set-top-boxes, as well as few entertain- ment PCs requires a secure connection to a compliant display. Due to the increase in manufacturers employing HDCP in their equipment, it is highly recommended that the HDTV you purchase is compatible. ASRock ConRoe1333-DVI/H Motherboard...
- Seite 17 To clear and reset the system parameters to default setup, please turn off the computer and unplug the power cord from the power supply. After waiting for 15 seconds, use a jumper cap to short 2 pins on CLRCMOS1 for 5 seconds. ASRock ConRoe1333-DVI/H Motherboard...
- Seite 18 SATA power cable to the power connector on each drive. Then (Optional) connect the white end of SATA connect to the SATA HDD power connector power cable to the power connect to the connector of the power supply. power supply ASRock ConRoe1333-DVI/H Motherboard...
- Seite 19 D. MIC_RET and OUT_RET are for HD audio panel only. You don’t need to connect them for AC’97 audio panel. E. Enter BIOS Setup Utility. Enter Advanced Settings, and then select Chipset Configuration. Set the Front Panel Control option from [Auto] to [Enabled]. ASRock ConRoe1333-DVI/H Motherboard...
-
Seite 20: Atx Power Connector
Please note that it is necessary to connect a power supply with (4-pin ATX12V1) ATX 12V plug to this connector (see p.2 No. 2) so that it can provides sufficient power. Failing to do so will cause the failure to power up. ASRock ConRoe1333-DVI/H Motherboard... - Seite 21 All manuals and user guides at all-guides.com Serial port Header This COM1 header supports a serial port module. (9-pin COM1) (see p.2 No. 29) ASRock ConRoe1333-DVI/H Motherboard...
- Seite 22 Please visit HITACHI’s website for details: http://www.hitachigst.com/hdd/support/download.htm The above examples are just for your reference. For different SATAII hard disk products of different vendors, the jumper pin setting methods may not be the same. Please visit the vendors’ website for the updates. ASRock ConRoe1333-DVI/H Motherboard...
- Seite 23 PCI / PCIE buses are in the fixed mode so that FSB can operate under a more stable overclocking environment. Please refer to the warning on page 6 for the possible overclocking risk before you apply Untied Overclocking Technology. ASRock ConRoe1333-DVI/H Motherboard...
- Seite 24 Main Menu automatically if “AUTORUN” is enabled in your computer. If the Main Menu does not appear automatically, locate and double-click on the file “ASSETUP. EXE” from the BIN folder in the Support CD to display the menus. ASRock ConRoe1333-DVI/H Motherboard...
- Seite 25 All manuals and user guides at all-guides.com ASRock ConRoe1333-DVI/H Motherboard...
- Seite 26 All manuals and user guides at all-guides.com ® ® ® ® ® ® ® ® ® ® ASRock ConRoe1333-DVI/H Motherboard...
- Seite 27 All manuals and user guides at all-guides.com ® ® ASRock ConRoe1333-DVI/H Motherboard...
- Seite 28 All manuals and user guides at all-guides.com ® ® ® ® ® ® ® ® ® ® ® ASRock ConRoe1333-DVI/H Motherboard...
- Seite 29 All manuals and user guides at all-guides.com ® ® ® ® ® ® ASRock ConRoe1333-DVI/H Motherboard...
- Seite 30 All manuals and user guides at all-guides.com ASRock ConRoe1333-DVI/H Motherboard...
- Seite 31 All manuals and user guides at all-guides.com ASRock ConRoe1333-DVI/H Motherboard...
- Seite 32 All manuals and user guides at all-guides.com ASRock ConRoe1333-DVI/H Motherboard...
- Seite 33 All manuals and user guides at all-guides.com DDRII_1 DDRII_2 DDRII_3 DDRII_4 DDRII_1 DDRII_2 DDRII_3 DDRII_4 DS/SS* DS/SS DS/SS DS/SS DS/SS DS/SS ASRock ConRoe1333-DVI/H Motherboard...
- Seite 34 All manuals and user guides at all-guides.com ASRock ConRoe1333-DVI/H Motherboard...
- Seite 35 All manuals and user guides at all-guides.com ASRock ConRoe1333-DVI/H Motherboard...
- Seite 36 All manuals and user guides at all-guides.com ASRock ConRoe1333-DVI/H Motherboard...
- Seite 37 All manuals and user guides at all-guides.com ® ® ® ® ASRock ConRoe1333-DVI/H Motherboard...
- Seite 38 All manuals and user guides at all-guides.com ASRock ConRoe1333-DVI/H Motherboard...
- Seite 39 All manuals and user guides at all-guides.com SATAII_4 SATAII_3 SATAII_1 SATAII_2 ASRock ConRoe1333-DVI/H Motherboard...
- Seite 40 All manuals and user guides at all-guides.com ASRock ConRoe1333-DVI/H Motherboard...
- Seite 41 All manuals and user guides at all-guides.com 1 2 3 4 ASRock ConRoe1333-DVI/H Motherboard...
- Seite 42 All manuals and user guides at all-guides.com ASRock ConRoe1333-DVI/H Motherboard...
- Seite 43 All manuals and user guides at all-guides.com ® ASRock ConRoe1333-DVI/H Motherboard...
- Seite 44 All manuals and user guides at all-guides.com ® ® ASRock ConRoe1333-DVI/H Motherboard...
- Seite 45 All manuals and user guides at all-guides.com ASRock ConRoe1333-DVI/H Motherboard...
-
Seite 46: Einführung
1. Einführung 1. Einführung 1. Einführung Wir danken Ihnen für den Kauf des ASRock ConRoe1333-DVI/H Motherboard, ein zuverlässiges Produkt, welches unter den ständigen, strengen Qualitätskontrollen von ASRock gefertigt wurde. Es bietet Ihnen exzellente Leistung und robustes Design, gemäß der Verpflichtung von ASRock zu Qualität und Halbarkeit. -
Seite 47: Spezifikationen
- Unterstützt DDRII667/533 (siehe VORSICHT 6) - Max. 4GB (siehe VORSICHT 7) Hybrid Booster - Schrittloser CPU-Frequenz-Kontrolle (siehe VORSICHT 8) - ASRock U-COP (siehe VORSICHT 9) - Boot Failure Guard (B.F.G. – Systemstartfehlerschutz) Erweiterungs- - 1 x PCI Express x16-Steckplätze steckplätze... - Seite 48 - Drehzahlmessung für Gehäuselüfter - CPU-Lüftergeräuschdämpfung - Spannungsüberwachung: +12V, +5V, +3.3V, Vcore ® ® Betriebssysteme - Unterstützt Microsoft Windows 2000 / XP / XP 64-Bit / Vista / Vista 64-Bit (siehe VORSICHT 14) Zertifizierungen - FCC, CE, WHQL ASRock ConRoe1333-DVI/H Motherboard...
- Seite 49 Wird eine Überhitzung der CPU registriert, führt das System einen automatischen Shutdown durch. Bevor Sie das System neu starten, prüfen Sie bitte, ob der CPU-Lüfter am Motherboard richtig funktioniert, und stecken Sie bitte den Stromkabelstecker aus und dann wieder ein. Um die ASRock ConRoe1333-DVI/H Motherboard...
-
Seite 50: Minimale Hardwarevorausetzungen Für Windows
* Sofern Sie eine externe Grafikkarte mit diesem Motherboard verwenden möchten, lesen Sie bitte unter Premium Discrete-Anforderungen auf unseren Internetseiten nach: http://www.asrock.com * Wenn VGA auf der Platte DVI unterstützt, muß es auch HDCP Function ® unterstützen,um Windows Vista Premium 2007 logo.zu befähigen. ASRock ConRoe1333-DVI/H Motherboard... -
Seite 51: Sicherheitshinweise Vor Der Montage
Bevor Sie die 775-Pin CPU in den Sockel sitzen, prüfen Sie bitte, ob die CPU-Oberfläche sauber ist und keine der Kontakte verbogen sind. Setzen Sie die CPU nicht mit Gewalt in den Sockel, dies kann die CPU schwer beschädigen. ASRock ConRoe1333-DVI/H Motherboard... - Seite 52 775-Pin Sockel 775-Pin CPU Um die CPU ordnungsgemäß einsetzen zu können, richten Sie die zwei Orientierungskerben der CPU mit den beiden Markierungen des Sockels aus. Schritt 2-3. Drücken Sie die CPU vorsichtig in vertikaler Richtung in den Sockel. ASRock ConRoe1333-DVI/H Motherboard...
- Seite 53 Schritt 4. Sockel schließen: Schritt 4-1. Drehen Sie die Ladeplatte auf den Kühlkörper (IHS). Schritt 4-2. Drücken Sie leicht auf die Ladeplatte und schließen Sie den Ladehebel. Schritt 4-3. Sichern Sie Ladehebel und Ladeplatte mithilfe des Hebelverschlusses. ASRock ConRoe1333-DVI/H Motherboard...
- Seite 54 Uhrzeigersinn zu drehen, wird der Kühlkörper nicht ordnungsgemäß am Motherboard befestigt. Schritt 5. Schließen Sie den Lüfter an den CPU- Lüfteranschluss des Motherboards. Schritt 6. Befestigen Sie überschüssiges Kabel mit Band, um eine Störung des Lüfters oder Kontakt mit anderen Teilen zu vermeiden. ASRock ConRoe1333-DVI/H Motherboard...
-
Seite 55: Installation Der Speichermodule (Dimm)
2.3 Installation der Speichermodule (DIMM) 2.3 Installation der Speichermodule (DIMM) 2.3 Installation der Speichermodule (DIMM) Die Motherboards ConRoe1333-DVI/H bieten vier 240-pol. DDRII (Double Data Rate II) DIMM-Steckplätze und unterstützen die Dual-Kanal-Speichertechnologie. Für die Dual-Kanalkonfiguration dürfen Sie nur identische (gleiche Marke, Geschwindigkeit, Größe und gleicher Chiptyp) DDRII DIMM-Paare in den... - Seite 56 Systemkomponenten hinzufügen oder entfernen. Schritt 1: Öffnen Sie einen DIMM-Slot, indem Sie die seitlichen Clips nach außen drücken. Schritt 2: Richten Sie das DIMM-Modul so über dem Slot aus, dass das Modul mit der Kerbe in den Slot passt. ASRock ConRoe1333-DVI/H Motherboard...
-
Seite 57: Einbau Einer Erweiterungskarte
Express-Slots): Express-Slots): Express-Slots): Express-Slots): Es stehen 2 PCI-, 1 HDMR- und 2 PCI Express-Slot auf dem ConRoe1333-DVI/H Motherboard zur Verfügung. PCI-Slots: PCI-Slots werden zur Installation von Erweiterungskarten mit dem 32bit PCI-Interface genutzt. HDMR-Slot: Der HDMR-Steckplatz dient zur Aufnahme der HDMR-Karte mit v.92 Modem-Funktionalität. - Seite 58 Steckplatz). Details hierzu sind im Installationsvorgang für eine Erweiterungskarte auf Seite 57 angegeben. DVI Graphics-HDCP-Karte Schritt 2: Verbinden Sie den DVI-D-Anschluss des DVI-D-Eingangsmonitors mit dem DVI-D-Ausgang der DVI Graphics-HDCP-Karte, die in PCIE1 (PCIE x16-Steckplatz) auf diesem Motherboard eingefügt ist. ASRock ConRoe1333-DVI/H Motherboard...
- Seite 59 HDCP bedeutet,daß Hoch-Breitband Digitalinhalt Schutz, Eine Spezifikation ist von Intel ® für den Schutz des Digitalunterhaltunginhalts entwickelt, der das DVI Interface benutzt. HDCP ist ein Schemakopieschutz, um die Möglichkeit für das Auffangen derDigitaldaten zwischen Videoquelle oder Transmitter auszusondern, dergleichen ein Computer, DVD ASRock ConRoe1333-DVI/H Motherboard...
-
Seite 60: Einstellung Der Jumper
Systeminformationen wie Systemkennwort, Datum, Zeit und System-Setupeinstellungen. Um die Einstellungen zu löschen und Default-Werte wiederherzustellen, schalten Sie den Computer aus, ziehen Sie den Netzstecker und überbrücken Sie 2-pin von CLRCMOS1 mithilfe des Jumpers für 5 Sekunden. ASRock ConRoe1333-DVI/H Motherboard... -
Seite 61: Integrierte Header Und Anschlüsse
(SATAII_4: siehe S.2, Punkt 13) ermöglicht eine SATAII_1 SATAII_2 Datenübertragungsrate bis 3,0 Gb/s. Serial ATA- (SATA-) Sie können beide Enden des Datenkabel SATA-Datenkabels entweder (Option) mit der SATA / SATAII- Festplatte oder dem SATAII-Anschluss am Mainboard verbinden. ASRock ConRoe1333-DVI/H Motherboard... - Seite 62 MPEG-Karten mit Ihrem System zu verbinden. Anschluss für Audio auf Dieses Interface zu einem der Gehäusevorderseite Audio-Panel auf der Vorderseite Ihres Gehäuses, ermöglicht (9-Pin HD_AUDIO1) Ihnen eine bequeme (siehe S.2 - No. 22) Anschlussmöglichkeit und Kontrolle über Audio-Geräte. ASRock ConRoe1333-DVI/H Motherboard...
-
Seite 63: Gehäuselautsprecher-Header
(siehe S.2 - No. 17) schwarzen Draht dem Erdungsstift an. CPU-Lüfteranschluss Verbinden Sie das CPU - Lüfterkabel mit diesem (4-pin CPU_FAN1) Anschluss und passen Sie den (siehe S.2 - No. 3) schwarzen Draht dem 1 2 3 4 Erdungsstift an. ASRock ConRoe1333-DVI/H Motherboard... - Seite 64 (siehe S.2 - Nr. 2) damit ausreichend Strom geliefert werden kann. Andernfalls reicht der Strom nicht aus, das System zu starten. COM-Anschluss-Header Dieser COM-Anschluss- Header wird verwendet, um (9-pin COM1) ein COM-Anschlussmodul zu (siehe S.2 - No. 29) unterstützen. ASRock ConRoe1333-DVI/H Motherboard...
-
Seite 65: Anleitung Zur Sa
DOS ausführbares Dienstprogramm. Auf der Internetseite von HITACHI finden Sie entsprechende Details: http://www.hitachigst.com/hdd/support/download.htm Die Beispiele oben dienen lediglich Ihrer Referenz. Die Steckbrückeneinstellungen können bei unterschiedlichen SATA II Festplatten verschiedener Hersteller abweichen. Aktualisierungen und ergänzende Informationen finden Sie auf der Internetseite des Herstellers. ASRock ConRoe1333-DVI/H Motherboard... - Seite 66 1. Setzen Sie die HDMR-Karte in den HDMR-Steckplatz am Motherboard ein. Achten Sie bitte darauf, dass die HDMR-Karte komplett in den Steckplatz eingeschoben ist. 2. Installieren Sie die HDMR-Kartentreiber von der Unterstützungs-CD in Ihrem System. 3. Starten Sie Ihren Computer neu. ASRock ConRoe1333-DVI/H Motherboard...
-
Seite 67: Entkoppelte Übertaktungstechnologie
Async.] um. Dadurch wird der CPU-FSB beim Übertakten entkoppelt, PCI-/PCIE- Busse werden jedoch fixiert, so dass der FSB in einer stabileren Übertaktungsumgebung arbeiten kann. Beziehen Sie sich auf die Warnung vor möglichen Overclocking-Risiken auf Seite 49, bevor Sie die Untied Overclocking-Technologie anwenden. ASRock ConRoe1333-DVI/H Motherboard... - Seite 68 ASSETUP.EXE im BIN-Verzeichnis der Support-CD, um die Menüs aufzurufen. Das Setup-Programm soll es Ihnen so leicht wie möglich machen. Es ist menügesteuert, d.h. Sie können in den verschiedenen Untermenüs Ihre Auswahl treffen und die Programme werden dann automatisch installiert. ASRock ConRoe1333-DVI/H Motherboard...
-
Seite 69: Contenu Du Paquet
1. Introduction Merci pour votre achat d’une carte mère ASRock ConRoe1333-DVI/H, une carte mère très fiable produite selon les critères de qualité rigoureux de ASRock. Elle offre des performances excellentes et une conception robuste conformément à l’engagement d’ASRock sur la qualité et la fiabilité au long terme. - Seite 70 - Max. 4Go (voir ATTENTION 7) L’accélérateur - Contrôle direct de la fréquence CPU (voir ATTENTION 8) hybride - ASRock U-COP (voir ATTENTION 9) - Garde d’échec au démarrage (B.F.G.) Slot d’extension - 1 x slot PCI Express x16 - 1 x slot PCI Express x1...
- Seite 71 - Ventilateur silencieux d’unité centrale - Monitoring de la tension: +12V, +5V, +3.3V, Vcore - Microsoft ® Windows ® 2000 / XP / XP 64-bit / Vista / Vista 64-bit (voir ATTENTION 14) Certifications - FCC, CE, WHQL ASRock ConRoe1333-DVI/H Motherboard...
- Seite 72 Pour améliorer la dissipation de la chaleur, n’oubliez pas de mettre de la pâte thermique entre le CPU le dissipateur lors de l’installation du PC. ASRock ConRoe1333-DVI/H Motherboard...
- Seite 73 * Si vous envisagez d’utiliser une carte graphique externe sur cette carte mère, veuillez vous référer aux exigences Premium Discrete sur http://www.asrock.com * Si le onboard VGA supporte DVI, il supporte aussi certainement HDCP fonction pour qualifier pour Windows ®...
- Seite 74 Lorsque vous placez les vis dans les orifices pour vis pour fixer la carte mère sur le châssis, ne serrez pas trop les vis ! Vous risquez sinon d’endommager la carte mère. ASRock ConRoe1333-DVI/H Motherboard...
- Seite 75 Etape 2-1. Tenez le processeur par ses bords là où se trouvent des lignes noires. Etape 2-2. Orientez le paquet avec le dissipateur thermique intégré (IHS) vers le haut. Repérez la broche 1 et les deux encoches d’orientation. ASRock ConRoe1333-DVI/H Motherboard...
- Seite 76 Etape 4-2. Tout en appuyant doucement sur la plaque de chargement, engagez le levier de chargement. Etape 4-3. Fixez le levier de chargement avec la languette de la plaque de chargement sous la languette de retenue du levier de chargement. ASRock ConRoe1333-DVI/H Motherboard...
- Seite 77 Etape 6. Fixez la longueur de câble en excès avec du ruban adhésif pour vous assurer que le câble ne gênera pas le fonctionnement du ventilateur ou n’entrera pas en contact avec les autres composants. ASRock ConRoe1333-DVI/H Motherboard...
- Seite 78 2.3 Installation des modules m émoire [DIMM] 2.3 Installation des modules m émoire [DIMM] La carte mère ConRoe1333-DVI/H dispose de quatre emplacements DIMM DDRII (Double Data Rate II) de 240-broches, et supporte la Technologie de Mémoire à Canal Double. Pour effectuer une configuration à canal double, vous devez toujours installer des paires de DIMM DDRII identiques (de la même marque, de la...
- Seite 79 (DDRII_1 et DDRII_3), soit dans l’endroit aménagé des fentes orange (DDRII_2 et DDRII_4). 3. cette carte-mère ne gère pas trois ou quatre modules de mémoire susmentionnés. ASRock ConRoe1333-DVI/H Motherboard...
- Seite 80 DIMM. Etape 3. Insérez fermement le module DIMM dans son emplacement jusqu’à ce que les clips de maintien situés aux deux extrémités se ferment complètement et que le module DIMM soit inséré correctement. ASRock ConRoe1333-DVI/H Motherboard...
- Seite 81 Slots PCIE: Le connecteur PCIE1 (connecteur PCIE x16) est utilisé pour les cartes PCI Express avec des cartes graphiques de largeur x16 ou une carte vidéo ASRock DVI Graphics-HDCP. PCIE2 (emplacement PCIE x1) est utilisé pour les cartes PCI Express avec cartes graphiques de largeur x1 voies, telles que les cartes Gigabit LAN, les cartes SATA2, etc.
- Seite 82 Branchez le moniteur à connexion DVI-D sur la sortie DVI-D de la carte DVI Graphics-HDCP installée sur le connecteur PCIE1 (connecteur PCIE x16) de la carte mère. Connecteur de sortie DVI-D de Connecteur DVI-D la carte DVI du moniteur Graphics-HDCP ASRock ConRoe1333-DVI/H Motherboard...
- Seite 83 HDTV set-top-boxes, et les divertissement PCs demande une securite connection sur l’ecran complie. Du l’accroissement sur l’emploi de HDCP des fabricants au niveau de leurs equipements, il est recommende fortement que le HDTV que vous achetez est compatible. ASRock ConRoe1333-DVI/H Motherboard...
- Seite 84 Pour restaurer les paramètres système à leur valeur par défaut, éteignez l’ordinateur et débranchez le câble d’alimentation. Puis placez un cavalier sur les pins CLRCMOS1 pendant 5 secondes. N’oubliez pas de retirer le cavalier avant après avoir restauré le CMOS. ASRock ConRoe1333-DVI/H Motherboard...
- Seite 85 3,0 Go/s. Câble de données L’une des deux extrémités du Série ATA (SATA) câble de données SATA peut être connectée au disque dur (en option) SATA / SATAIIou au connecteur SATAII sur la carte mère. ASRock ConRoe1333-DVI/H Motherboard...
- Seite 86 DVD-ROM, un tuner TV ou une carte MPEG. Connecteur audio panneau C’est une interface pour un câble avant audio en façade qui permet le branchement et le contrôle (HD_AUDIO1 br. 9) commodes de périphériques (voir p.2 No. 22) audio. ASRock ConRoe1333-DVI/H Motherboard...
- Seite 87 (voir p.2 No. 17) Connecteur du ventilateur Veuillez connecter le câble de de l’UC ventilateur d’UC sur ce connecteur et brancher le fil (CPU_FAN1 br. 4) (voir p.2 No. 3) 1 2 3 4 ASRock ConRoe1333-DVI/H Motherboard...
- Seite 88 électrique ATX (ATX12V1 br.4) 12V sur ce connecteur. (voir p.2 No. 2) En-tête de port COM Cette en-tête de port COM est utilisée pour prendre en charge (COM1 br.9) un module de port COM. (voir p.2 No. 29) ASRock ConRoe1333-DVI/H Motherboard...
- Seite 89 Pour les différents produits disques durs SATAIII provenant de différents vendeurs, les méthodes de mise en place de cavaliers ne sont pas les mêmes. Veuillez visiter le site Internet des vendeurs pour les mises à jours. ASRock ConRoe1333-DVI/H Motherboard...
- Seite 90 [Auto] à [CPU, PCIE, Async.]. Par conséquent, le CPU FSB n’est pas lié durant le surcadençage, mais les bus PCI / PCIE sont en mode fixé de sorte que FSB peut opérer sous un environnement de surcadençage plus stable. ASRock ConRoe1333-DVI/H Motherboard...
- Seite 91 CD-ROM. Le Menu principal s’affiche automatiquement si “AUTORUN” est activé dans votre ordinateur. Si le Menu principal n’apparaît pas automatiquement, localisez dans le CD technique le fichier “ASSETUP.EXE” dans le dossier BIN et double-cliquez dessus pour afficher les menus. ASRock ConRoe1333-DVI/H Motherboard...
-
Seite 92: Contenuto Della Confezione
Grazie per aver scelto una scheda madre ASRock ConRoe1333-DVI/H, una scheda madre affidabile prodotta secondo i severi criteri di qualità ASRock. Le prestazioni eccellenti e il design robusto si conformano all’impegno di ASRock nella ricerca della qualità e della resistenza. - Seite 93 - Supporta DDRII667/533 (vedi ATTENZIONE 6) - Max. 4GB (vedi ATTENZIONE 7) Booster ibrido - Stepless control per frequenza del processore (vedi ATTENZIONE 8) - ASRock U-COP (vedi ATTENZIONE 9) - Boot Failure Guard (B.F.G.) Slot di - 1 x slot PCI Express x16 espansione...
- Seite 94 - Ventola CPU silenziosa - Voltaggio: +12V, +5V, +3.3V, Vcore ® ® Compatibi- - Microsoft Windows 2000 / XP / XP 64 bit / Vista lità SO Vista 64 bit (vedi ATTENZIONE 14) Certificazioni- FCC, CE, WHQL ASRock ConRoe1333-DVI/H Motherboard...
- Seite 95 Prima di riavviare il sistema, assicurarsi che la ventolina CPU della scheda madre funzioni correttamente; scollegare e ricollegare il cavo d’alimentazione. Per migliorare la dissipazione del calore, ricordare di applicare l’apposita pasta siliconica tra il processore e il dissipatore quando si installa il sistema. ASRock ConRoe1333-DVI/H Motherboard...
- Seite 96 “selezione modalità DVMT” del BIOS. * In caso si preveda di utilizzare schede grafiche aggiuntive su questa scheda madre, consultare i requisiti Premium Discrete su http://www.asrock.com * Se la scheda VGA supporta DVI,supporta inoltre la funzione HDCP per qualificare il ®...
- Seite 97 5. Nell’usare i giraviti per fissare la scheda madre al telaio non serrare eccessivamente le viti! Altrimenti si rischia di danneggiare la scheda madre. ASRock ConRoe1333-DVI/H Motherboard...
- Seite 98 Fase 1-2. Ruotare di circa 135 gradi la leva di carico per aprirla completamente. Fase 1-3. Ruotare di circa 100 gradi la piastra di carico per aprirla completamente. Fase 2. Inserire la CPU 775-Pin: Fase 2-1. Tenere la CPU dai bordi segnati con linee nere. ASRock ConRoe1333-DVI/H Motherboard...
- Seite 99 2. Questo tappo deve essere inserito se se la scheda madre deve essere restituita per l’assistenza. Fase 4. Chiudere la presa: Fase 4-1. Ruotare la piastra di carico sull’IHS. Fase 4-2. Bloccare la leva di carico mentre si preme leggermente sulla piastra di carico. ASRock ConRoe1333-DVI/H Motherboard...
- Seite 100 Fase 6. fissare il cavo in eccesso con fascette per assicurare che il cavo non interferisca con il funzionamento della ventola o che venga a contatto con gli altri componenti. 1 0 0 1 0 0 1 0 0 1 0 0 1 0 0 ASRock ConRoe1333-DVI/H Motherboard...
- Seite 101 2.3 Installazione dei moduli di memoria (DIMM) 2.3 Installazione dei moduli di memoria (DIMM) La scheda madre ConRoe1333-DVI/H fornisce quattro alloggiamenti DIMM DDRII (Double Data Rate II) a 240 pin, e supporta la tecnologia Dual Channel Memory. Per la configurazione a due canali, è necessario installare sempre coppie identiche (stessa marca, velocità, dimensioni e tipo di chip) di DIMM DDRII negli alloggiamenti...
- Seite 102 (DDRII_2 e DDRII_4). 3. La presente scheda madre non supporta tre o quattro dei moduli di memoria menzionati precedentemente. 1 0 2 1 0 2 1 0 2 1 0 2 1 0 2 ASRock ConRoe1333-DVI/H Motherboard...
- Seite 103 Step 3. Inserire saldamente la DIMM nello slot fino a far scattare completamente in posizione i fermagli di ritegno alle due estremità e fino ad installare correttamente la DIMM nella sua sede. 1 0 3 1 0 3 1 0 3 1 0 3 1 0 3 ASRock ConRoe1333-DVI/H Motherboard...
- Seite 104 Step 3. Allineare il connettore della scheda con lo slot e premere con decisione finché la scheda è completamente inserita nello slot. Step 4. Agganciare la scheda allo chassis con le viti. 1 0 4 1 0 4 1 0 4 1 0 4 1 0 4 ASRock ConRoe1333-DVI/H Motherboard...
- Seite 105 DVI-D della scheda grafica HDCP DVI inserita in PCIE1 (slot PCIE x16) di questa scheda madre. Connettore uscita DVI-D Connettore DVI-D della scheda per ingresso grafica HDCP DVI monitor DVI-D 1 0 5 1 0 5 1 0 5 1 0 5 1 0 5 ASRock ConRoe1333-DVI/H Motherboard...
- Seite 106 HDTV set-top-boxes via cavo, come anche alcuni PC, richiedono una connessione sicura allo schermo relativo. Dato che il produttore produce apparecchi HDCP, raccomandiamo di acquistare unita‘ compatibili con l‘HDTV. 1 0 6 1 0 6 1 0 6 1 0 6 1 0 6 ASRock ConRoe1333-DVI/H Motherboard...
- Seite 107 Per pulire I parametri di sistema e resettare ai parametri di default, spegnere il computer e scollegare l’alimentatore, poi collegare il jumper sul CLRCMOS1 per 5 secondi. 1 0 7 1 0 7 1 0 7 1 0 7 1 0 7 ASRock ConRoe1333-DVI/H Motherboard...
- Seite 108 Entrambe le estremità del cavo dati SATA possono collegarsi (Opzionale) all’hard disk SATA / SATAII o al connettore SATAII sulla scheda madre. 1 0 8 1 0 8 1 0 8 1 0 8 1 0 8 ASRock ConRoe1333-DVI/H Motherboard...
- Seite 109 È un’interfaccia per il cavo del pannello frontale pannello audio. Che consente connessione facile e controllo (9-pin HD_AUDIO1) dei dispositivi audio. (vedi p.2 Nr. 22) 1 0 9 1 0 9 1 0 9 1 0 9 1 0 9 ASRock ConRoe1333-DVI/H Motherboard...
- Seite 110 CPU a questo connettore e far (4-pin CPU_FAN1) combaciare il filo nero al pin (vedi p.2 Nr. 3) terra. 1 2 3 4 1 1 0 1 1 0 1 1 0 1 1 0 1 1 0 ASRock ConRoe1333-DVI/H Motherboard...
- Seite 111 Collettore porta COM Questo collettore porta COM è utilizzato per supportare il (9-pin COM1) modulo porta COM. (voir p.2 Nr. 29) 1 1 1 1 1 1 1 1 1 1 1 1 1 1 1 ASRock ConRoe1333-DVI/H Motherboard...
- Seite 112 Visitare i siti web dei produttori per gli aggiornamenti. 1 1 2 1 1 2 1 1 2 1 1 2 1 1 2 ASRock ConRoe1333-DVI/H Motherboard...
- Seite 113 PCI / PCIE sono nella modalità fissata in modo tale che l’FSB posa operare sotto un più stabile ambiente di overclocking. 1 1 3 1 1 3 1 1 3 1 1 3 1 1 3 ASRock ConRoe1333-DVI/H Motherboard...
- Seite 114 Menù principale. Se il Menù principale non appare automaticamente, posizionarsi sul file “ASSETUP.EXE” nel CESTINO del CD di supporto e cliccare due volte per visualizzare i menù. 1 1 4 1 1 4 1 1 4 1 1 4 1 1 4 ASRock ConRoe1333-DVI/H Motherboard...
-
Seite 115: Contenido De La Caja
1. Introducción 1. Introducción Gracias por su compra de ASRock ConRoe1333-DVI/H placa madre, una placa de confianza producida bajo el control de calidad estricto y persistente. La placa madre provee realización excelente con un diseño robusto conforme al compromiso de calidad y resistencia de ASRock. - Seite 116 - Max. 4GB (ver ATENCIÓN 7) Amplificador - Stepless control de frecuencia de CPU (vea ATENCIÓN 8) Híbrido - ASRock U-COP (vea ATENCIÓN 9) - Protección de Falla de Inicio (B.F.G..) Ranuras de - 1 x ranuras PCI Express x16 Expansión...
- Seite 117 Windows 2000 / XP / XP 64 bits / Vista / Vista 64 bits (vea ATENCIÓN 14) Certificaciones - FCC, CE, WHQL 1 1 7 1 1 7 1 1 7 1 1 7 1 1 7 ASRock ConRoe1333-DVI/H Motherboard...
- Seite 118 Para mejorar la disipación de calor, acuérdese de aplicar thermal grease entre el procesador y el disipador de calor cuando usted instala el sistema de PC. 1 1 8 1 1 8 1 1 8 1 1 8 1 1 8 ASRock ConRoe1333-DVI/H Motherboard...
- Seite 119 DVMT” en el sistema BIOS. * Si piensa utilizar una tarjeta gráfica externa en esta placa base, consulte los requisitos en Premium Discrete en http://www.asrock.com * Si el VGA en la placa se apoya DVI, también se debe apoyar la función de HDCP ®...
- Seite 120 No introduzca la CPU en el socket por la fuerza si se produce la situación anterior. Si lo hace, puede producir daños graves en la CPU. 1 2 0 1 2 0 1 2 0 1 2 0 1 2 0 ASRock ConRoe1333-DVI/H Motherboard...
- Seite 121 Step 2-4. Compruebe que la CPU se encuentra en el socket y la orientación coincide con la indicada por las muescas. 1 2 1 1 2 1 1 2 1 1 2 1 1 2 1 ASRock ConRoe1333-DVI/H Motherboard...
- Seite 122 (Aplique el material termal de interfaz) Paso 1. Aplique el material termal de interfaz en el centro del IHS de la superficie del socket. 1 2 2 1 2 2 1 2 2 1 2 2 1 2 2 ASRock ConRoe1333-DVI/H Motherboard...
- Seite 123 Paso 6. Fije el cable que sobre con un lazo para asegurarse de que el cable no interfiere en el funcionamiento del ventilador y tampoco entra en contacto con otros componentes. 1 2 3 1 2 3 1 2 3 1 2 3 1 2 3 ASRock ConRoe1333-DVI/H Motherboard...
- Seite 124 2.3 Instalación de Memoria 2.3 Instalación de Memoria La placa ConRoe1333-DVI/H ofrece cuatro ranuras DIMM DDRII de 240 pines, y soporta Tecnología de Memoria de Doble Canal. Para la configuración de doble canal, necesitará instalar siempre pares DIMM DDRII idénticos (de la misma marca, velocidad, tamaño y tipo) en las ranuras del mismo color.
- Seite 125 (DDRII_1 y DDRII_3), o en el conjunto de ranuras naranja (DDRII_2 y DDRII_4). 3. Esta placa base no soporta trs o cuatro módulos de memoria más. 1 2 5 1 2 5 1 2 5 1 2 5 1 2 5 ASRock ConRoe1333-DVI/H Motherboard...
- Seite 126 Paso 3. Inserte la DIMM con firmeza dentro de la ranura hasta que los clips de sujeción de ambos lados queden completamente introducidos en su sitio y la DIMM se haya asentado apropiadamente. 1 2 6 1 2 6 1 2 6 1 2 6 1 2 6 ASRock ConRoe1333-DVI/H Motherboard...
- Seite 127 PCIE1 (ranura PCIE x16) se utiliza para tarjetas PCI Ex- press con tarjetas gráficas con una anchura de 16 carriles o para tarjetas gráficas HDCP DVI ASRock. PCIE2 (ranura PCIE x1) se utiliza para tarjetas PCI Ex- press con tarjetas gráficas con una anchura de 1 carriles, como por ejemplo, para tarjetas Gigabit LAN, SATA 2, etc.
- Seite 128 (ranura PCIE x16) en esta placa base. Conector de salida Conector DVI-D del DVI-D de tarjeta monitor de entrada gráfica HDCP DVI DVI-D 1 2 8 1 2 8 1 2 8 1 2 8 1 2 8 ASRock ConRoe1333-DVI/H Motherboard...
- Seite 129 Debido al aumento de los fabricantes que emplean HDCP en su equipo, Es recomendado altamente que el HDTV que compra es compatible. 1 2 9 1 2 9 1 2 9 1 2 9 1 2 9 ASRock ConRoe1333-DVI/H Motherboard...
- Seite 130 CLRCMOS1 por más que 5 segundos usando un jumper cap. 1 3 0 1 3 0 1 3 0 1 3 0 1 3 0 ASRock ConRoe1333-DVI/H Motherboard...
- Seite 131 Ambos extremos del cable serie ATA (SATA) pueden conectarse al disco duro SATA / SATAII o la (Opcional) conexión de la placa base. 1 3 1 1 3 1 1 3 1 1 3 1 1 3 1 ASRock ConRoe1333-DVI/H Motherboard...
- Seite 132 (9-pin HD_AUDIO1) conveniente de apparatos de (vea p.2, N. 22) Audio. 1 3 2 1 3 2 1 3 2 1 3 2 1 3 2 ASRock ConRoe1333-DVI/H Motherboard...
- Seite 133 CPU a este conector y haga coincidir el cable negro (4-pin CPU_FAN1) con el conector de tierra. (vea p.2, N. 3) 1 2 3 4 1 3 3 1 3 3 1 3 3 1 3 3 1 3 3 ASRock ConRoe1333-DVI/H Motherboard...
- Seite 134 Cabezal del puerto COM Este cabezal del puerto COM se utiliza para admitir un (9-pin COM1) módulo de puerto COM. (vea p.2, N. 29) 1 3 4 1 3 4 1 3 4 1 3 4 1 3 4 ASRock ConRoe1333-DVI/H Motherboard...
- Seite 135 Por favor visite el sitio Web de los proveedores para obtener las actualizaciones. 1 3 5 1 3 5 1 3 5 1 3 5 1 3 5 ASRock ConRoe1333-DVI/H Motherboard...
- Seite 136 2. Instale el controlador de la tarjeta HDMR (que encontrará en nuestro CD de soporte) en el sistema. 3. Reinicie el equipo. 1 3 6 1 3 6 1 3 6 1 3 6 1 3 6 ASRock ConRoe1333-DVI/H Motherboard...
- Seite 137 1 3 7 1 3 7 1 3 7 1 3 7 1 3 7 ASRock ConRoe1333-DVI/H Motherboard...
- Seite 138 Principal automáticamente si «AUTORUN» está habilitado en su computadora. Si el Menú Principal no aparece automáticamente, localice y doble-pulse en el archivo “ASSETUP.EXE” para iniciar la instalación. 1 3 8 1 3 8 1 3 8 1 3 8 1 3 8 ASRock ConRoe1333-DVI/H Motherboard...